SLZB-MRW10 and MRW10U
- Overview
- 🧰 Manual for Testers: Setting Up Z-Wave JS UI in Home Assistant
- 🧰 Manual for Testers: Z-Wave Integration Installation (Home Assistant)
- 🧰 Manual for Testers: Pairing a Z-Wave Device
Overview
SLZB-MRW10 is a compact, powerful multiprotocol adapter developed by SMLIGHT, integrating:
- CC2674P10 for Zigbee 3.0, Thread, and Matter over Thread
- EFR32ZG23 for Z-Wave 800 series (currently non-Z-Wave certified)
- ESP32 (ESP32-S3 for U variant) for Wi-Fi and Bluetooth LE
Designed for integration into smart home hubs, bridges, and custom automation platforms, the device provides a reliable multiprotocol foundation for next-generation development.
Important Notice
Z-Wave support in this device is non-certified and is included strictly for evaluation and testing purposes.
These are not certified, not for commercial deployment, and are clearly labeled as non-Z-Wave certified samples.
Key Features
- CC2674P10: Supports Zigbee 3.0, Thread, and Matter
- EFR32ZG23: Provides non-Z-Wave certified support 800 series (for testing only)
- ESP32: Dual-core MCU with integrated Wi-Fi and Bluetooth LE
- Compact modular design
- Ships with two antennas:
- 2.4 GHz antenna for Zigbee/Thread/Matter
- Z-Wave antenna optimized for US, EU, and NAZ frequency bands (please note, non-Z-Wave certified samples)
Important Conditions
- Z-Wave functionality is non-certified and intended only for testing
- Devices are not for resale and not suitable for commercial use
- Each sample is clearly labeled as a non-Z-Wave certified sample
🧰 Manual for Testers: Setting Up Z-Wave JS UI in Home Assistant
Z-Wave JS UI is a powerful Z-Wave Home Assistant integration with a full web interface for network management. It's ideal for advanced users who want full control.
Purposes of each component:
- Z-Wave JS UI addon - this addon manages Z-Wave network from Home Assisntant.
- Z-Wave Integration - Z-Wave device management app. It uses add-on as intermediary part for communication between Home Assistant and Z-Wave devices.
1️⃣ Install the Z-Wave JS UI Add-on
📦 Step 1: Add the Add-on Repository
-
Go to Settings → Add-ons in Home Assistant.
-
Click “Add-on Store”.
-
Click the menu (⋮) in the top right → Repositories.
-
Paste the repository URL:
https://github.com/hassio-addons/addon-zwave-js-ui -
Click Add, then close the dialog.
🧪 Step 2: Install Z-Wave JS UI
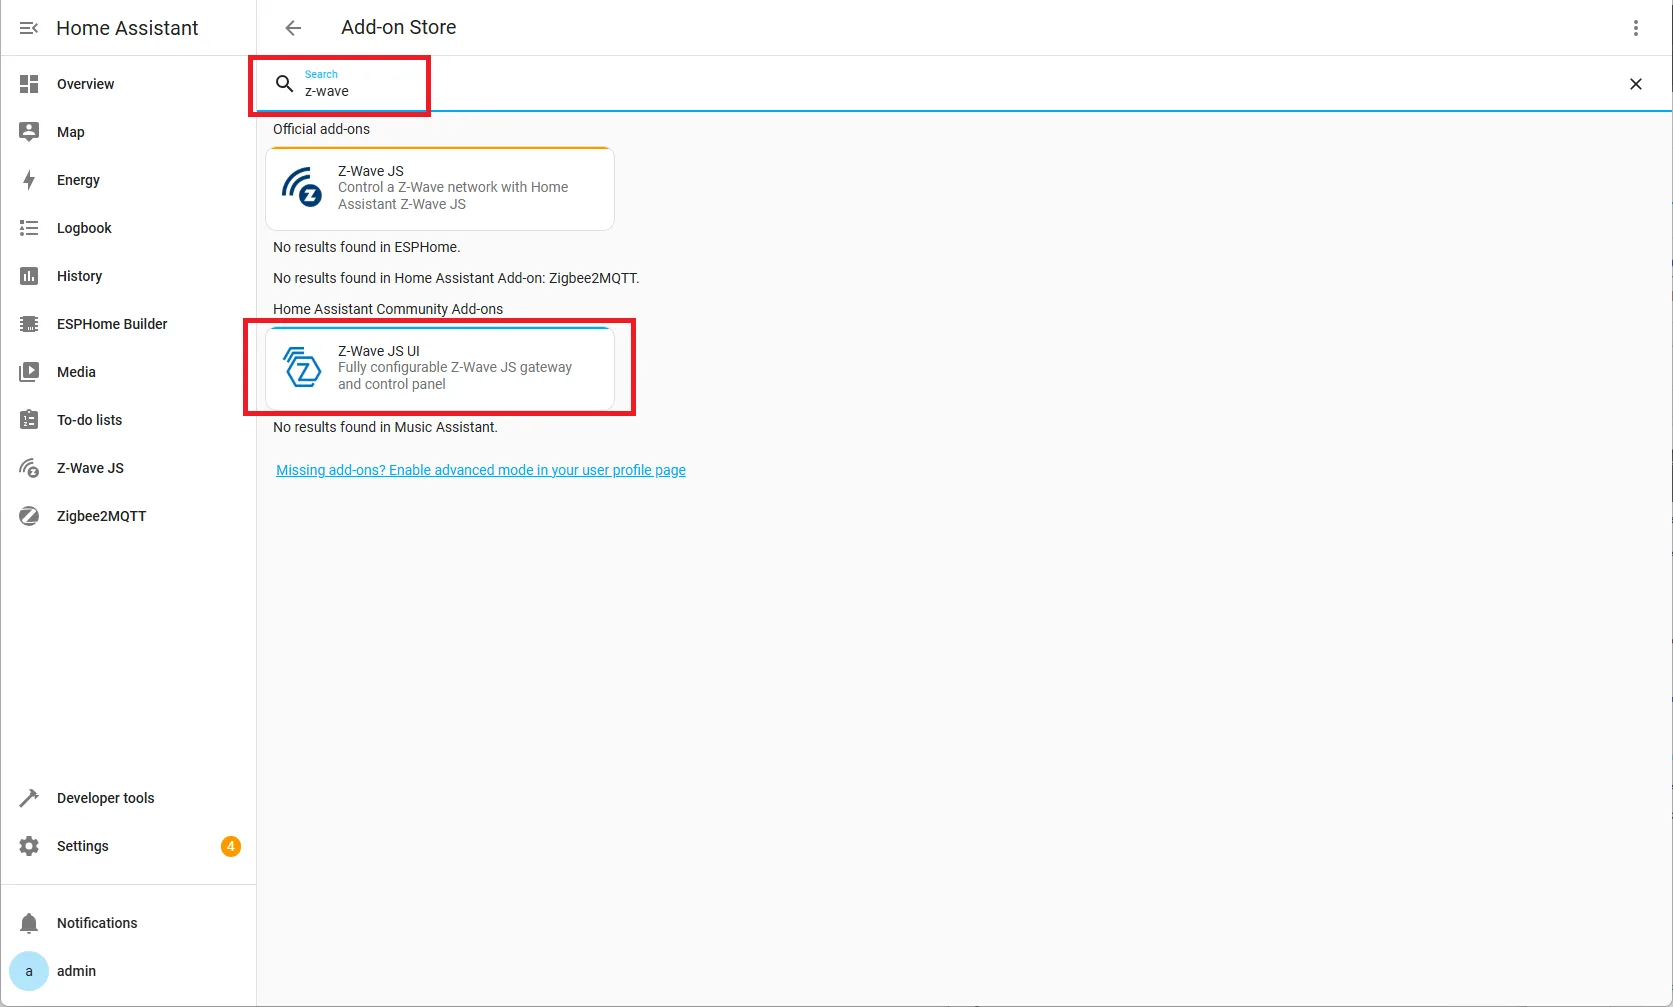
- Locate Z-Wave JS UI in the Add-on Store.
- Click it → Press Install.
- Wait for installation to complete.

2️⃣ Configure the Add-on
🛠️ Step 3: Basic Settings
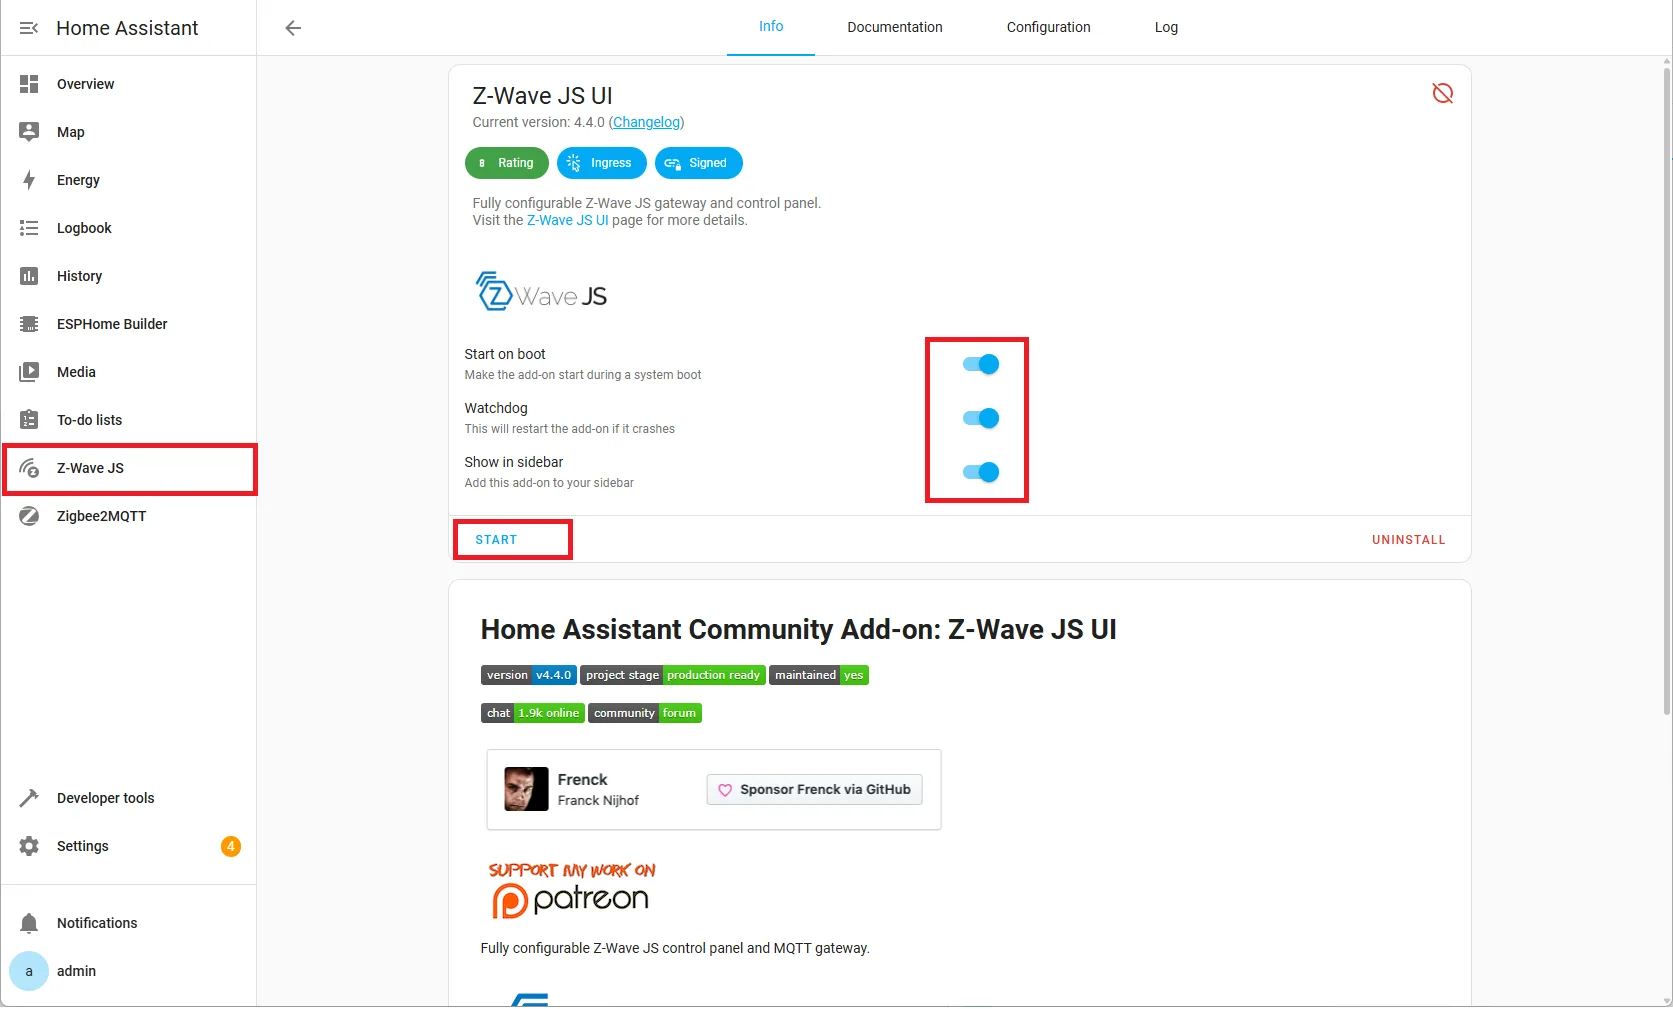
- Enable (optional) Start on boot
- Enable (optional) Watchdog
- Enable Show on sidebar
- Click
Start -

🔌 Step 4: Set the Serial Port and Z-Wave settings
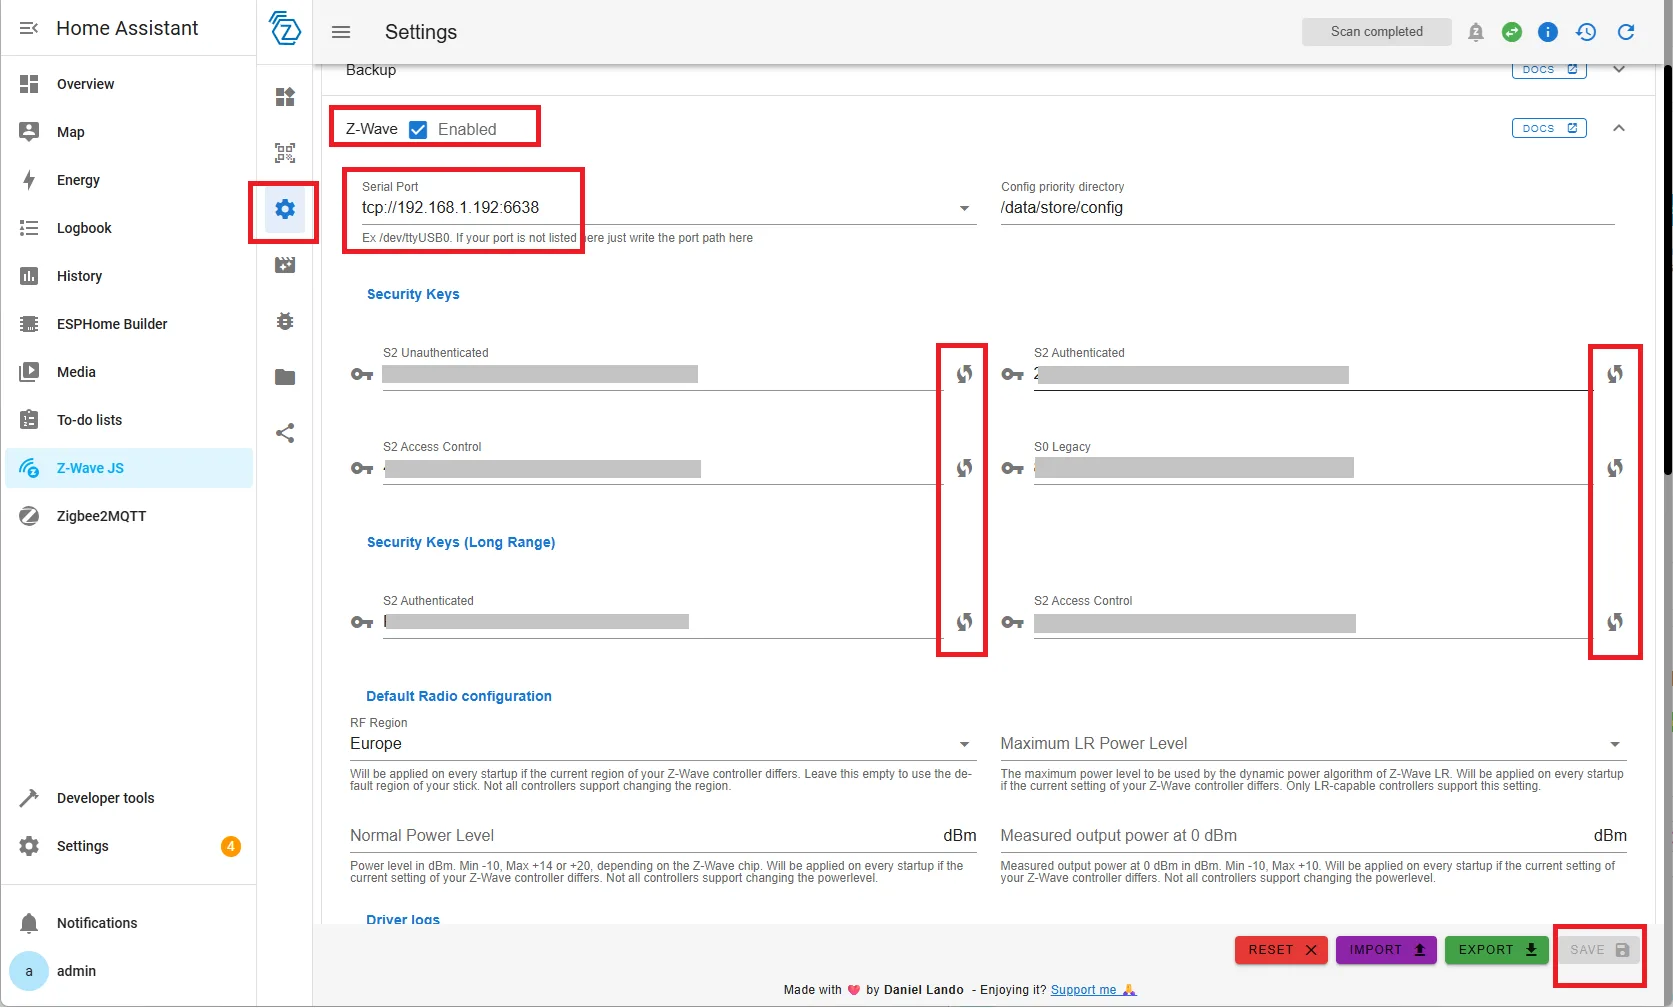
- After Starting, open Z-Wave JS tab in the left menu.
- Click on Setting button.
- Go to Z-Wave list of setting, Enable, enter Seiral port based on template
tcp://IP-ADDRESS:port, generate keys and click Save.

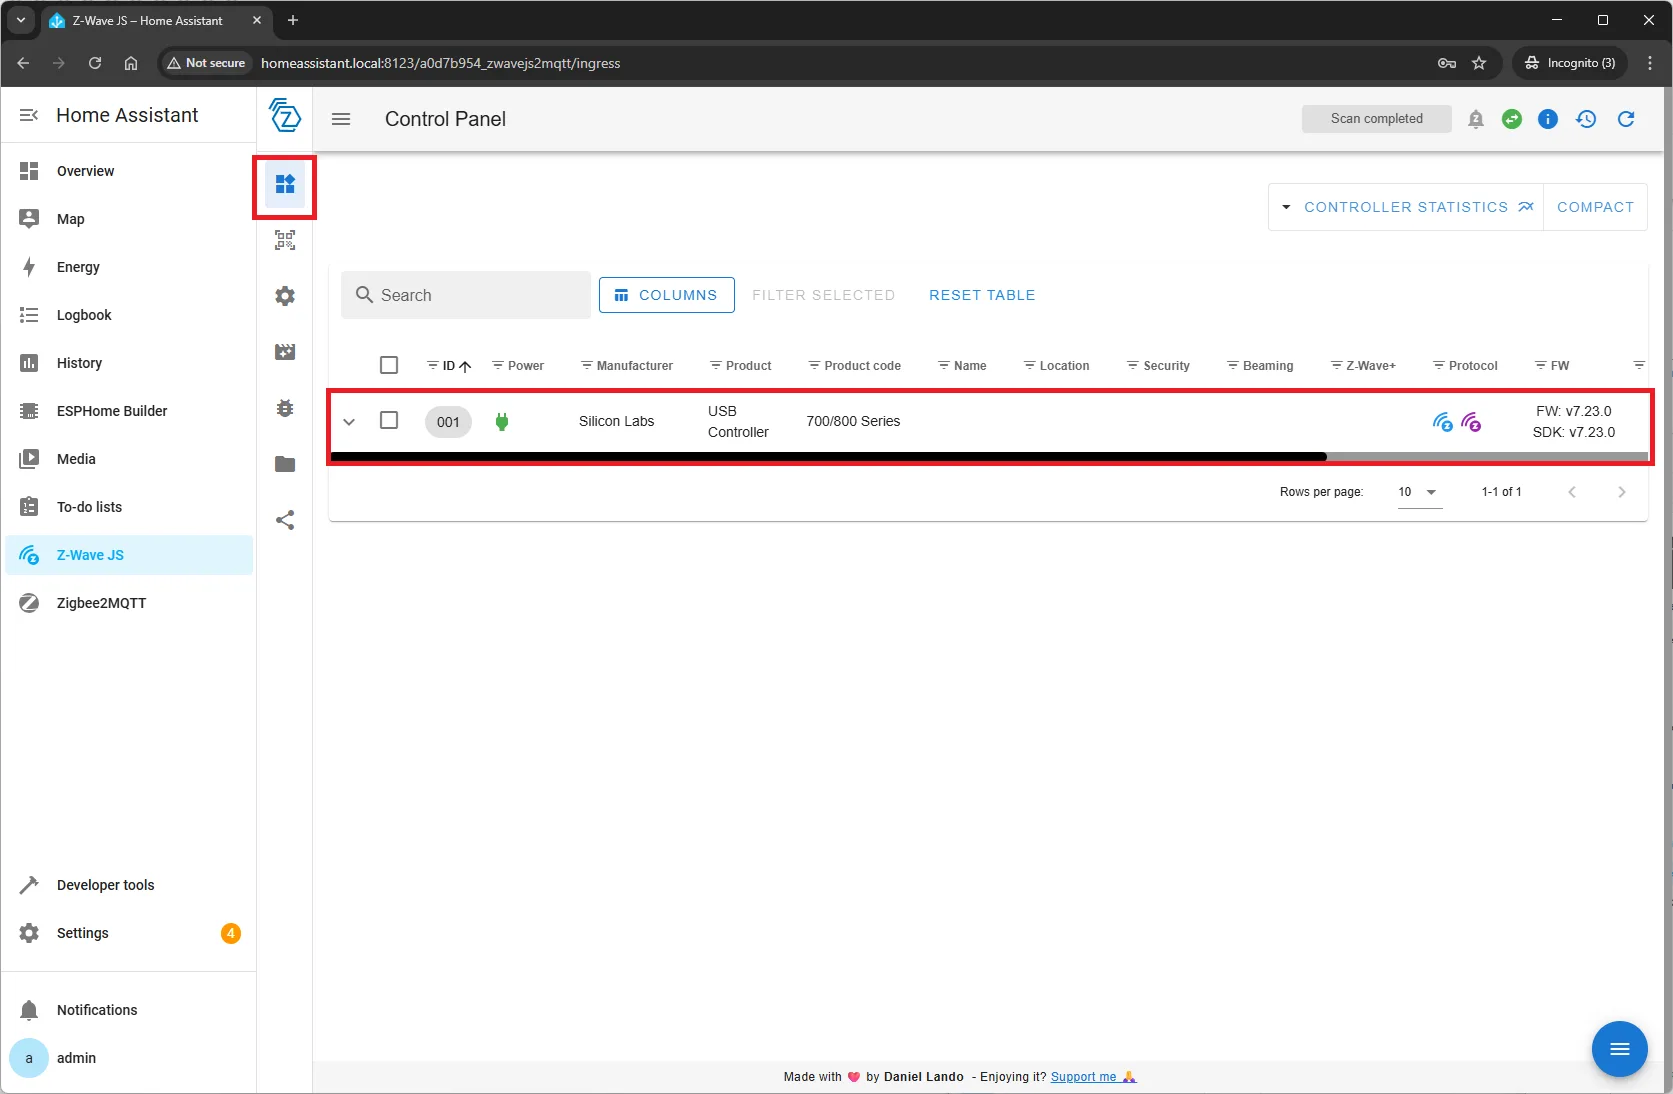
- Go to Z-Wave JS UI dashboard and check that Z-Wave controller was activated.

🧰 Manual for Testers: Z-Wave Integration Installation (Home Assistant)
1. Open Integrations Menu
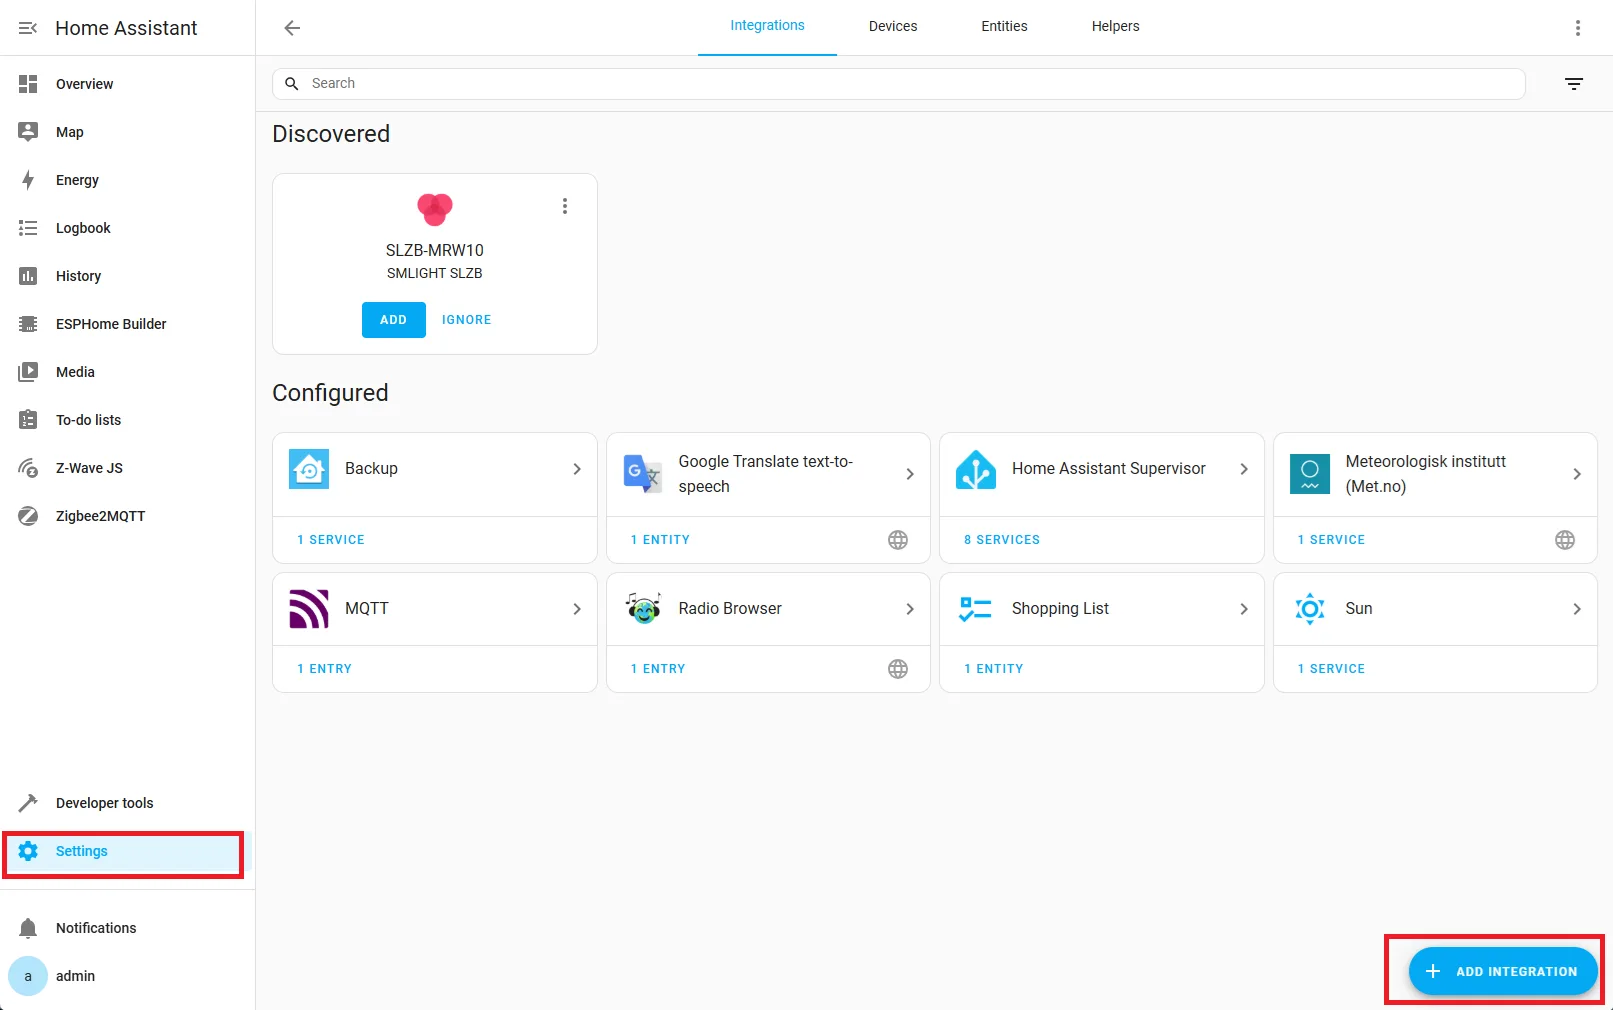
Go to Settings → Devices & Services, then click Add Integration at the bottom right.
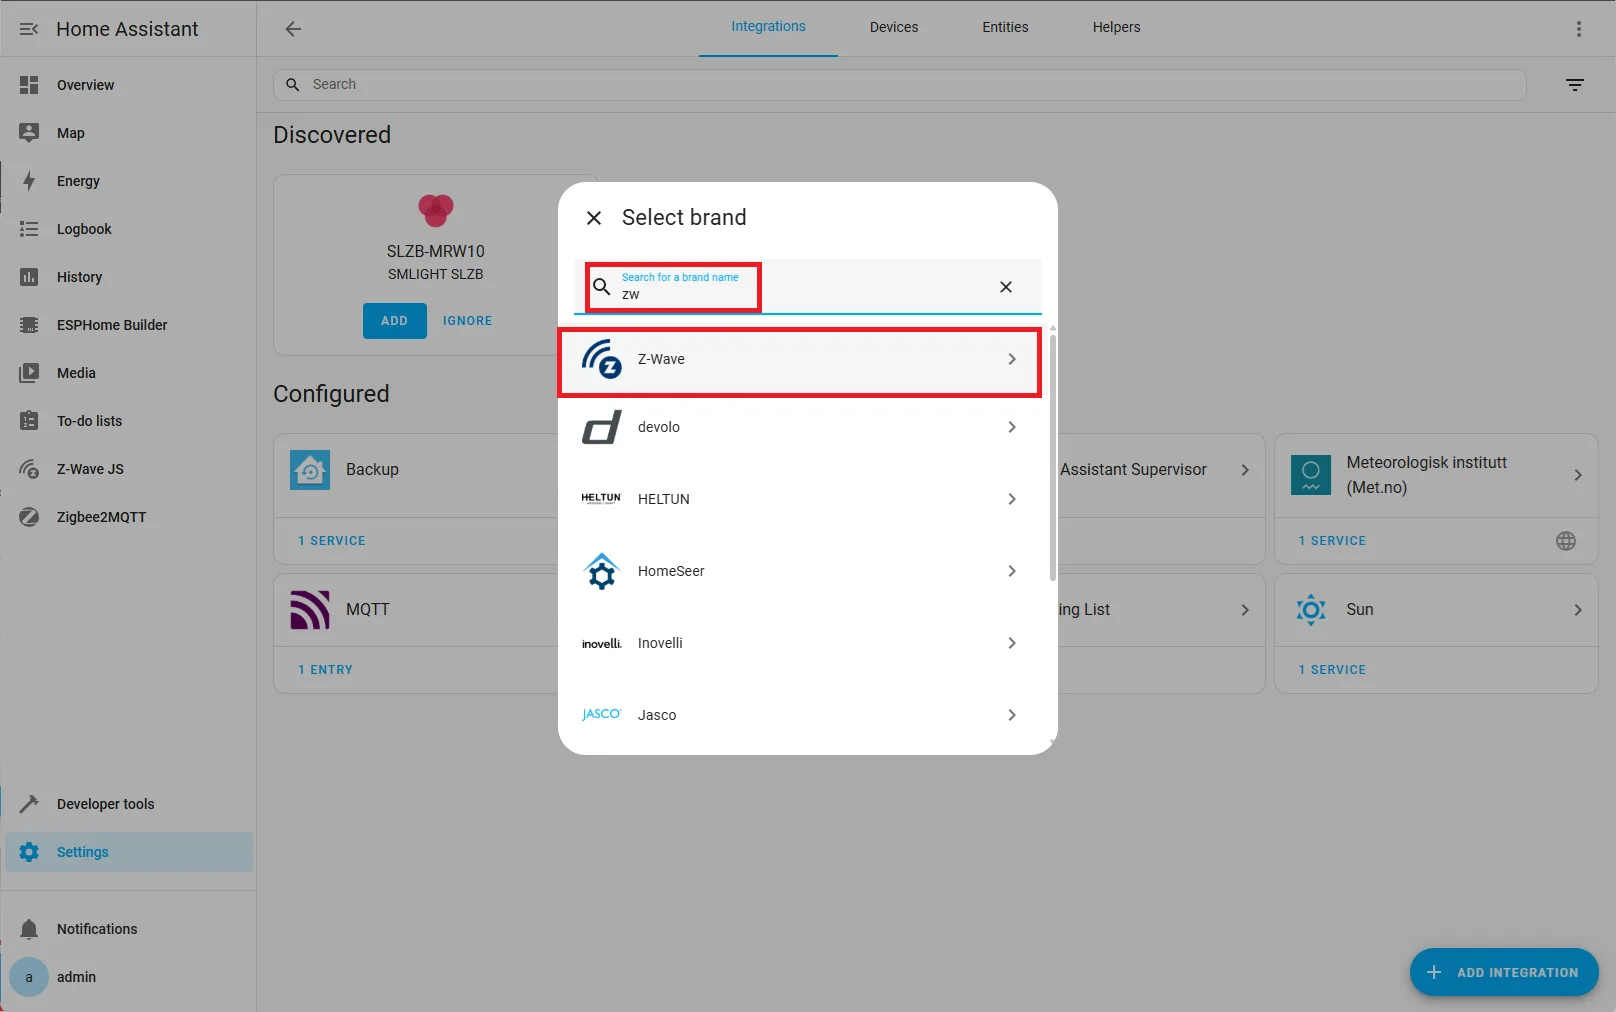
2. Search for Z-Wave Integration
Type Z-Wave into the search bar and click on the integration when it appears.
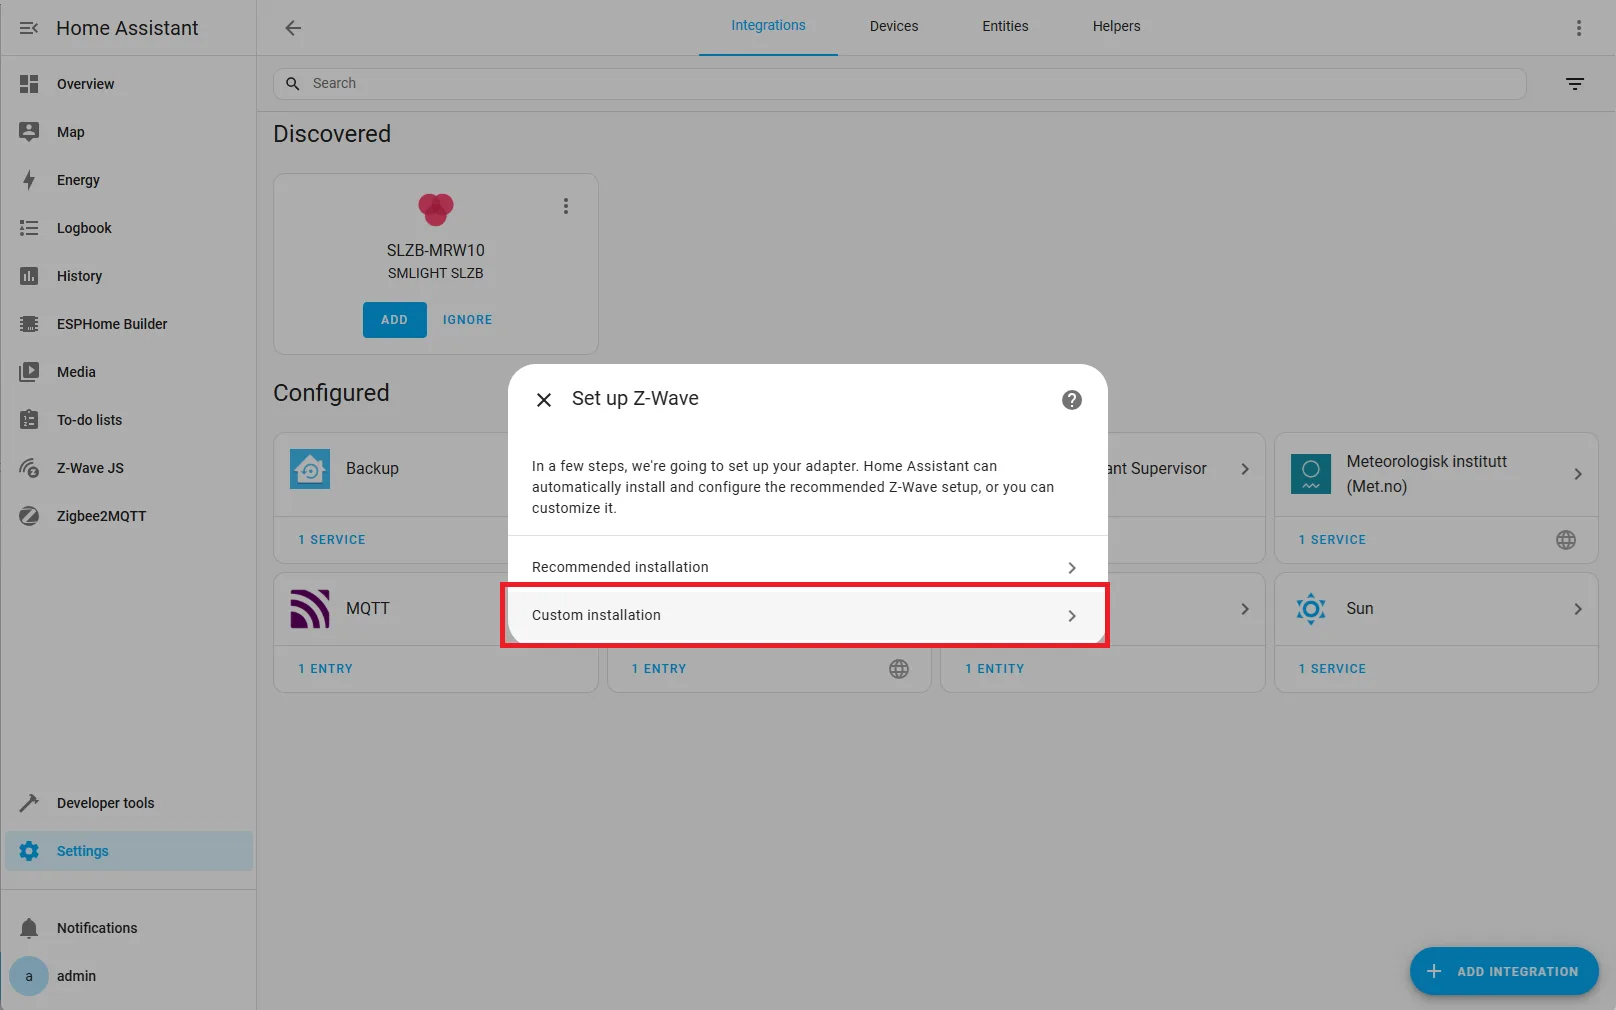
3. Select Custom Installation
Choose the Custom Installation option.
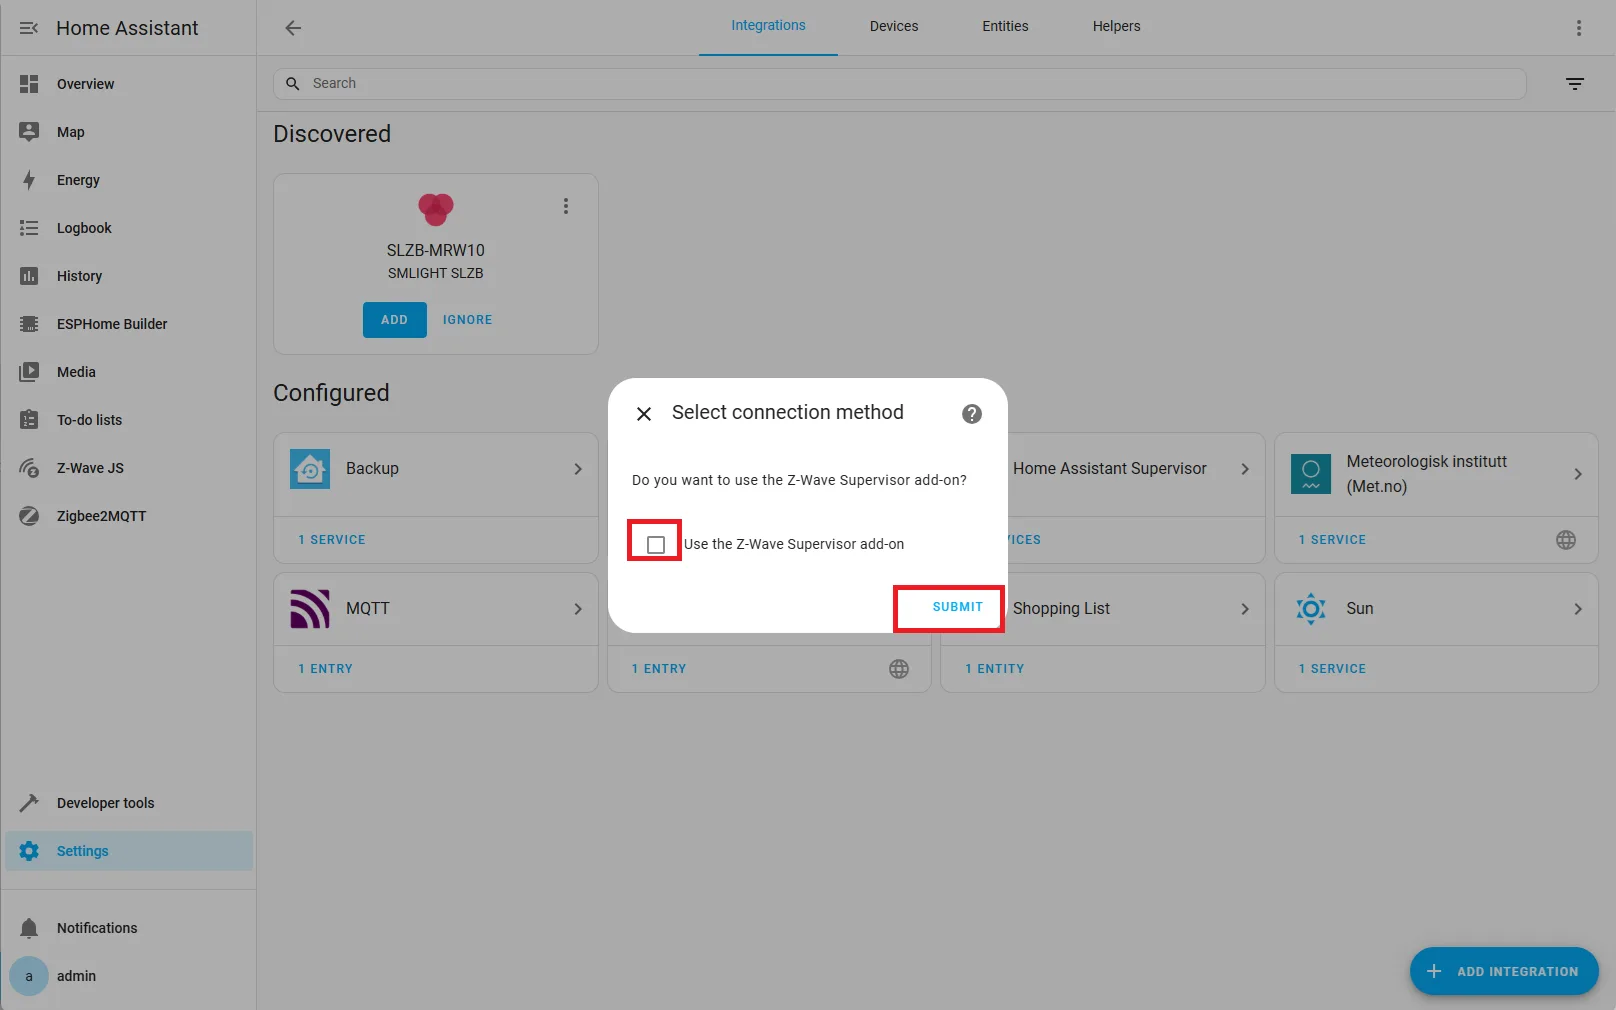
4. Disable Supervisor Add-on
Uncheck Use the Z-Wave Supervisor Add-on and click Submit.
5. Get the Add-on Hostname
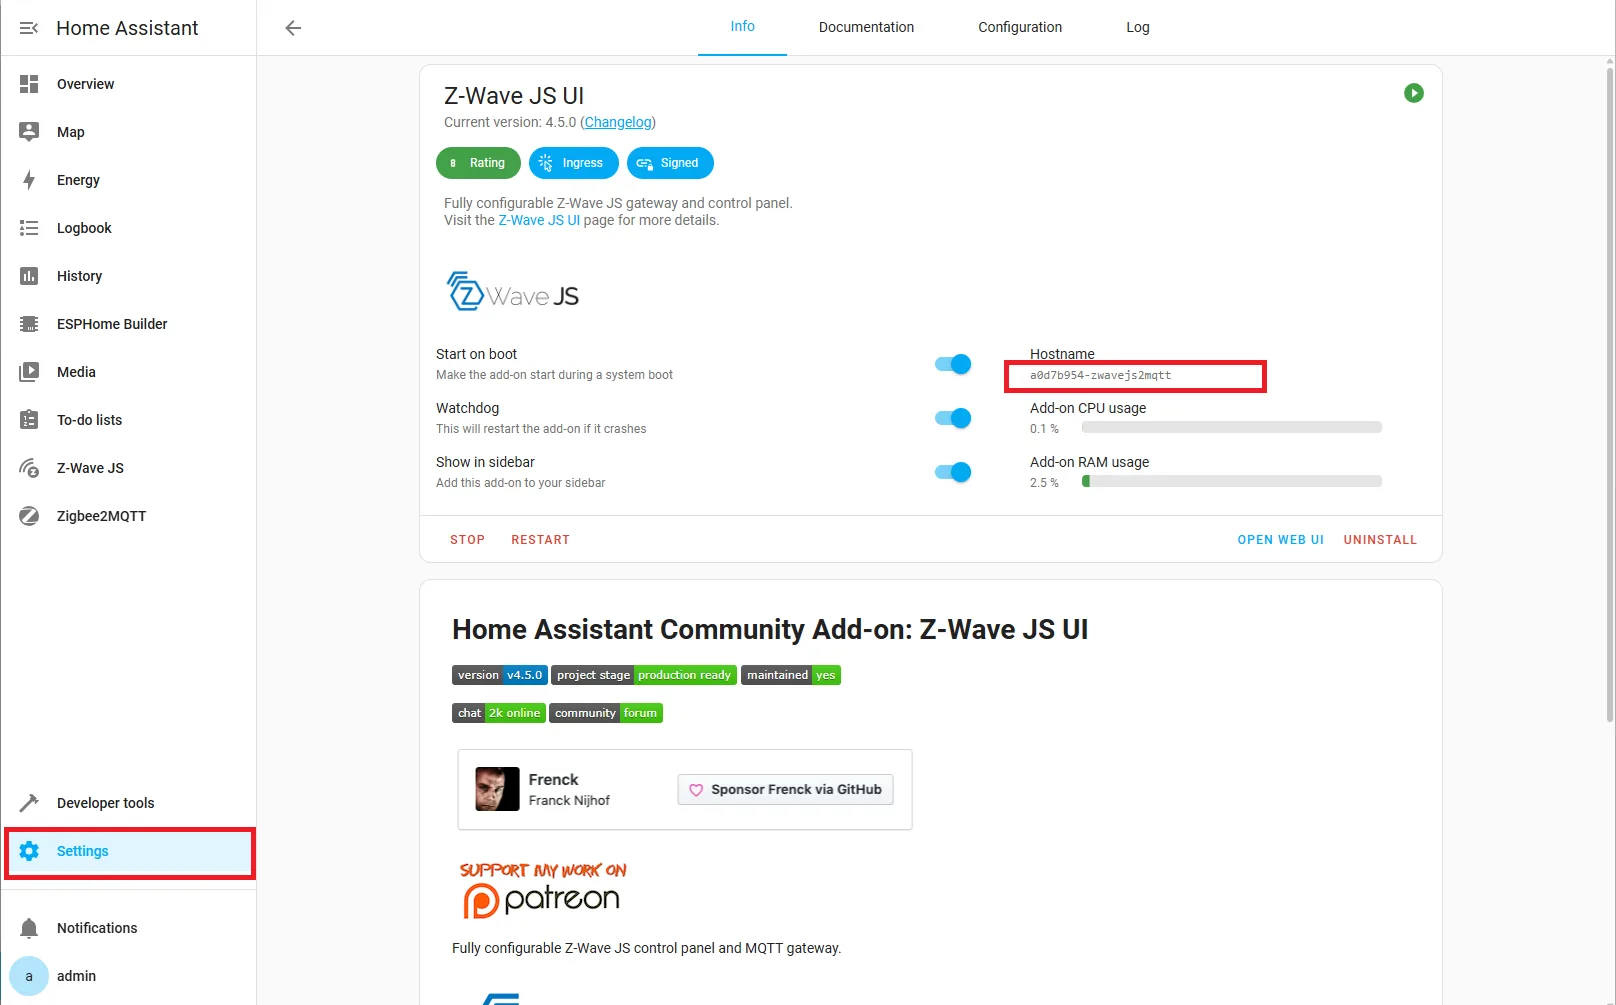
In a new window, go to Settings → Add-ons → Z-Wave JS UI, and copy the hostname of the add-on.
6. Enter WebSocket URL
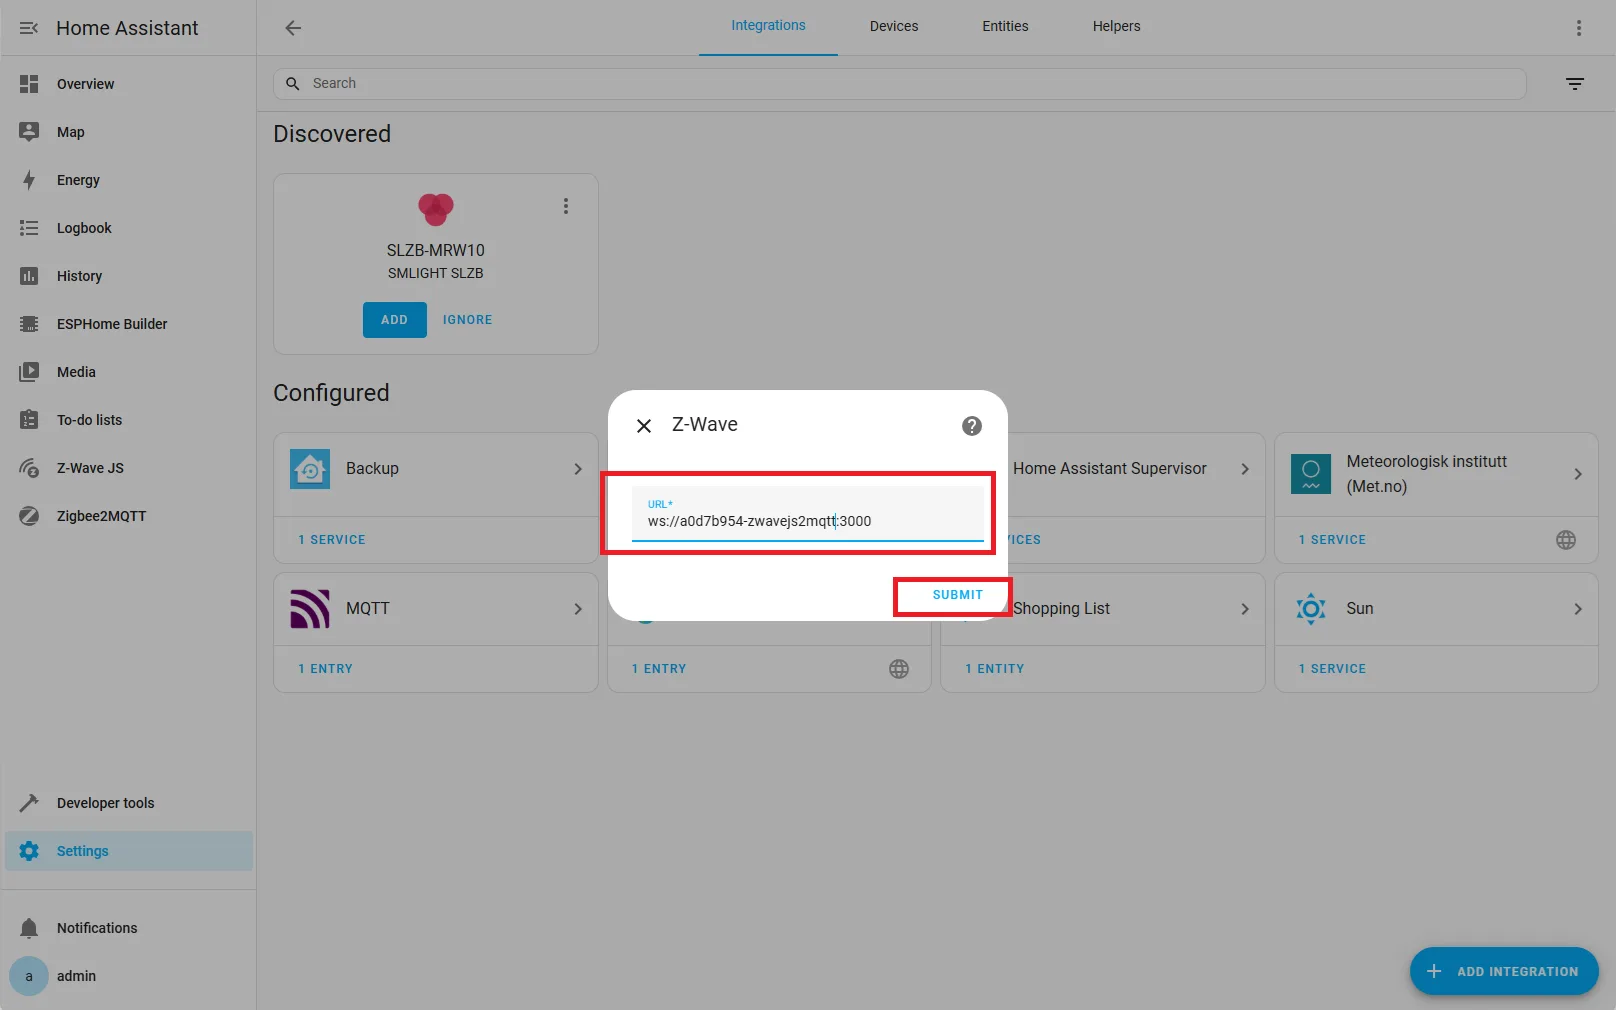
Return to the Z-Wave integration setup screen and enter the WebSocket URL in the format:
ws://HOSTNAME:3000Replace HOSTNAME with the copied hostname.
7. Finalize Integration
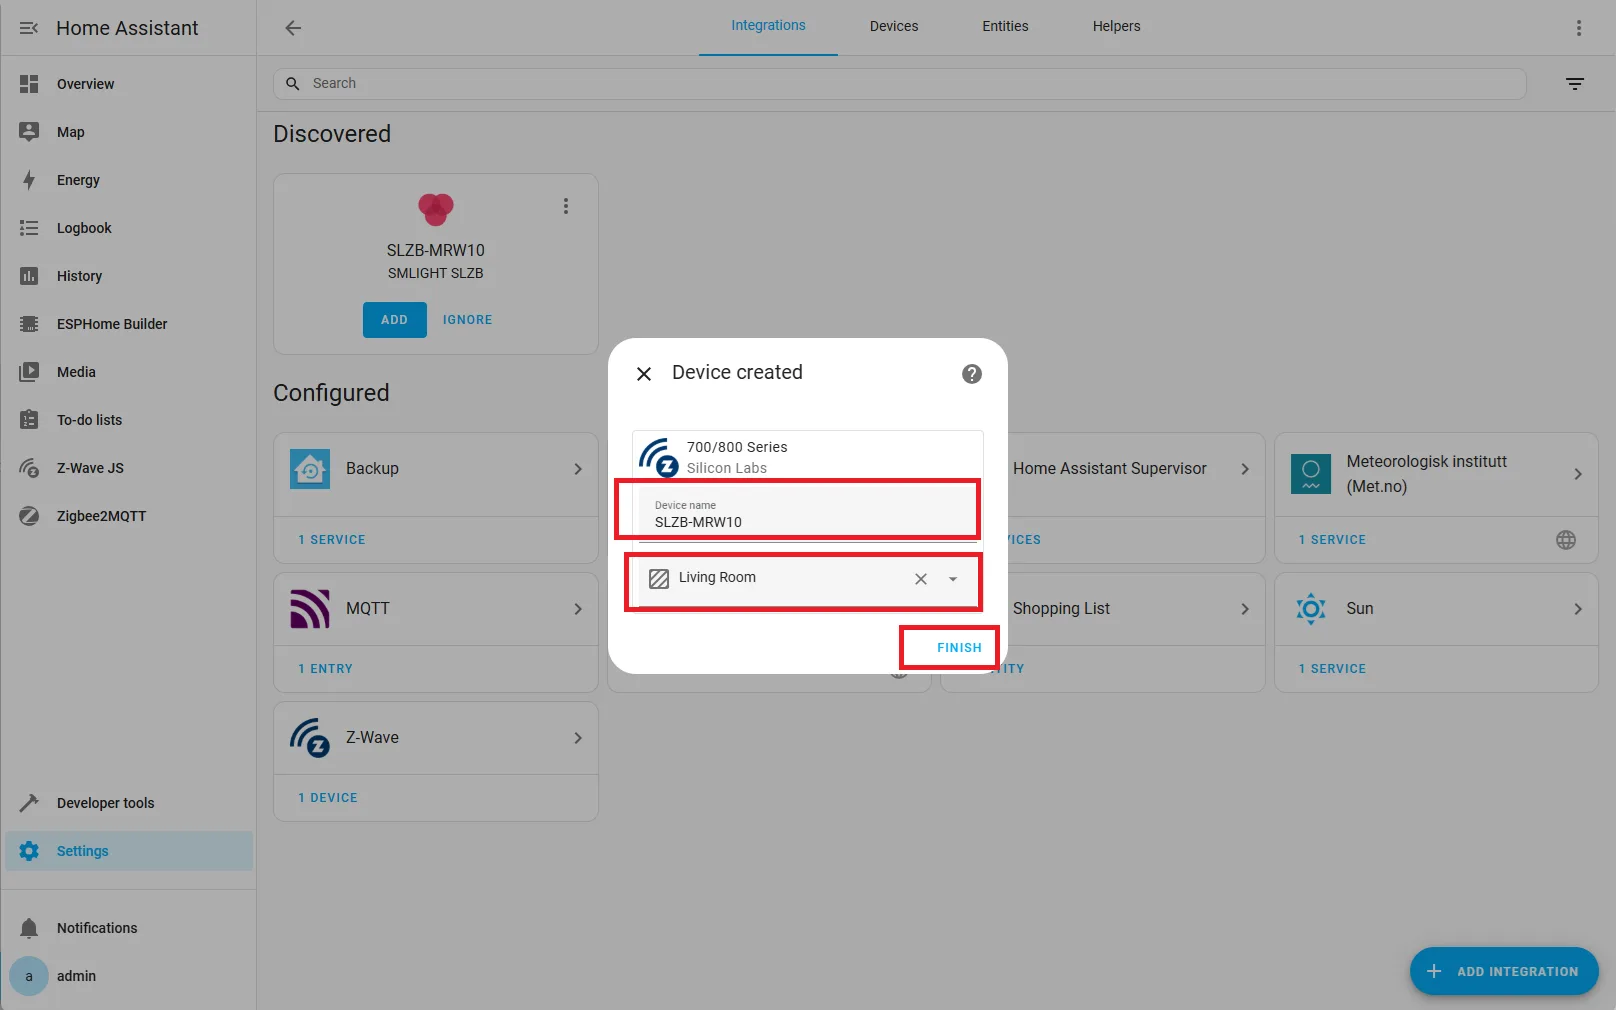
Optionally set a device name (e.g., SLZB-MRW10) and select a location. Click Finish.
🧰 Manual for Testers: Pairing a Z-Wave Device
1. Open Device Page
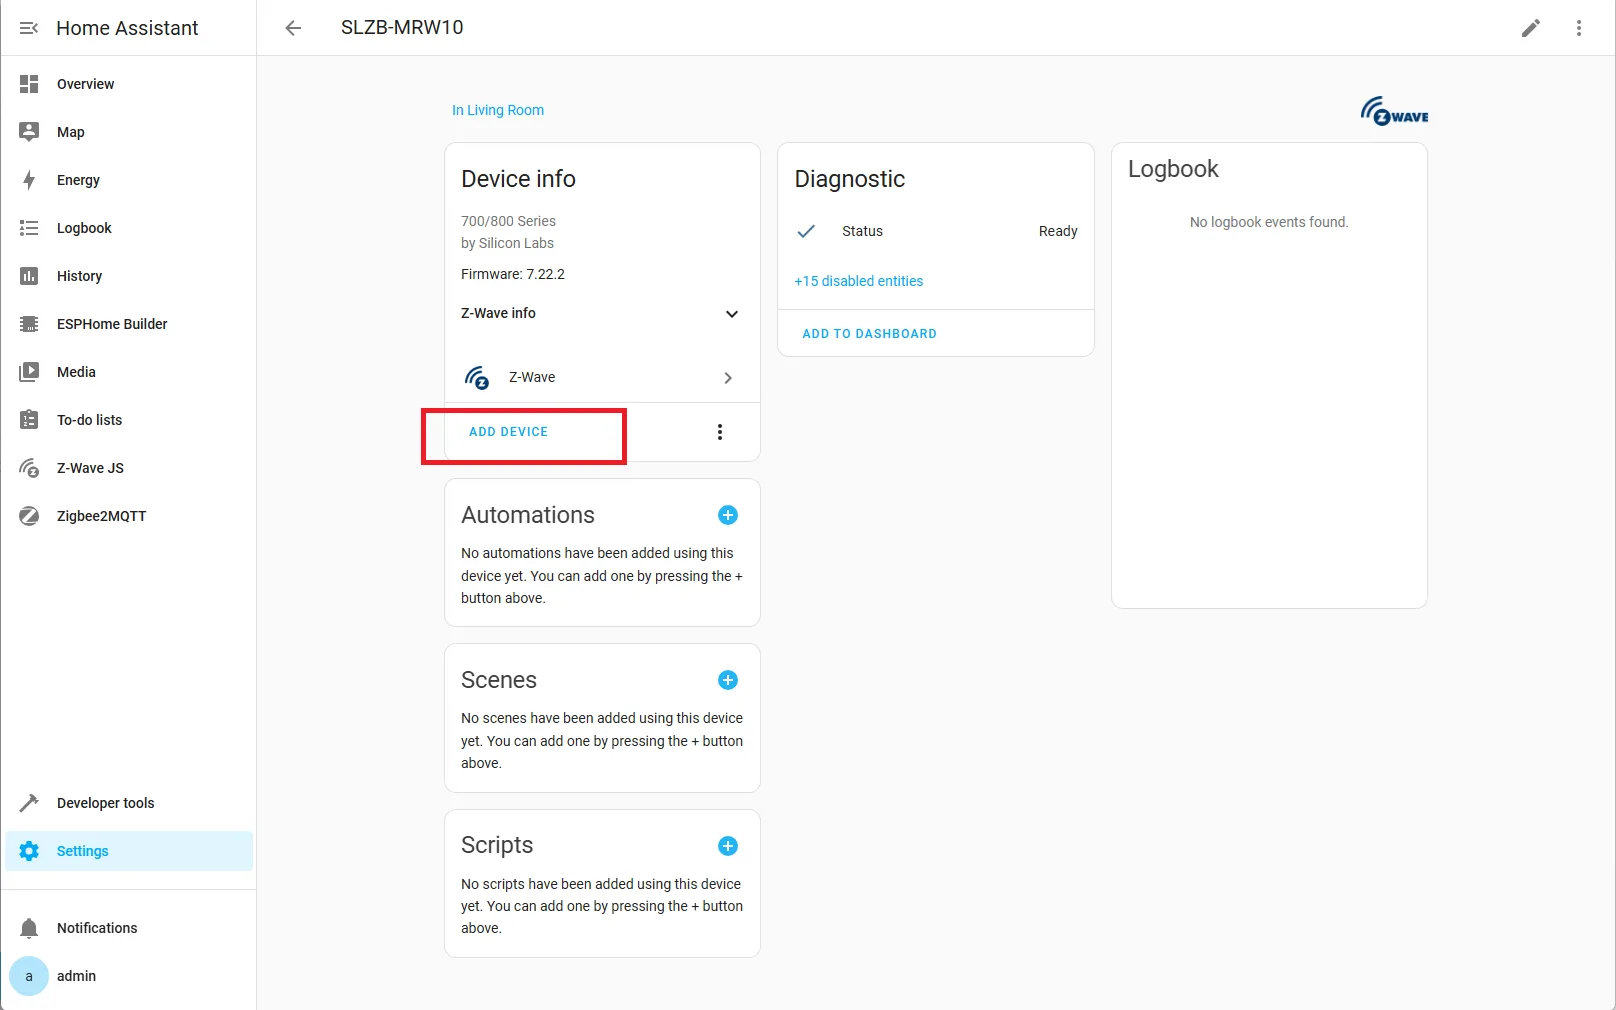
You should be redirected to the Z-Wave adapter page. Click Add Device.
If not redirected, go to:
Settings → Devices & Services → Z-Wave → SLZB-MRW10
2. Choose Pairing Method
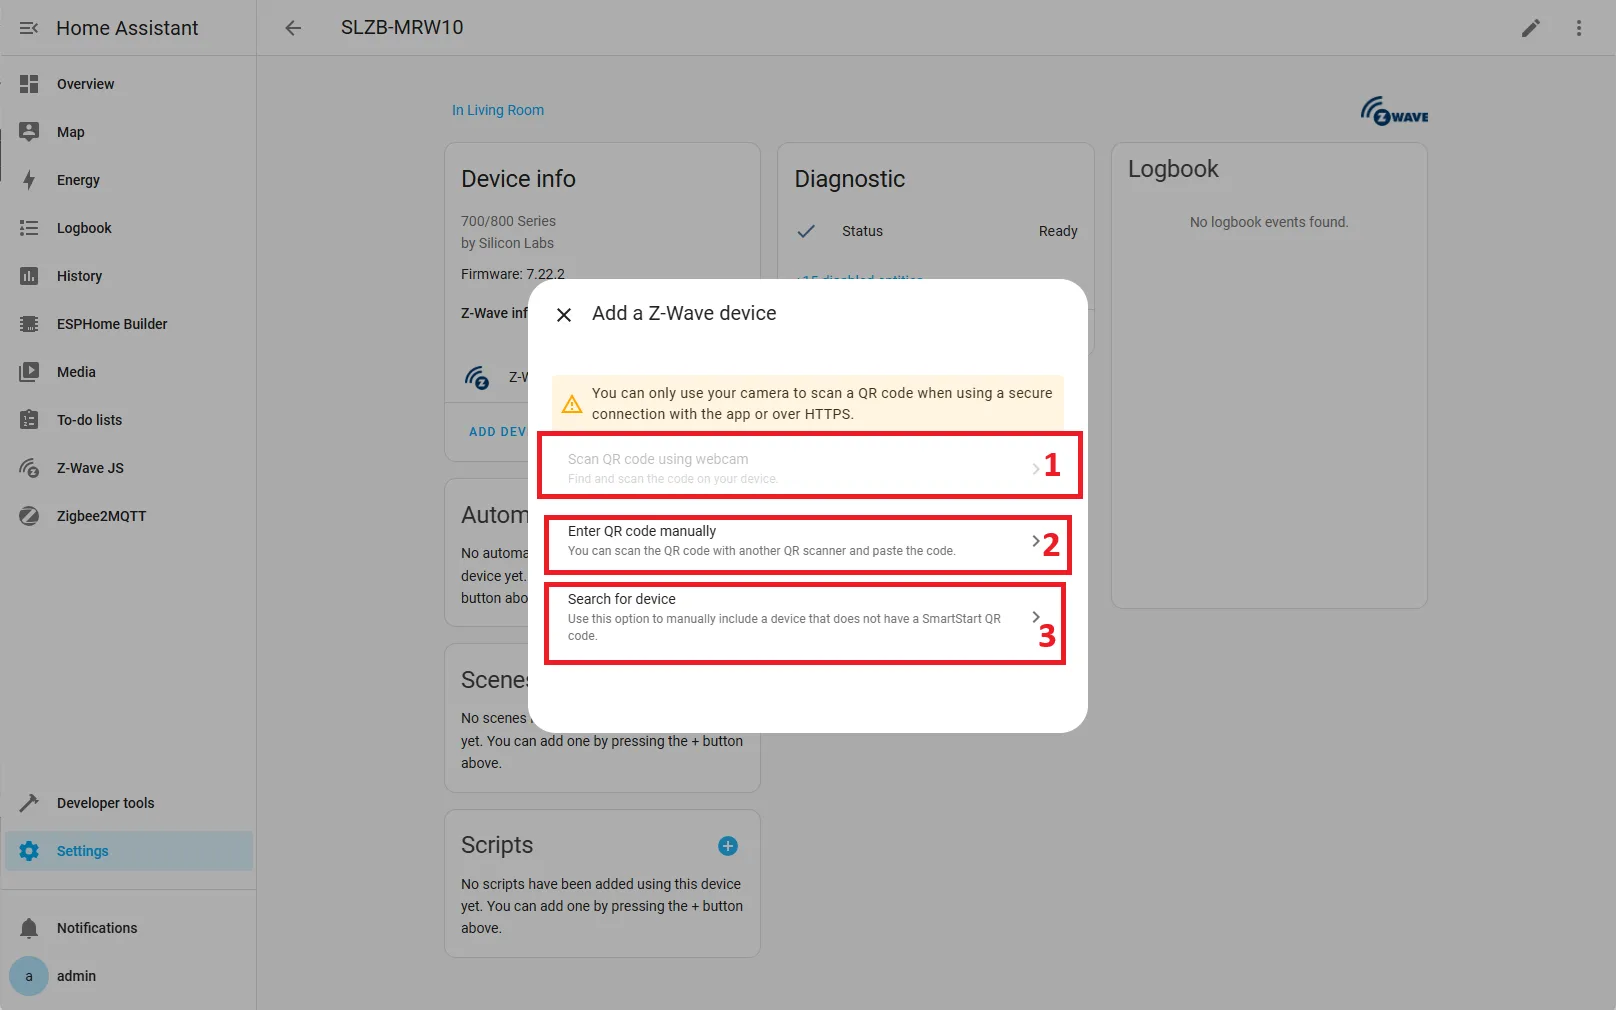
Choose your preferred pairing method:
| Method | Ease | Notes |
|---|---|---|
| Scan QR‑code using web-cam | ⭐⭐⭐ | Easiest & secure if the device has a SmartStart label. |
| Enter QR-code manually | ⭐⭐ | Secure S2 inclusion when QR‑code isn’t available. |
| Search for device | ⭐ | Put device in pairing mode, then let the hub discover it. |
We will use the third method.
3. Put Device into Pairing Mode
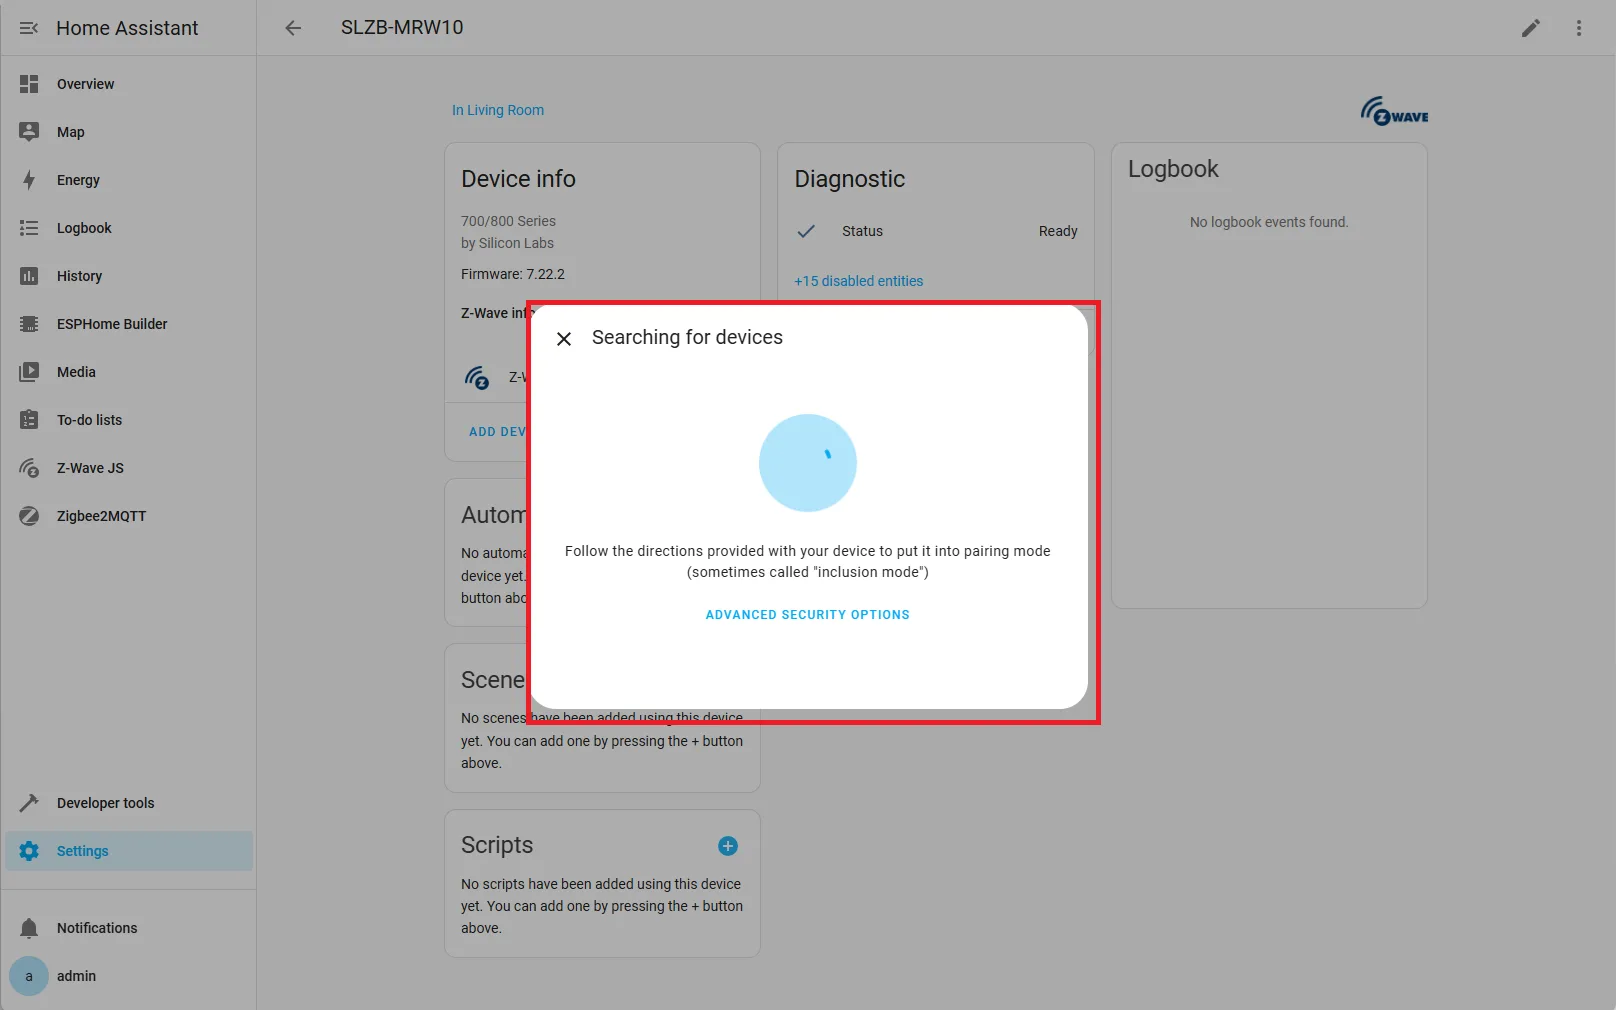
Follow your device’s instructions to enter pairing mode.
4. Wait for Device Info
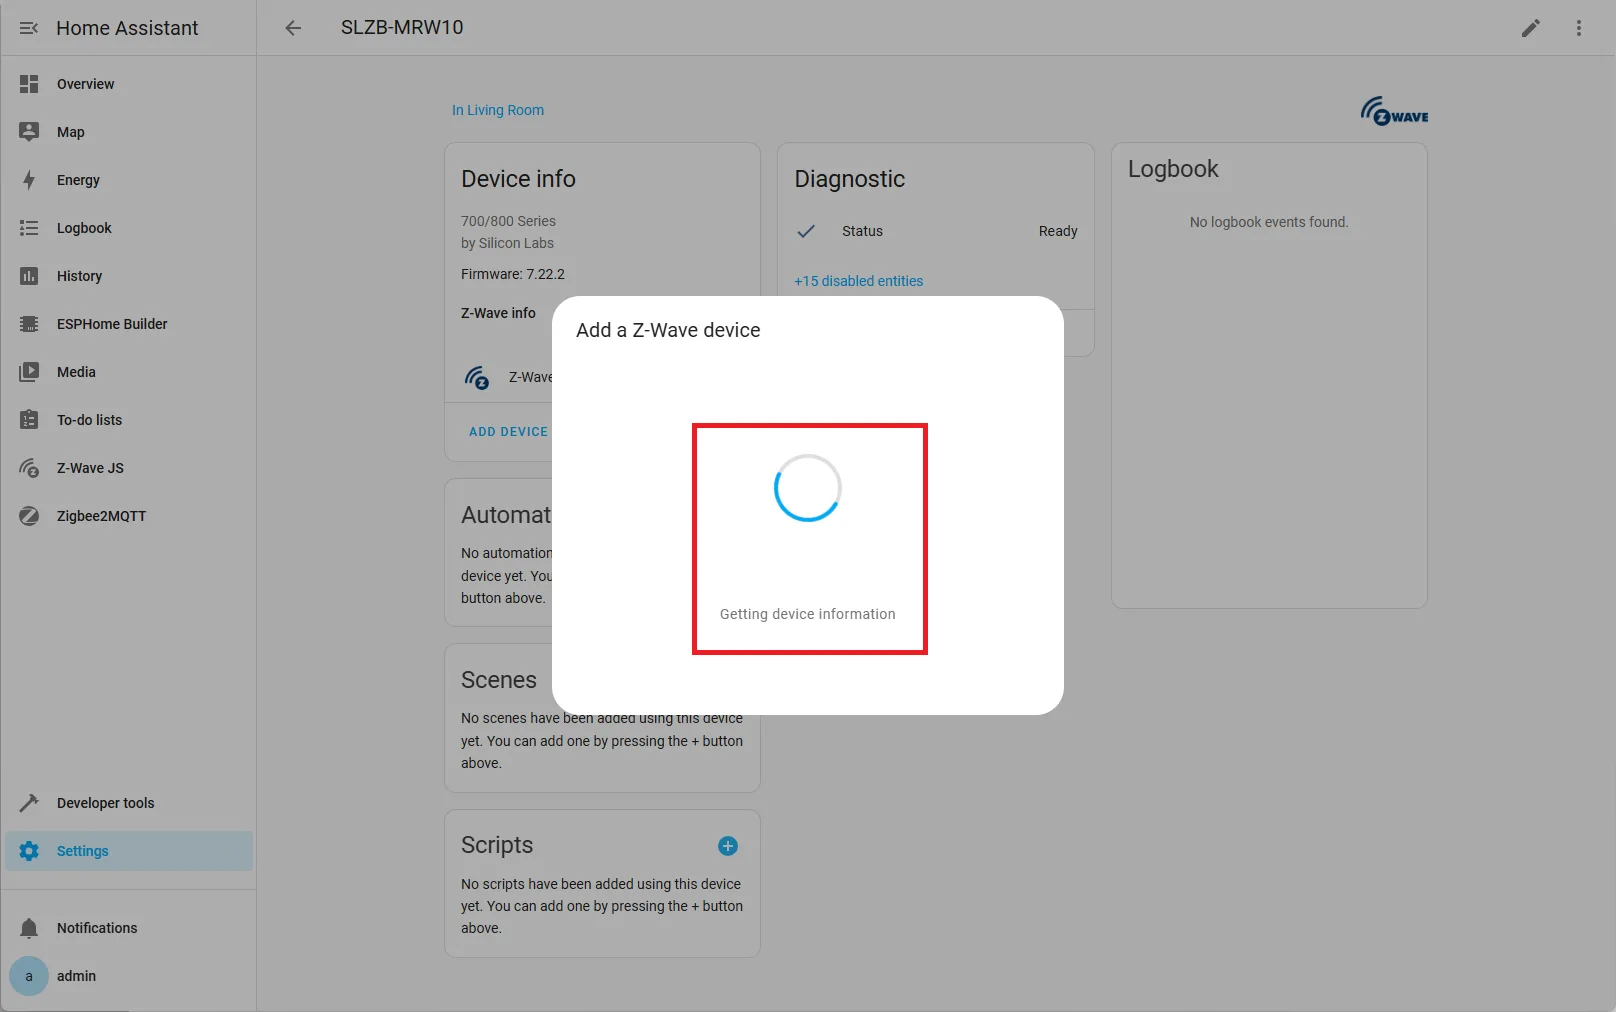
Z-Wave will begin requesting information from the device.
5. Enter Requested Data
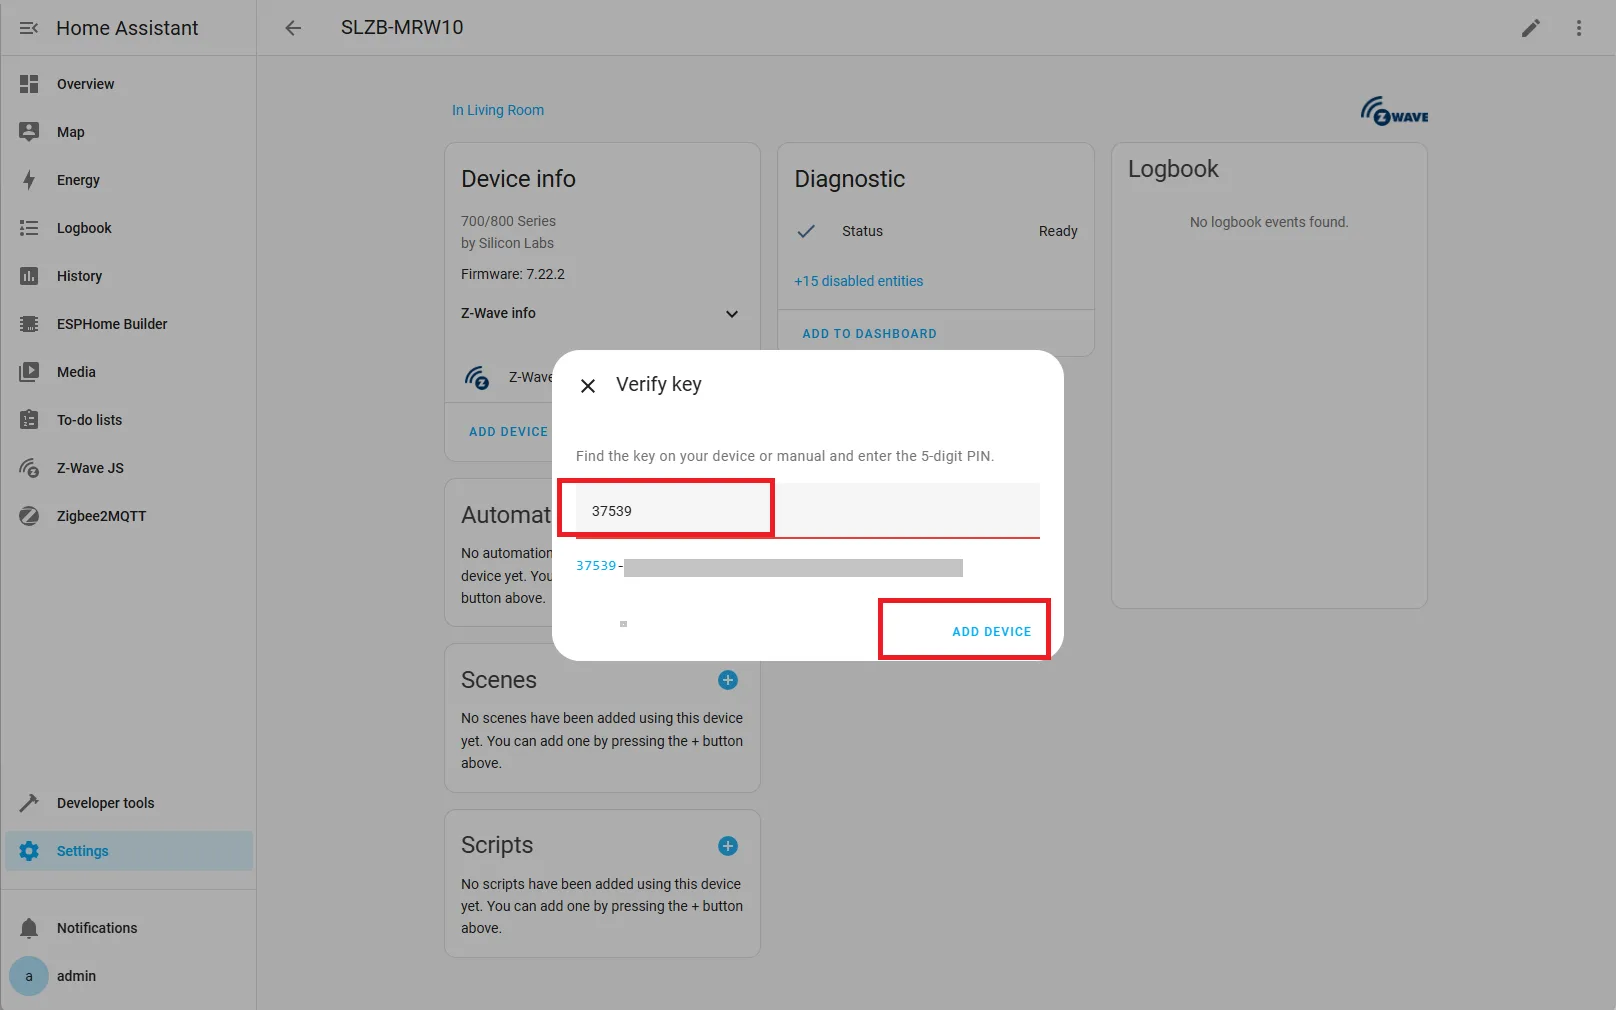
If prompted, enter required details (e.g., PIN code found on your device).
6. Device Added!
The device is now ready for use. You’ll be redirected to the device page where you can monitor and control it.
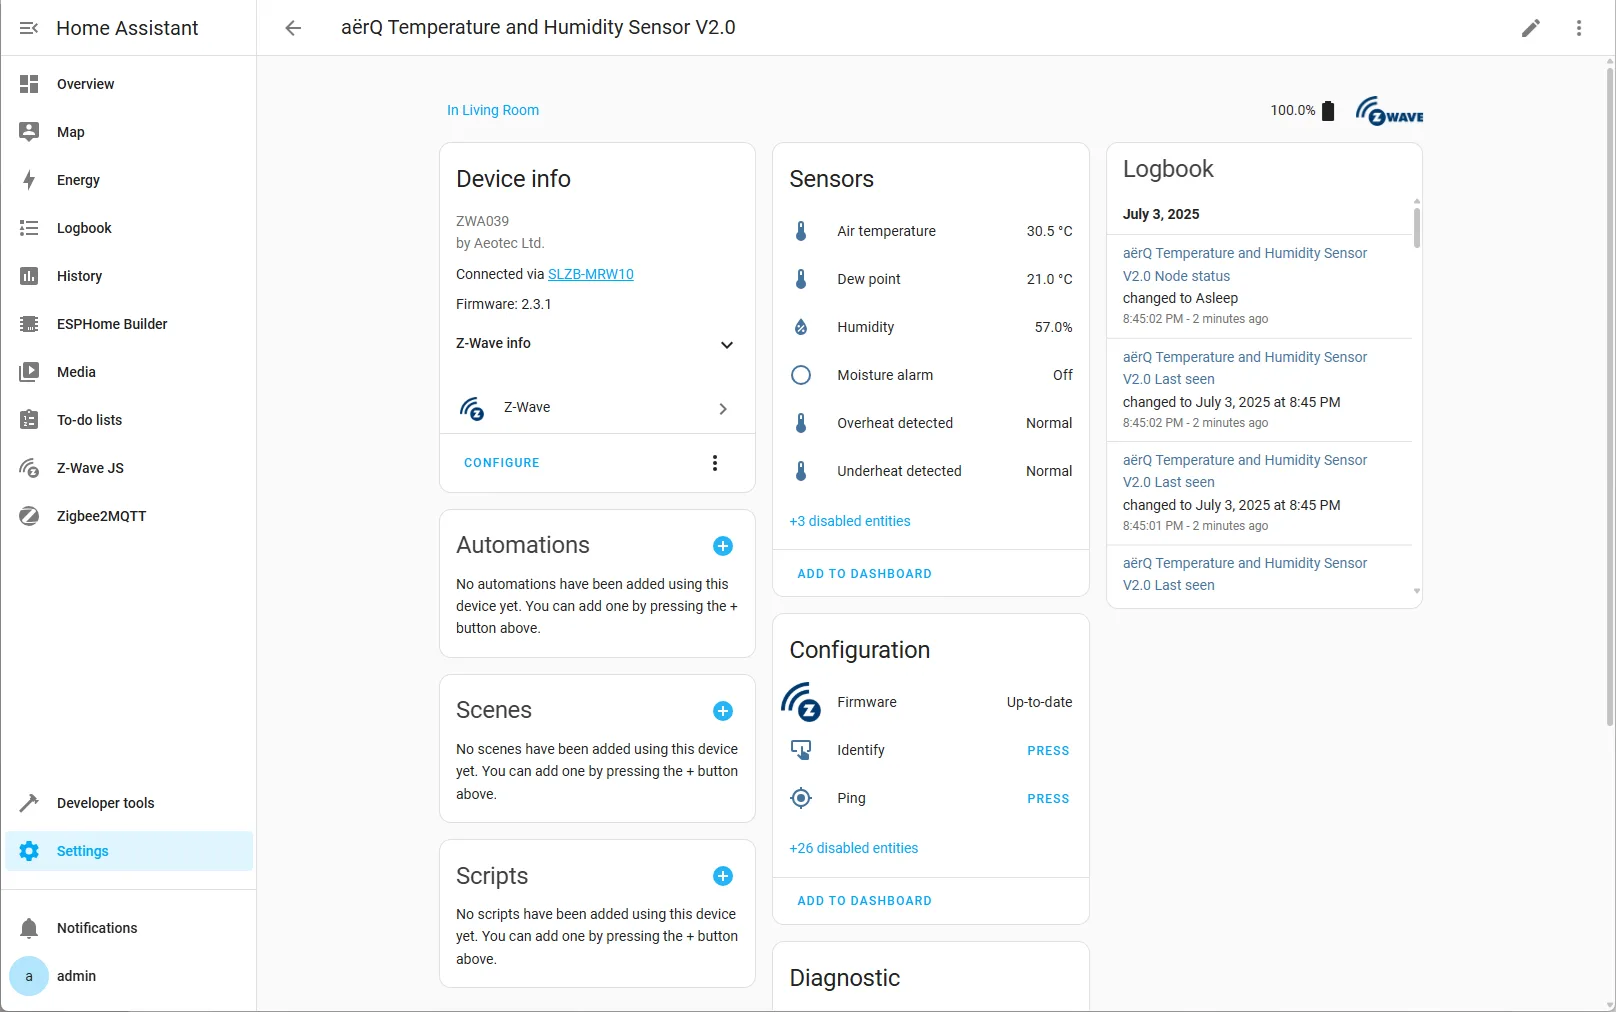
✅ You’re all set! Your Z‑Wave device is now fully integrated and ready for automation with the SLZB‑MRW10 adapter.
📋 Post‑Pairing Tips
- Rename entities to something meaningful (e.g., Kitchen Motion Sensor).
- Assign the device to an Area to keep your dashboard tidy.
- If a secure device fails to interview fully, exclude it first, then re‑include closer to the hub.