SLZB-06x/MRx/MRxU/Ultima series
- SLZB Series Overview
- SLZB-xxU and ZWA-2
- SLZB-Ultima
- ESPHome firmware for Ultima and xU Series
- Thread setup (network and USB connection)
- Zigbee network sniffing guide for SLZB-MRx and SLZB-06Mx adapters
SLZB Series Overview
- SLZB-06 series - can run Zigbee and Thread (and capable for Multiprotocol, but not recommended by Home Assistant and deprecated), connects over Ethernet, could be powered by PoE or Type-C (if you do not have PoE - can connect Ethernet and power with Type-C). Support Wi-Fi and Bluetooth (BT is based on ESPHomne firmware). Could be used as Zigbee Coorinator, Zigbee Router or Open Thread Border Router (all models);
- SLZB-MR series - supercool version with two radios for Zigbee and Thread networks at the same time, connected over Ethernet, could be powered by PoE or Type-C (if you do not have PoE - can connect Ethernet and power with Type-C). Support Wi-Fi and Bluetooth (BT is based on ESPHomne firmware). Could be used as Zigbee Coorinator, Zigbee Router AND Open Thread Border Router at the same time;
- SLZB-07 series - can run Zigbee and Thread (and Multiprotocol, but not recommended by Home Assistant and deprecated), connects over USB. Could Zigbee Coorinator, Zigbee Router or Open Thread Border Router (all models);
- SLZB-06xU/MRxU (U series) - same as SLZB-06x/MRx but better:
- USB host support
- additional 2MB PSRAM
- updated ethernet controller
More Detailed Summary
SLZB-06 Series
Triple radio:
Based on CC26XX (TI) and EFR32XX (Silicon Labs) SoCs. Silicon Labs models support Zigbee + Thread via Multiprotocol firmware, but this is not recommended by Home Assistant (see FAQ). Powered by SLZB-OS with full feature set including web UI, VPN, OTA, scripting, and native Home Assistant integration. |
 |
SLZB-MR Series
Quadruple radio:
Supports true simultaneous Zigbee and Thread operation on separate SoCs (e.g., ZHA + Zigbee2MQTT or dual Thread networks). Powered by SLZB-OS with full feature set identical to SLZB-06 series. |
 |
SLZB-07 Series
| Supercompact USB-based coordinator with 1 radio SoC (TI or Silicon Labs). Designed for low power, plug-and-play setups (Raspberry Pi, miniPC, etc.). Benefits from full SLZB firmware stack with preconfigured compatibility. |
 |
SLZB Series – Tech Details
HIGH LEVEL OVERVIEW of SLZB Series
| Feature / Model Series | SLZB-06 Series | SLZB-MR Series | SLZB-07 Series |
|---|---|---|---|
| Models in Series | 5 models (06, 06M, 06p7, 06p10, 06Mg24) | 3 models (MR1, MR2, MR3) | 4 models (07, 07p7, 07p10, 07Mg24) |
| Zigbee Support | ✅ | ✅ | ✅ |
| Thread Support | ✅ | ✅ Native on separate SoC | ✅ |
| Wi-Fi Support | ✅ | ✅ | ❌ |
| Bluetooth Support | ✅ | ✅ | ❌ |
| Radio SoC 1 (Zigbee/Thread) | CC26XX or EFR32XX Series | EFR32XX Series | CC26XX or EFR32XX Series |
| Radio SoC 2 (Thread/Zigbee) | ❌ | CC26XX Series | ❌ |
| Radio SoC 3 (Wi-Fi/Bluetooth) | ✅ ESP32 2×240 MHz | ✅ ESP32 2×240 MHz | ❌ |
| Radio Count | Triple (Zigbee or Thread + Wi-Fi + Bluetooth) | ✅ Quadraple (Zigbee + Thread + Wi-Fi + Bluetooth) | Single (Zigbee or Thread) |
| Ethernet Support | ✅ | ✅ | ❌ |
| Ethernet-to-Wi-Fi bridge mode | ✅ | ✅ | ❌ |
| PoE Support | ✅ Active / 802.3af 48V | ✅ Active / 802.3af 48V | ❌ |
| USB Connectivity | ✅ | ✅ | ✅ |
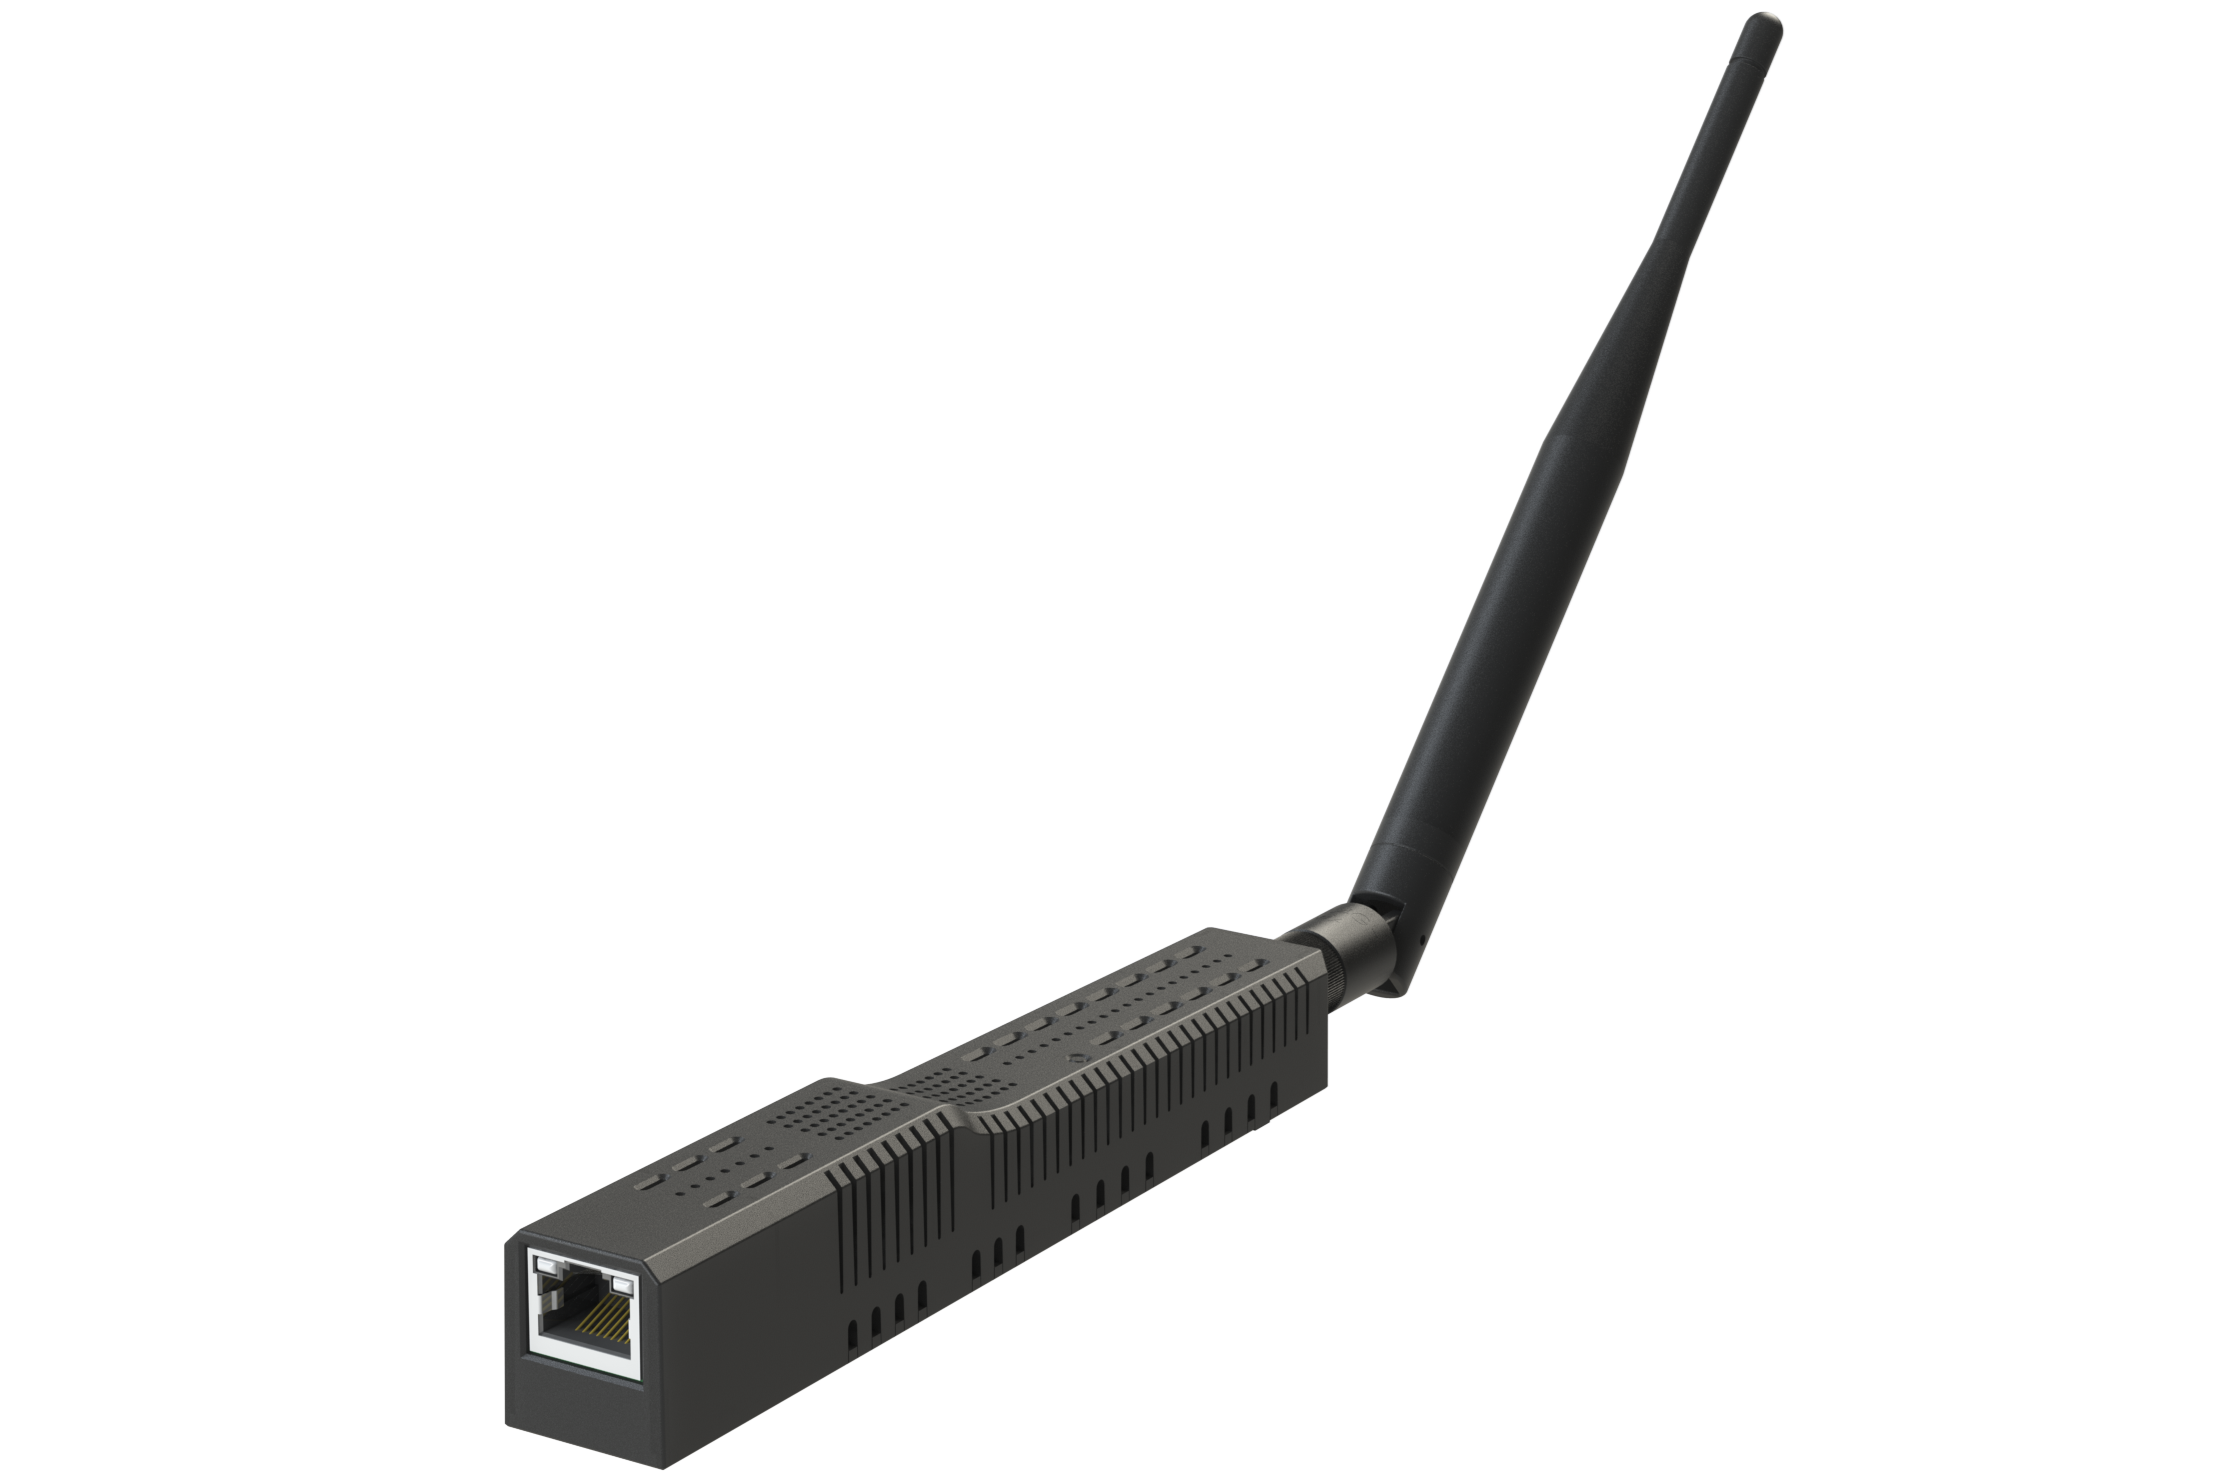
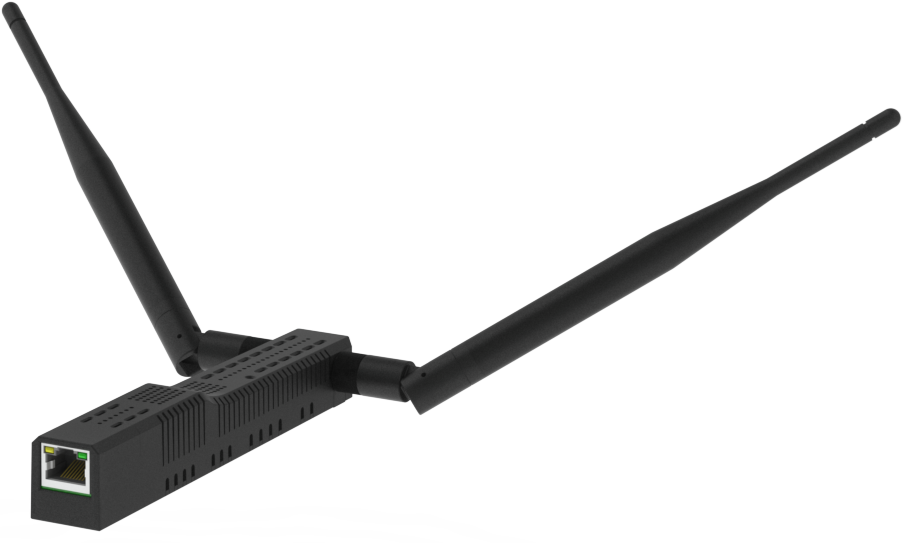
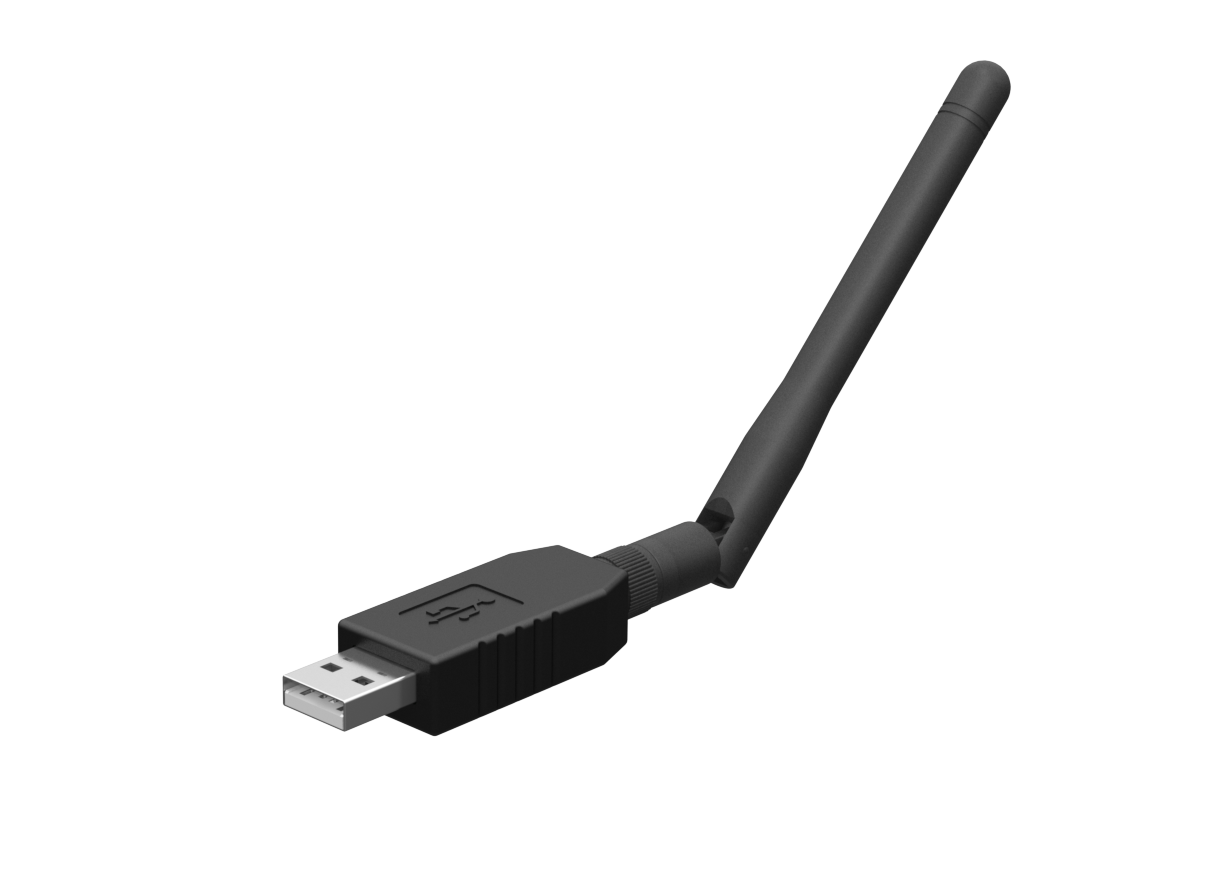
| Form Factor | Compact with 1x Antenna | Compact with 2x Antennas | Ultra-Compact USB with 1x Antenna |
| Antenna Count | 2 Antennas | 3 Antennas | 1 Antenna |
| Antenna Type | External 5dB (Zigbee/Thread) + Internal (Wi-Fi/Bluetooth) | 2× External 5dB (Zigbee and Thread) + Internal (Wi-Fi/Bluetooth) | External 3dB (Zigbee/Thread) |
| Target Use Case | General & Industrial | Advanced / Multi-mesh | Plug-and-play USB |
| Multi-Network Support | ❌ | ✅ | ❌ |
| Max Device Scalability | ~150–400 devices, depending on model | ~300–750 devices, depending on model | ~150–400 devices, depending on model |
| Zigbee2MQTT Compatible | ✅ Plug-and-Play | ✅ Plug-and-Play | ✅ Plug-and-Play |
| Home Assistant ZHA Compatible | ✅ Plug-and-Play | ✅ Plug-and-Play | ✅ Plug-and-Play |
| Open Thread Border Router Compatible | ✅ Plug-and-Play | ✅ Plug-and-Play | ✅ Plug-and-Play |
U series devices
U series devices are complete analogues of the regular SLZB-06x/MRx devices but with an updated SoC and PCB.
Full list of HW updates:
- Updated SoC ESP32S3R2. 2x 240MHz cores, 320Kib RAM + 2MB PSRAM, 16MiB flash, native USB host and device support.
- Updated ethernet controller
- Ethernet port LEDs control circuit
- RTS/CTS lines for radio modules (you can use firmware with HW flow control)
What dongles (USB sticks) can be connected to U series USB host?
The new U series coordinators support connecting any serial devices on the following chipsets:
- CP210x
- PL2303
- CH340
- CH341
- CH9102
Compatibility with other chipsets is not guaranteed!
To find out which chipset your dongle uses, please contact USB dongle manufacturer's support.
SLZB-06 Models
The SLZB-06 series is a versatile line of PoE-enabled Zigbee and Thread coordinators built for reliability, performance, and advanced integration scenarios. Featuring USB, Ethernet, and 802.3af PoE connectivity options, these models are ideal for both residential smart homes and industrial environments.
Each SLZB-06 model includes a powerful Zigbee/Thread radio (based on either Texas Instruments CC26XX or Silicon Labs EFR32MG SoCs) and an onboard ESP32 that runs SLZB-OS - a secure operating system with web-based configuration, OTA updates, scripting, Home Assistant support, and VPN capabilities.
Use the table below to compare models based on SoC type, wireless protocol support, maximum Zigbee device capacity, and recommended integration method.
| Feature | SLZB-06 | SLZB-06M | SLZB-06MG24 | SLZB-06P7 | SLZB-06P10 |
|---|---|---|---|---|---|
| Radio 1 – SoC Type | CC2652P | EFR32MG21 | EFR32MG24 | CC2652P7 | CC2674P10 |
| Radio 1 – Manufacturer | Texas Instruments | Silicon Labs | Silicon Labs | Texas Instruments | Texas Instruments |
| Maximum Connected End Devices | up to 200 | up to 200 | up to 350 | up to 300 | ✅ up to 400 |
| Best for | Zigbee2MQTT | ZHA | ZHA | Zigbee2MQTT | Zigbee2MQTT |
| Good with | ZHA | Zigbee2MQTT | Zigbee2MQTT | ZHA | ZHA |
| Zigbee Support | ✅ All models nativelly support Zigbee | ||||
| Thread Support | ✅ Supported on all models nativelly | ||||
| Wi-Fi Support | ✅ Native support 2.4 GHz, including Ethernet-to-Wi-Fi Bridge mode | ||||
| Bluetooth ESPHome Support | ✅ All models support BLE via ESP32 and ESPHome integration | ||||
| Powered by SLZB-OS | ✅ Yes, out of the box | ||||
| Multiprotocol | No | Yes | Yes | No | No |
| Note | Multiprotocol mode is not recommended by Home Assistant. See FAQ item: "What is the current state of multiprotocol support?" . | ||||
SLZB-MR Models
The SLZB-MR series represents the most advanced line of Zigbee and Thread coordinators available on the market. These devices feature quad-radio configurations, enabling simultaneous operation of multiple Zigbee networks or parallel Zigbee and Thread infrastructures on physically separated chips.
Each model includes two independent radio SoCs (one from Texas Instruments and second from Silicon Labs), along with an onboard ESP32 running SLZB-OS. This architecture eliminates the limitations of multiprotocol firmware by physically separating the protocols across dedicated chips - resulting in superior reliability and performance. Advanced user can also utilize to run both ZHA and Zigbee2MQTT at the same time ont he same device.
The table below compares SLZB-MR models by radio generation, supported protocols, maximum device count, and recommended use cases such as ZHA + Zigbee2MQTT or Matter over Thread.
| Feature | SLZB-MR1 | SLZB-MR2 | SLZB-MR3 |
|---|---|---|---|
| Radio 1 – SoC Type | EFR32MG21 | EFR32MG21 | EFR32MG24 |
| Radio 1 – Manufacturer | Silicon Labs | Silicon Labs | Silicon Labs |
| Radio 2 – SoC Type | CC2652P7 | CC2652P | CC2674P10 |
| Radio 2 – Manufacturer | Texas Instruments | Texas Instruments | Texas Instruments |
| Maximum Connected End Devices | up to 500 (200+300) | up to 400 (200+200) | ✅ up to 750 (350+400) |
| Best for | ✅ Native on all protocols on different chips (dual Zigbee or Zigbee+Thread) | ||
| Zigbee Support | ✅ Native on all models (via first SoC) | ||
| Thread Support | ✅ Native on all models (via second SoC) | ||
| Multiple Zigbee Network Support | ✅ Native on all models (can run ZHA and Z2M, or 2x Z2M) | ||
| Wi-Fi Support | ✅ 2.4 GHz via ESP32 with SLZB-OS; includes Ethernet-to-Wi-Fi Bridge | ||
| Bluetooth ESPHome Support | ✅ Supported via ESP32 (BLE + ESPHome integration) | ||
| Powered by SLZB-OS | ✅ Yes, all Features are Available! | ||
| Multiprotocol | ❌ Not needed – Zigbee and Thread run on separate dedicated SoCs | ||
| Note | SLZB-MR devices use dedicated chips for Zigbee and Thread, ensuring superior stability and performance. | ||
SLZB-07 Models
The SLZB-07 series offers a compact and energy-efficient alternative to full-featured Ethernet-based coordinators. Designed primarily for USB-powered use, these models integrate a high-performance Zigbee / Thread radio SoC into a minimalistic form factor - ideal for plug-and-play setups on PCs, Raspberry Pi, or miniPC.
All SLZB-07 devices are preflashed and support native integration with popular home automation platforms such as Home Assistant (ZHA, Zigbee2MQTT) and Matter (on Thread-capable models). While the SLZB-07 series lacks an onboard ESP32 and web UI, it offers excellent performance and cost-efficiency for focused applications.
Use the table below to compare the key features of each SLZB-07 model, including SoC generation, multiprotocol support, and preferred usage.
| Feature | SLZB-07 | SLZB-07P7 | SLZB-07P10 | SLZB-07MG24 |
|---|---|---|---|---|
| Radio 1 – SoC Type | EFR32MG21 | CC2652P7 | CC2674P10 | EFR32MG24 |
| Radio 1 – Manufacturer | Silicon Labs | Texas Instruments | Texas Instruments | Silicon Labs |
| Maximum Connected End Devices | up to 200 | up to 250 | ✅ up to 400 | up to 350 |
| Best for | ZHA | Zigbee2MQTT | Zigbee2MQTT | ZHA / Thread |
| Good with | Zigbee2MQTT | ZHA | ZHA | Zigbee2MQTT |
| Zigbee Support | ✅ Native Zigbee support on all models | |||
| Thread Support | ✅ Supported on all models nativelly | |||
| Multiprotocol | Yes | No | No | Yes |
| Note | Multiprotocol mode is not recommended by Home Assistant. See FAQ item: "What is the current state of multiprotocol support?" . | |||
SLZB-OS Feature Overview
SLZB-OS is a firmware preinstalled on all SLZB-06 and MR series devices with. It provides a powerful local web interface, configuration tools, scripting, and network utilities - making your coordinator more than just a coordinator.
The table below outlines key features included in SLZB-OS. These are designed to support both beginners and advanced users by simplifying smart home integrations, increasing network visibility, and adding flexibility without requiring third-party tools.
| Feature | Description | |
|---|---|---|
| ???? | Web UI | Access configuration and diagnostics via local web interface. |
| ???? | OTA Firmware Updates | Update both Zigbee SoC and ESP32 firmware via web interface. |
| ???? | Built-in VPN (WireGuard) | Secure remote access via integrated VPN client. |
| ???? | Ethernet-to-Wi-Fi Bridge | Use the device to bridge wired Ethernet to 2.4 GHz Wi-Fi network. |
| ???? | Zigbee2MQTT & ZHA Config Generator | Auto-generates config snippets for quick integration into popular coordinators. |
| ???? | Home Assistant Integration | Works natively with Home Assistant (ZHA & Zigbee2MQTT), no extra steps needed. |
| ???? | Home Assistant Autodiscovery | Enables seamless device detection and setup in Home Assistant. |
| ???? | mDNS Autodiscovery | Broadcasts device presence on local network using mDNS. |
| ???? | Standalone Zigbee Hub | Operates without a separate Zigbee2MQTT or Home Assistant instance. |
| ???? | Local Scripting | Write custom automations using embedded scripting engine. |
| ???? | Multi-language Support | Available in over 20 languages with automatic detection. |
| ???? | IEEE Address Management | Change Zigbee MAC/IEEE address via web interface. |
| ???? | Security & Firewall | Password protection, IP filtering, and system hardening enabled by default. |
SLZB-xxU and ZWA-2
✅ Using ZWA-2 Z-Wave Dongle with SLZB-MR1U via USB Passthrough
Overview
Many users asked whether the ZWA-2 Z-Wave USB stick can be used with the SLZB-MR1U using its USB passthrough over Ethernet feature.
Until recently, we couldn’t confirm, as it hadn’t been tested in-house.
We have now completed testing and can confirm:
✅ ZWA-2 works with SLZB-MR1U using USB passthrough.
Requirements
-
SLZB-MR1U hardware
-
SLZB-OS firmware v3.0.0 or newer
-
ZWA-2 USB Z-Wave stick
-
Z-Wave JS UI (or other TCP-compatible Z-Wave host)
-
Network access to the SLZB-MR1U IP address
Why SLZB-OS v3.0.0?
Firmware v3.0.0 (released 29 August 2025) is required because it:
✅ Resolves USB passthrough instability
✅ Fixes EFR32 firmware update failures
✅ Improves overall SLZB-MR1U reliability
You can update via:
-
OTA (if available)
-
Manual update via USB-C and our Web Flasher:
➡️ https://smlight.tech/flasher/#SLZB-06U-MRxU
Setup Instructions
-
Flash SLZB-MR1U with SLZB-OS v3.0.0
- Enable USB passthrough option (Go to http://slzb-mr1u.local/usb)

-
Plug the ZWA-2 USB stick into the USB-A port - right out of the box.
-
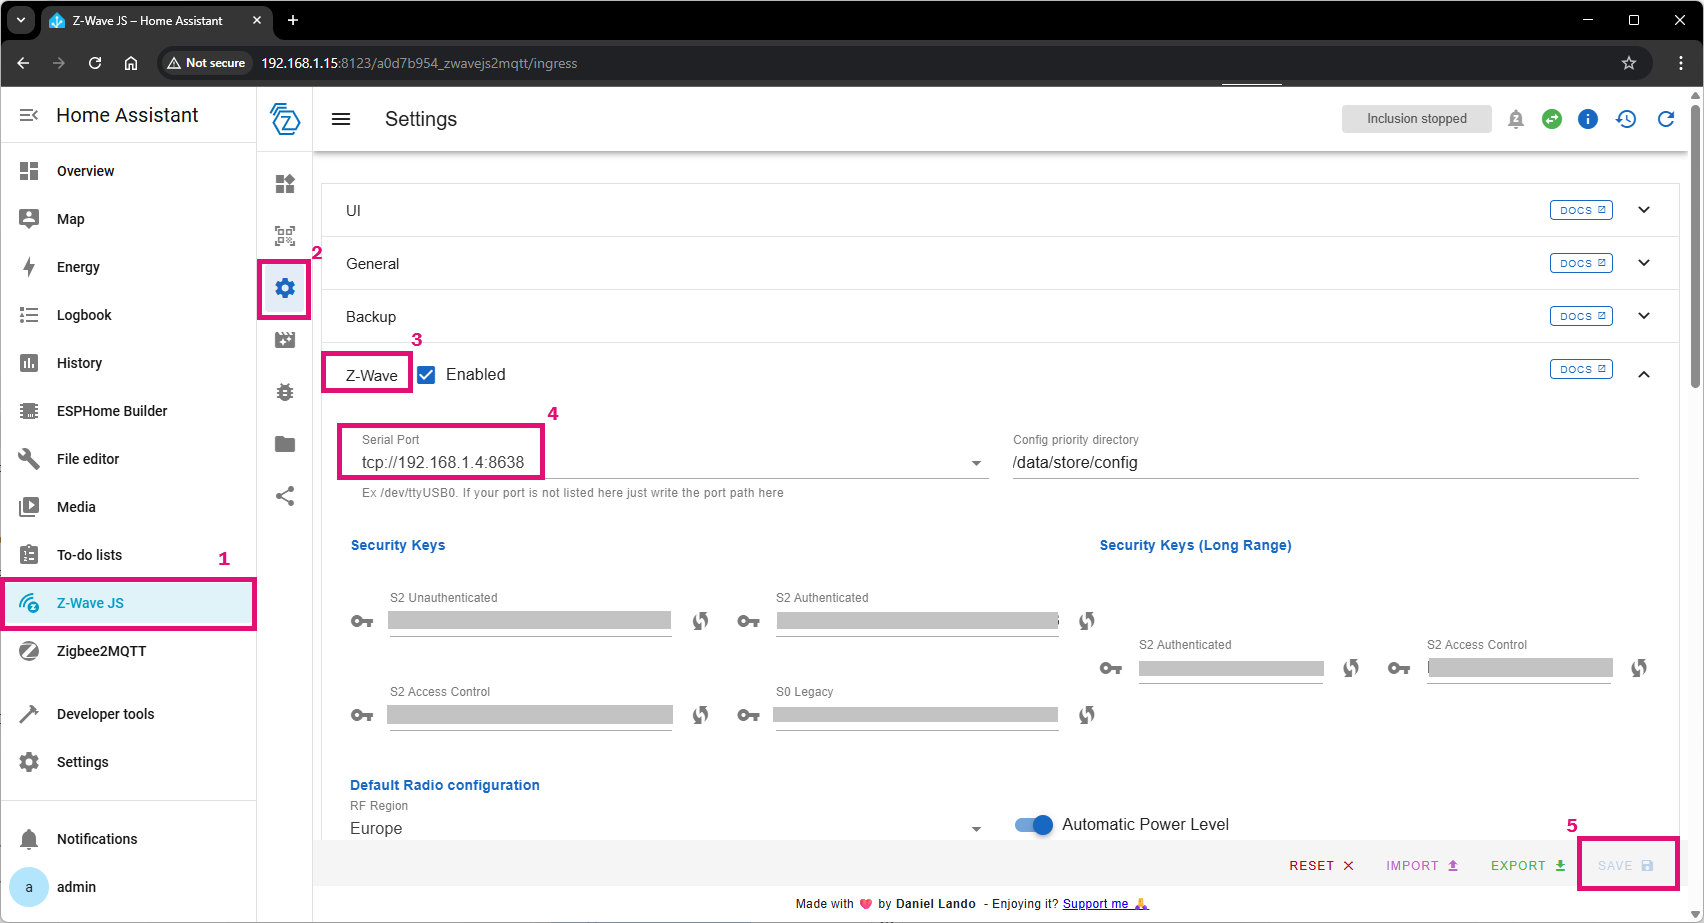
Open Z-Wave JS UI on your smart home host
-
Go to Settings -> Z-Wave -> Serial port and Set the serial port to:
-
Save settings and restart the service, if asked.

-
Pair Z-Wave devices as usual (we did it via Z-Wave integration).

⚠️ Notes & Best Practices
-
One USB device is supported at the moment via USB passthorugh.
- Ensure port 8638 is accessible on your LAN
Troubleshooting
| Problem | Solution |
|---|---|
| ZWA-2 not detected | Confirm IP and port, check firmware is v3.0.0 or newer |
| Devices won’t pair | Restart Z-Wave JS UI after configuring the serial port |
| Unstable USB connection | Use a shorter or higher-quality USB cable (or powered USB hub) |
SLZB-Ultima
Install addons on SLZB-Ultima
Microphone addon
Z-Wave, POE, 4G/LTE
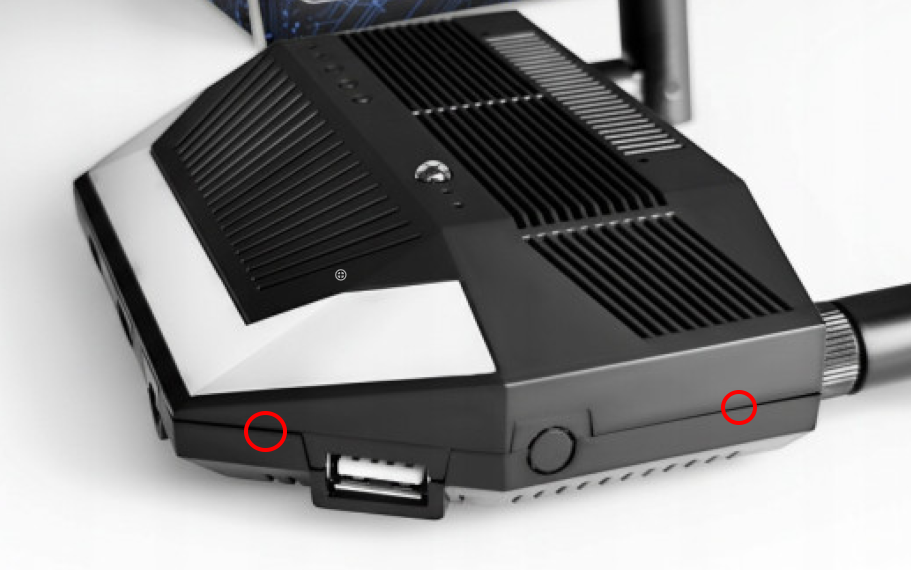
Opening the case
How to open device
Prepare a flat, thin tool. This can be a small screwdriver.
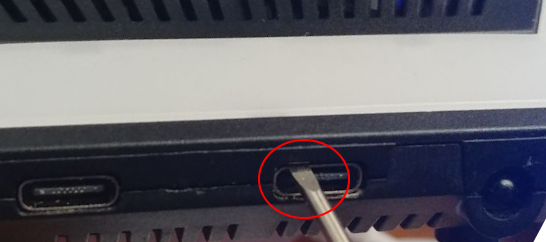
Insert the tool from above, between the Type-C port and the case.
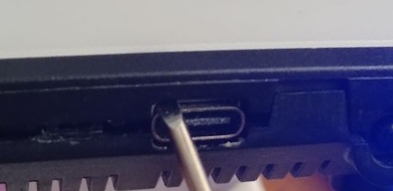
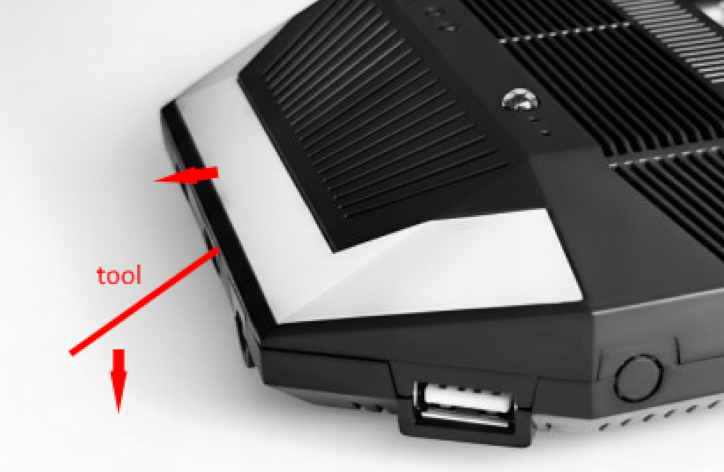
Carefully pull the top cover forward using the tool, leaning against the Type-C
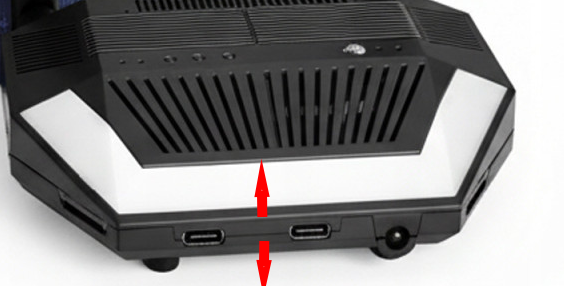
Carefully pull off the top and bottom covers
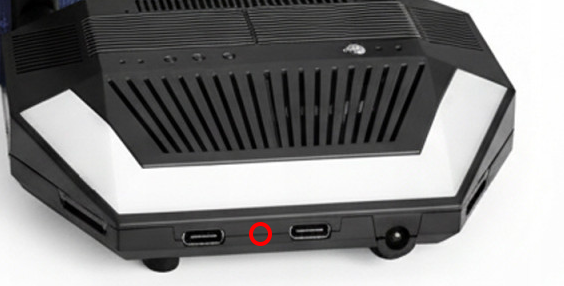
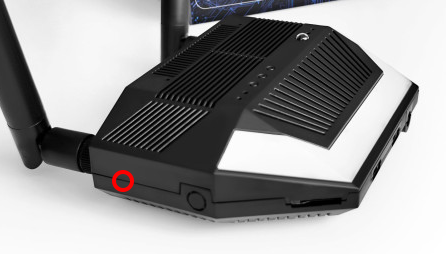
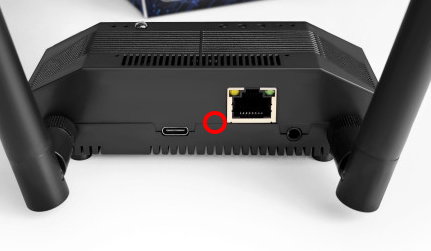
Snaps locations
ESPHome firmware for Ultima and xU Series
SLZB ESPHome Firmware Flashing Guide for SLZB-Ultima, MRxU and 06xU
-
Open SLZB-ESPHome repository: https://github.com/smlight-tech/slzb-esphome
-
Download the firmware file that matches your device:
-
SLZB-Ultima →
ultima-r1-04xx -
SLZB-MRxU series →
MRxU-r1-73xx(only for models with U) -
SLZB-06xU series →
06xU-r1-73xx(only for models with U)
Make sure you select the correct file for your product.
-
-
Connect your SLZB device to your computer using a USB cable.
-
Download and open the flashing tool (easiest one is here: https://github.com/Jason2866/ESP_Flasher/releases/tag/v3.2.0).
-
In the flasher tool, select the firmware file you downloaded and start flashing.
-
If flashing does not start, unplug the device, press and hold the button on the device (on SLZB-Ultima, this is the first button from the left), keep it pressed, plug the USB cable back in, and try flashing again.
-
Wait until flashing finishes.
-
Open Home Assistant. Your device should appear automatically. If it does not, add it manually in the ESPHome integration using the device’s IP address.
Ports for Z2M/ZHA/OTBR/ZWavejSUI configs:
Ultima:
-
-
- EFR32 SoC: 6638
- CC26 SoC: 7638
- ZWave: 8638
-
SLZB-MRxU
-
-
- EFR32/ZWave SoC: 6638
- CC26 SoC: 7638
-
SLZB-06xU
-
-
- EFR32/CC26 SoC: 6638
-
Remarks:
- The web server is turned OFF by default because of this: https://esphome.io/components/bluetooth_proxy/#memory-issues
- Bluetooth proxy is turned on by default in the existing builds. If you want to build your own firmware, please use YAML and compile your firmware.
Moving back from ESPHome:
To flash the SLZB-OS to the device, please use the official flasher https://smlight.tech/flasher/#SLZB-06U-MRxU.
If flashing does not start, unplug the device, press and hold the button on the device (on SLZB-Ultima, this is the first button from the left), keep it pressed, plug the USB cable back in, and try flashing again. This is because your USB port could be in Host mode, and the button forces ESP to be in Flash mode.
Thread setup (network and USB connection)
Thread setup for Home Assistant: two options
SLZB devices support two ways to run a Thread network with Home Assistant:
- Option A - “Thread to remote OTBR”: OTBR runs on Home Assistant (OTBR add-on, or, since Jan-2026, called "App"), SLZB works as a Thread RCP (radio).
- Option B - “Thread + OTBR running on device”: OTBR runs directly on the SLZB device, Home Assistant connects to it via REST API.
Prerequisites
- A server with Home Assistant installed and running (example: Raspberry Pi 4 with HAOS).
- An SLZB device with a Thread-capable radio module.
- The Matter device you want to connect (example: Eve Energy EU).
- An Android or iOS smartphone.
Additional:
- Option A (Thread to remote OTBR): Available on ALL SLZB coordinators. Can run over either USB or network (Serial-over-IP).
- Option B (Thread + OTBR on device): Available on SLZB-06xU, SLZB-MRxU and SLZB-Ultima. OTBR requires IPv6 on your LAN (IPv6 will be force-enabled on the device when this mode is activated).
Step 1 - Choose your setup option
Option A: “Thread to remote OTBR” (OTBR add-on/app runs on Home Assistant)
Choose this if you want OTBR to run on Home Assistant or other smart home systems. SLZB acts as a Thread RCP (radio only). This is the traditional setup, and supports USB or network connection.
Option B: “Thread + OTBR running on device” (OTBR runs on SLZB)
Choose this if you want OTBR to run directly on the SLZB device. Home Assistant connects via network API (http://device-ip:8080), and you don’t need the OTBR add-on in HA.
Note: this is an initial (beta) integration and may have limitations or unexpected behavior.
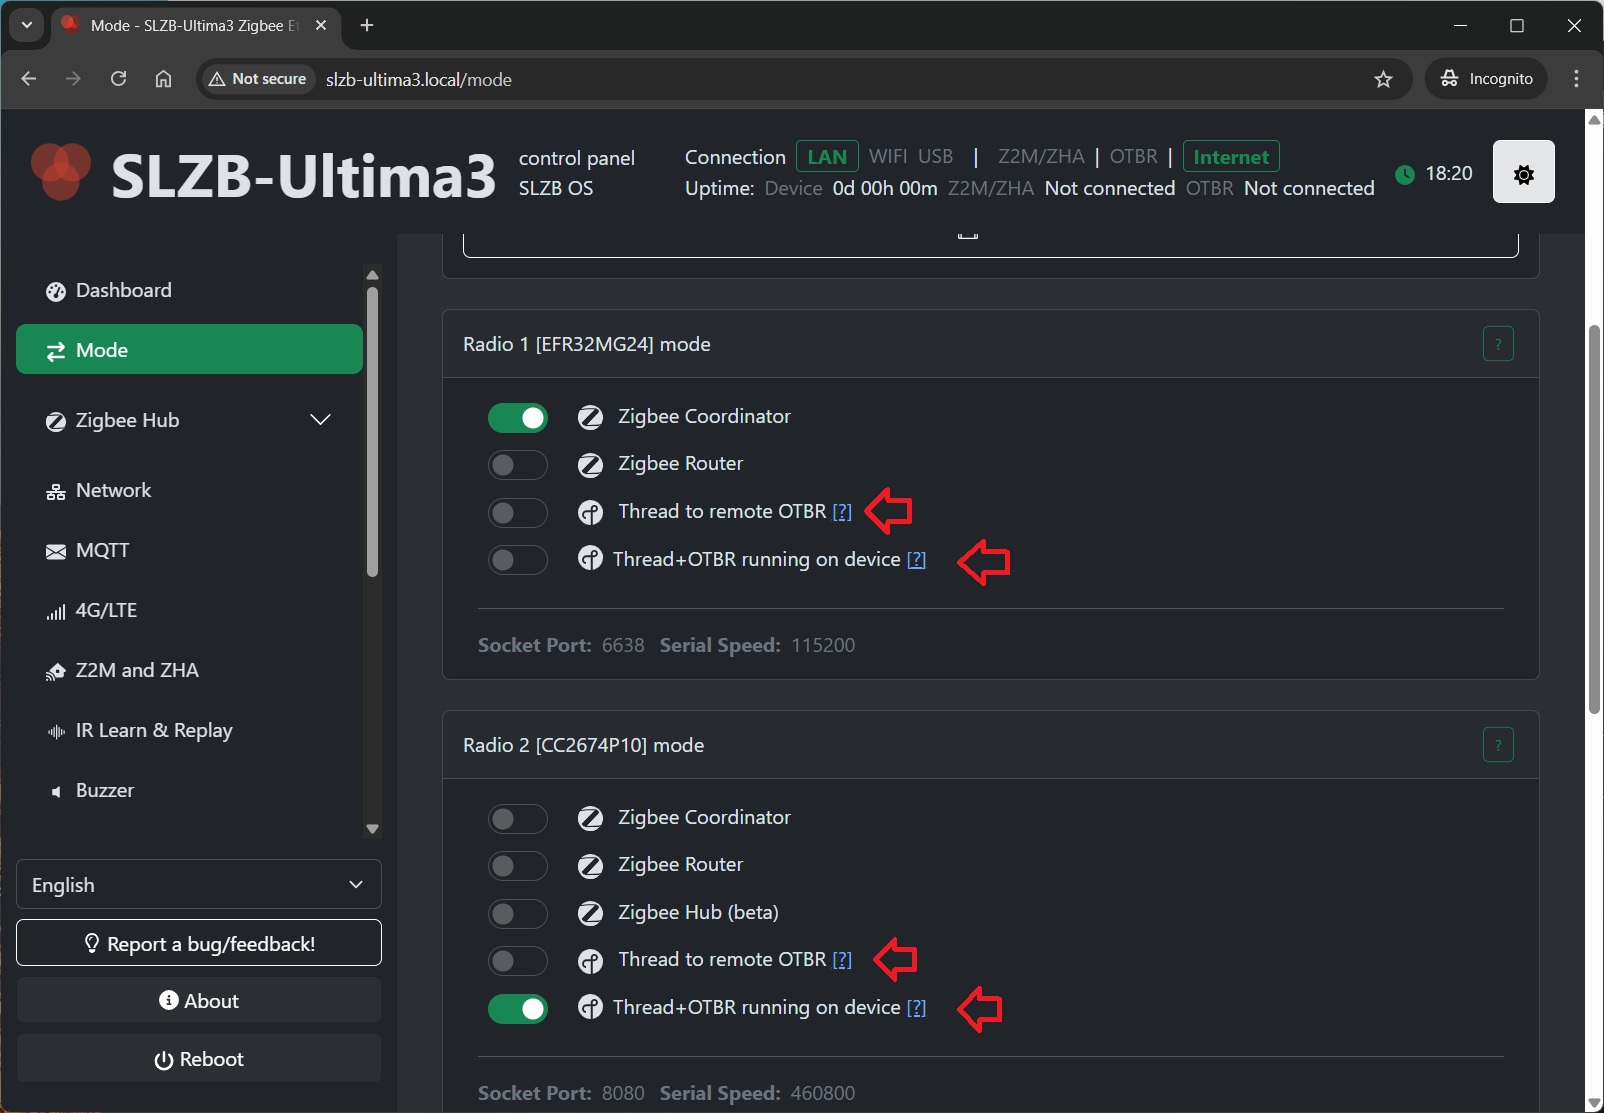
Step 2 - Set SLZB mode / firmware
Option A (Thread to remote OTBR): Flash / select Thread RCP mode
- Your device must have an internet connection.
- Go to
Modeand select the "Thread to remote OTBR". The device will be reflashed; wait until the update completes.
Option B (Thread + OTBR on device): Enable OTBR on the device
- Your device must have an internet connection.
- Go to
Modeand select “Thread + OTBR running on device”. The device will apply the required configuration and services and reboots. - OTBR REST API will be available at http://device-ip:8080.
Step 3 - Home Assistant software setup
3.1 Install and start Matter Server (required for both options)
- In Home Assistant go to
Settings→Devices & Services. - Click
Add integrationand search forMatter. - Keep
Use the official Matter Server Supervisor add-onenabled and clickSubmit. - Wait until Matter Integration and Matter Server add-on are installed.
- Go to
Settings→Add-ons→Matter Serverand clickStart. Recommended: enableStart on bootandWatchdog.
Step 4 - Thread / OTBR setup in Home Assistant
Option A: OTBR add-on on Home Assistant
Install the OpenThread Border Router add-on and connect it to the SLZB radio (USB or network).
- Go to
Settings→Add-ons→Add-on Store. - Search for
OpenThread Border Routerand clickInstall. - Open the add-on and go to the
Configuretab.
Option A - OTBR add-on with USB connection
- Switch the coordinator to USB connection mode (if applicable).
- Set OTBR add-on parameters:
Port: select your SLZB USB serial port.Hardware flow control: NoBaud rate: 460800Flash firmware: No (use pre-flashed RCP firmware)- Click
Save
- Go to
Infotab and clickStart. - Recommended: enable
Start on bootandWatchdog.
Option A - OTBR add-on with Network connection (Serial-over-IP)
Configure the OTBR add-on to connect to the SLZB network serial endpoint (example: 192.168.1.10:6638).
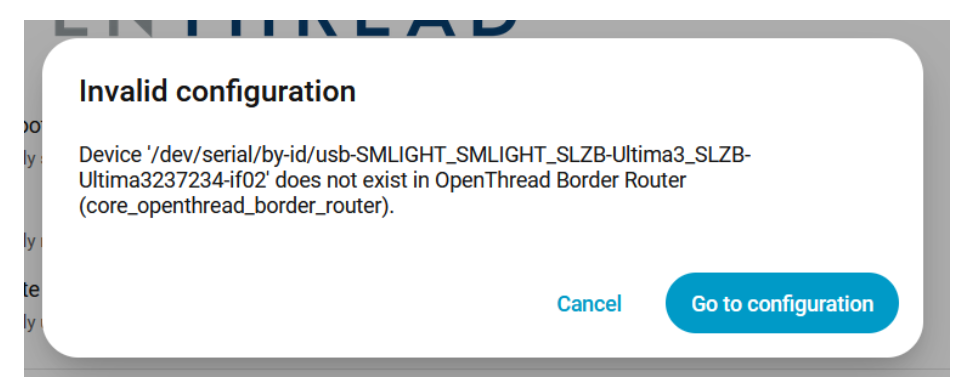
Setting Up the Thread Border Router Add-on (Network connection)
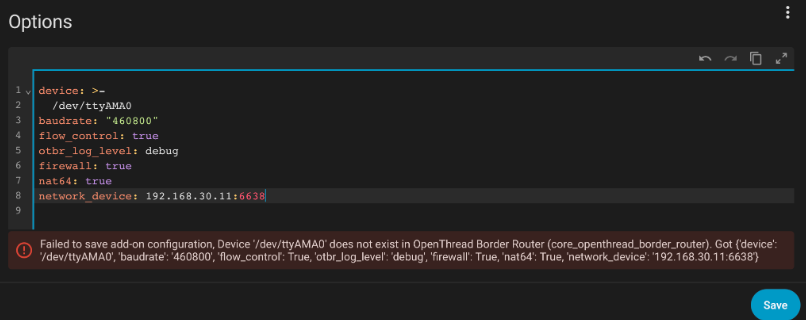
- OTBR config validation issues workarounds.
If you have errors like the ones in the screenshots below:

Workarounds:
- https://github.com/home-assistant/addons/issues/3993#issuecomment-3536041147 and https://github.com/home-assistant/addons/issues/4299#issuecomment-3771514634
- Connect any USB-serial device - Configure the addon according to the example below

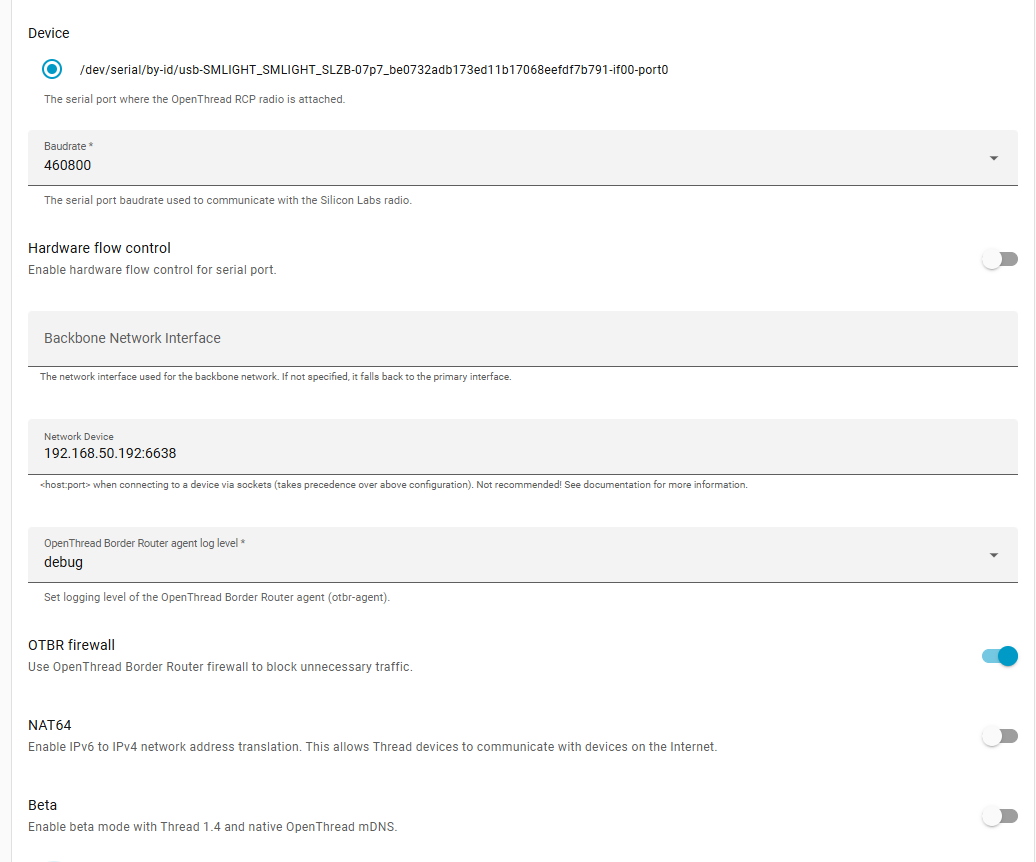
- Select
Show unused optional configuration options Hardware flow control: No.Baud rate: 460800.Flash firmware: No (we use pre-flashed coordinator)Network Device: Enter the IP and port of your coordinator. (for example 192.168.1.10:6638)- Click
Save.
- Go back to the INFO tab and
Startthe OpenThread Border Router add-on. It may take a moment to initialize. We would suggest to activate bothStart on bootandWatchdog. - You can check logs, they should say that addon started, although they can contain some errors as Thread and Matter are still under development in Home Assistant.
Option B: OTBR runs on the SLZB device (no OTBR add-on needed)
In this option, you do not install/use the OTBR add-on in Home Assistant. OTBR is already running on the SLZB device.
- Make sure SLZB mode is set to “Thread + OTBR running on device”.
Step 5 - Configure Home Assistant integrations (both options)
- Go to
Settings→Devices & Services. - Add (or confirm autodiscovery of) these integrations:
- Thread
- OpenThread Border Router
Notes:
- If you use Option A, the “OpenThread Border Router” integration will typically use the OTBR add-on.
- If you use Option B, when asked for the Border Router address, use: <device-ip>:8080.
In the Thread integration:
- Set OpenThread Border Router as the Preferred network.
- If available, enable Use router for Android + iOS credentials.
Step 6 - Reboot Home Assistant
- After installing and configuring Matter + Thread components, reboot your Home Assistant server.
Step 7 - Pre-set up your phone
- Install
Home Assistantapp on your phone. - Install
Google Homeapp (often required for Thread credential handling on Android). - Open Home Assistant app and connect it to your Home Assistant server (same Wi-Fi network).
- In the app go to
Settings→Companion app→Troubleshooting→Sync Thread Credentials. - Repeat until you see:
Home Assistant and this device use the same network. - If it fails repeatedly, try resetting Google Play Services data (Android) and try again.
Step 8 - Add the Matter-over-Thread device
- Ensure Bluetooth is enabled on your phone.
- In Home Assistant app:
Settings→Devices & Services→Devices. - Tap
+ ADD DEVICE→Add Matter device. - Scan the QR code (or enter the pairing code) and follow the on-screen steps.
- If prompted “Which app to open?”, choose
Other→Home Assistant.
The pairing flow usually goes through:
- Connecting to device…
- Generating Matter credentials…
- Connecting device to network…
- Checking network connectivity…
- Connecting device to Home Assistant…
- Device connected!
Tips:
- If the device was powered for a long time, you may need to reset it to enter pairing mode again.
- If you have Google/Nest Thread devices and pairing is unstable, try turning them off temporarily while pairing.
Step 9 - Verify connection and control
- After pairing, the device should appear in Home Assistant under
Devices. - Open it and confirm you can control it (e.g., switch on/off).
Congratulations! You’ve successfully connected a Matter-over-Thread device to Home Assistant.
TIP:
Home Assistant Thread documentation: https://www.home-assistant.io/integrations/thread/
Zigbee network sniffing guide for SLZB-MRx and SLZB-06Mx adapters
Prerequisites
1. Coordinator
You will need coordinator with EFR32 radio module from Silicon Labs.
You can use radio module1 on SLZB-MR adapters or single-radio adapters with EFR32 only: SLZB-06M, 06Mg24, 06Mg26 and their U versions.
2. Host PC with internet access
Software preparation
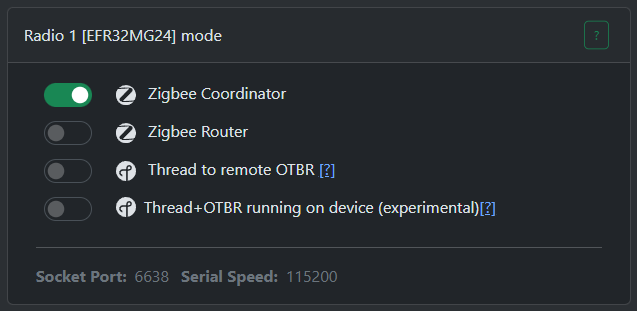
1. Coordinator preparation
Go to "Mode" page and select "Zigbee Coordinator". Wait for the update to complete.
Make sure the coordinator radio module is not in use! Stop Z2M/ZHA before moving on to the next steps!
2. Preparing the PC
You must have NodeJS installed. If you don't have it, please download and install it first from this link https://nodejs.org/en/download/current
Open CMD or terminal and run the command: npm install -g ember-zli and wait for install to complete.
To start configuring the sniffer, run the command: ember-zli sniff

Note the "Data Folder", this is where the capture files will be saved.
Select "TCP"

Answer n

Enter the IP and port of your coordinator
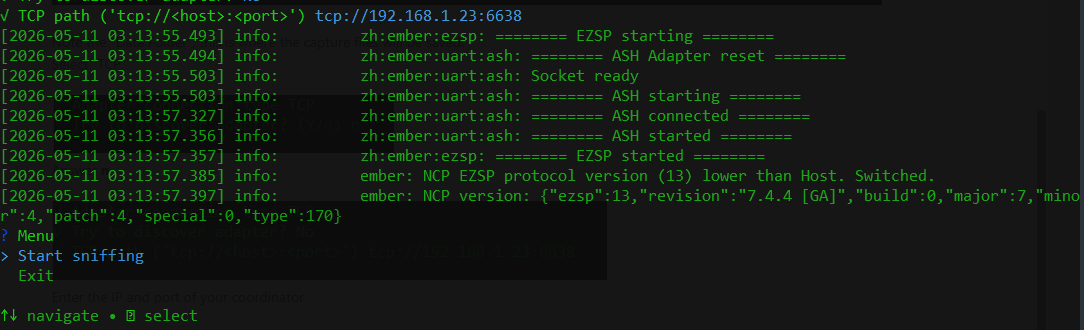
Wait for connection.
Select "Start sniffing"

Select "Wireshark" for Wireshark server or select "PCAP file" if if you want to save to a capture file.