# SLZB-OS
Operating system for SLZB series devices: SLZB-06x, SLZB-MRx, SLZB-06xU and SLZB-MRxU
# About SLZB-OS
- ## **1. About SLZB-OS**
### **1.1 Overview**
SLZB-OS is the official firmware platform developed by **SMLIGHT** for its line of Zigbee and multi-radio Ethernet/USB/PoE adapters. It provides a web-based management interface that allows you to configure, monitor, and control your device from any browser on your local network — and, if desired, from remote locations via VPN or DDNS.
The system is designed for stability, performance, and seamless integration with modern smart home ecosystems such as **Zigbee2MQTT**, **Home Assistant (ZHA)**, and other MQTT-capable platforms.
### **1.2 Supported Devices**
SLZB-OS runs on a variety of SMLIGHT hardware, including but not limited to:
- **SLZB-06x series:** SLZB-06, SLZB-06M, SLZB-06P7, SLZB-06P10, SLZB-06MG24, SLZB-06MG26
- **SLZB-MRx series:** SLZB-MR1, SLZB-MR2, SLZB-MR3, SLZB-MR4, SLZB-MRW10
- **SLZB-MRx series:** SLZB-MR1U
- **SLZB-USB-to-LAN adapter**
- **SLZB-UltimaX series**: SLZB-Ultima1, SLZB-Ultima2, SLZB-Ultima3, SLZB-Ultima4,
- **Future-ready models:** Support is regularly expanded via firmware updates.
> **Note:** Certain functions may differ depending on your device model and hardware capabilities (e.g., availability of PoE, dual-radio features, or USB passthrough).
### **1.3 Key Features**
- **Zigbee network management** – Integrated Zigbee hub with support for popular coordinators and firmware.
- **Multiple connectivity options** – Ethernet, USB, Wi-Fi (where hardware supports it), and PoE.
- **Direct integration** – Works with Zigbee2MQTT and ZHA without additional bridges.
- **Advanced features** – Wi-Fi bridge, Bluetooth Proxy (ESPHome mode), dual-radio support, VPN, DDNS, automation scripts, and more.
- **31 interface languages** – making it accessible to users worldwide.
- **Advanced networking** – VPN client/server, DDNS support, static/DHCP IP configuration.
- **Custom automation** – Built-in scripts and triggers for device behaviors.
- **Security** – User authentication, password management, and remote access controls.
- **Diagnostics & logging** – View detailed logs and debug information for troubleshooting.
- **Firmware flexibility** – Easy updates via local file upload or online sources.
### **1.4 Accessing the Interface**
1. Connect your SLZB device to your network via Ethernet, PoE, or USB (depending on model and mode).
2. Determine its IP address using your router’s DHCP client list or a network scanning tool.
3. Open a web browser and enter the device’s IP address in the format:
`http://`
4. The SLZB-OS dashboard will load, showing system status and navigation menus.
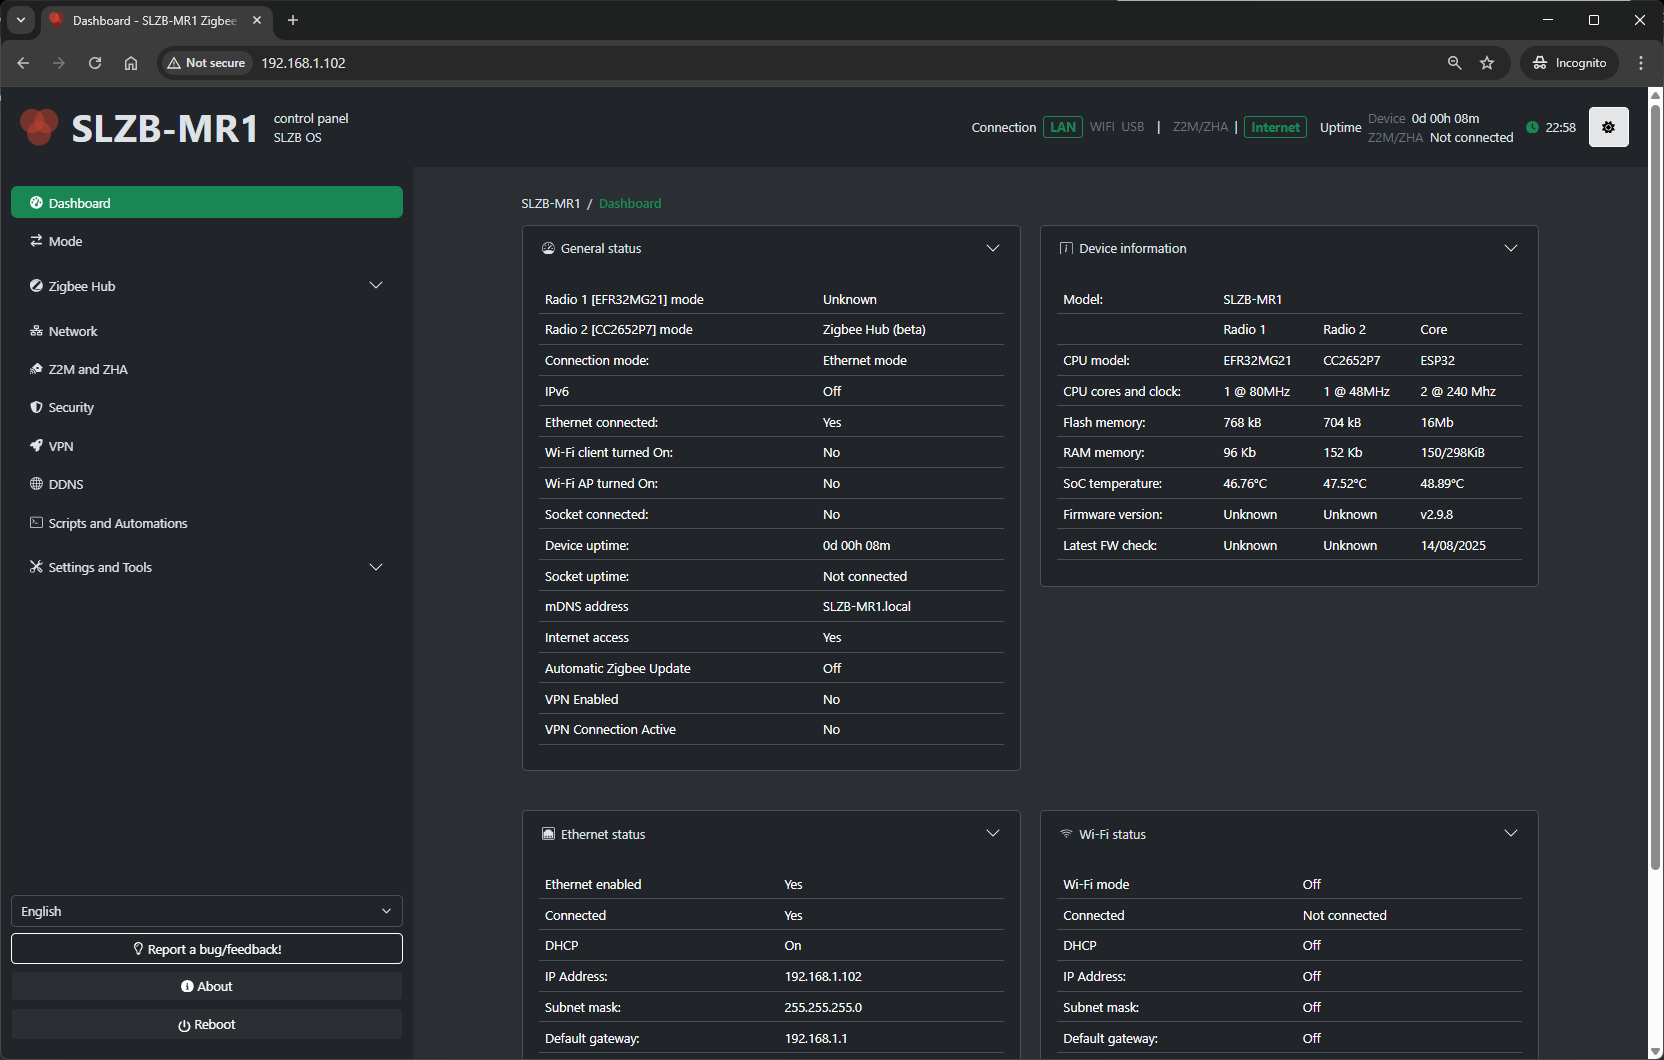
# Dashboard
## **2. Dashboard**
The **Dashboard** is the first screen you see when logging into SLZB-OS.
It provides an at-a-glance overview of your device’s current status, connectivity, and Zigbee network health.
From here, you can quickly access detailed sections via the top or side navigation menus.
[](https://smlight.tech/support/manuals/uploads/images/gallery/2025-08/image.png)
---
### **2.1 Layout Overview**
The dashboard typically consists of the following key blocks:
1. **Device Status Panel**
- **Model** – Displays the hardware model (e.g., SLZB-MR1U).
- **Firmware Version** – Current SLZB-OS version installed.
- **Uptime** – How long the device has been running since last restart.
- **CPU & Memory Usage** – Real-time resource utilization.
2. **Network Status**
- **IP Address** – Current assigned IPv4 address.
- **Connection Type** – Ethernet, PoE, USB, or Wi-Fi (depending on model).
- **MAC Address** – Unique network identifier.
- **Link Status** – Connection state and link speed.
3. **Zigbee Hub Summary**
- **Coordinator State** – Online/Offline status.
- **Connected Devices** – Number of active Zigbee devices.
- **Last Message** – Timestamp of the last received Zigbee event.
- **Zigbee2MQTT / ZHA Status** – Shows which integration is currently active.
4. **Quick Actions**
- **Restart Device** – Reboots the SLZB device.
- **Restart Zigbee Hub** – Restarts Zigbee coordinator service without rebooting the whole system.
- **Open Zigbee2MQTT Web UI** – Shortcut to Z2M frontend (if enabled).
- **Check for Firmware Update** – Quick link to update page.
---
### **2.2 Indicators & Colors**
- **Green** – Normal operation.
- **Yellow/Orange** – Warning or degraded performance (e.g., high CPU usage).
- **Red** – Critical issue (e.g., coordinator offline).
---
### **2.3 Typical Uses**
- **Monitoring** – Quickly verify if both network and Zigbee hub are running normally.
- **Troubleshooting** – Identify offline status or high resource load.
- **Fast Navigation** – Jump directly to network or Zigbee hub settings.
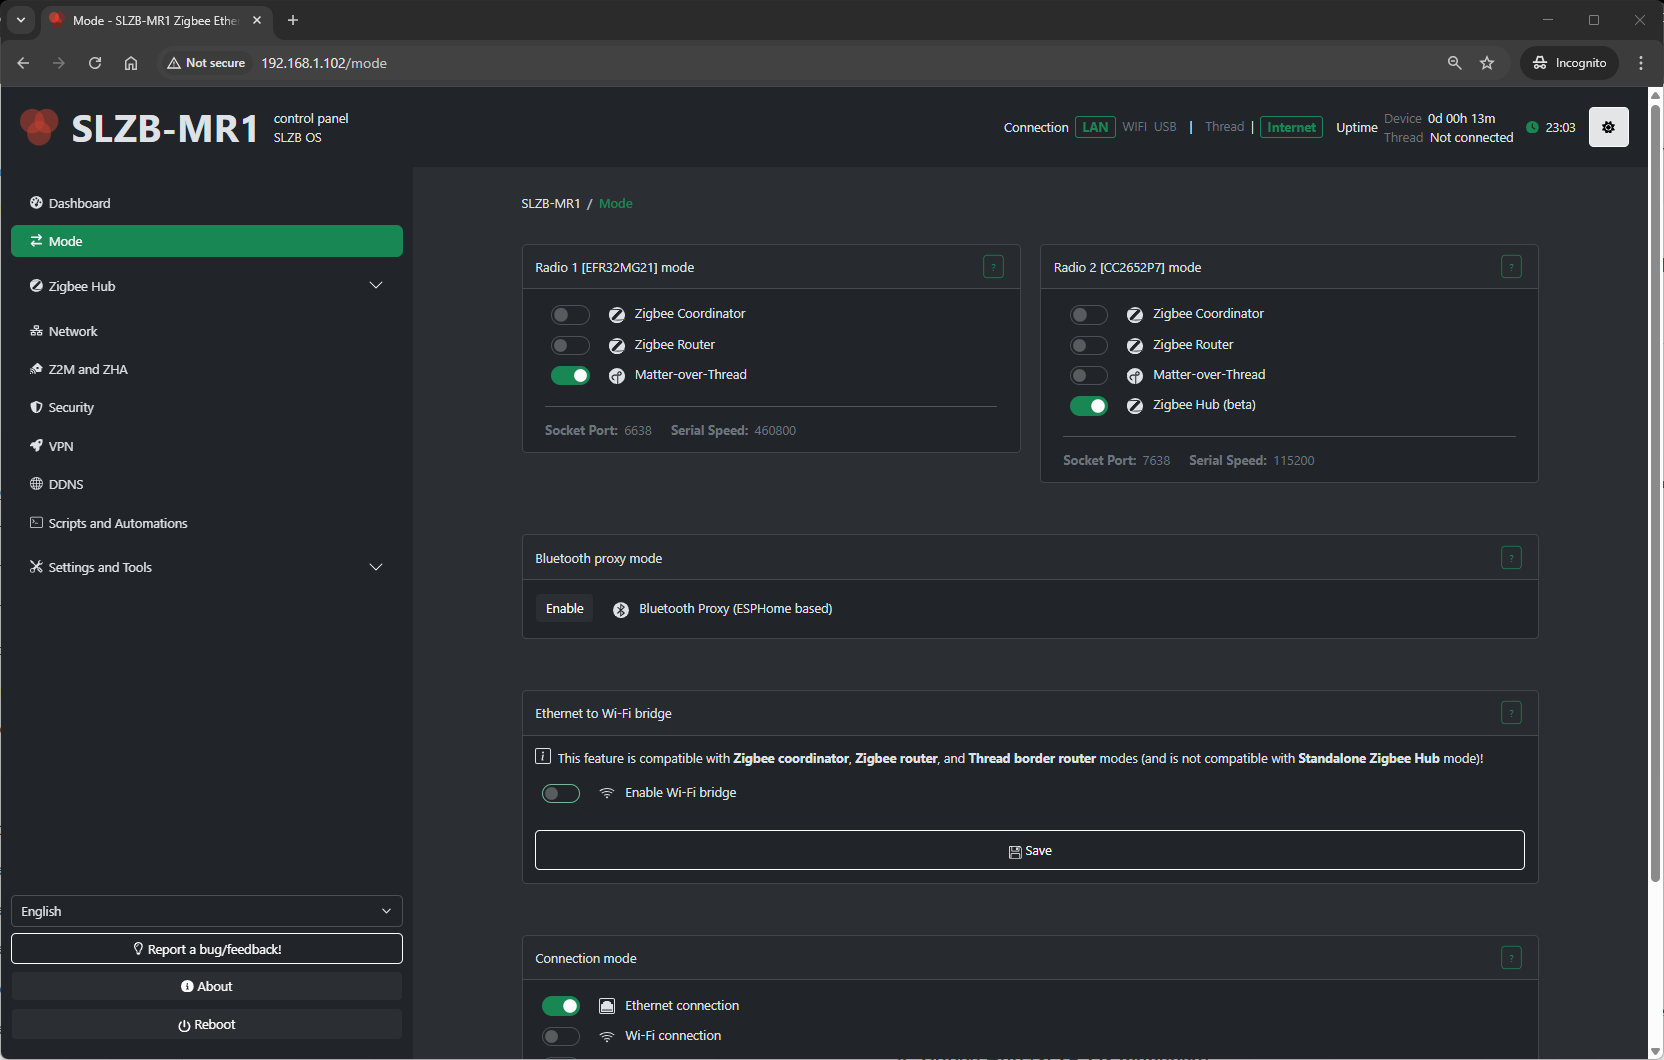
# Mode
# **3. Mode**
The **Mode** page lets you choose **how the coordinator is exposed** to your smart‑home stack.
[](https://smlight.tech/support/manuals/uploads/images/gallery/2025-08/RoVimage.png)
## 3.1 Radio SoC Modes
Your SLZB device’s **primary radio SoC** can operate in different roles depending on your smart home network design:
### 1. **Zigbee Coordinator**
- Creates and manages a Zigbee network.
- Required if this device is the **main Zigbee hub** in your setup.
- Works with Zigbee2MQTT, ZHA, and other Zigbee controllers.
- Allows pairing new devices and maintaining the full network routing table.
### 2. **Zigbee Router**
- Extends an existing Zigbee network by relaying messages between devices.
- Improves coverage and reliability in large or signal-challenged areas.
- Cannot create a network; must join an existing one.
- Useful for eliminating “dead zones” without replacing your main coordinator.
### 3. **OpenThread Border Router (OTBR)**
- Allows Thread devices (e.g., Matter over Thread) to join your home network.
- Bridges Thread to IP networks for integration into Matter-compatible platforms.
- Typically used alongside Matter controllers like Home Assistant, Google Home, or Apple HomeKit.
### 4. **Zigbee Hub** *(SLZB-OS managed)*
- Runs the Zigbee stack directly on the device under SLZB-OS control.
- No need for a PC/NAS to host Zigbee2MQTT or ZHA.
- Integrates easily via MQTT or native ZHA API.
- Managed through **Zigbee Hub** menu pages (Dashboard, Devices, Settings, MQTT).
---
## 3.2 Connection Modes
Once the radio role is selected, choose **how** the coordinator/router connects to your automation system:
### A) **Ethernet** (Serial over TCP)
- Coordinator serial interface exposed as a TCP server.
- Ideal for stable wired installations (PoE optional).
- Use in remote Docker/VM/NAS setups where the Zigbee stack runs off-device.
- Access via:
`tcp://<device-ip>:<port>`
### B) **USB** (Direct Serial)
- Device acts as a USB dongle with a standard serial interface.
- Requires physical connection to the host running Z2M/ZHA.
- Best for small servers or Raspberry Pi deployments.
### C) **Wi-Fi**
- Coordinator available over Wi-Fi instead of Ethernet.
- Useful when wired connection isn’t possible.
- Expect slightly higher latency compared to Ethernet.
---
## 3.3 Additional Features
These optional modes and functions can be enabled separately to expand device capabilities:
### **Wi-Fi Bridge (Ethernet ↔ Wi-Fi)**
- Two types:
1. **Transparent (802.1D)** – Makes connected Wi-Fi devices visible on the Ethernet network.
2. **NAT/Proxy** – Routes traffic from Wi-Fi clients via the device’s Ethernet uplink.
- Handy for extending Wi-Fi coverage to IoT devices in Ethernet-only zones.
### **Bluetooth Proxy (ESPHome mode)**
- Turns the device into a Bluetooth LE proxy for Home Assistant.
- Ideal for extending coverage of BLE sensors like Xiaomi/Mijia, Aqara, etc.
- Uses ESPHome firmware module within SLZB-OS.
---
## 3.4 How to Apply Changes
1. Go to **Mode** in the SLZB-OS menu.
2. Select **Radio SoC mode** (Coordinator / Router / OTBR / Zigbee Hub).
3. Choose **Connection mode** (Ethernet / USB / Wi-Fi).
4. Enable any **Additional Features** (Wi-Fi Bridge, BLE Proxy) if needed.
5. Click **Save/Apply**.
6. Restart the service or device if prompted.
7. Confirm status in **Dashboard** and, for Zigbee Hub, under **Zigbee Hub → Dashboard**.
# Zigbee Hub
Build your local ZigBee network without Z2M/ZHA
# About Zigbee Hub mode
# **4. About Zigbee Hub mode**
**It is highly recommended to use U series coordinators for this mode (SLZB-06xU / MRxU)**
## 4.1 What is Zigbee Hub in SLZB-OS?
The **Zigbee Hub** feature allows the SLZB device to run its Zigbee network **directly on the device** — without needing an external computer, Raspberry Pi, or NAS to host the Zigbee stack.
In Zigbee Hub mode, SLZB-OS launches an integrated Zigbee stack service that can connect directly to your smart home platform over MQTT.
This mode is ideal for:
- **Self-contained setups** where the device acts as both the coordinator and the host.
- **Reducing complexity** by eliminating extra hardware.
- **PoE/Ethernet-based installations** for maximum stability.
When Zigbee Hub is active, a dedicated **Zigbee Hub** menu appears in the SLZB-OS interface, containing the following pages:
1. **Dashboard** – Live overview of Zigbee network status.
2. **Devices** – List and manage all paired Zigbee devices.
3. **MQTT** – Configure the MQTT broker connection.
4. **Settings** – Advanced Zigbee network and coordinator options.
---
## 4.2 Zigbee Hub → Dashboard
The **Dashboard** is the central monitoring page for your Zigbee network.
[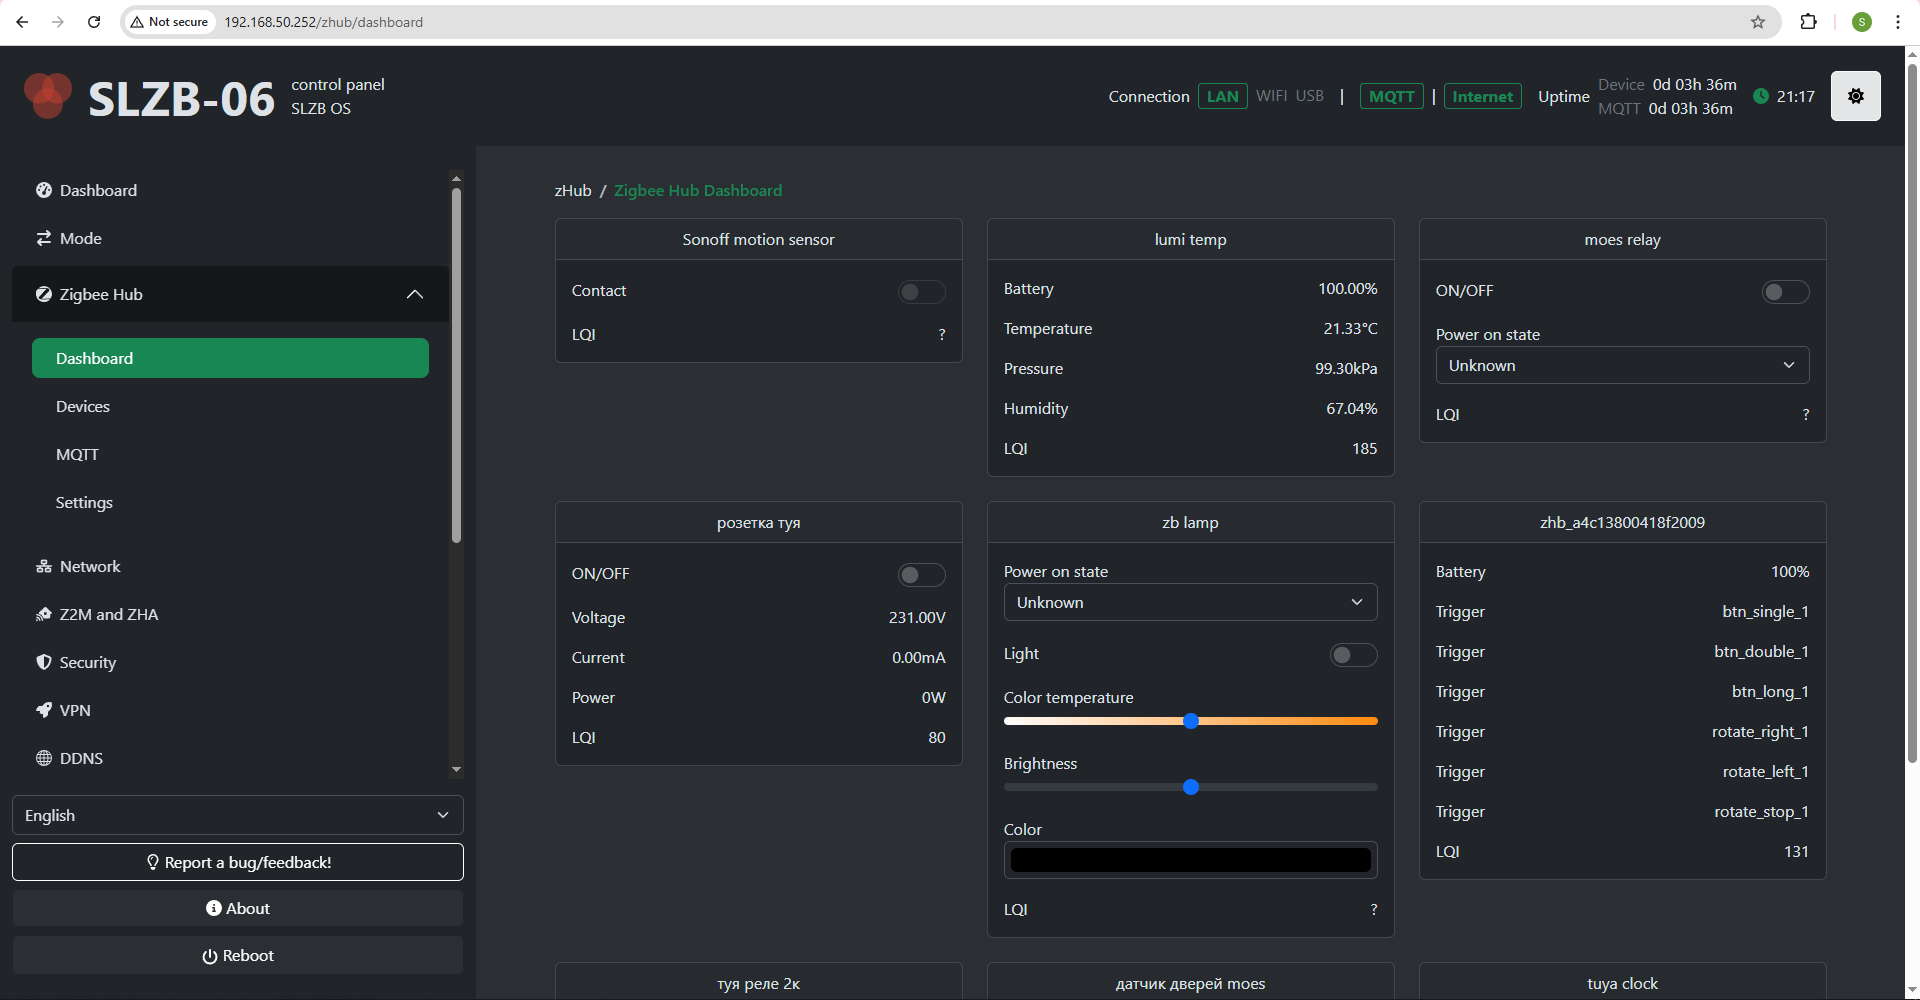](https://smlight.tech/support/manuals/uploads/images/gallery/2025-08/keCimage.png)
The dashboard contains cards of your ZigBee devices with the data they provide and controls.
The dashboard is updated in real time via SSE.
---
## 4.3 Zigbee Hub → Devices
The **Devices** page lists every Zigbee device paired to your coordinator.
[](https://smlight.tech/support/manuals/uploads/images/gallery/2025-08/527image.png)
**Pairing control:**
- **Permit Join** (+ button on the bottom right side of the device table) – Allow or deny new devices joining the network.
**For each device, you’ll see:**
- **Name / Friendly Name** – Human-readable identifier.
- **IEEE Address** – Unique device ID.
- **Network Address** – Short Zigbee address assigned by the coordinator.
- **Last Seen** – Timestamp of the last communication.
- **Powering** – Device power source (AC/battery) or ? if the device does not provide information.
- **Link Quality (LQI)** – Signal strength indicator.
- **Actions:**
- Rename device
- Remove/unpair device
- View device details (clusters, endpoints, bindings)
- Bind/unbind devices (if supported)
**Typical uses:**
- Verify devices are online and responsive.
- Rename devices for easier identification in automations.
- Remove devices no longer in use.
### Device config
#### How to rename device
Select the pencil icon [](https://smlight.tech/support/manuals/uploads/images/gallery/2026-04/image.png)
[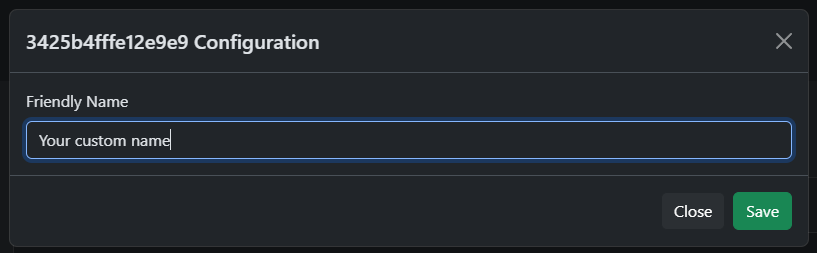](https://smlight.tech/support/manuals/uploads/images/gallery/2026-04/TD5image.png)
Enter new name and press "Save". Maximum length - 50 characters.
#### Device config
Click on the wrench[](https://smlight.tech/support/manuals/uploads/images/gallery/2026-04/5YYimage.png)
##### Binding
[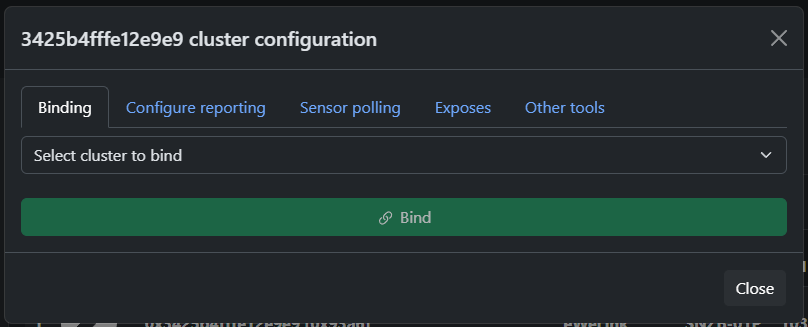](https://smlight.tech/support/manuals/uploads/images/gallery/2026-04/cSRimage.png)
This menu sends the device a bind request **to the coordinator**, the device must be active to accept this. If it is a battery-powered device you need to wake it up.
##### Configure reporting
[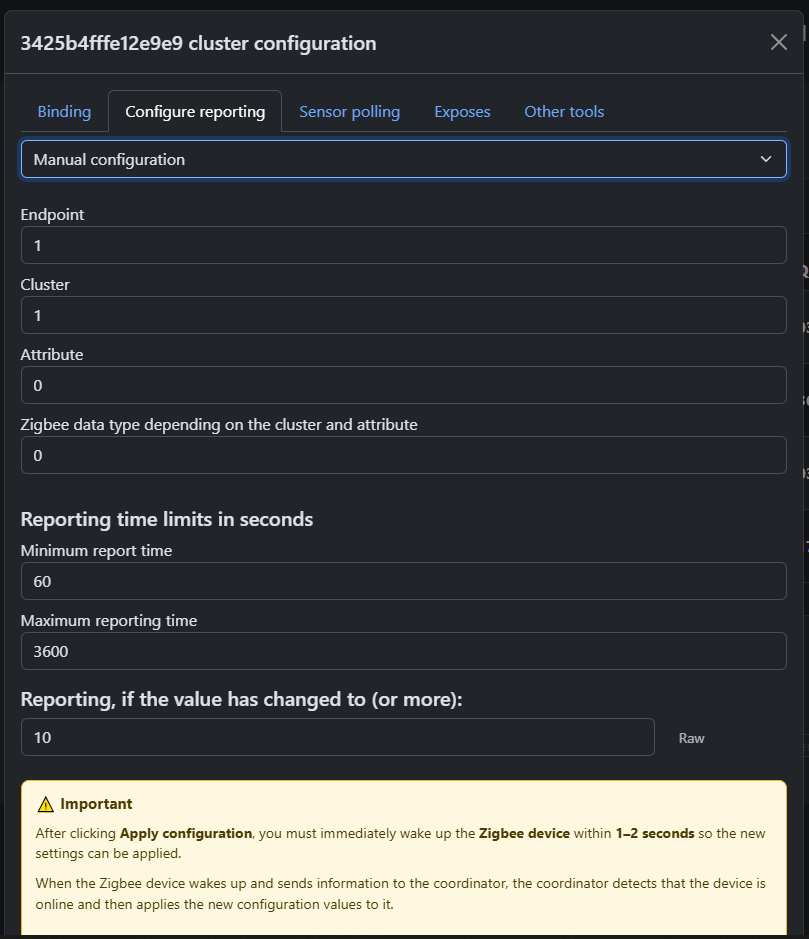](https://smlight.tech/support/manuals/uploads/images/gallery/2026-04/Gr5image.png)
##### Polling
[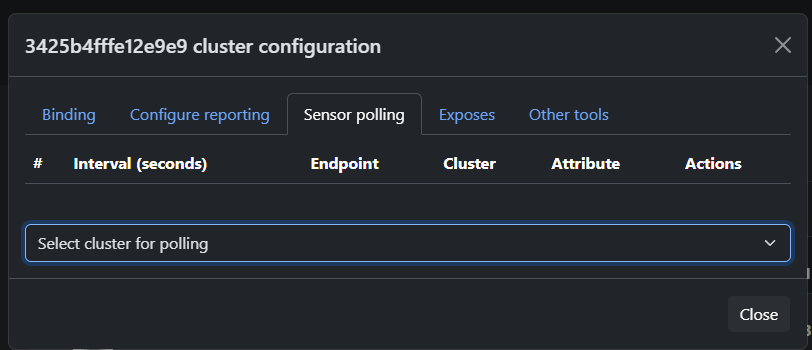](https://smlight.tech/support/manuals/uploads/images/gallery/2026-04/FPwimage.png)
Allows you to configure polling of the selected attribute after a certain time interval
##### Exposes
[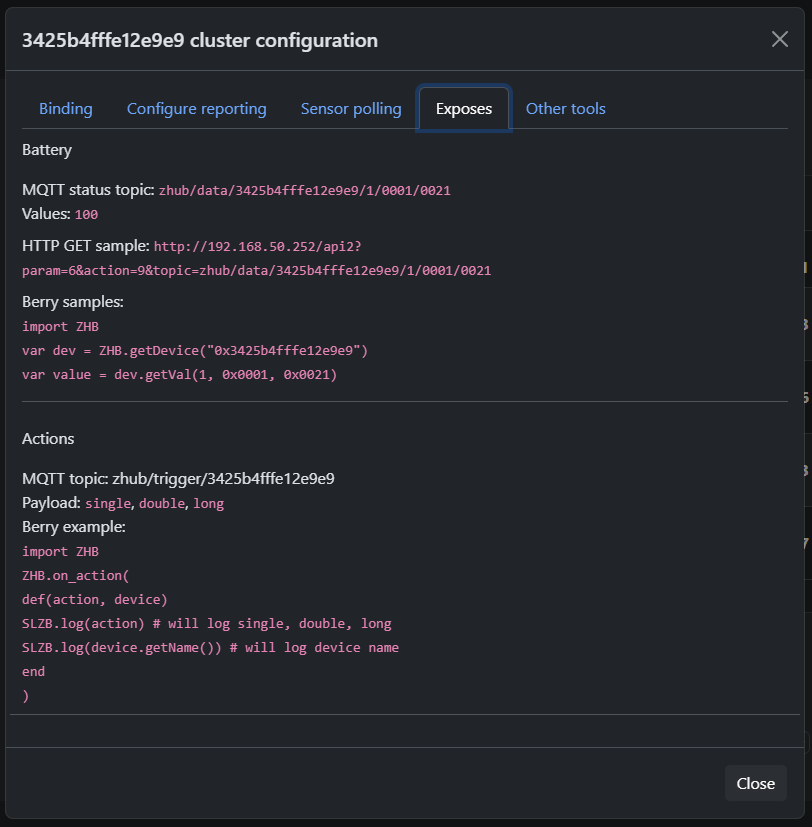](https://smlight.tech/support/manuals/uploads/images/gallery/2026-04/VReimage.png)
[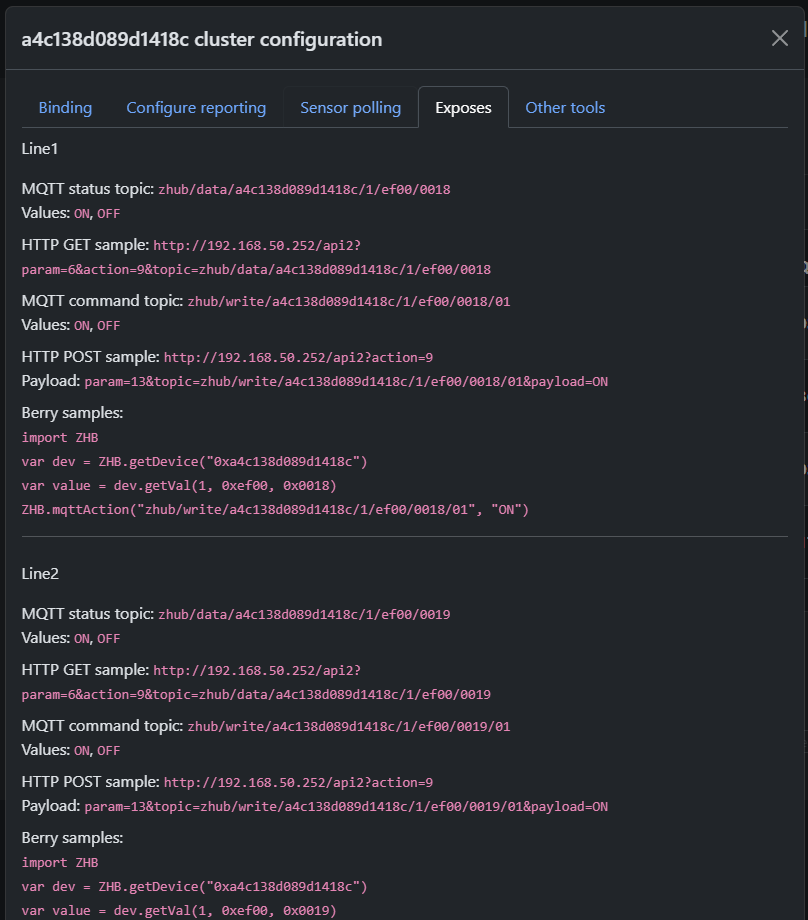](https://smlight.tech/support/manuals/uploads/images/gallery/2026-04/Yh4image.png)
Provides information about **expected** data from the device and examples of using MQTT, HTTP, and Berry API to get or set device state.
**IMPORTANT!**
This section provides information about **EXPECTED** data from the device, based on information about the device clusters or converter (if it exists).
This information may not match the actual behavior of the device if it uses non-standard clusters!
If this is a Tuya DP device, then information will be displayed here only if a converter exists for the device!
##### Other tools
[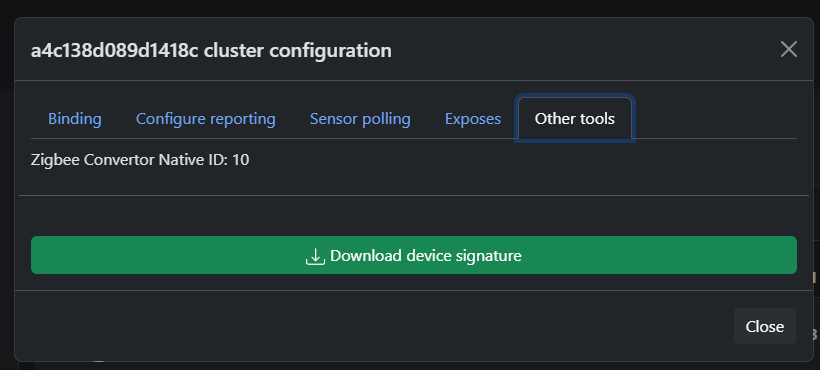](https://smlight.tech/support/manuals/uploads/images/gallery/2026-04/wBBimage.png)
Here you can find the ZCN converter number (if used) and download device information
---
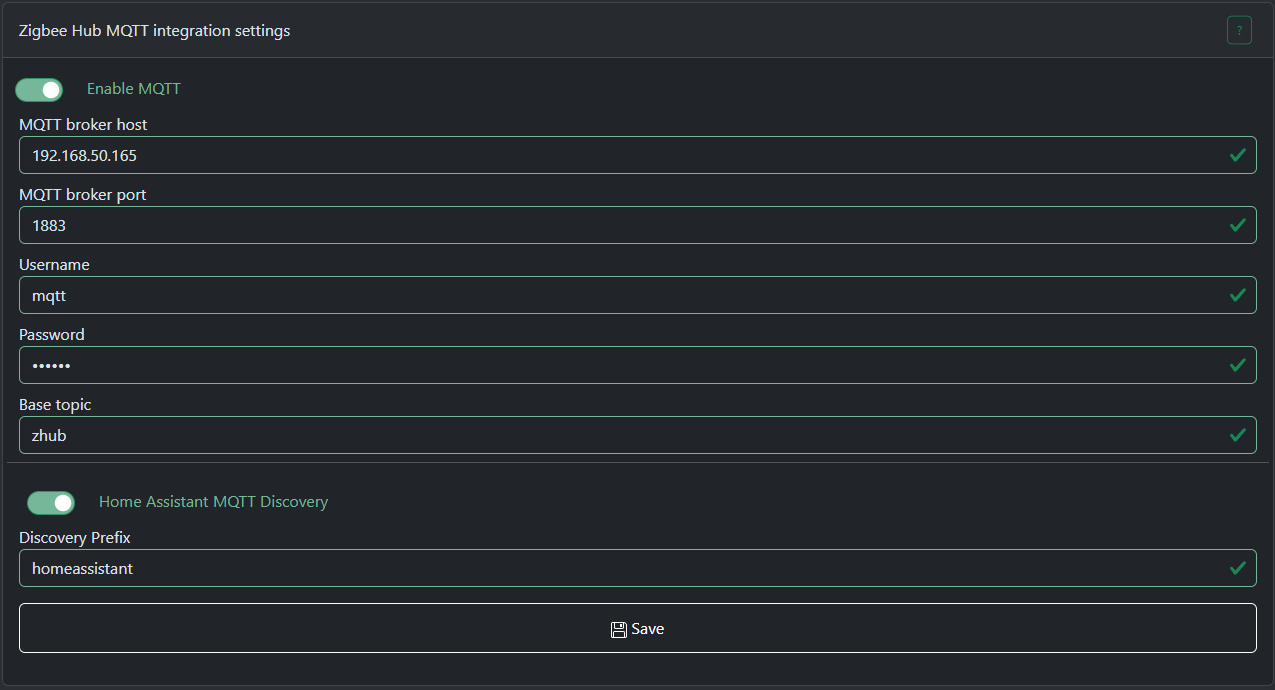
## 4.4 Zigbee Hub → MQTT
This page configures the MQTT connection that Zigbee2MQTT (running on SLZB-OS) uses to communicate with your smart home platform.
[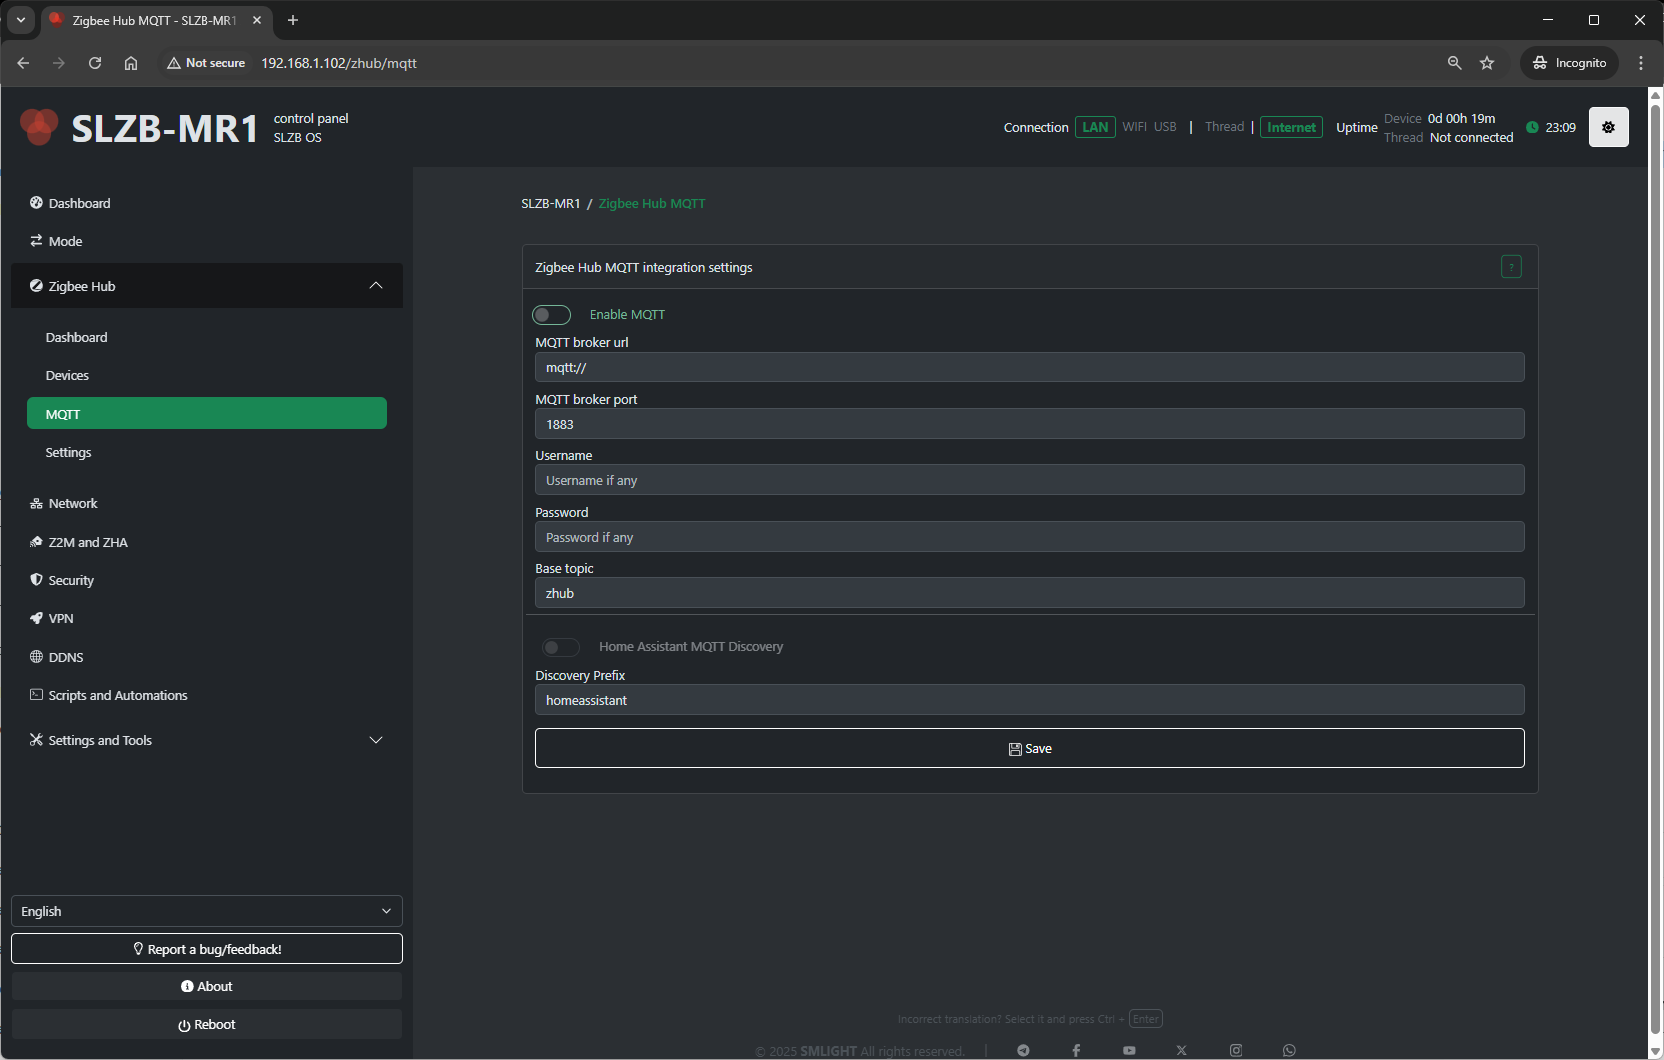](https://smlight.tech/support/manuals/uploads/images/gallery/2025-08/OHQimage.png)
**Configuration fields include:**
- **MQTT Server Address** – IP or hostname of your broker (e.g., `mqtt://192.168.1.100`).
- **Port** – Default 1883 for MQTT, 8883 for MQTT over TLS.
- **Username / Password** – Broker authentication (if required).
- **Base Topic** – Topic prefix for Zigbee messages (default: `zigbee2mqtt`).
- **Discovery Prefix** - Home assistant main topic name.
**Tips:**
- For Home Assistant with Mosquitto add-on, use the HA IP and port `1883`.
- Always use a unique base topic if you run multiple Zigbee networks.
- Save and restart Zigbee Hub after making MQTT changes.
---
## 4.5 Zigbee Hub → Settings
The **Settings** page contains deeper configuration for the Zigbee coordinator and Zigbee2MQTT service.
[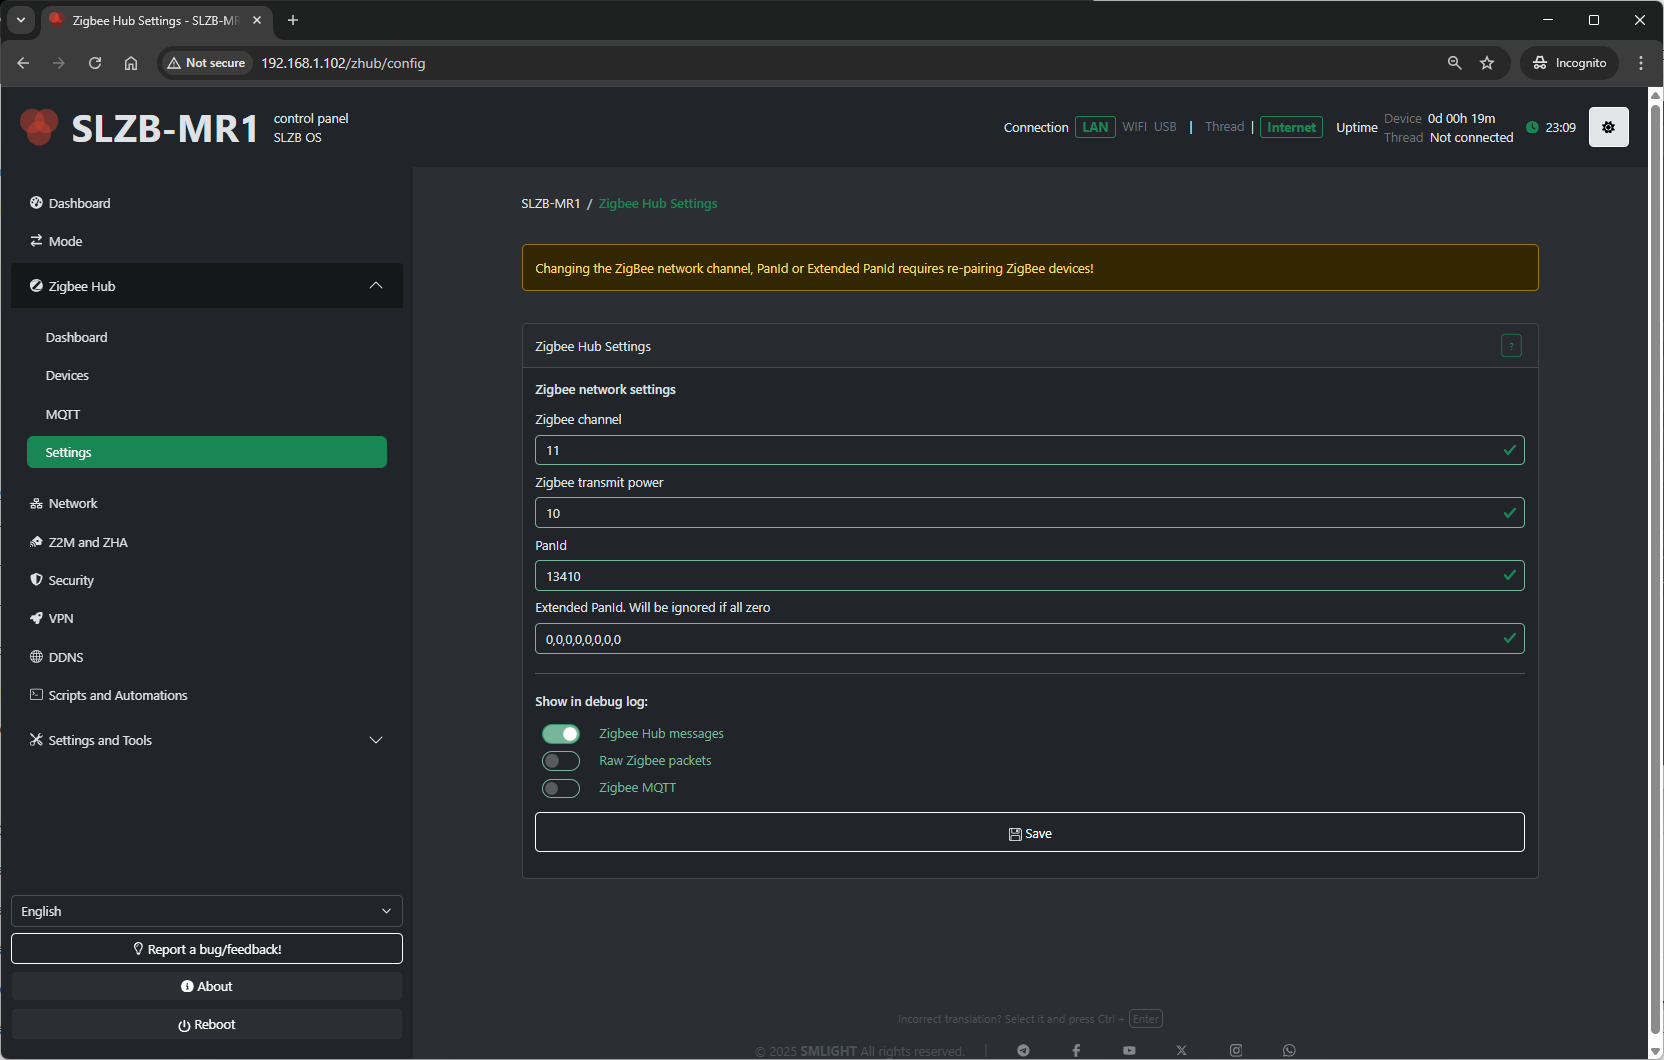](https://smlight.tech/support/manuals/uploads/images/gallery/2025-08/dJpimage.png)
**Typical settings available:**
- **Network Parameters**:
- **PAN ID** – Zigbee network identifier.
- **Channel** – RF channel (11–26; avoid Wi-Fi overlap if possible).
- **Extended PAN ID** – Long network identifier.
- **Transmit Power** – Radio TX power in dBm (higher = longer range, more power draw).
- **Show in debug log -** Select which categories of Zigbee-related information are recorded in the Log & Debug page.
- **Zigbee Hub messages** – Logs high-level events from the Zigbee Hub service (e.g., device joins, status updates).
- **Raw Zigbee packets** – Logs low-level Zigbee frame data; useful for deep protocol debugging.
- **Zigbee MQTT** – Logs MQTT messages related to Zigbee communication, including publishes and subscriptions.
**Best practices:**
- Change the Zigbee channel only on a fresh network (re-pair required after change).
- Keep `Permit Join` disabled most of the time for security.
- Adjust transmit power to match your coverage needs and regulatory limits.
## 4.6 Troubleshooting
### Problems when starting a Zigbee network
OS v3.0.9 update is breaking. If you updated OS to v3.0.9 and started getting this error then follow the instructions below
**Network commissioning timed out - most likely network with the same panId or extendedPanId already exists nearby.**
**Network formation refused there is too much RF interference or network with the same panId or extendedPanId already exists.**
If you got this error after updating Zigbee chip:
- turn off coordinator
- turn off ALL Zigbee routers that were connected to Zigbee Hub. **This is important, it will not work without this**
- turn on coordinator. Zigbee Hub should start now but zigbee devices will be unavailable
- remove all devices (click on the red trash can)
- download and run berry script below, this script will keep permit join enabled as long as it is running
```python
#META {"start":0}
#Insert your code below
import ZHB
ZHB.waitForStart(0xFF)
while 1
ZHB.permitJoin(254)
SLZB.delay(255 * 1000)
end
```
- turn back on previously disabled zigbee devices
- repair all devices
- after devices repaired you can stop and delete script
Other cases:
- move the coordinator away from the wifi router
- make sure there is no other coordinator nearby with the same zigbee network settings
# Zigbee Hub backup format
4b -
# MQTT API
[](https://smlight.tech/support/manuals/uploads/images/gallery/2025-10/iqOimage.png)
Zigbee Hub mode has the ability to connect to local or remote MQTT brokers. Currently only TCP connections are supported.
This document describes MQTT API for SLZB-OS 3.0.9 or higher
Topics are divided into **IN** and **OUT**.
**IN** - you can send messages to these topics.
**OUT** - Zigbee Hub sends messages to these topics.
## zHub topics format
### Data topic (OUT)
General `data` topic format below:
`base topic` / `data` / `zigbee device ieee` / `zigbee endpoint` / `zigbee cluster` / `zigbee attribute`
`base topic` - global prefix, so you can have few Zigbee Hubs connected to one broker, you just have to set different base topics.
`data` - static text (topic type)
`zigbee device ieee` - sender IEEE address in HEX format.
`zigbee endpoint` - zigbee endpoint from which this message is coming, DEC format.
`zigbee cluster` - zigbee cluster from which this message is coming, HEX format.
`zigbee attribute` - zigbee attribute from which this message is coming, HEX format.
Data topic example: `zhub/data/a4c1383439bf5cc9/1/0000/0001`
### Read topic (IN) (available from v3.3.0)
This topic accepts requests to read attributes of ZigBee devices.
When you send a message to this topic, the coordinator generates and sends a request for the specified attribute to the target ZigBee device. The device must be online to accept the request, so this is usually used for AC-powered devices.
Topic format: `base topic` / `read` / `zigbee device ieee` / `zigbee endpoint` / `zigbee cluster` / `zigbee attribute`
`base topic` - global prefix, so you can have few Zigbee Hubs connected to one broker, you just have to set different base topics.
`read` - static text (topic type)
`zigbee device ieee` - sender IEEE address in HEX format.
`zigbee endpoint` - zigbee endpoint from which this message is coming, DEC format.
`zigbee cluster` - zigbee cluster from which this message is coming, HEX format.
`zigbee attribute` - zigbee attribute from which this message is coming, HEX format.
Read topic example: `zhub/read/a4c1383439bf5cc9/1/0006/0000`
payload: `any text`
Attribute update will be sent to `data` topic!
**PLEASE NOTE!**
**You must add any text content to the payload! Do not send an empty payload to this topic!** An empty payload will only delete this topic (if it exists). The coordinator will not respond to empty payloads.
### Command topic (IN)
This topic is intended for sending ZCL commands to a Zigbee device.
General `cmd` topic format below:
`base topic` / `cmd` / `zigbee device ieee` / `zigbee endpoint` / `zigbee cluster` / `zigbee command`
`base topic` - global prefix, so you can have few Zigbee Hubs connected to one broker, you just have to set different base topics.
`cmd` - static text (topic type)
`zigbee device ieee` - target zigbee device IEEE address in HEX format.
`zigbee endpoint` - target zigbee device endpoint to which this message is coming, DEC format.
`zigbee cluster` - target zigbee device cluster to which this message is coming, HEX format.
`zigbee command` - zigbee command to send, HEX format.
Some clusters have special handlers for input commands, such as the ON/OFF or Light cluster. You can find their formats below:
##### ON/OFF cluster payload format for command topic
`ON` - send ON command
`OFF` - send OFF command
Example: `zhub/cmd/a4c1383439bf5cc9/1/0006` payload: `ON`
Will send command to enable relay or light device.
##### Level control for Light cluster payload format
`0000` command payload is a number in DEC from 1 to 254, the larger the number, the brighter the lamp will be.
##### Color control cluster payload format
`0007` command payload is a **color** in **HEX** or **RGB** format. For example: `255,29,0` or `#FFFFFF`
`000a` command payload is a **light temperature** in [**mired**](https://en.wikipedia.org/wiki/Mired). For example: 200
##### Other clusters
If no built-in clusters or ZCN converters has overridden the processing of this command, if the command contains a payload, it must be a HEX string of the following format:
\- Bytes without spaces, uppercase, multiple of two. Example: `010203FF`
\- Bytes with spaces, uppercase, grouped by two. Example: `01 02 03 FF`
### Write topic (IN)
This topic is intended for writing ZigBee device ZCL attributes.
General `write` topic format below:
`base topic` / `write` / `zigbee device ieee` / `zigbee endpoint` / `zigbee cluster` / `zigbee attribute`
`base topic` - global prefix, so you can have few Zigbee Hubs connected to one broker, you just have to set different base topics.
`write` - static text (topic type)
`zigbee device ieee` - target zigbee device IEEE address in HEX format.
`zigbee endpoint` - target zigbee device endpoint to which this message is coming, DEC format.
`zigbee cluster` - target zigbee device cluster to which this message is coming, HEX format.
`zigbee attribute` - target zigbee device attribute to which this message is coming, HEX format.
##### Cluster 0006, attribute 4003 payload format
`Last state` - device will remember its state
`ON` - device will be on after power loss
`OFF` - device will be off after power loss
##### Cluster EF00 (Tuya DP) payload format
**Please note that the write topic format for Tuya is different!**`base topic` / `write` / `zigbee device ieee` / `1` / `ef00` / `data point` / `data type`
`data point` - Tuya data point id. You can read more about it here: [https://www.zigbee2mqtt.io/advanced/support-new-devices/03\_find\_tuya\_data\_points.html](https://www.zigbee2mqtt.io/advanced/support-new-devices/03_find_tuya_data_points.html)
`data type` - a number that represents the type of data being sent.
0 - RAW, **1** - BOOL, **2** - INT, **3** - STRING, **4** - ENUM, **5** - BITMAP
Examples:
topic: zhub/write/a4c138d089d1418c/1/ef00/0018/1
payload: 1
##### Any other clusters/attributes payload format
Payload should contain **JSON**: {"type": <zigbee data type>, "data":<data to be sent>}
`type` - a number that represents the type of data being sent.
##### Zigbee Data Types and Data Type IDs
**Data Class**
**Data Type**
**Data Type ID**
Null
No data
Reserved
0x00
0x01—0x07
General Data
8-bit data
16-bit data
24-bit data
32-bit data
40-bit data
48-bit data
56-bit data
64-bit data
0x08
0x09
0x0a
0x0b
0x0c
0x0d
0x0e
0x0f
Logical
Boolean
Reserved
0x10
0x11—0x17
Bitmap
8-bit data
16-bit data
24-bit data
32-bit data
40-bit data
48-bit data
56-bit data
64-bit data
Signed 8-bit integer
Signed 16-bit integer
Signed 24-bit integer
Signed 32-bit integer
Signed 40-bit integer
Signed 48-bit integer
Signed 56-bit integer
Signed 64-bit integer
0x28
0x29
0x2a
0x2b
0x2c
0x2d
0x2e
0x2f
Enumeration
8-bit enumeration
16-bit enumeration
Reserved
0x30
0x31
0x32—0x37
Floating point
Semi-precision
Single precision
Double precision
Reserved
0x38
0x39
0x3a
0x3b—0x3f
String
Reserved
Octet string
Character string
Long octet string
Long character string
Reserved
0x40
0x41
0x42
0x43
0x44
0x45—0x47
Ordered sequence
Array
Reserved
Structure
Reserved
0x48
0x49—0x4b
0x4c
0x4d—0x4f
Collection
Set
Bag
Reserved
0x50
0x51
0x52—0x57
Reserved
-
0x58—0xdf
Time
Time of day
Date
UTC Time
Reserved
0xe0
0xe1
0xe2
0xe3—0xe7
Identifier
Cluster ID
Attribute ID
BACnet ID
Reserved
0xe8
0xe9
0xea
0xeb—0xef
Miscellaneous
IEEE Address
128-bit security key
Reserved
0xf0
0xf1
0xf2—0xfe
Unknown
Unknown
0xff
`data` - a HEX string of the following format:
\- Bytes without spaces, uppercase, multiple of two. Example: `010203FF`
\- Bytes with spaces, uppercase, grouped by two. Example: `01 02 03 FF`
Please note that the number of bytes in the payload **strictly** depends on the data type!
For example, if you send data with type 16-bit integer, the number of bytes in the payload should be 2.
Example: `{"type": 33, "data":"0000"}`
33 - is 0x21 converted to DEC
### System control topic (IN) (available from v3.3.0)
This topic allows you to control main functions of the Zigbee Hub.
Topic format: `base topic` / `system_control`
Payload format: {"action": "<system control actions>", <additional parameters>}
#### Permit join action
Allows you to open a ZigBee network to add new devices.
Payload format: {"action": "permit\_join", "time": <time to open the network in seconds, from 1 to 254>, "addr": <network address of the device on which to open the network. Can be omitted if the network needs to be opened on all devices>}
Examples:
`{"action": "permit_join", "time": 60}` - open the entire network for 60 seconds
`{"action": "permit_join", "time": 0}` - close network
`{"action": "permit_join", "time": 60, "addr": 64580}` - open the network for 60 seconds only on device with network address 64580 (DEC number, not HEX)
#### Configure reporting action
Configures reporting for the selected device. If the device is battery-powered, it must be woken up to accept this command.
Payload format: {"action": "configure\_reporting", "ieee": <IEEE address of the target device, HEX string>, "ep": <target endpoint, DEC>, "cl": <target cluster, DEC>, "attr": <target attribute, DEC>, "minRep": <minimum time for reporting in seconds, DEC>, "maxRep": <max time for reporting in seconds, DEC>, "dType": <zigbee reporting data type for this attribute, DEC>, "change": <how much the attribute value must change for reporting to occur. Should be omitted for discrete attributes>}
Examples:
`{"action": "configure_reporting", "ieee": "3425b4fffe12e9e9", "ep": 1, "cl": 6, "attr": 0, "minRep": 1, "maxRep": 3600, "dType": 0}` - configure ON/OFF attribute repotring to minimum 1s and max 3600s report time. "change" field is omitted because it is a discrete attribute.
`{"action": "configure_reporting", "ieee": "3425b4fffe12e9e9", "ep": 1, "cl": 2820, "attr": 1285, "minRep": 30, "maxRep": 3600, "dType": 33, "change": 200}` - configure RMS Voltage attribute repotring to minimum 1s and max 3600s report time. Reporting will occur no earlier than 30s if the value has changed by 200 or more (2v) or after a 3600s timeout if value does not changed.
#### Binding action
Binds the target device to the coordinator or to another device.
If one device bound to another, the coordinator will stop receiving reports from the bound device cluster.
Payload format: {"action": "binding", "mode": "<binding mode>", "scrIeee": "<IEEE of the device to which the binding request will be sent, HEX string>", ""scrEp": <endpoint number that needs to be bound, DEC number>, "scrCl": <cluster number that needs to be bound, DEC number>, <additional parameters>}
##### To device mode
Binds one device to another.
Payload format: {"action": "binding", "mode": "to\_device", "scrIeee": "<IEEE of the device to which the binding request will be sent, HEX string>", ""scrEp": <endpoint number that needs to be bound, DEC number>, "scrCl": <cluster number that needs to be bound, DEC number>, "dstEp": <endpoint number **to which** the binding will be done, DEC number>, "dstIeee": "<IEEE device to which binding will be performed, HEX string>"}
Example: `{"action": "binding", "mode": "to_device", "scrIeee": "3425b4fffe12e9e9", ""scrEp": 1, "scrCl": 6, "dstEp": 1, "dstIeee": "a4c1389ffb198304"}` - binding a Zigbee button (ON/OFF cluster) to a Zigbee relay.
##### To coordinator mode
Binds to the coordinator so that it can receive reports from this cluster.
Zigbee Hub will attempt to bind automatically when interviewing a device, but this does not always work perfectly.
Payload format: {"action": "binding", "mode": "to\_device", "scrIeee": "<IEEE of the device to which the binding request will be sent, HEX string>", ""scrEp": <endpoint number that needs to be bound, DEC number>, "scrCl": <cluster number that needs to be bound, DEC number>}
Example: `{"action": "binding", "mode": "to_coordinator", "scrIeee": "3425b4fffe12e9e9", ""scrEp": 1, "scrCl": 6}` - binding a Zigbee button (ON/OFF cluster) to the coordinator.
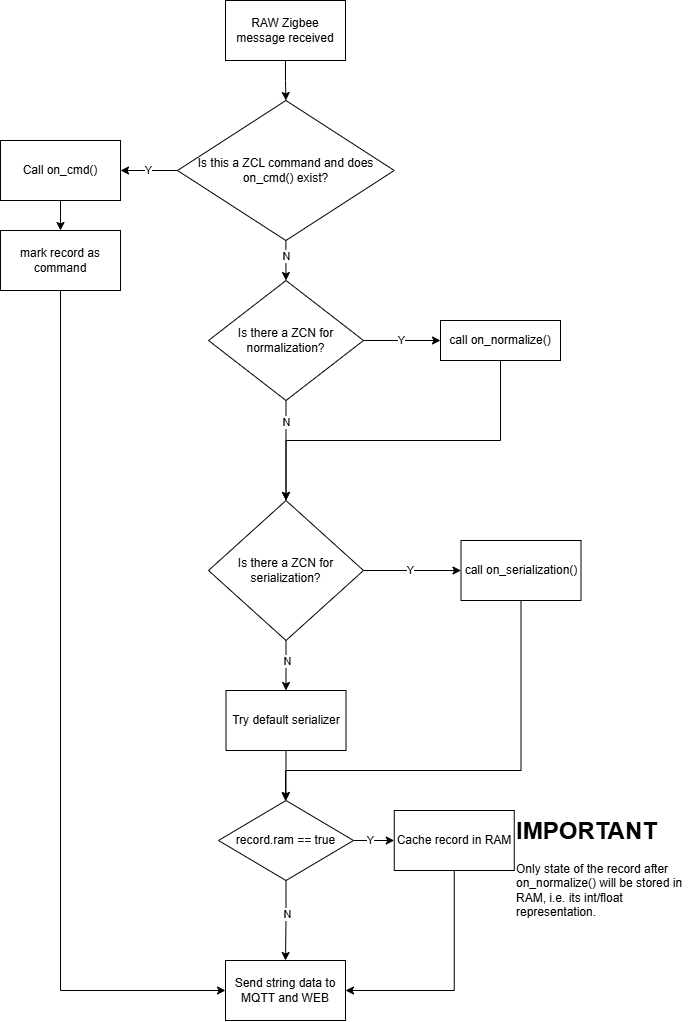
# Zigbee Converter Native (ZCN) concept
### Introduction
When developing the Zigbee stack for zHub, we had to take into account the **strict RAM limitations of the ESP32**, so it is physically impossible to provide the same convenient and functional Zigbee converters as in Zigbee2Mqtt or ZHA.
So, we develop an alternative **ZCN** concept based on **static C++ structures** that contain a set of **callbacks** that allow you to override the processing of packets from/to ZigBee devices.
#### ZHB Incoming Zigbee message flow structure
The life cycle of a ZigBee message consists of two main stages:
##### Normalization
Converting ZigBee data into a format understandable by the zHub.
zHub records currently support 8 data types:
1. NONE - indicates an empty record. Empty records are not forwarded to MQTT / WEB
2. U32 - uint32\_t
3. I32 - int32\_t
4. FLOAT - float
5. BUF - uint8\_t array
6. STR - char string
7. BOOL - boolean value (true / false)
8. CMD - ZCL command. The command ID will be placed in the attribute field of the record. If it is a Tuya DP, the datapoint number will be placed in the record value (U32).
COMMANDS ARE NOT CACHED IN RAM
Normalization example: you have a Zigbee temperature sensor, this sensor sends the temperature as an Zigbee int16 number (zType = 0x29), i.e. when you receive a message, the I32 field will contain the value 2150 for a temperature of 21.50.
To normalize this value you need to convert it to Float, to do this you need to divide 2150 by 100 (for one decimal place in this case),
i.e. the normalization will look like:
```c++
record.setFloat(record.val.i32 / 100.0);
```
This is a working option, but to simplify things, we have developed helper functions for the most common cases:
```c++
static float u16_divide_by_10(const uint16_t val) {
return (float)val / 10.0;
}
static float u16_divide_by_100(const uint16_t val) {
return (float)val / 100.0;
}
static float u16_divide_by_1000(const uint16_t val) {
return (float)val / 1000.0;
}
static float i16_divide_by_10(const int16_t val) {
return (float)val / 10.0;
}
static float i16_divide_by_100(const int16_t val) {
return (float)val / 100.0;
}
static float i16_divide_by_1000(const int16_t val) {
return (float)val / 1000.0;
}
```
Is normalization mandatory?
The answer is no, if the received value does not require conversion from one format to another, then you can skip this step.
##### Serialization
Once the value has been normalized you need to tell zHub how to properly convert it to text, this is the serialization!
zHub uses ArduinoJson to form a data packet for MQTT / WEB. Therefore, for ordinary int, bool or string, you can use a simple code:
```c++
data[zcl_json.type_sm] = zcl_json.report;
data[zcl_json.val] = record.val.u32;
```
For float, it is better to format manually to get right number of characters:
```c++
char buf[11] = {0}; // "-222.00"
snprintf(buf, sizeof(buf), "\"%.2f\"", record.val.fl);
data[zcl_json.type_sm] = zcl_json.report;
data[zcl_json.val] = serialized(buf);
```
To simplify things, we developed functions to serialize more common cases:
```c++
// converts color in X/Y to text (in R,G,B format (255,255,255))
static void zcn_ser_xy(ZCL_SER_ATTR_HANDLER_ARGS);
// converts a float to its text representation (2 digits precision)
static void zcn_ser_float(ZCL_SER_ATTR_HANDLER_ARGS);
// converts a raw uint32 to its text representation
static void zcn_ser_raw_uint(ZCL_SER_ATTR_HANDLER_ARGS);
// return "ON" if integer value > 0. otherwise return "OFF"
static void zcn_tuya_ser_switch(ZCL_SER_ATTR_HANDLER_ARGS);
```
Is serialization mandatory?
This can be omitted only for ZCL commands, all other records, if they are not empty, must be serialized so that zHub can send them to MQTT / WEB
#### ZCN structures
**zcn\_endpoint\_override\_t**
```c++
struct zcn_endpoint_override_t {
uint8_t endpoint;
uint8_t clusterCount;
const zcl_cluster_config_t* clusters;
};
```
`endpoint`- zigbee endpoint to which this converter corresponds. You can find device endpoints in device signature
`clusterCount` - element count in `zcl_cluster_config_t`
`clusters` - cluster override list
---
**zcl\_cluster\_config\_t**
```c++
struct zcl_cluster_config_t {
uint16_t id;
bool bind; // bind this cluster?
const zcl_cmd_config_t cmd_config;
uint8_t attrCount;
const zcl_attr_config_t *attrs;
};
```
`id` - attribute to which this config entry corresponds. You can find device attributes in device signature
`bind` - if `true` zHub will send bind request on device interview
`cmd_config` - structure that defines which triggers this device exposes to MQTT/WEB. Useful for Zigbee buttons etc
`attrCount` - element count in `zcl_attr_config_t`
---
**zcl\_cmd\_config\_t**
```c++
struct zcl_cmd_config_t {
ZCL_ON_CMD_HANDLER on_cmd;
ZCL_CMD_EXPOSES_HANDLER exposesOverride;
const char *exposes; // "|" separated
};
```
`on_cmd` - сalled when zHub received a ZCL command for this cluster. If this function **exists**, it will be called **instead of the default behavior!** `exposesOverride` - overrides `exposes`, you can use this function if you need to generate dynamic exposes based on some information from the device
`exposes` - the list of triggers to be generated for this cluster, must be separated by `|`
Example of using `zcl_cmd_config_t` based on converter for SNZB-01P:
```c++
static bool ewelink_cmd_action(ZCL_ON_CMD_HANDLER_ARGS) {
switch (record.attr) {
case 0:
result = "long";
break;
case 1:
result = "double";
break;
case 2:
result = "single";
break;
default:
result = "unknown";
break;
}
if (strcmp(result.c_str(), "unknown")) return true;
return false;
}
static const zcn_converter_t eWeLink_SNZB_01P = {
.signature = {
.model = "SNZB-01P",
.manuf = "eWeLink",
},
.on_intw_stage = [](ZCN_CONV_INTW_STAGE_ARGS) -> uint8_t {
if (!strcmp(intwTag, "intw_get_power_source")) {
dev->data.powerSource = ZB_POWER_SOURCE_BATTERY; // mark device as battery-powered
return 0; // stage overrided
} else {
return INTW_F_STATUS_ZCN_UNUSED; // ignore this stage
}
},
.overrides_count = 1, // we have only one override
.overrides = {
{
.endpoint = 1, // endpoint number
.clusterCount = 1, // clusters array len
.clusters = (const zcl_cluster_config_t[]){
{
.id = ZCL_CL_ON_OFF, // we expect the commands to be from the ON/OFF cluster
.bind = false, //
.cmd_config = {
.on_cmd = ewelink_cmd_action, // commands handler
.exposes = "single|double|long", // what trigger types we will expose to MQTT/WEB
},
.attrCount = 0, // we have 0 attr overrides
},
},
},
},
};
```
**zcl\_attr\_config\_t**
```c++
struct zcl_attr_config_t {
zcl_mqtt_dev_class_t mqttClass;
const char *mqttSubClass;
const char *name;
const char *unit;
uint16_t id;
bool rp; // is this attr reported?
bool ram; // store received value in ram?
bool query; // query this attr?
uint16_t minReport;
uint16_t maxReport;
uint16_t change;
uint8_t dataType;
uint16_t poolingInterval;
ZCL_NORMALIZE_HANDLER on_normalize; // on raw zb packer received
ZCL_SER_ATTR_HANDLER on_serialization; // on converting ZclAttrRecord to string value
ZCL_DIS_ATTR_HANDLER on_discovery; // on HA discovery. return false to skip discovery for this attr
};
```
`mqttClass` - interface element class that will be sent to MQTT discovery and zHub dashboard
`mqttSubClass` - MQTT discovery sub-class
`name` - name of the element that will be displayed in MQTT discovery and WEB
`unit` - unit of measurement for this attribute (text)
`id` - attribute identifier
`rp` - set to `true` if this attribute support reporting
`ram` - set to `true` if the value of this attribute should be stored in RAM
`query` - set to `true` if the value of this attribute should be requested from the ZigBee device when the coordinator starts. Useful for AC powered devices
`minReport` - minimum reporting time for this attribute in seconds (if reporting is supported)
`maxReport` - maximum reporting time for this attribute in seconds (if reporting is supported)
`change` - how much the attribute must change for the report to occur (if reporting is supported)
`dataType` - the data type of this attribute according to ZCL
`pollingInterval` - time to poll this attribute. **Сurrently not used**
`on_normalize` - this function is called to convert a zigbee packet to a C++ data type so that the zHub can process it
`on_serialization` - called to convert the attribute value to a string
`on_discovery` - used to generate MQTT discovery for this attribute.
For simple sensors (containing only one attribute), a simple function that returns false is enough, in which case zHub will generate topics automatically:
```c++
static bool zcl_dis_gen_basic(ZCL_DIS_ATTR_HANDLER_ARGS) {
return true;
}
```
If you need to combine multiple attributes into one MQTT discovery then you will have to do it manually:
```c++
static bool light_discovery(ZCL_DIS_ATTR_HANDLER_ARGS) {
const uint8_t stateTopicLen = mqttCalcZhubTopicLen(MQTT_TOPIC_DATA, zhbBase);
char stateTopic[stateTopicLen] = {0};
mqttBuildZhubTopic(MQTT_TOPIC_DATA, stateTopic, stateTopicLen, zhbBase, dev->data.ieeeAddr, ep, cl, attr);
const uint8_t cmdRgbTopicLen = mqttCalcZhubTopicLen(MQTT_TOPIC_CMD, zhbBase);
char cmdTopicRGB[cmdRgbTopicLen] = {0};
mqttBuildZhubTopic(MQTT_TOPIC_CMD, cmdTopicRGB, cmdRgbTopicLen, zhbBase, dev->data.ieeeAddr, ep, cl, ZCL_CL_CMD_COLOR_CONTROL_MOVE_TO_COLOR);
char cmdTopic[cmdRgbTopicLen] = {0};
mqttBuildZhubTopic(MQTT_TOPIC_CMD, cmdTopic, cmdRgbTopicLen, zhbBase, dev->data.ieeeAddr, ep, ZCL_CL_ON_OFF, ZCL_CL_ATTR_ON_OFF_ONOFF);
const uint8_t stateOnOffTopicLen = mqttCalcZhubTopicLen(MQTT_TOPIC_DATA, zhbBase);
char stateOnOffTopic[stateOnOffTopicLen] = {0};
mqttBuildZhubTopic(MQTT_TOPIC_DATA, stateOnOffTopic, stateOnOffTopicLen, zhbBase, dev->data.ieeeAddr, ep, ZCL_CL_ON_OFF, ZCL_CL_ATTR_ON_OFF_ONOFF);
char stateLevelSetTopic[cmdRgbTopicLen] = {0};
mqttBuildZhubTopic(MQTT_TOPIC_CMD, stateLevelSetTopic, cmdRgbTopicLen, zhbBase, dev->data.ieeeAddr, ep, ZCL_CL_LEVEL_CONTROL_FOR_LIGHTING, ZCL_CL_ATTR_LEVEL_CONTROL_FOR_LIGHTING_CURRENTLEVEL);
char stateLevelTopic[stateOnOffTopicLen] = {0};
mqttBuildZhubTopic(MQTT_TOPIC_DATA, stateLevelTopic, stateOnOffTopicLen, zhbBase, dev->data.ieeeAddr, ep, ZCL_CL_LEVEL_CONTROL_FOR_LIGHTING, ZCL_CL_ATTR_LEVEL_CONTROL_FOR_LIGHTING_CURRENTLEVEL);
char clorTempSetTopic[cmdRgbTopicLen] = {0};
mqttBuildZhubTopic(MQTT_TOPIC_CMD, clorTempSetTopic, cmdRgbTopicLen, zhbBase, dev->data.ieeeAddr, ep, cl, ZCL_CL_CMD_COLOR_CONTROL_MOVE_TO_COLOR_TEMPERATURE);
char clorTempStateTopic[stateOnOffTopicLen] = {0};
mqttBuildZhubTopic(MQTT_TOPIC_DATA, clorTempStateTopic, stateOnOffTopicLen, zhbBase, dev->data.ieeeAddr, ep, cl, ZCL_CL_ATTR_COLOR_CONTROL_COLOR_TEMPERATURE);
doc["clr_temp_cmd_t"] = clorTempSetTopic;
doc["clr_temp_stat_t"] = clorTempStateTopic;
doc["clr_temp_val_tpl"] = MQTT_DEFAULT_TEMPLATE;
doc[ha_json.cmd_t] = cmdTopic;
doc["stat_t"] = stateOnOffTopic;
doc["stat_val_tpl"] = MQTT_DEFAULT_TEMPLATE;
doc["bri_cmd_t"] = stateLevelSetTopic;
doc["bri_stat_t"] = stateLevelTopic;
doc["bri_val_tpl"] = MQTT_DEFAULT_TEMPLATE;
doc["rgb_stat_t"] = stateTopic;
doc["rgb_val_tpl"] = MQTT_DEFAULT_TEMPLATE;
doc["rgb_cmd_t"] = cmdTopicRGB;
doc["p"] = "light";
doc["schema"] = "basic";
doc["brightness"] = false;
doc["sup_clrm"] = serialized("[\"rgb\"]");
doc["on_cmd_type"] = "first";
return true;
}
```
# Network
# **5. Network Settings**
The **Network** page in SLZB-OS manages how your device connects to your local network and, if required, to the internet.
The available sections may vary depending on the selected **Mode** and hardware capabilities (Ethernet, Wi-Fi).
[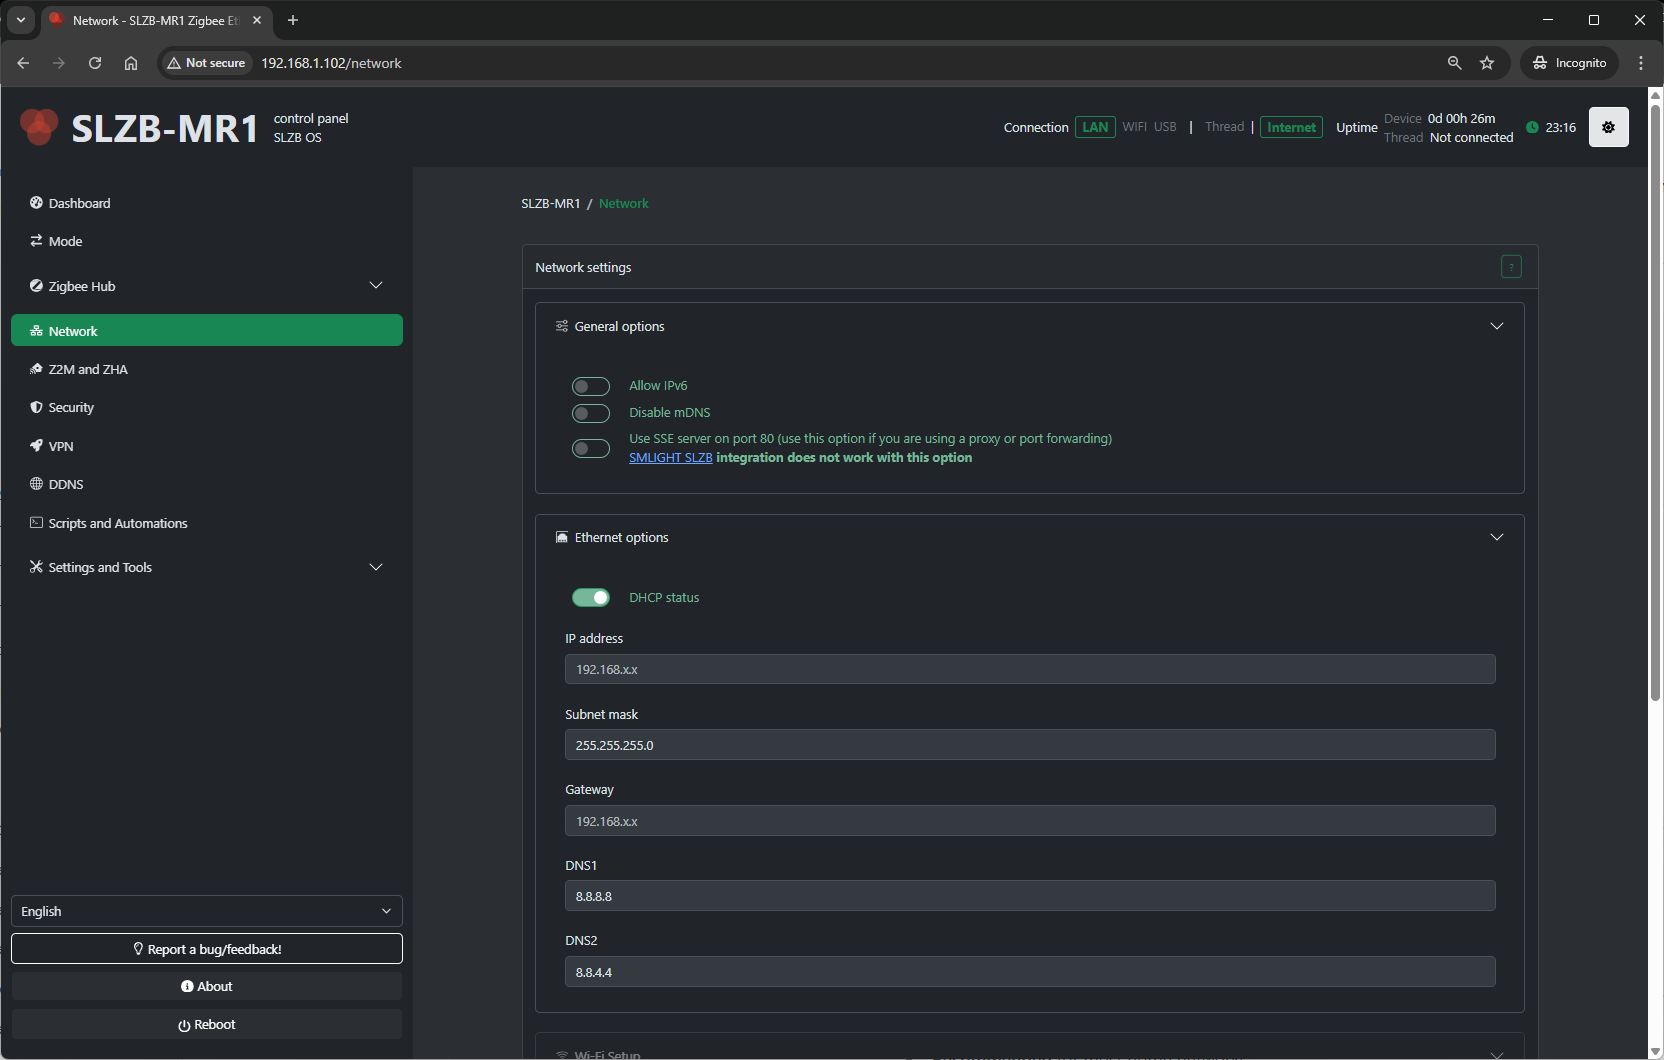](https://smlight.tech/support/manuals/uploads/images/gallery/2025-08/TsAimage.png)
---
## **5.1 Information Block**
At the top of the page you may see an **info notice** if certain network interfaces are inactive.
Example:
> *“Wi-Fi page is inactive because Wi-Fi mode is not activated.”*
> To enable it, change the device’s mode to one that supports Wi-Fi (see **Mode** page).
---
## **5.2 Connection Overview**
A visual diagram shows the main connections:
- **LAN** – Wired Ethernet connection.
- **Wi-Fi** – Wireless interface (if enabled).
---
## **5.3 LAN / Ethernet Settings**
Ethernet is the primary connection method for most SLZB devices.
### **5.3.1 DHCP (Dynamic Host Configuration Protocol)**
- **Enable** to have the SLZB device automatically receive network settings (IP, subnet mask, gateway) from your router.
- **Recommended** for most home networks.
### **5.3.2 Static IP Configuration**
If DHCP is disabled, manually configure:
1. **IP Address** – The fixed address the device will use. Must be unique on your network.
2. **Subnet Mask** – Defines which IP addresses are considered local (e.g., `255.255.255.0`).
3. **Gateway** – The IP address of your router or gateway to access external networks.
4. **DNS Server(s)** – Optional; used to resolve domain names. Defaults to your gateway if not set.
> **Tip:** Use a static IP if you run integrations that need a consistent address (e.g., Home Assistant with static MQTT host).
---
## **5.4 Wi-Fi Settings**
*(Visible only when Wi-Fi mode is active)*
### **5.4.1 Scan for Wi-Fi Networks**
- Searches for available networks.
- Displays SSID, signal strength, and security type.
### **5.4.2 Connect to Network**
- **SSID** – Chosen from scan or entered manually.
- **Password** – Required for secured networks.
- **Security Type** – WPA/WPA2, WPA3 (depending on hardware/firmware).
### **5.4.3 IP Configuration**
- Same as Ethernet — can use **DHCP** or set **Static IP**, **Subnet**, **Gateway**, **DNS**.
---
## **5.5 Applying Changes**
1. Adjust the settings for the interface you are using (Ethernet/Wi-Fi).
2. Click **Save** or **Apply**.
3. The device may briefly lose connectivity while settings are applied.
4. Verify new settings on the **Dashboard** or via your router.
---
## **5.6 Troubleshooting**
- **No connection after static IP set** – Ensure the IP, subnet, and gateway match your network’s addressing scheme.
- **Wi-Fi not available** – Check mode selection; only certain modes enable Wi-Fi.
- **PoE not powering device** – Confirm your switch/injector supports the correct PoE standard for your SLZB model.
- **Can’t reach device** – Use a network scanner or check router’s DHCP leases to find its IP.
# Zigbee2MQTT / ZHA Settings
# **6. Zigbee2MQTT and ZHA Configuration**
The **Z2M and ZHA** page in SLZB-OS provides configuration tools for connecting your device’s Zigbee coordinator to an external server running either **Zigbee2MQTT (Z2M)** or **Zigbee Home Automation (ZHA)**.
It also contains advanced options for connection methods and device identity.
> **Note:**
>
> - On **single-radio devices** (e.g., SLZB-06x and SLZB-06xU series), these settings apply to that one radio.
> - On **dual-radio devices** (e.g., SLZB-MRx and SLZB-MRxU series), settings will appear for **both radios**, and each must be configured separately.
[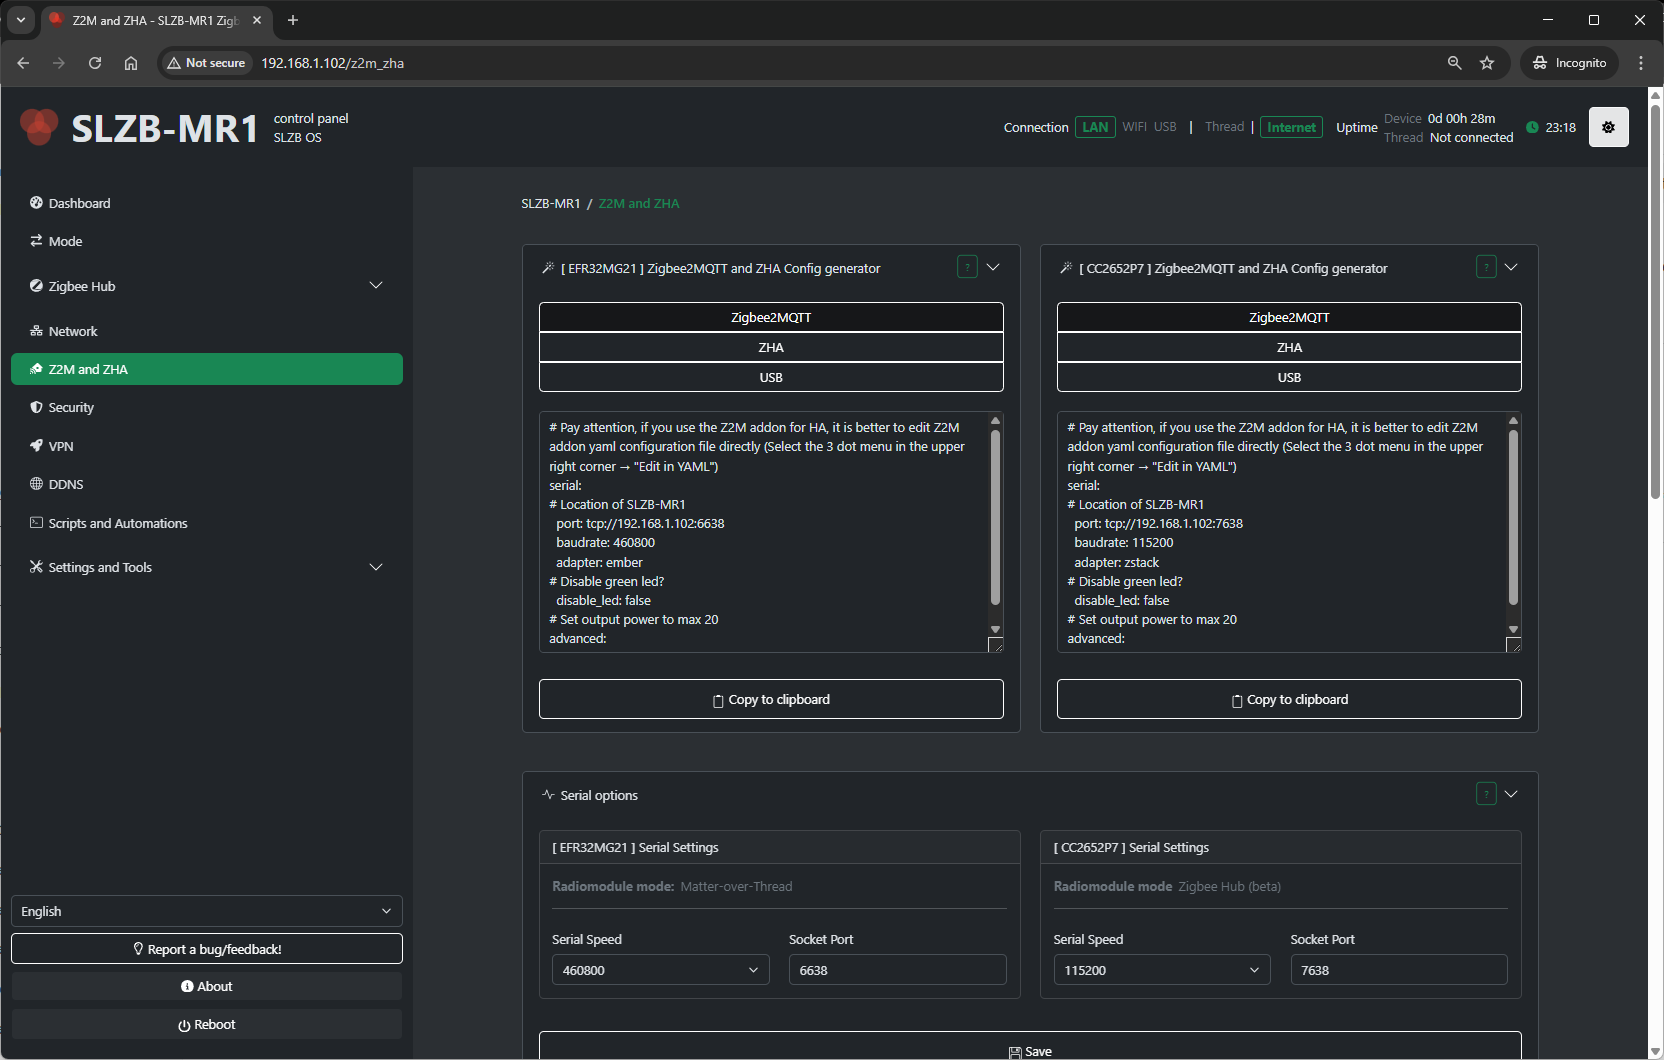](https://smlight.tech/support/manuals/uploads/images/gallery/2025-08/s3qimage.png)
---
## **7.1 Configuration Generator – Purpose and Output**
This section provides **ready-to-use parameters** for integrating your coordinator with an external Zigbee2MQTT or ZHA setup via Ethernet.
**What it does:**
- Reads the current radio configuration.
- Generates adapter type, connection interface, baud rate, and socket settings.
- Reduces manual input errors when configuring your external Z2M/ZHA installation.
**What it provides:**
- **Adapter type** (e.g., CC2652P7 = ZNP, EFR32MG21 = EZSP).
- **Serial settings** (port, baud rate).
- **Socket details** (IP, port) if using Ethernet bridge mode.
You simply copy these values into your external Z2M `configuration.yaml` or ZHA connection string.
---
## **7.2 Serial Options**
If you use **USB or direct serial** mode, the **Serial Settings** section appears.
Available fields:
- **Serial port** - socket port to which the external server has to connect. Default is `6638`
- **Serial Speed** – Choose from:
- 115200 *(default for most Zigbee firmwares)*
- 460800 *(default for most Thread firmwares)*
Select the baud rate supported by your firmware and integration.
- **Save** – Apply changes.
---
## **7.3 Advanced Socket Connection Options**
The **ADVANCED: Socket options – helper** section controls how the coordinator’s serial data is forwarded over TCP.
Available options:
1. **Enable Zigbee Socket packet processing**
- Instead of forwarding raw bytes, SLZB-OS assembles complete **EZSP/ZNP frames** before sending them.
- Only valid Zigbee frames are forwarded — other traffic is ignored.
2. **Allow multi-threaded socket connection**
- Up to **5 clients** can connect to the socket at once.
- **Important:** Only **one client** can actively communicate with the Zigbee chip at a time. If multiple clients send data simultaneously, the connection will not function correctly.
3. **Multi-Radio Queue Control** *(only shown on dual-radio devices)*
- Balances socket traffic between radios.
---
## **7.4 IEEE Address Change**
The **ADVANCED: Adapter IEEE address change** section allows you to read or modify the coordinator’s IEEE (extended) address.
[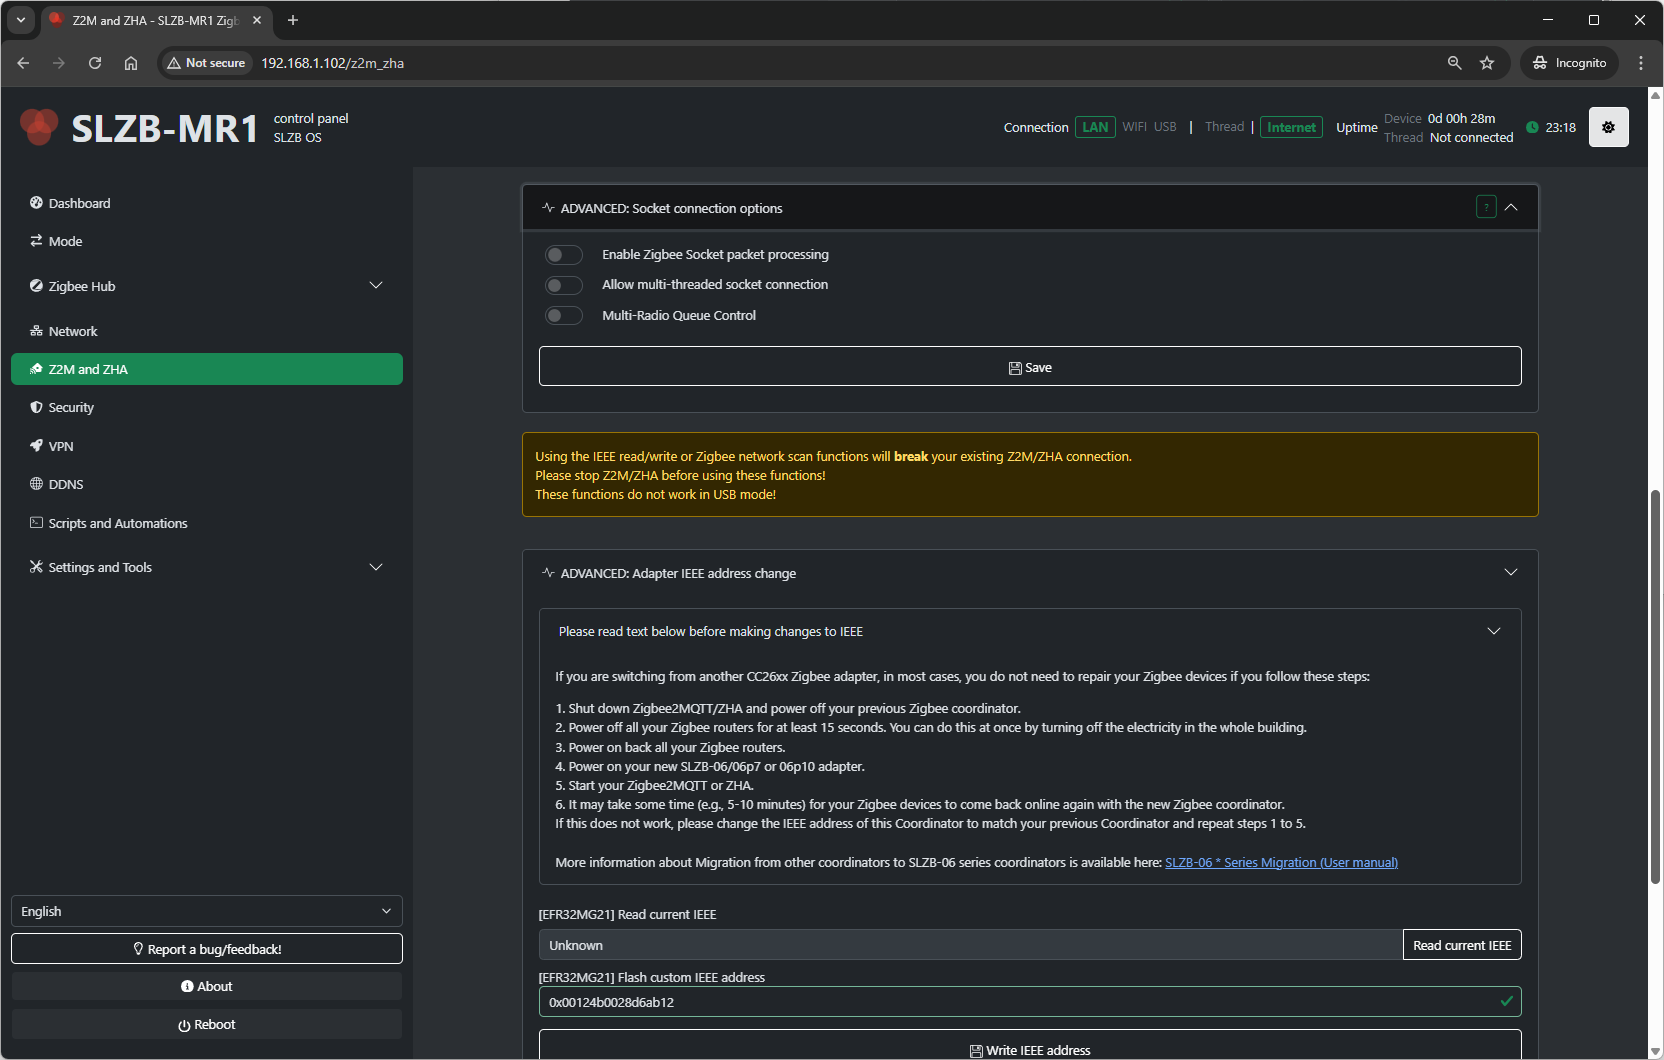](https://smlight.tech/support/manuals/uploads/images/gallery/2025-08/t3Qimage.png)
**Important notes from the UI:**
- **Using IEEE read/write** or Zigbee network scan will **break your current Z2M/ZHA connection**.
- **Stop Z2M/ZHA** before using these functions.
- **Does not work in USB mode**.
**Migration tip from SLZB-OS:**
If migrating from another CC26xx adapter, you may avoid re-pairing devices if you:
1. Shut down Zigbee2MQTT/ZHA and power off your old coordinator.
2. Power off all Zigbee routers for ≥15 seconds (e.g., cut building power briefly).
3. Power on the new coordinator.
4. Power on routers.
5. Start Zigbee2MQTT/ZHA.
Devices may take **5–10 minutes** to reconnect.
6. If they do not, set the **IEEE address** of your new coordinator to match the old one, and repeat steps 1–5.
**IEEE tools in UI:**
- **Read factory IEEE**
- **Read current IEEE**
- **Flash custom IEEE address**
- **Write IEEE address**
# Security
# 8. Security
This page controls access to the SLZB‑OS web interface and the TCP “socket” that exposes the Zigbee coordinator to Z2M/ZHA. The options below are listed exactly as they appear.
---
[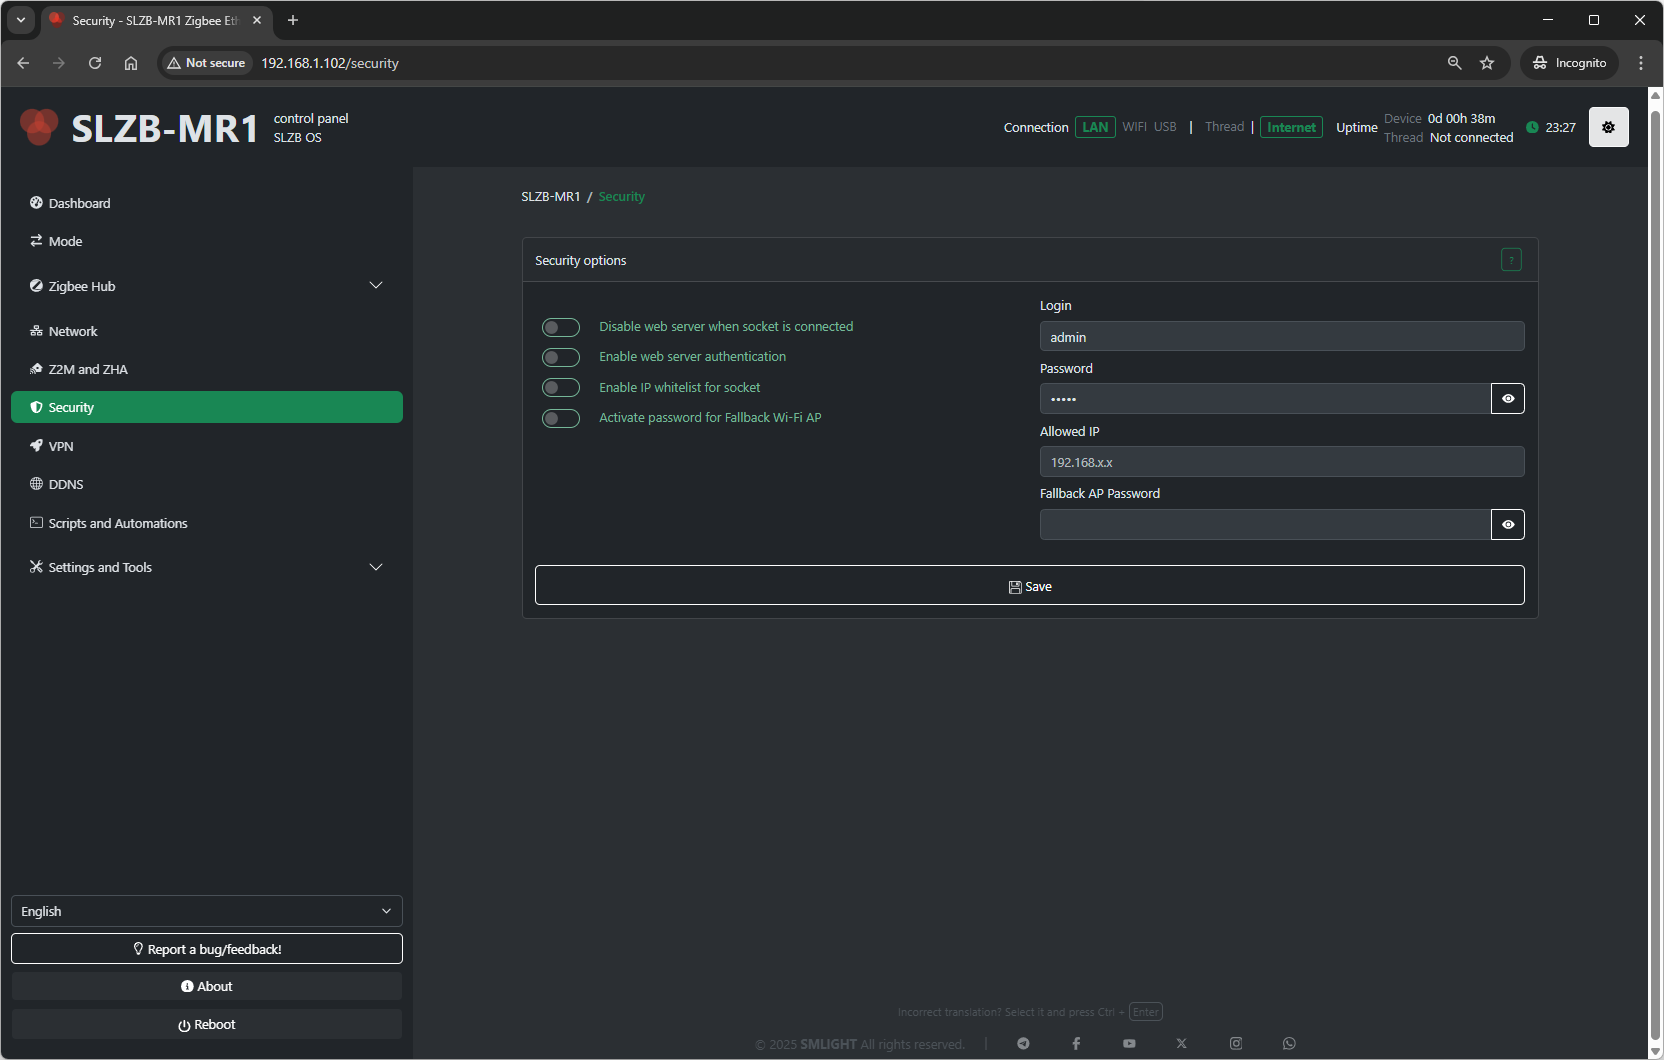](https://smlight.tech/support/manuals/uploads/images/gallery/2025-08/4koimage.png)
## 8.1 Web‑server when socket is connected
**What it does:** Controls whether the SLZB‑OS web UI remains available while the coordinator’s TCP socket is actively in use by Zigbee2MQTT or ZHA.
- **Enable** – The web server stays accessible **even when** the socket is already connected (e.g., your Z2M/ZHA is using the coordinator). Useful when you want to keep configuring the device during active operation.
- **Disable** – The web server is **turned off** whenever the socket is connected. This adds security by preventing web access while Z2M/ZHA is using the coordinator.
**Recommendation:**
For maximum security on production systems, choose **Disable**. Use **Enable** while commissioning or troubleshooting.
---
## 8.2 Web server authentication
**What it does:** Enables login protection for the SLZB‑OS web interface.
- **Enable web server authentication** – Requires credentials to access the web UI.
- **Fields (shown when enabled):**
- **Login** – Username for web access
- **Password** – Password for web access
**Recommendation:**
Keep this **enabled** and use a strong password.
---
## 8.3 IP whitelist for socket
**What it does:** Restricts which client can connect to the **Zigbee TCP socket** (the bridge used by Z2M/ZHA).
- **Enable IP whitelist for socket** – Only the specified address can connect to the Zigbee socket.
- **Field:**
- **Allowed IP** – A **single IP address** permitted to access the socket. All other addresses are blocked.
- **Disable** – Any device on the network can attempt to access the socket (less secure).
**Recommendation:**
Enable this and set **Allowed IP** to the host that runs Z2M/ZHA (e.g., your Home Assistant server).
---
## 8.4 Fallback Wi‑Fi AP password
**What it does:** Protects the **fallback Wi‑Fi access point** (brought up by the device in recovery/initial setup scenarios).
- **Activate password for Fallback Wi‑Fi AP** – Requires a password to join the fallback AP.
**Recommendation:**
Enable this to prevent unauthorized local access during recovery.
---
## 8.5 Save & Operational Notes
- After changing security options, **Save/Apply** and reconnect if prompted.
- If you **Disable web server when socket is connected**, you may temporarily lose UI access when Z2M/ZHA is connected; disconnect the client or stop the service to regain the UI.
- When **IP whitelist for socket** is enabled with a wrong IP, Z2M/ZHA will fail to connect—double‑check the **Allowed IP** value.
# VPN
# 9. VPN (WireGuard)
The VPN page in SLZB-OS contains a **WireGuard settings helper**, allowing the Zigbee coordinator to securely connect to your Home Assistant server or other remote endpoint.
---
[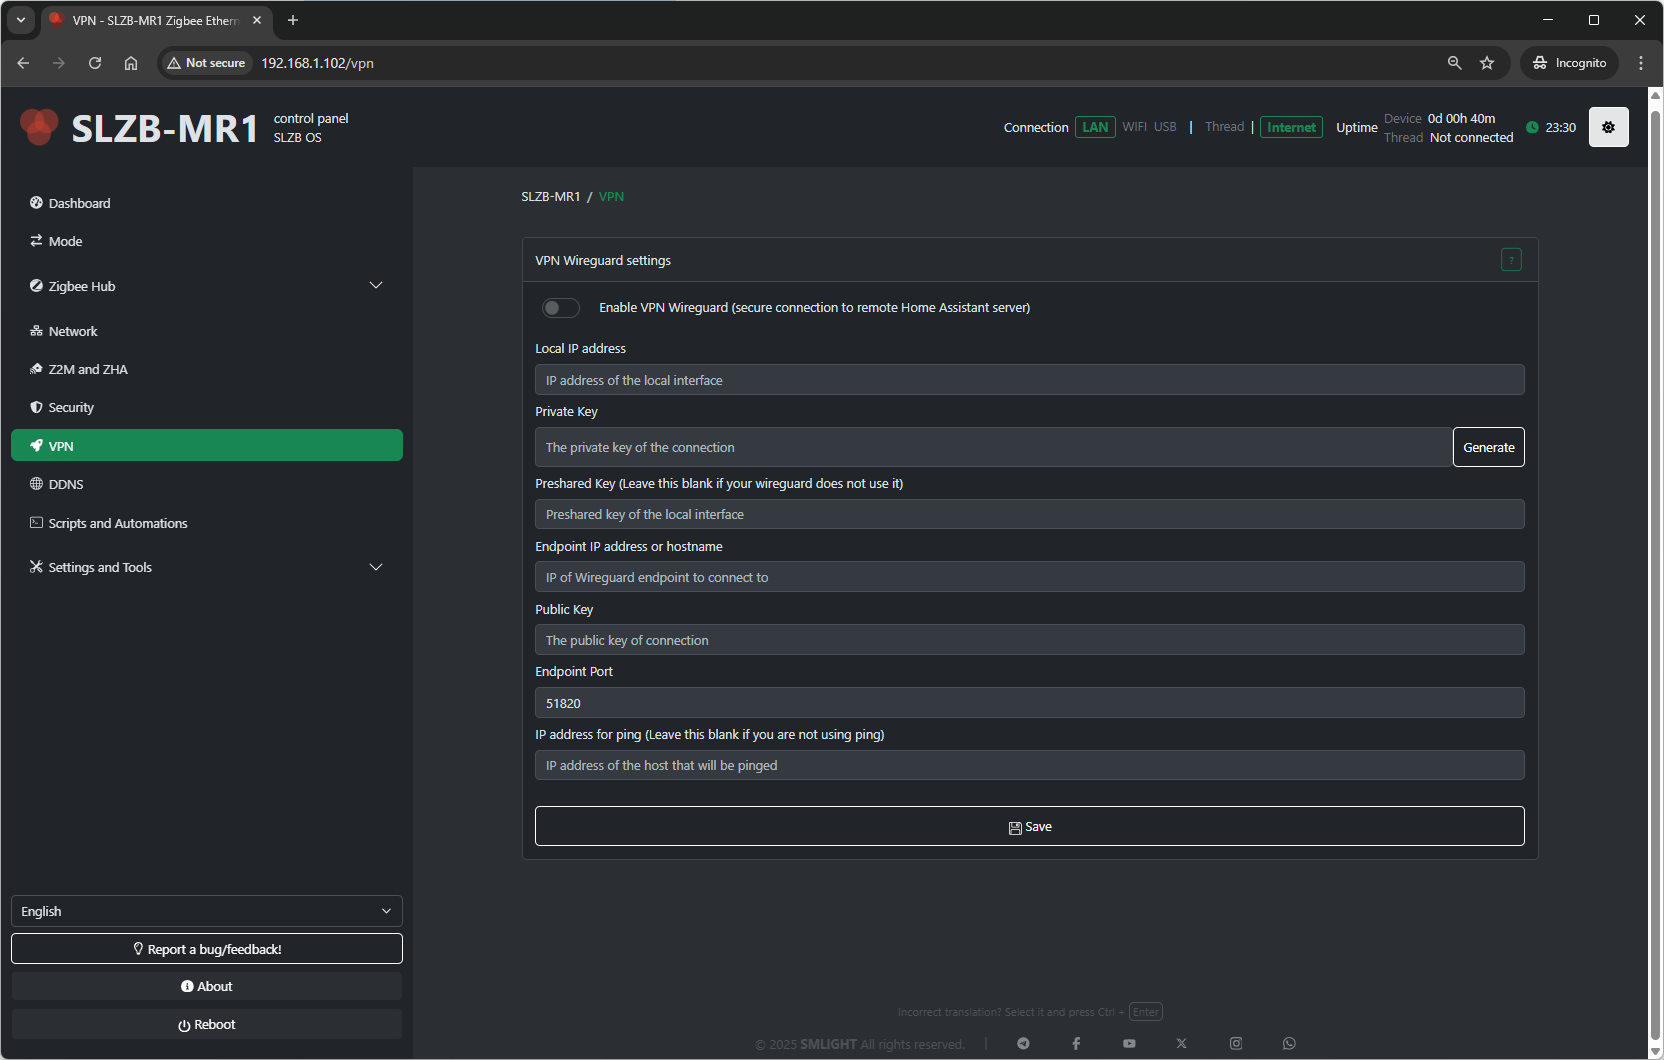](https://smlight.tech/support/manuals/uploads/images/gallery/2025-08/V8jimage.png)
## 9.1 WireGuard Overview
WireGuard is a modern, highly secure VPN protocol. In SLZB-OS, it:
- Establishes an encrypted link between your coordinator and a remote server (e.g., Home Assistant).
- Protects data in transit across the internet or local networks.
- Provides privacy and prevents unauthorized access.
> **Note:** You must have the **WireGuard add-on** installed and configured on your Home Assistant or other VPN server.
---
## 9.2 How WireGuard Works for Home Assistant
When configured:
1. Your coordinator connects to the WireGuard server.
2. All Zigbee and management traffic is securely tunneled through this encrypted channel.
3. The remote server sees the coordinator as if it were on the same local network.
This is useful when:
- Your coordinator is in a different physical location than the server.
- You want to expose the coordinator to Home Assistant without opening public ports.
---
## 9.3 WireGuard Settings
The page provides the following editable fields:
1. **Local IP Address**
IP address of the coordinator *inside* the VPN network.
2. **Private Key**
Secret key unique to the coordinator. **Keep it confidential.**
3. **Public Key**
Coordinator’s public key (share with the WireGuard server so it can authenticate your device).
4. **Peer Public Key**
The public key of the VPN server or peer you will connect to.
5. **Endpoint**
IP address or domain name of the VPN server, plus port (e.g., `vpn.example.com:51820`).
6. **Allowed IPs**
Specifies which IP ranges are routed through the VPN tunnel (e.g., `0.0.0.0/0` to route all traffic).
7. **Persistent Keepalive**
Interval in seconds to send keepalive packets and maintain connection (useful behind NAT).
---
## 9.4 Save & Connect
- After filling all fields, click **Save** to store settings.
- The VPN will attempt connection automatically using the provided details.
---
## 9.5 Security Recommendations
- Use a strong **Private/Public key pair** generated for the device only.
- Limit **Allowed IPs** to the networks actually needed for Zigbee control.
- Keep **Persistent Keepalive** enabled if the device is behind NAT or in networks with aggressive idle timeouts.
# DDNS
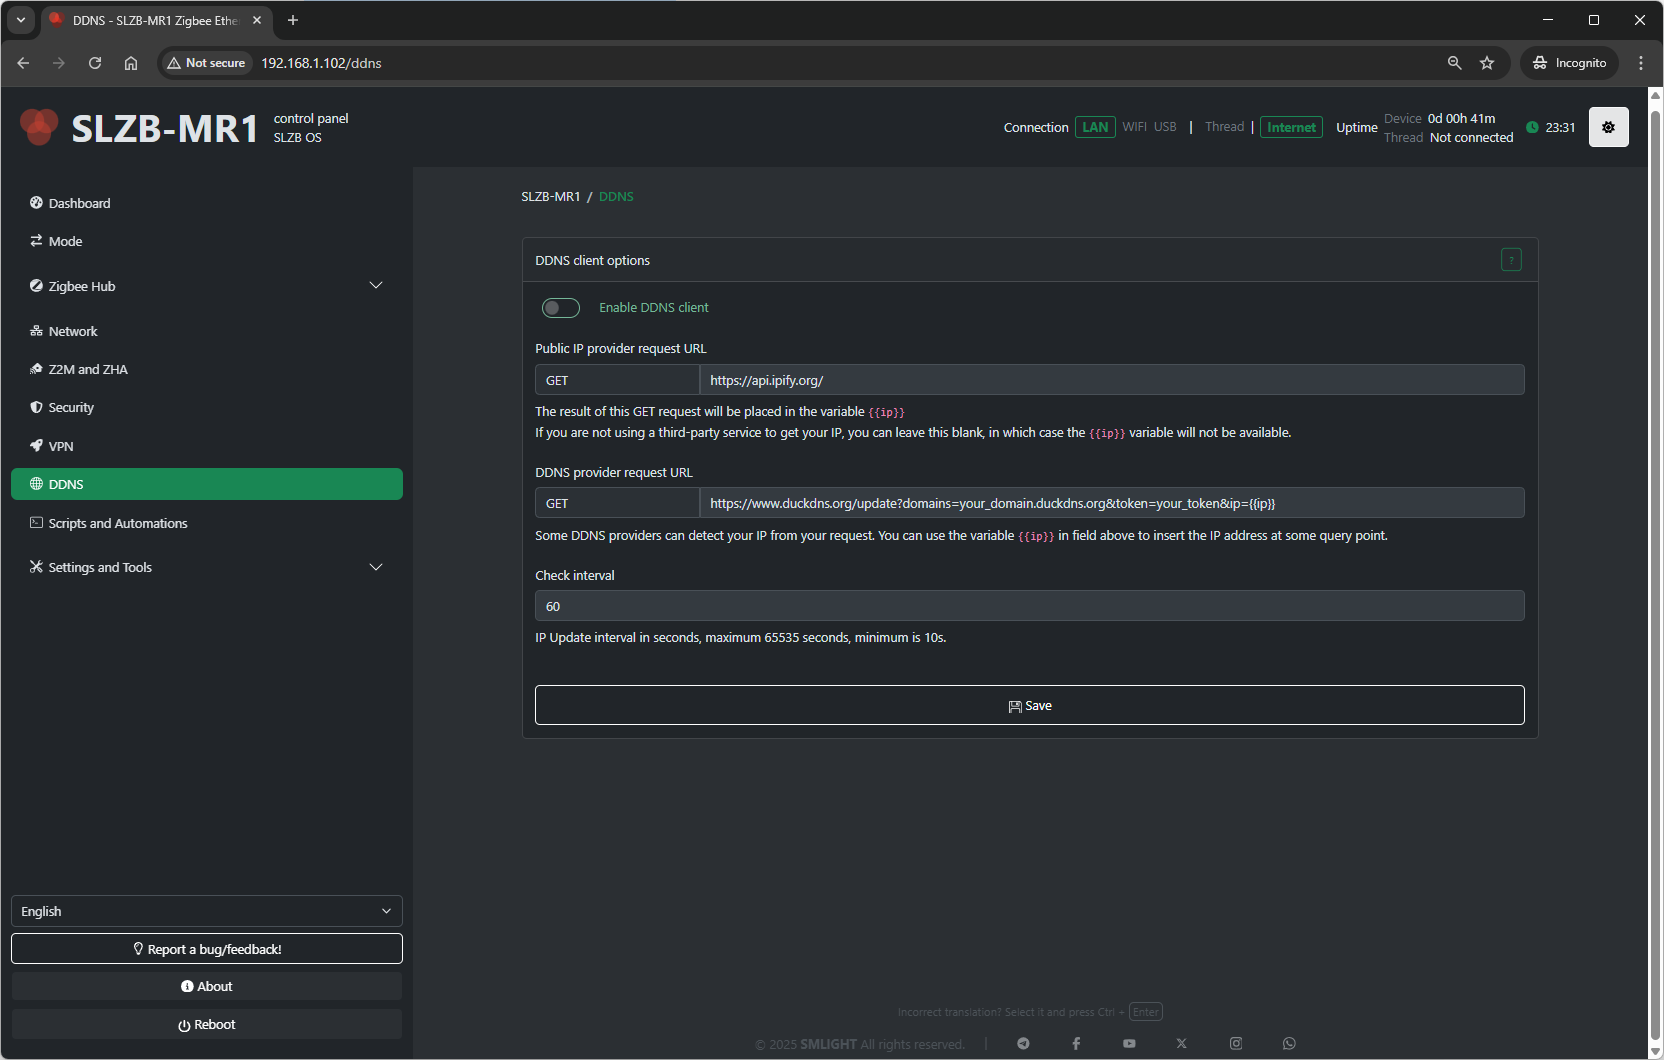
# 10. DDNS (Dynamic DNS)
The **DDNS** page in SLZB-OS provides a helper to keep a public hostname updated with your device’s current public IP address. This is especially useful if your ISP changes your IP periodically and you want to access the coordinator remotely without manually tracking IP changes.
---
[](https://smlight.tech/support/manuals/uploads/images/gallery/2025-08/RK6image.png)
## 10.1 How It Works
When enabled, SLZB-OS:
1. Detects your current public IP.
2. Sends an update request to your chosen DDNS provider.
3. Repeats this at the set interval to ensure your hostname always points to the correct IP.
---
## 10.2 Available Settings
1. **Enable DDNS client**
Turns the DDNS updater on or off.
2. **Public IP provider request URL**
- A URL to query your current public IP address.
- The result of this `GET` request is placed into the variable `{{ip}}`.
- If you are not using a third-party service to get your IP, you can leave this blank.
- If blank, the variable `{{ip}}` will not be available.
3. **DDNS provider request URL**
- The URL used to update your DDNS provider with the current IP.
- You can use `{{ip}}` in this field to insert the IP address from the previous step at the required point in the query.
- Some providers can detect your IP automatically from the request — in that case, you may not need to insert it manually.
4. **Check interval**
- How often the IP address is checked/updated, in seconds.
- Minimum: **10 seconds**
- Maximum: **65535 seconds**
---
## 10.3 Example Workflow
1. Set **Public IP provider request URL** to something like:
`https://api.ipify.org`
2. Set **DDNS provider request URL** according to your DDNS service’s API. For example:
`https://myddns.example/update?hostname=myhome&myip={{ip}}`
3. Set **Check interval** to a reasonable value, such as 300 seconds (5 minutes).
4. **Save** settings.
---
## 10.4 Security Note
- If your DDNS provider’s URL contains authentication tokens or passwords, ensure the coordinator’s network is secure and **do not** share screenshots containing the full URL.
# Scripts and Automations
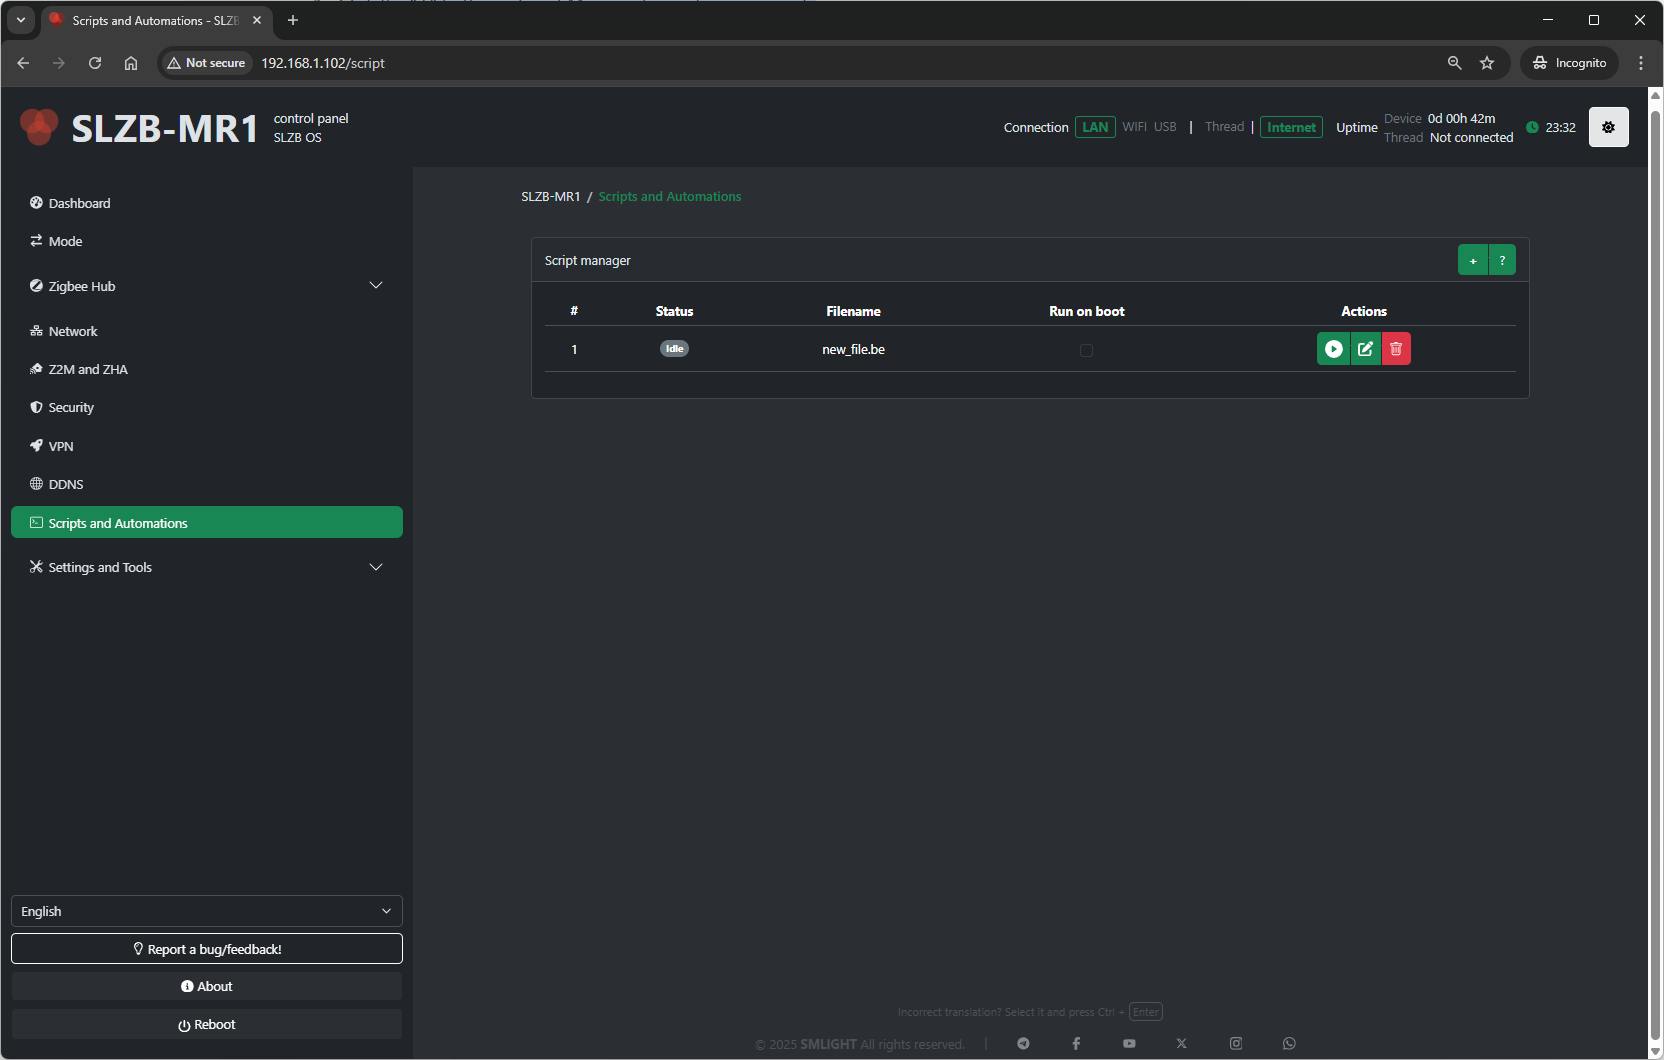
# 11. Scripts and Automations
The **Scripts and Automations** feature in SLZB-OS lets you create and run your own automation logic directly on the coordinator, without needing an external controller to send every command. Scripts can respond to events, toggle GPIOs, interact with the Zigbee hub, or perform other custom actions.
---
[](https://smlight.tech/support/manuals/uploads/images/gallery/2025-08/vwwimage.png)
## 11.1 Overview
- Scripts are executed by the coordinator’s firmware.
- They can be triggered automatically (on boot) or run manually.
- They support features such as an **HTTP client** to fetch or send data over the network.
- This feature is intended for advanced users familiar with automation logic and scripting.
For examples and full API documentation, refer to the official repository:
???? **[https://github.com/smlight-tech/slzb-os-scripts](https://github.com/smlight-tech/slzb-os-scripts)**
---
## 11.2 Script Manager
The Script Manager section contains the list of available scripts and their control options:
Field / Button
Description
**Status**
Shows whether the script is enabled/disabled.
**Filename**
The name of the script file stored in the coordinator.
**Run on boot**
Toggle to run the script automatically after the device boots.
**Actions**
Buttons to edit, run, stop, or delete the script.
---
## 11.3 Adding a Script
1. Click the **“+”** button in Script Manager to create a new script.
2. Enter your code in the built-in script editor.
3. Save the script — it will appear in the list with its filename.
4. Optionally enable **Run on boot**.
---
## 11.4 Running a Script
- To run a script manually, click the **Run** action button next to it.
- The script will execute immediately and perform its programmed logic.
---
## 11.5 Editing / Updating a Script
- Click the **Edit** button for the script you want to modify.
- Make changes in the script editor and save.
- If “Run on boot” is enabled, the updated script will take effect at the next reboot.
---
## 11.6 Removing a Script
- Click the **Delete** button.
- Confirm deletion — the file will be removed from the coordinator.
---
## 11.7 Notes & Best Practices
- Test scripts carefully before enabling **Run on boot**, to avoid loops or undesired behaviors.
- The HTTP client functionality enables integration with external APIs or local services.
- Avoid blocking operations or excessive network calls to keep the coordinator responsive.
- Store scripts in a safe location outside the coordinator for backup, as they may be lost on a full reset.
# Settings
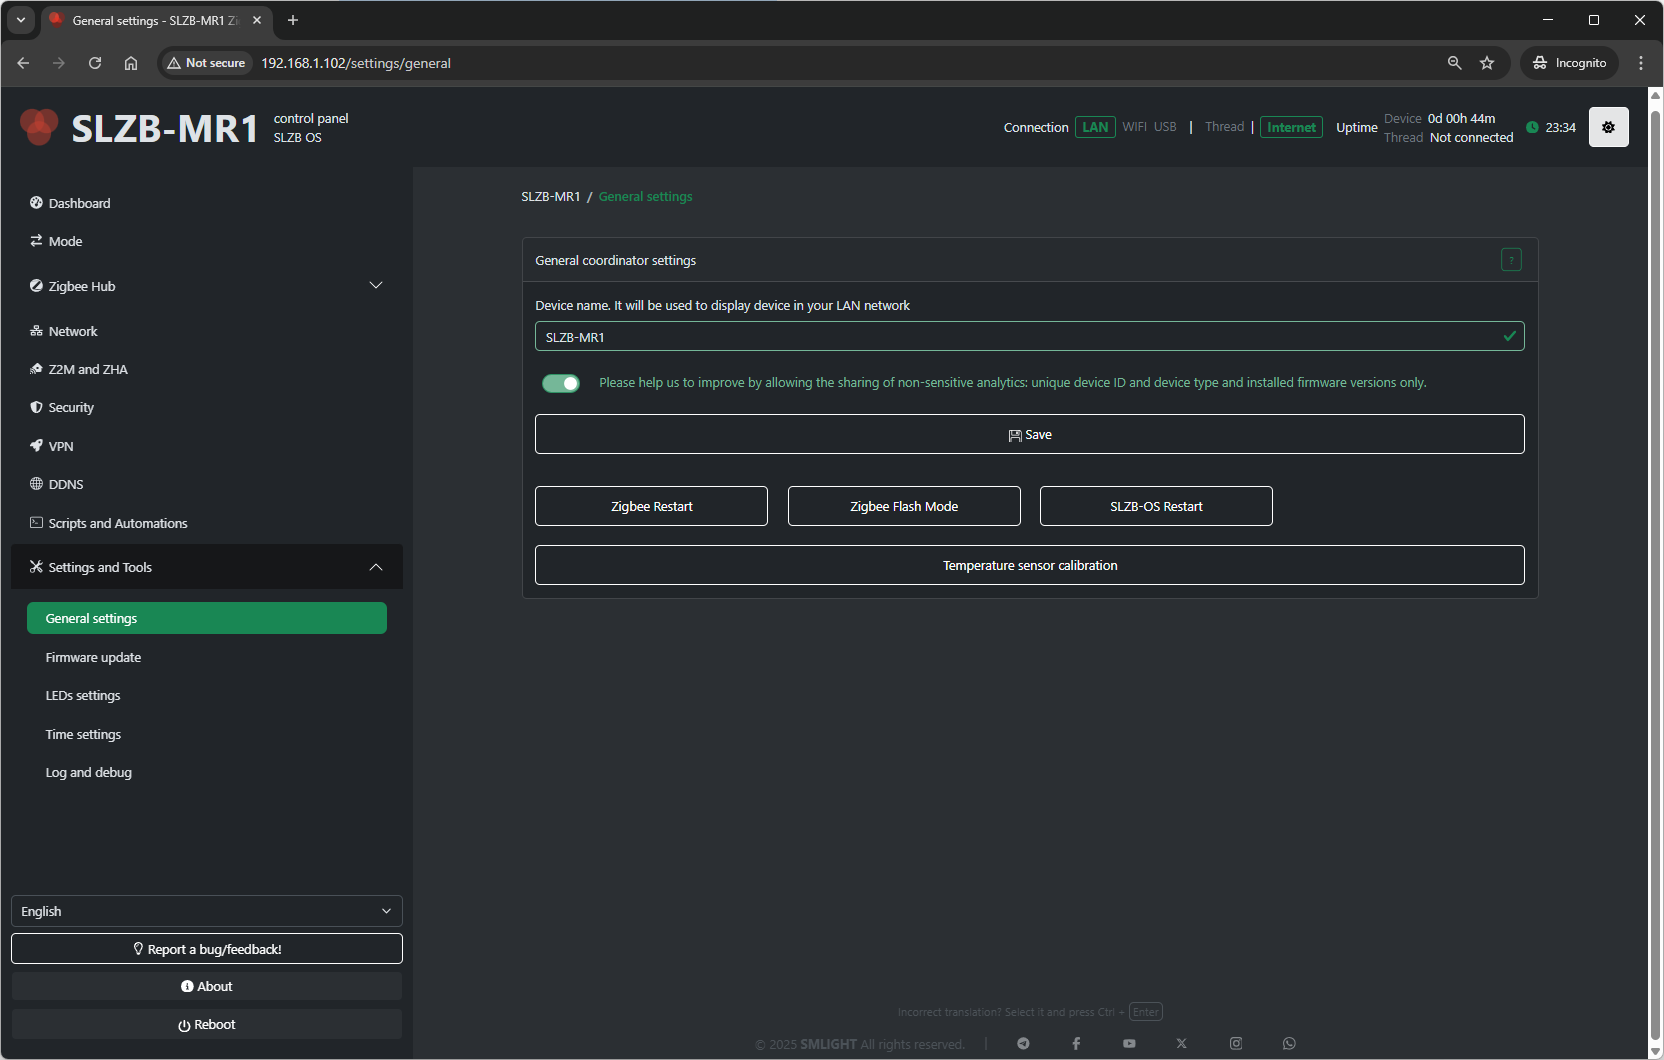
# 12. Settings & Tools
The **Settings & Tools** section in SLZB-OS contains core configuration and maintenance options that apply to the entire coordinator, regardless of the selected Zigbee mode or network configuration.
---
[](https://smlight.tech/support/manuals/uploads/images/gallery/2025-08/ClZimage.png)
## 12.1 General Settings
### 12.1.1 Device Name
- Sets a friendly name for your coordinator.
- Appears in the web interface header and can help distinguish multiple devices.
### 12.1.2 Update Check Interval
- Defines how often SLZB-OS checks for firmware updates (in hours).
- Minimum: **1 hour**; Maximum: **168 hours** (1 week).
### 12.1.3 Enable Remote Support Mode
- Allows temporary remote access by SMLIGHT support (if instructed).
- For troubleshooting purposes only.
---
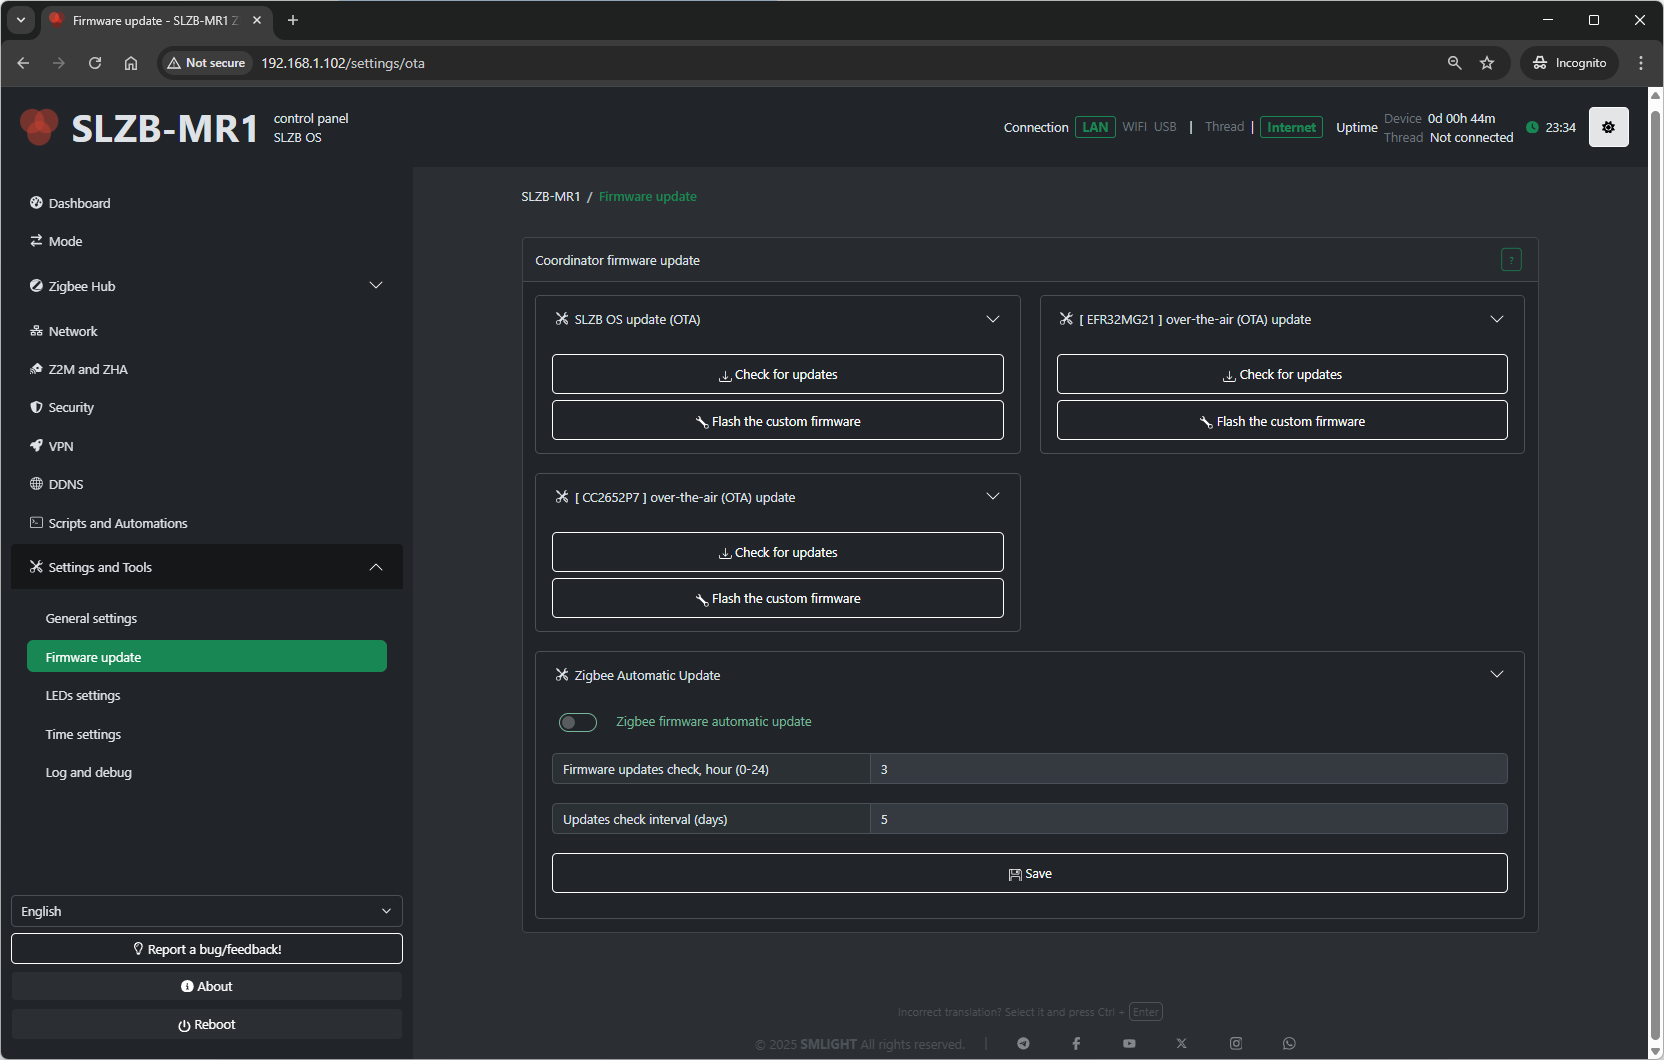
## 12.2 Firmware Update
The **Firmware Update** page allows upgrading SLZB-OS to the latest release or a specific version.
[](https://smlight.tech/support/manuals/uploads/images/gallery/2025-08/sY0image.png)
### 12.2.1 Update Methods
1. **Online Update**
- Fetches and installs the latest stable firmware from SMLIGHT servers.
2. **Manual Upload**
- Lets you upload a `.bin` firmware file from your computer.
### 12.2.2 Update Process
1. Select update method (online or manual).
2. Confirm and start update.
3. Device will reboot automatically after installation.
> **Note:** Updating SLZB-OS does **not** affect your Zigbee network data — Zigbee pairing and configuration are stored in Zigbee2MQTT/ZHA, not in the core firmware.
---
### 12.2.3 Automatic Zigbee Firmware Updates
- **Enable Zigbee Automatic Updates** (checkbox):
- When enabled, SLZB-OS will automatically check for Zigbee firmware updates **every # DAY** and **TIME** (for example, every fifth day at 3 am)
- If a new version is found, the Zigbee chip will update automatically.
- This process restarts the Zigbee component — ensure your Zigbee2MQTT or ZHA setup is ready to reconnect devices after the restart.
## 12.3 LED Settings
This page configures the behavior of the onboard status LEDs.
[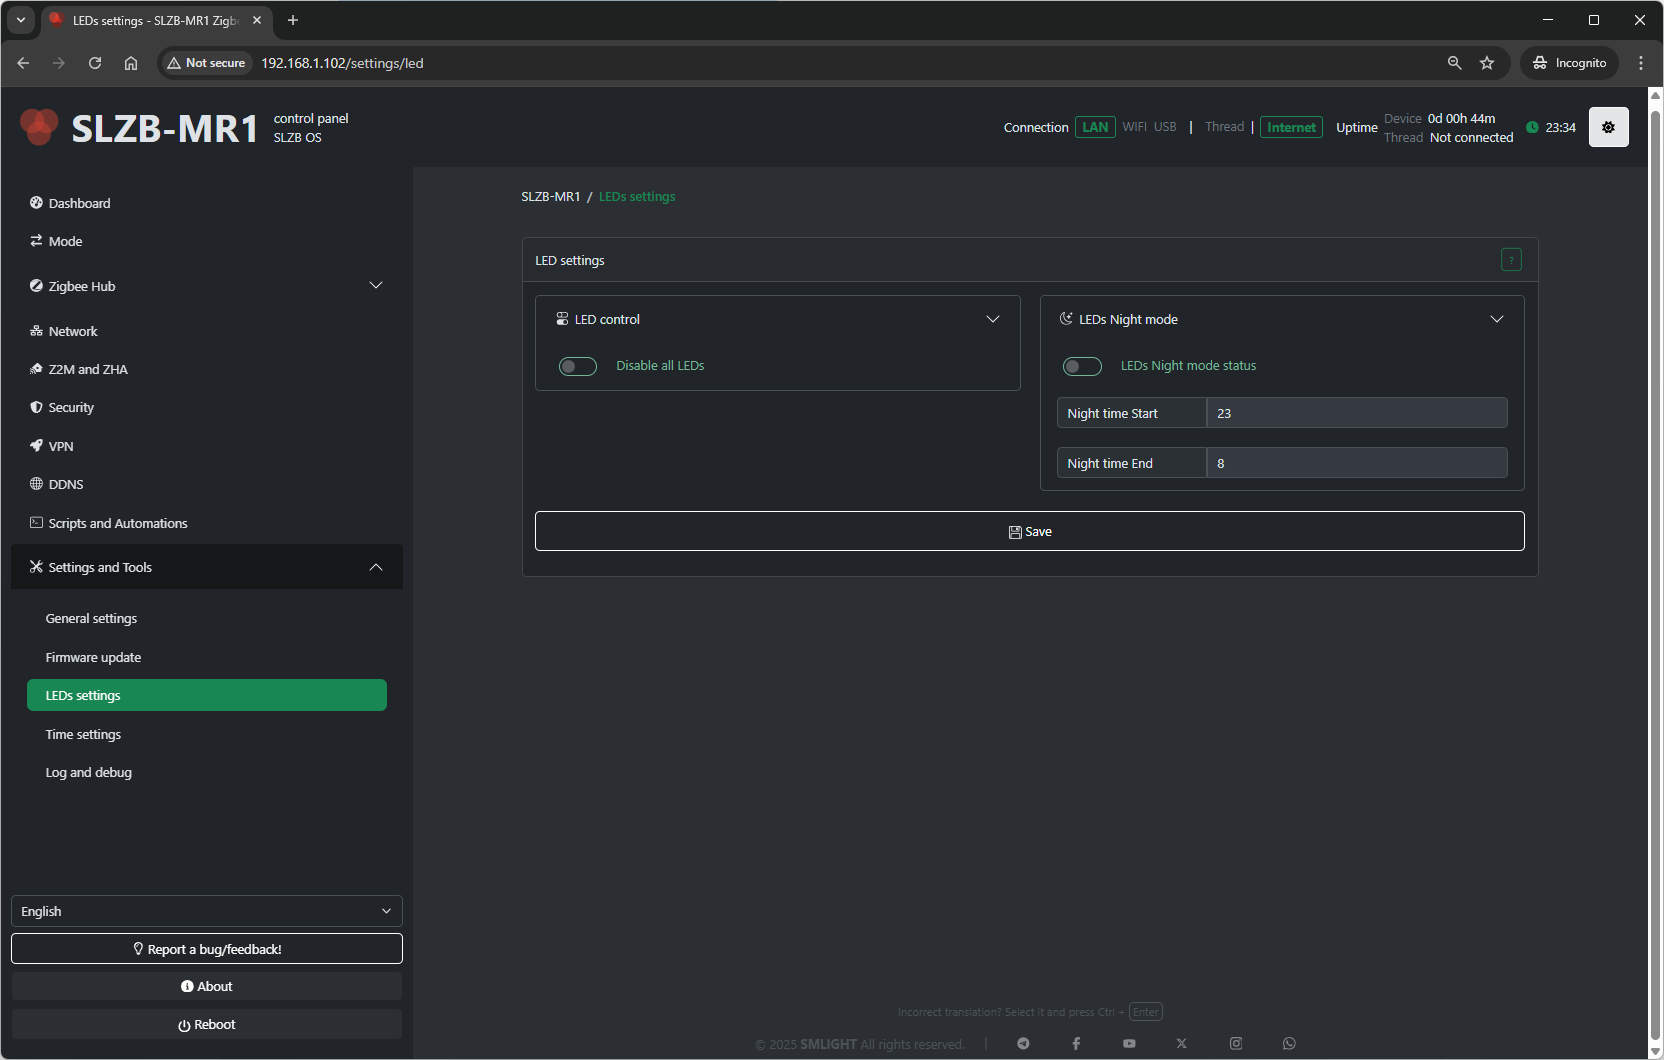](https://smlight.tech/support/manuals/uploads/images/gallery/2025-08/JwDimage.png)
### 12.3.1 LED Modes
- **Always On** – LEDs remain lit continuously.
- **Always Off** – LEDs are disabled entirely.
- **Status Indication** – LEDs display network or coordinator activity.
- **Blink on Activity** – LEDs flash when Zigbee or network events occur.
### 12.3.2 Brightness
- Adjusts LED brightness (0–100%).
---
## 12.4 Time Settings
[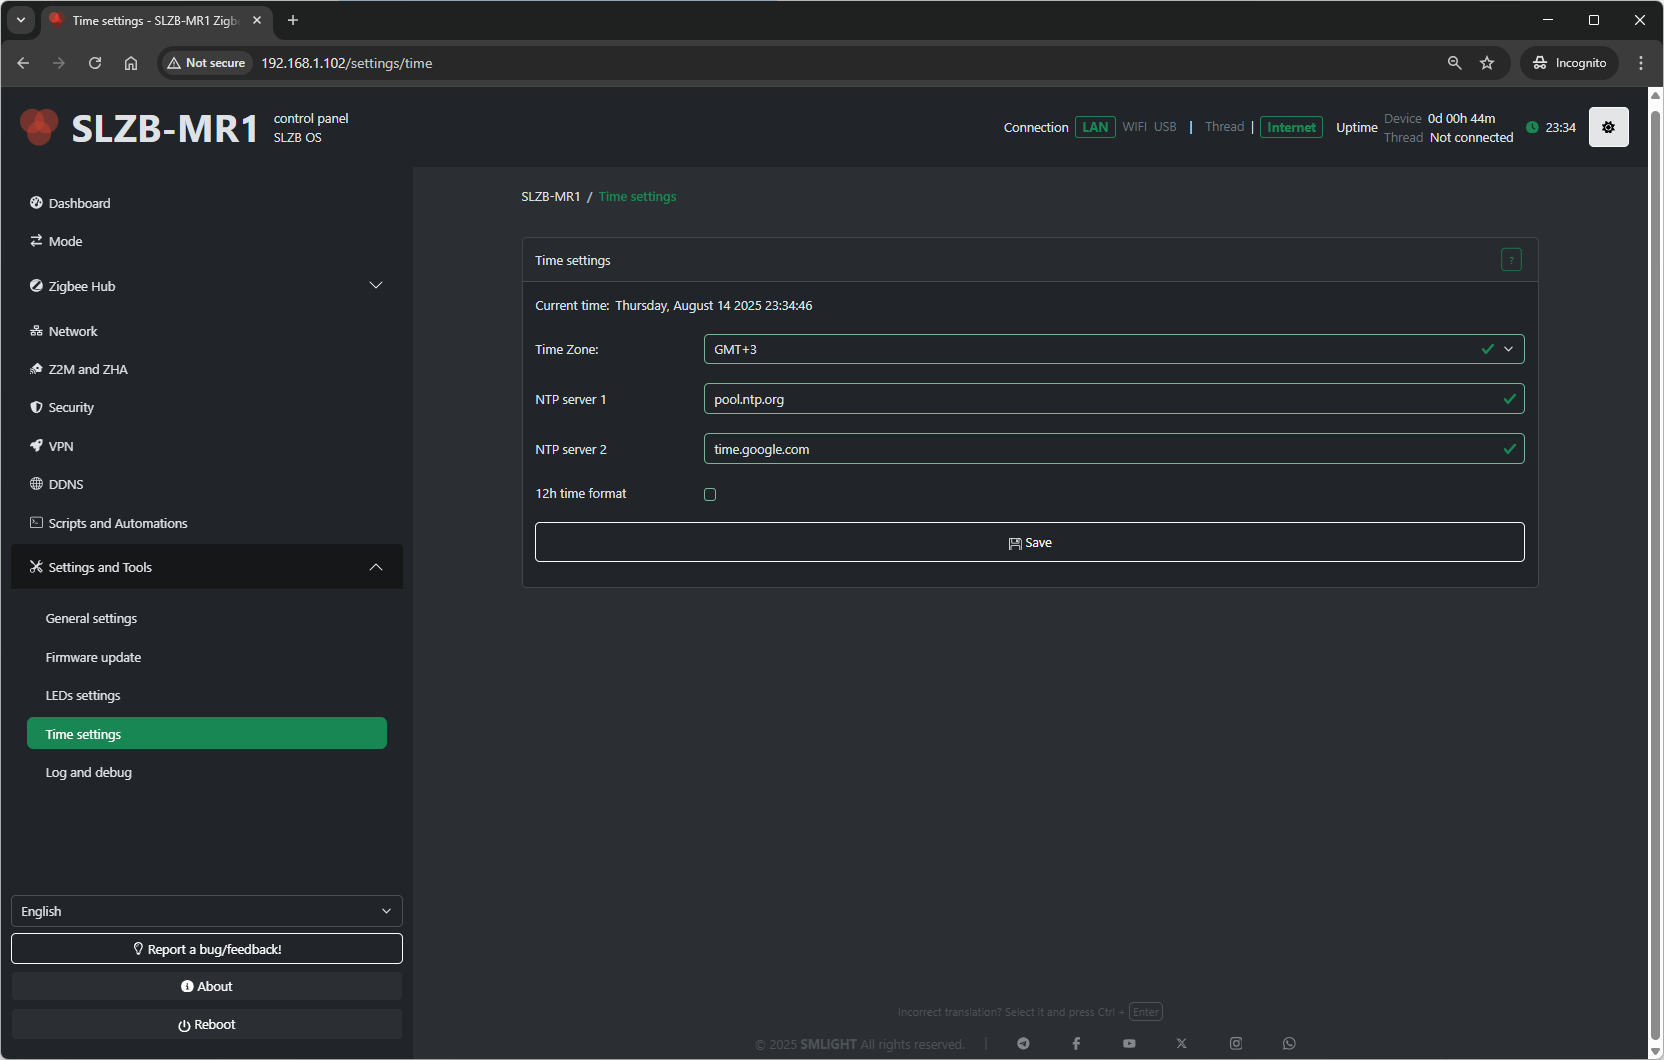](https://smlight.tech/support/manuals/uploads/images/gallery/2025-08/ZhWimage.png)
### 12.4.1 Time Zone
- Select the time zone for the coordinator’s internal clock.
### 12.4.2 NTP Server
- Specify the Network Time Protocol (NTP) server used for synchronization.
- Default is a public NTP pool, but you can set a local NTP server.
### 12.4.3 Manual Time Set
- Option to set time and date manually if NTP is not used.
---
## 12.5 Log and Debug
This section helps in troubleshooting and monitoring.
[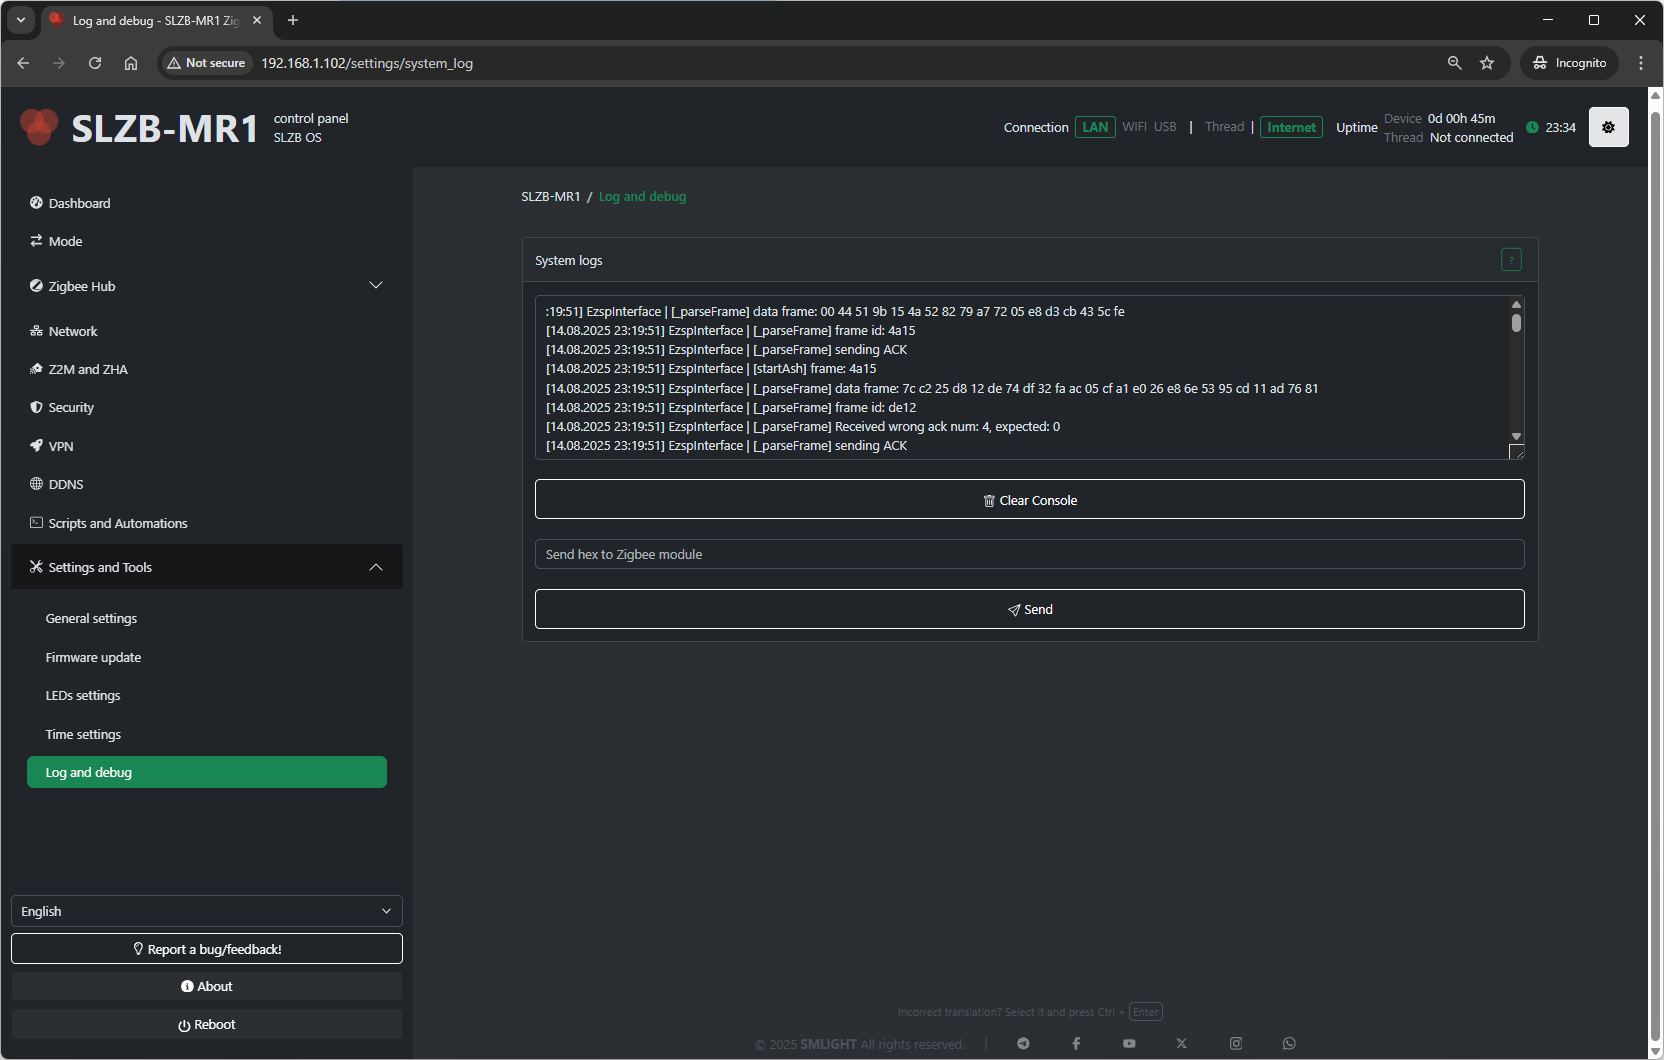](https://smlight.tech/support/manuals/uploads/images/gallery/2025-08/GDLimage.png)
### 12.5.1 Clear Logs
- Deletes all stored logs on the device.
# Additional features
# 13. Report a Bug / Feedback
The **Report a Bug / Feedback** page in SLZB-OS is dedicated to collecting your input to improve your experience with the smart home Zigbee coordinator.
---
[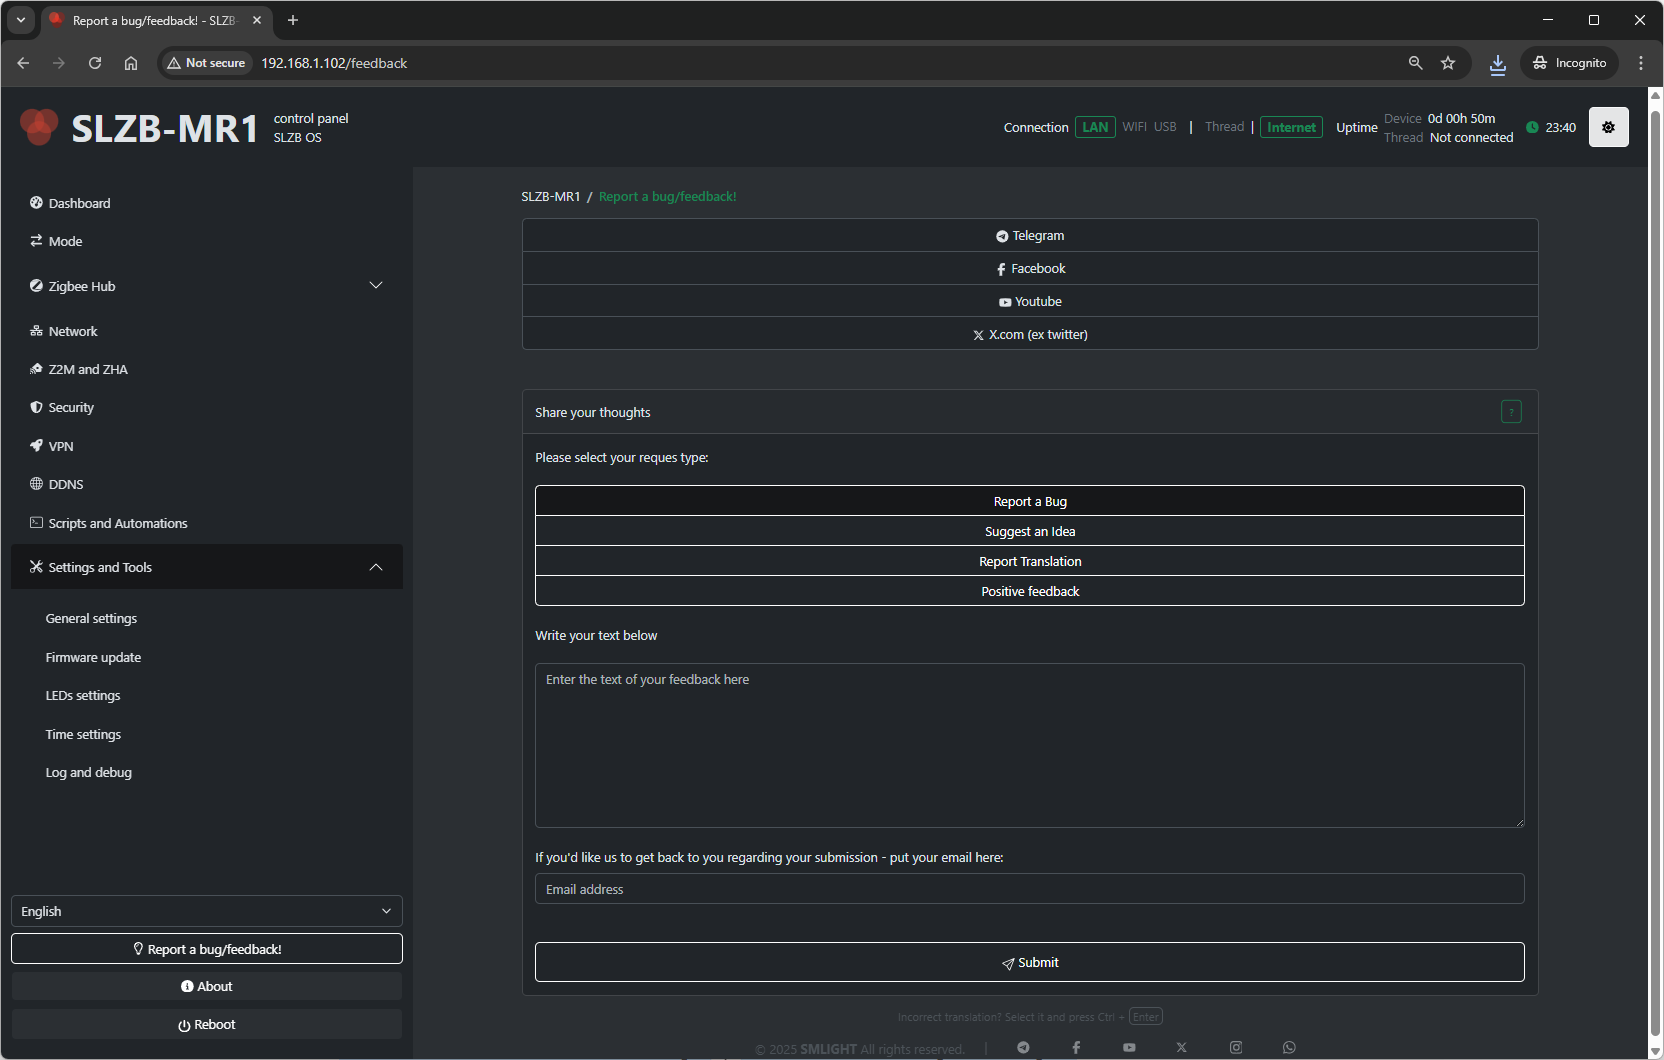](https://smlight.tech/support/manuals/uploads/images/gallery/2025-08/OBnimage.png)
## 13.1 Purpose
From this page, you can:
1. **Report a Bug** – If you encounter issues or unexpected behavior.
2. **Suggest an Idea** – Share innovative thoughts or feature requests.
3. **Report Incorrect Translation** – Notify the team about any translation errors in the interface.
4. **Provide General Feedback** – Offer comments or suggestions about the product.
5. **Leave Positive Feedback** – Share what you enjoy about the device or firmware.
---
## 13.2 How to Submit
1. **Select Request Type**:
- Report a Bug
- Suggest an Idea
- Report Translation
- Positive Feedback
2. **Write Your Text** – Enter details about the bug, idea, translation correction, or general thoughts.
3. **Optional Contact Details**:
- Email address – if you want the SMLIGHT team to follow up.
- Name – optional identifier.
4. Click **Submit**.
---
## 13.3 Tips for Useful Reports
- For bugs, include steps to reproduce, what you expected, and what happened.
- Mention your **device model** and **firmware version** (found in the *About* page).
- For translation corrections, specify the language and the exact text that needs improvement.
---
## 13.4 Quick Translation Reporting
If you spot a translation issue anywhere in the interface:
- Highlight the incorrect text.
- Press **Ctrl + Enter** to open a quick report dialog.
---
## 13.5 Privacy
The information you submit is used solely for troubleshooting and product improvement. Technical data from logs will not include Zigbee/Thread/Z-Wave network keys or passwords!
# SLZB-OS API endpoints
## General information
The SLZB-OS operating system has several API channels: HTTP, SSE and MQTT.
When using any of these channels, it is **not recommended to send more than one request per second.** A large number of requests per second **can slow down** the coordinator and **negatively affect stability**.
## HTTP API
- Used by the device's web interface.
- Processed by the built-in web server.
- Single-threaded, all requests are processed in turn
- **NO HTTPS SUPPORT! (And it is not planned)**
### Web-interface API endpoints
Not documented and may change without notice. The primary purpose is for internal use by the web interface system!
You can find all the queries in the developer tools in your browser:
[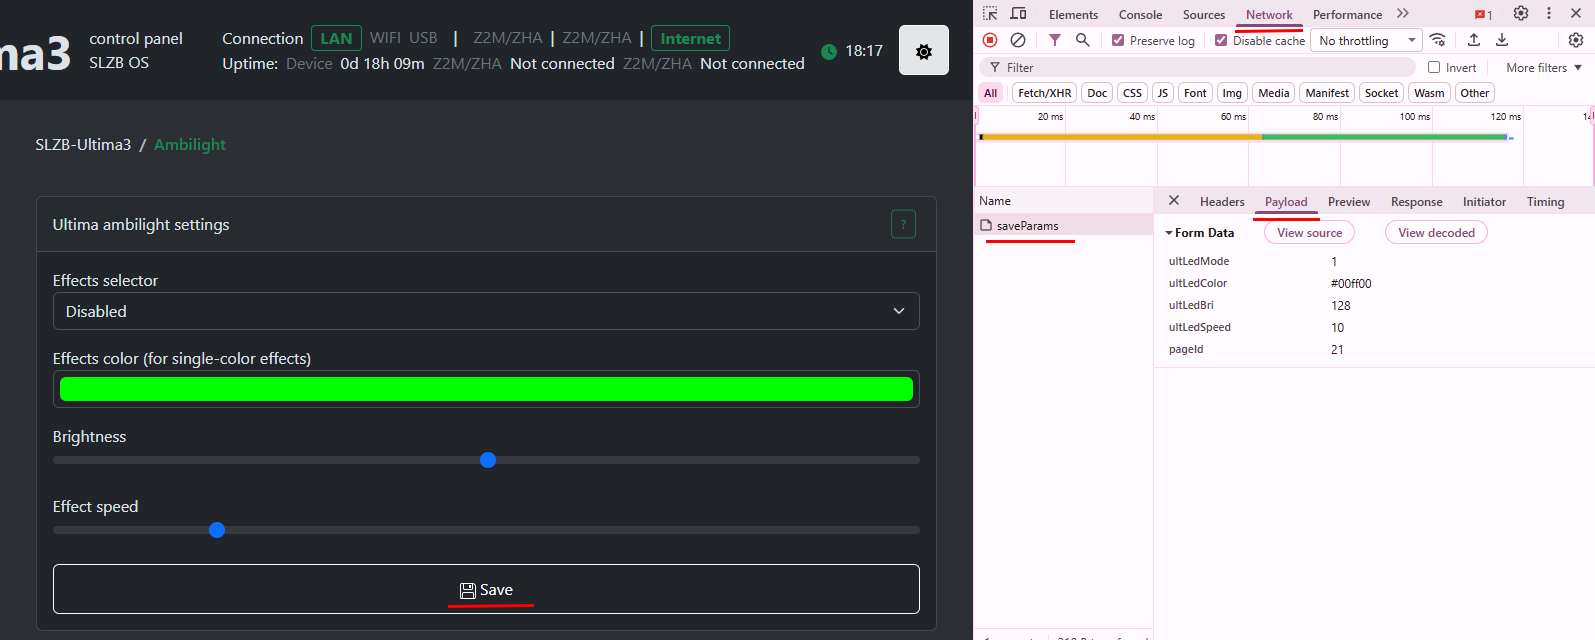](https://smlight.tech/support/manuals/uploads/images/gallery/2026-02/image.png)
### Prometheus metrics
Endpoint: `/metrics`
[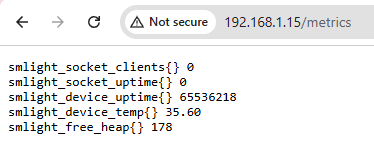](https://smlight.tech/support/manuals/uploads/images/gallery/2026-02/8toimage.png)
### SSE
[https://en.wikipedia.org/wiki/Server-sent\_events](https://en.wikipedia.org/wiki/Server-sent_events)
[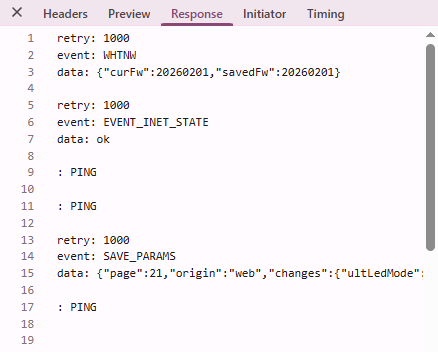](https://smlight.tech/support/manuals/uploads/images/gallery/2026-02/I5Uimage.png)
Endpoint: `/events`
### Home Assistant endpoints
General device information: `/ha_info`
[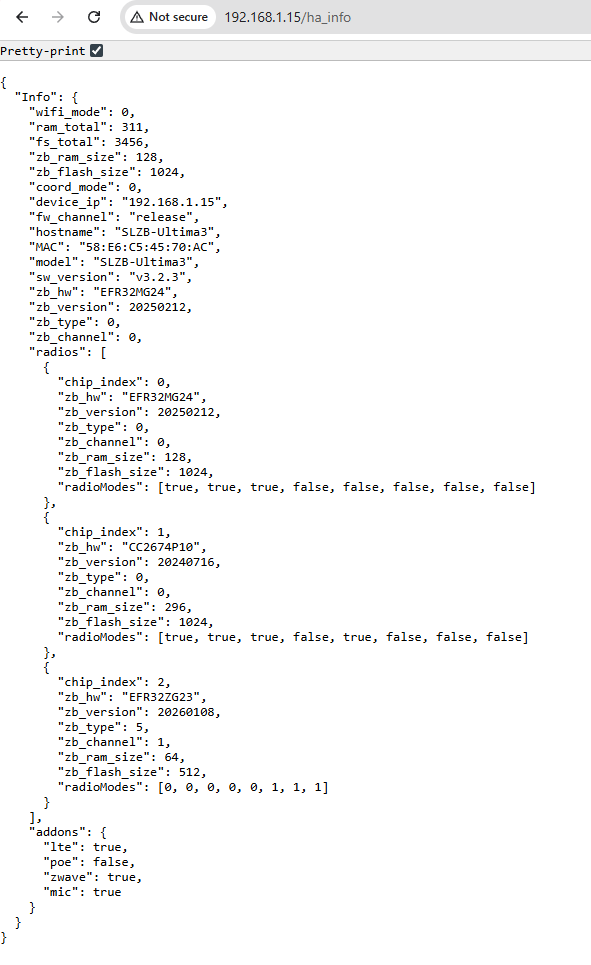](https://smlight.tech/support/manuals/uploads/images/gallery/2026-02/mVfimage.png)
Real time sensors: `/ha_sensors`
[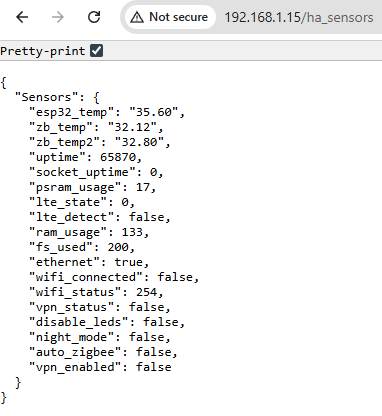](https://smlight.tech/support/manuals/uploads/images/gallery/2026-02/uHQimage.png)
## MQTT API
This API is available from firmware **v3.2.4**
zHub MQTT API can be found here: [https://smlight.tech/support/manuals/books/slzb-os/page/mqtt-api](https://smlight.tech/support/manuals/books/slzb-os/page/mqtt-api)
**ATTENTION! Some topics are reserved by the system!
`/api2/#` topic is reserved for MQTT API usage.
`/cmd/#`, `/write/#`, `/read/#` and `/data/#` topics are used by HA discovery for Zigbee Hub.
Please avoid using these topics.**
### SLZB-Ultima specific
Ultima has a special API for interacting with IR, Ambilight, Buzzer, etc. Other models don't have this!
#### Buzzer Control
Buzzer control topic: `/api2/write/buzzer`
Payload: RTTTL sound pattern
Example: `Arkanoid:d=4,o=5,b=140:8g6,16p,16g.6,2a#6,32p,8a6,8g6,8f6,8a6,2g6`
#### IR Learn & Replay
##### IR Learn
Topic: `/api2/status/ir`
The OS will send information about all received IR messages to this topic.
Example message below:
```json
{
"raw": "472209080a190909090809080a08090809090908090909080a070a08091a090809080a0809080a080908090909080a0809190a0809080909090809080a0809080a08091a0908091a0a19091a09190a080908091a0a0809190a190a19091a09080a190a",
"proto": 11,
"addr": "0x0008",
"cmd": "0x003d"
}
```
"proto" field values:
```
UNKNOWN = 0,
PULSE_WIDTH = 1,
PULSE_DISTANCE = 2,
APPLE = 3,
DENON = 4,
JVC = 5,
LG = 6,
LG2 = 7,
NEC = 8,
NEC2 = 9,
ONKYO = 10,
PANASONIC = 11,
KASEIKYO = 12,
KASEIKYO_DENON = 13,
KASEIKYO_SHARP = 14,
KASEIKYO_JVC = 15,
KASEIKYO_MITSUBISHI = 16,
RC5 = 17,
RC6 = 18,
RC6A = 19,
SAMSUNG = 20,
SAMSUNGLG = 21,
SAMSUNG48 = 22,
SHARP = 23,
SONY = 24,
BANG_OLUFSEN = 25,
BOSEWAVE = 26,
LEGO_PF = 27,
MAGIQUEST = 28,
WHYNTER = 29,
FAST = 30,
OTHER = 31,
```
##### Replay
Topic: `/api2/write/ir`
Raw payload example:
```
472209080a190909090809080a08090809090908090909080a070a08091a090809080a0809080a080908090909080a0809190a0809080909090809080a0809080a08091a0908091a0a19091a09190a080908091a0a0809190a190a19091a09080a190a
```
Starting from SLZB-OS v3.3.0 you can use JSON payload below:
Json payload examples:
```json
{
"proto": 11,
"addr": "0x0008",
"cmd": "0x003d",
"repeats": 5
}
```
```json
{
"proto": 11,
"addr": 8,
"cmd": 61,
"repeats": 5
}
```
```json
{"raw":"472209080a190909090809080a08090809090908090909080a070a08091a090809080a0809080a080908090909080a0809190a0809080909090809080a0809080a08091a0908091a0a19091a09190a080908091a0a0809190a190a19091a09080a190a"}
```
#### Ambilight
Topic: `/api2/write/ambilight`
Payload example:
```json
{"color":"#00ff00","bri":128,"effect":2,"speed":10}
```
If you only need to change one ambilight parameter then you can send only that one:
```json
{"color":"#ffff00"}
```
`color` - LEDs color in #RRGGBB hex format.
`bri` - Brightness from 1 to 255
`effect` - effect to be installed. You can choose between: 0 - Solid, 1 - LEDs disabled, 2 - Blur, 3 - Rainbow.
`speed` - speed for this effect. Range: 1 - 50
# USB to Ethernet passthrough mode
## General information
This feature is supported only by "**U**" series devices and SLZB-Ultima
(CPU model: ESP32S3)
USB to Ethernet passthrough mode allows connecting a USB device to your coordinator USB port (directly or via a USB hub) and using such USB devices remotely over IP.
For example, a USB Z-Wave adapter can be connected and used remotely, similarly to an Ethernet-based Z-Wave coordinator.
## What devices can be connected?
1. Devices on **CP210x** chipset
2. Devices on **PL2303** chipset
3. Devices on **CH340** chipset
4. Devices on **CH341** chipset
5. Devices on **CH9102** chipset
6. Other **CDC-ACM** devices
We cannot guarantee support for all third-party CDC-ACM devices.
## How many USB devices can be connected?
If the "Use new USB driver" option is disabled - one USB device.
With the "Use new USB driver" option active, 2 USB devices can be connected, but **ONLY ON THE CONDITION THAT THEY ARE BOTH ON THE CP2102x CHIPSET!**
## How much power can the coordinator provide via USB?
The coordinator can provide up to 1A.
The optimal current is 500mA.
If you are using a **powered** USB hub, please make sure that PoE is disabled!
It is **forbidden** to use **PoE** and a **powered** USB hub at the **same** time!
## USB to Ethernet passthrough setup
### 1. Mode select
Open the "USB" page and activate "Enable USB to Ethernet passthrough mode" and "Use new USB driver"
[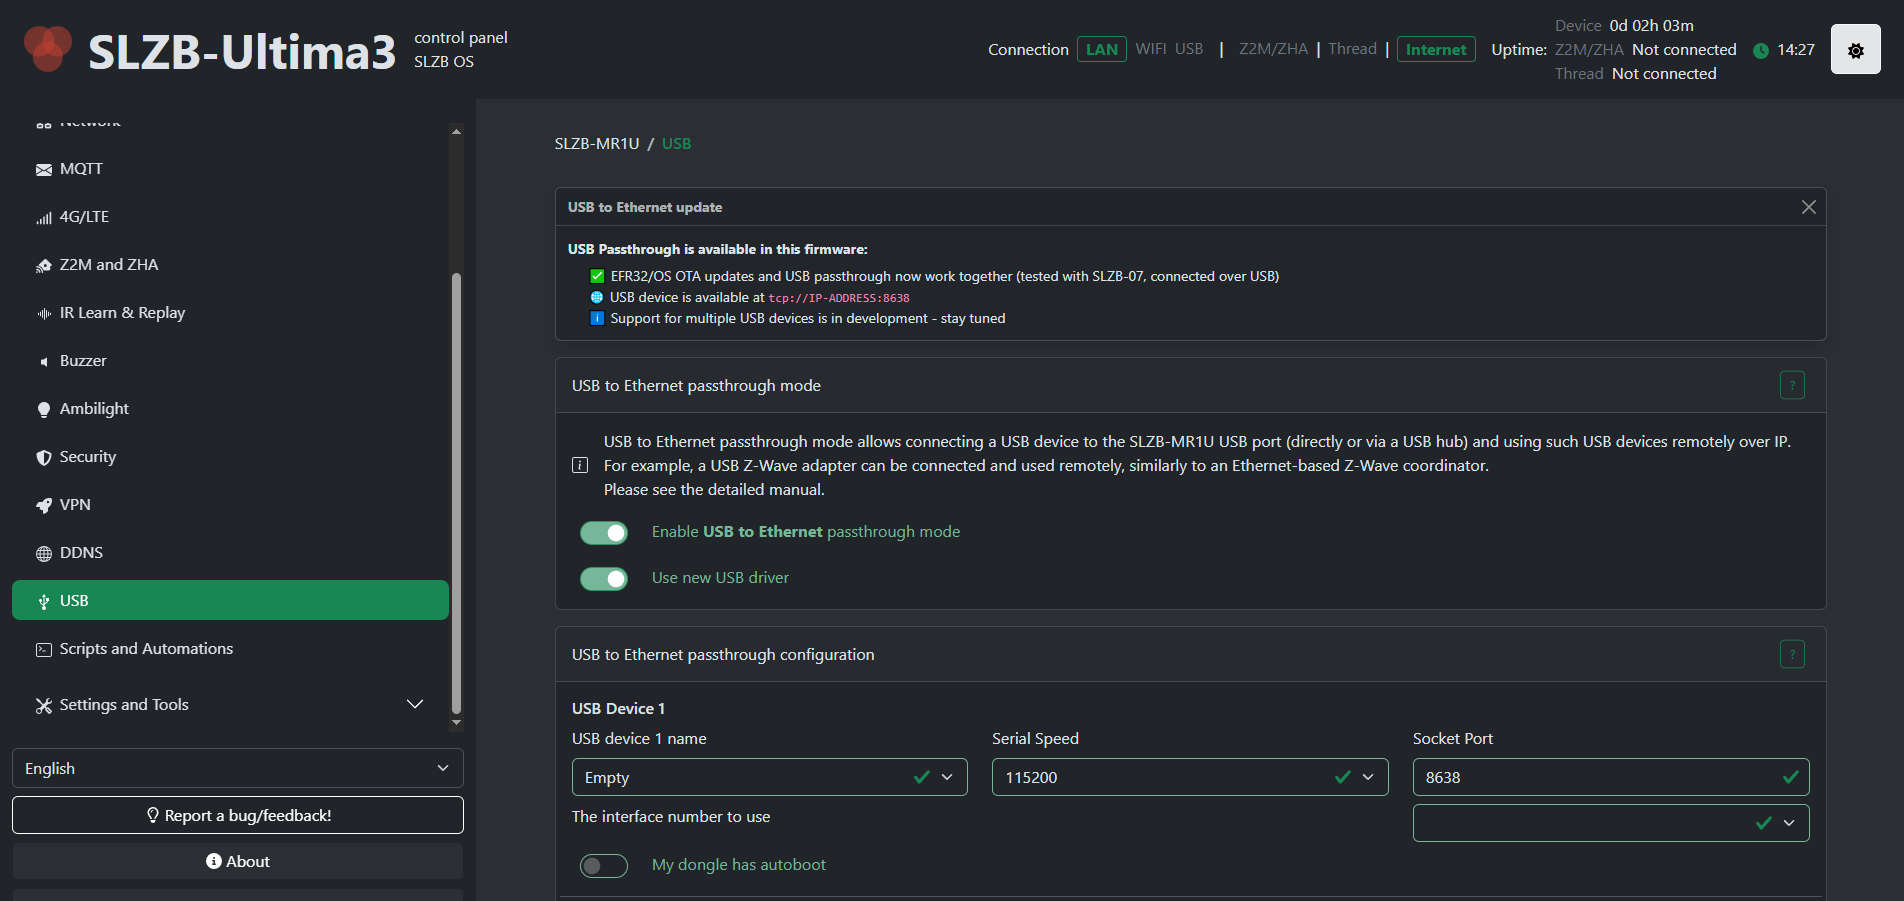](https://smlight.tech/support/manuals/uploads/images/gallery/2026-02/2Bwimage.png)
We recommend using the "Use new USB driver" option as the new driver provides greater stability and a wider list of supported USB devices.
**The old driver will be removed in future updates!**
### 2. Connect your USB device and reboot your coordinator
### 3. Select your USB device
Select your USB device from the list.
[](https://smlight.tech/support/manuals/uploads/images/gallery/2026-02/TbNimage.png)
"Empty" - passthrough server disabled.
"Any serial device" - the system will select the first device found and try to open interface 0.
### 4. Set the serial speed
The most common setting is 115200.
The serial speed depends on the firmware of your dongle. If you don't know what to choose, please contact the support service of the dongle manufacturer.
### 5. Choose an interface
[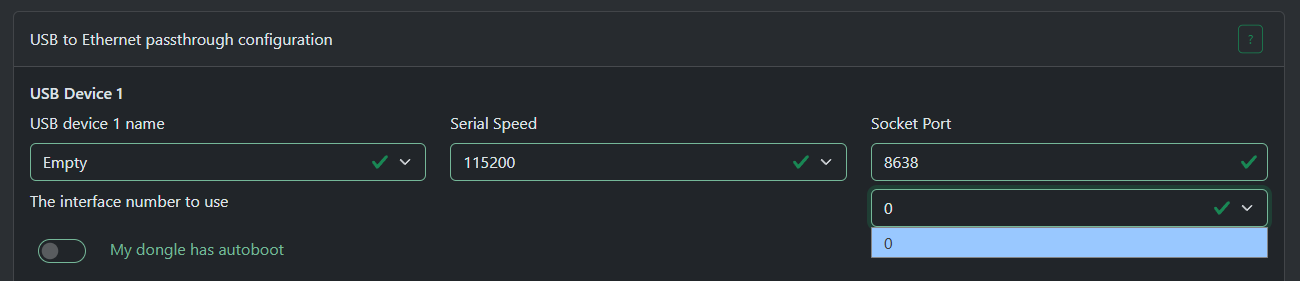](https://smlight.tech/support/manuals/uploads/images/gallery/2026-02/ztgimage.png)
Most USB devices will only have one interface - interface 0.
But some devices may have several: for example one for `firmware update/debug` and another for `communication`.
If your device has multiple interfaces then you will have to try them all until you find correct one.
For **ZWA-2** you need to select interface **1**
### 6. About autoboot
Some dongles have an autoboot circuit that puts the radio module into bootloader mode using the DTR/RTS lines, for example SLZB-07p7/p10.
For such a dongle to work you need to select the option "My dongle has autoboot".
Most dongles that have autoboot use the **CH340** or **CP2102x** chipsets.
If you don't know if your dongle has autoboot, please contact the support service of the dongle manufacturer.
### 7. After setup
After you have selected all the settings, please click the "Save" button and restart the coordinator for the changes to take effect.
### 8. Host application settings
Most programs use the format `tcp://ip:port` or `socket://ip:port`, less often just `ip:port`
```
Examples:
tcp://192.168.50.196:8638
socket://192.168.50.196:8638
192.168.50.196:8638
```
If your host program has "RTS/CTS" or "Hardware flow control" settings, you should select "**disabled**"
# Wire Guard VPN setup
## WHAT IS VPN WIREGUARD
This is a feature of SLZB-OS that allow them to connect to remote Home Assistant / Zigbee2MQTT server through secure VPN tunnel without any additional hardware. [WireGuard](https://github.com/hassio-addons/addon-wireguard/blob/main/wireguard/DOCS.md) is an extremely simple yet fast and modern VPN that utilizes state-of-the-art cryptography. It aims to be faster, simpler, leaner, and more useful than IPsec while avoiding the massive headache. It intends to be considerably more performant than OpenVPN.
## Current VPN limits
Via VPN, the following is currently available:
- Webserver
- Radiomodules (sockets)
What doesn't work through a VPN:
- Ethernet to WiFi bridge
- MQTT
## 1. Prerequisites
### 1.1. Hardware and Software used
- A server with Home Assistant is installed and running. In this manual, we are using Raspberry Pi 3B+ with a clean fresh install of HAOSS.
- An SLZB-06 family coordinator (firmware version 2.2.6 or later).
- WireGuad add-on, Zigbee2MQTT add-on and ZHA integration.
- The Zigbee device you want to connect remotelly.
### 1.2. IP Address reservation
It is reccomended to reserve a static IP addresses on the router for Home Assistant server and the SLZB-06 family coordinator. In our case, on a TP-Link router, static IP address reservations can be configured under the `Network` >> `DHCP Server` >> `Address Reservation` section.
## 2. Establishing access to your Home Assistant / Zigbee2MQTT
In order to let remote SLZB-06 coordinator to establish secure connection with your Home Assistant / Zigbee2MQTT, coordinator should know how to reach your Home Assistant. There are two options here:
- if you do not have a white IP address - you can use intermediary services like DuckDNS, that will let SLZB-06 coordinator know how to find your Home Assistant (so coordinator will knock to the doors and ask "Hey, may I connect to your Wireguard Add-on and establish a secure tunnel?").
- if you have a white IP address - you can open a port to access your Home Assistant directly without intermediary services like DuckDNS (although you can use DuckDNS togather with white IP address).
TIP
You need to use only one option - if you do not have white/static IP address from your provider - use DuckDNS, if you have - either open port or use service like DuckDNS as well.
Lets looks through both options.
### 2.1. Port forwarding
The location of this function may vary depending on your router. On a TP-Link router, it can be found under `Advanced` >> `NAT Forwarding` >> `Port Forwarding`. Add a port forwarding rule in which you specify:
Service Name: `wireguard`
Device IP Address: `IP address of Home Assistant` (in our case 192.168.0.103)
External Port: `51820`
Internal Port: `51820`
Protocol: `UDP`
### 2.2. DuckDNS set-up
#### 2.2.1. Duck DNS domain registration
1. Visit the [duckdns.org](https://www.duckdns.org/) website and log in using your preferred method.
2. Create a unique domain name, such as slzb-06, enter it in the domains section and click add domain. This will add the new domain to your list of domains.

**WARNING
DuckDNS is not compatible with CGNAT!**
#### 2.2.2. Install Duck DNS add-on
1. We'll need to install the DuckDNS add-on in Home Assistant. Head over to the Left panel within Home Assistant click `Settings` and choose `Add-ons`.
2. Navigate to the Add-on Store and search for `Duck DNS` add-on. Click `Install` and wait for the installation to complete.
3. Once installed, click `Configure` tab on the top side of the add-on.
#### 2.2.3. Duck DNS add-on configuration
TIP:
Keep your DuckDNS token private!
1. In the `Domains` field, enter the domain you created in Duck DNS. In UI mode, delete the empty domain.
2. In the `Token` field, enter your Duck DNS token.
3. In the `Lets Encrypt` section, set `accept_terms` to true.
4. Save settings and run add-on.
duckdns-addon-config

Once these steps are completed, you can use the Duck DNS address as the host in Wireguard and as the Endpoint hostname in the coordinator's web interface.
## 3. WireGuard add-on setting-up and configuration
### 3.1. Wireguard add-on installation
1. We'll need to install the WireGuad add-on in Home Assistant. Head over to the Left panel within Home Assistant click `Settings` and choose `Add-ons`.
2. Navigate to the Add-on Store and search for `WireGuard` Add-on. Click `Install` and wait for the installation to complete.
3. Once installed, click the `Configure` tab on the top side of the add-on.
### 3.2. WireGuard add-on configuration in Home Assistant
The configuration is divided into two parts: the server side and the client side.
#### 3.2.1. Server side:
`host`: The public IP address that clients can use to access WireGuard. This guide uses a static public IP address. However, you can also use DuckDNS.
`address`: The IP address assigned to the WireGuard add-on interface. For a WireGuard network, it is recommended to use a different network than the main one to avoid routing problems. Home routers typically use the 192.168.0.0/24 or 192.168.1.0/24 network.
*Network Selection:* The /24 subnet mask is the most common. It determines how many devices can be on the network. A /24 subnet mask allows for 256 IP addresses or 254 connected devices. Two IP addresses are reserved for the network address and the gateway address. The /24 subnet mask is popular because of its simplicity. Every /24 network address always ends with 0. For example, 192.168.0.0/24, 192.168.1.0/24, 192.168.2.0/24, ..., 192.168.255.0/24. For WireGuard, you can choose any arbitrary network. For example, I chose 192.168.10.0/24. You can choose this one or another.
*Host Selection:* Once the network address is selected, you need to choose the host addresses. This includes the WireGuard interface address and the peer addresses. You can use an [IP calculator](https://jodies.de/ipcalc) to see the range of available addresses on the network. In my case, this is the range from 192.168.10.1 to 192.168.10.254. For the WireGuard add-on interface address, I chose 192.168.10.1.
`dns`: For DNS, you can use the router's address, or 1.1.1.1, 1.0.0.1.
#### 3.2.2. Client side:
`name`: Arbitrary client name, e.g., myphone, mylaptop, SLZB-06
`addresses`: Address from the Wireguard network issued to the client. You can take the next address after the Wireguard interface.
`client_allowed_ips`: This is a list of networks that the WireGuard peer is allowed to access. In this guide, this is the main network and the WireGuard network.
```yaml
server:
host: 176.37.187.207 #Avoid publicly sharing your public IP address
addresses:
- 192.168.10.1
dns:
- 192.168.0.1
log_level: debug
peers:
- name: slzb-06
addresses:
- 192.168.10.2
allowed_ips: []
client_allowed_ips:
- 192.168.0.0/24 #Change this address if your main network is different
- 192.168.10.0/24
```
You can add more clients. For example, your phone or another coordinator. To do this, copy the client part, change the name, and increase the IP address by one.
```yaml
- name: slzb-06-2
addresses:
- 192.168.10.3
allowed_ips: []
client_allowed_ips:
- 192.168.0.0/24 #Change this address if your main network is different
- 192.168.10.0/24
```
### 3.3. Getting Wireguard configuration for use at SLZB-06
#### 3.3.1. Using File Editor
1. Install the `File Editor` add-on.
2. Go to the `Configuration` tab and turn off the `Enforce Basepath` switch. This will allow full access to the Home Assistant file system.
4. Open the `File editor` add-on. In the top left corner, click the directory icon. Click the back arrow to go up one level. Select the directory `ssl` >> `wireguard` >> `SLZB-06` >> `client.conf`.

#### 3.3.2. Using Studio Code Server
If you prefer `Studio Code Server`. Open the add-on, on the left Exproler panel in a space, right-click >> `Add Folder to Workspace` >> select the `ssl` directory >> `wireguard` >> click ok. Select the `slzb-06` directory >> `client.conf`.

TIP:
You can run Wireguard in a separate container instead of an HA addon
TIP:
Change `SERVERURL` to your URL wireguard (using some like dudckns if this ip changes )
/path/to/wireguard/config in order to use your config wireguard folder.
### 3a.3. Add route to access client vpn ip's from host and others containers (like zigbee2mqtt)
```shell
wireguard_internal_subnet=$(docker exec wireguard printenv INTERNAL_SUBNET)
wireguard_ip=$(docker inspect -f '{{range.NetworkSettings.Networks}}{{.IPAddress}}{{end}}' wireguard)
ip route replace $wireguard_internal_subnet/24 via $wireguard_ip
```
### 3a.4. Get wireguard connection data
- Go to wireguard config folder and enter into `peer1` or `peer2` and read `peer1.conf` or `peer2.conf`
- Enter this info into SLZB-06
### 3a.5. zigbee2mqtt configuration.yaml for WG container
- Modify line `port: tcp://IP:6638` and replace IP with the IP Address of wireguard container (The `$wireguard_ip` value obtaneid previously)
- Restart Z2M container/addon
## 4. Wireguard configuration on SLZB-06
WARNING
You should never share your private key and public IP address with anyone.
TIP:
Newer versions of Wireguard require a `Preshared Key`. SLZB-06 supports `Preshared Key` starting from firmware version `v2.5.3`
A VPN tunnel allows you to be on one network and connect to another. To add a VPN configuration to the SLZB-06 coordinator, go to the device address, in the left-hand side menu, click `VPN`, and activate the `Enable VPN Wireguard` switch. Transfer local and endpoint IP addresses, and private and public keys from the `client.conf` file. Click `Save`
## 5. Configuring IP routing on Home Assistant server
1. Install the `Advanced SSH & Web Terminal` add-on on your Home Assistant.
2. Go to the `Configuration` tab and in the `password` row set a strong password. The password [can be generated](https://www.lastpass.com/features/password-generator). Click `Save`
3. In the `Info` tab, disable the `Protection mode` switch and start the add-on.
4. Click `Open Web UI` and paste the following command:
```shell
host_result=$(host a0d7b954-wireguard); addon_ip=${host_result##* }; ip route replace 192.168.10.0/24 via $addon_ip; echo $addon_ip
```
where `192.168.10.0/24` is the network that we have allocated for the Wireguard interface and peers. This command tells Home Assistant that to reach the 192.168.10.0/24 network, it needs to go through the IP address of the Wireguard add-on.
To check if the command works, you can view the routing table by running the command `route -n`. If the desired network is in the list, then the command worked. Additionally, you can `ping` the coordinator.
The routing command only works temporarily and then gets erased. To make it permanent, you need to create a sensor in the `configuration.yaml` file and restart Home Assistant. After that, the sensor name will appear in `Devices & Services` >> `Entities`.
```shell
command_line:
- sensor:
name: wireguard_route
command: "host_result=$(host a0d7b954-wireguard); addon_ip=${host_result##* }; ip route replace 192.168.10.0/24 via $addon_ip; echo $addon_ip"
```
# 6. Running ZHA / Zigbee2MQTT with remote SLZB-06
## 6.1. ZHA launch with remote SLZB-06
1. Head over to the Left panel within Home Assistant click `Settings` and choose `Devices & Services`.
2. In the bottom right corner, click the `Add Integration` button, find and select the `Zigbee Home Automation`integration.
3. In the Radio Type window, select the line
- ZNP - for SLZB-06/06p7 and 06p10 (based on Texas Instruments chips) `Submit`.
- EZSP - for SLZB-06M and SLZB-06Mg24 (based on SiliconLabs chips) and click `Submit`.
4. In the Serial Port Settings window, enter `socket://192.168.10.2:6638`. Where 192.168.10.2 is the IP address assigned to the coordinator in Wireguard. Leave the Port speed and Data flow control unchanged and click `Submit`.
5. In the Network Formation window, select the option to create a new network. After following these steps, you should receive a success message.

## 6.2. Running local and Remote SLZB-06 with Zigbee2MQTT via Wireguard
### 6.2.1. Zigbee2MQTT running with local SLZB-06
*MQTT Settings*
1. in Home Assistant go to `Settings` >> `Add-ons` >> `Add-on store` and install the `Mosquitto broker` addon >> enable Watchdog switch, then start it. As of the writing of this manual, the version of the add-on is 6.4.0.
2. Click on the Home Assistant user icon >> User settings section >> and enable the Advanced mode switch.
3. Go to `Settings` >> `People` >> `Users tab` >> click the add user button:
`Display name`: mqtt\_user
`Username`: mqtt\_user
`Password`: mqtt\_password
You can choose your username and password.
4. Go to `Settings` >> `Devices & Services` >> press the Add Integration button >> MQTT >> MQTT
`Broker`: core-mosquitto
`Port`: 1883
`Username`: mqtt\_user
`Password`: mqtt\_password
Press Submit and Finish
*Zigbee2MQTT Settings*
1. Go back to the Add-on store, click `⋮` >> Repositories, fill in `https://github.com/zigbee2mqtt/hassio-zigbee2mqtt` and click Add
2. Install `Zigbee2MQTT` add-on and enable the Watchdog switch. As of the writing of this manual, the version of the add-on is 1.37.1-1.
3. Click on `Configuration` and paste in the following configuration. You need to change the mqtt login and password in it if they differ and the coordinator IP address. Click `Save`. Switch to the info tab and click Start. The add-on takes some time to start, so if you get a `502: Bad Gateway` error try again in a minute.
```yaml
data_path: /config/zigbee2mqtt
socat:
enabled: false
master: pty,raw,echo=0,link=/tmp/ttyZ2M,mode=777
slave: tcp-listen:8485,keepalive,nodelay,reuseaddr,keepidle=1,keepintvl=1,keepcnt=5
options: "-d -d"
log: false
mqtt:
server: mqtt://core-mosquitto
user: mqtt_user
password: mqtt_password #Change password if it is different for you
serial:
port: tcp://192.168.0.109:6638 #Change the IP address to the address of your coordinator
adapter: zstack
```
### 6.2.2. Zigbee2MQTT running with remote SLZB-06 connected via Wireguard
To set up a second Zigbee2MQTT instance, you need to add another slightly modified repository URL to Home Assistant. Each such URL is perceived as new and unique. Here are some examples of modified URLs:
`https://github.com/zigbee2mqtt/hassio-zigbee2mqtt/`
`http://github.com/zigbee2mqtt/hassio-zigbee2mqtt`
`http://github.com/zigbee2mqtt/hassio-zigbee2mqtt/`
`http://www.github.com/zigbee2mqtt/hassio-zigbee2mqtt/`
1. Navigate to the `Add-on store`, click on the three dots `⋮` icon, and then select Repositories. Paste any of the provided links into the URL field.
2. Refresh the page and install the new Zigbee2MQTT instance. Activate the Watchdog switch.
3. Click on the Configuration tab and paste in the following configuration, change the network port and save it.
`data_path`: The directory where the Zigbee2MQTT configuration file is located. By default, this is the /config/zigbee2mqtt directory (the same as homeassistant/zigbee2mqtt/ in File Editor"). For the second network, I created a new directory by changing its name in the add-on settings to /config/zigbee2mqtt\_lan2
`base_topic`: The MQTT topic for publishing messages to and from the Zigbee network. By default, the base topic is called zigbee2mqtt and is used by the first instance. For the second network, I created a different topic by changing its name to zigbee2mqtt\_lan2 in the add-on settings.
`Network port`: By default, port 8485 is used. This port is occupied by the first add-on. For the second instance, I used port 8486 and saved the port settings.
As a result, we will have two instances of Zigbee2MQTT with two different Zigbee networks running independently of each other. Following the example of the second instance, more Zigbee2mqtt instances can be set up.
#### Advanced Config
For advanced Zigbee network configuration, including pan ID, coordinator transmit power, device last seen time, and Z2M logging level, you can utilize a separate Zigbee2MQTT configuration file named `configuration.yaml`.
If the addon has not been started after changing the configuration, the folder and file must be created manually.
For example, if your data path in the addon configuration is called `config/zigbee2mqtt_lan2`, then the directory that needs to be created will be named `zigbee2mqtt_lan2` in the `homeassistant` folder This is the same thing. Then you need to create a new file called `configuration.yaml` and paste the configuration below.
If the addon is running, stop it and completely delete its directory with all subfolders. Create a folder with the same name again, and create a `configuration.yaml` file inside it. After that, you can start the Zigbee2MQTT addon.
```yaml
mqtt:
server: mqtt://core-mosquitto:1883
user: mqtt_user
password: mqtt_password
base_topic: zigbee2mqtt_lan2
version: 5
serial:
port: tcp://192.168.10.3:6638
adapter: zstack
baudrate: 115200
disable_led: false
advanced:
transmit_power: 20
channel: 15
pan_id: GENERATE
network_key: GENERATE
availability_blocklist: []
availability_passlist: []
last_seen: ISO_8601
```
# 7. Pairing Zigbee devices on a remote coordinator
Adding Zigbee devices to a remote WireGuard coordinator is the same as adding them to a local network coordinator.
# 8. Conclusion
As a result of following this guide, we established a secure connection to a remote Zigbee LAN coordinator using a custom Wireguard VPN client.
# 9. Troubleshooting
*z2m: MQTT error: Connection refused: Not authorized*
Check the correctness of the mqtt\_user data. Wrap mqtt\_user and mqtt\_password in quotes like this `"`
*Zigbee2MQTT not adding to MQTT Bridge*
Delete the MQTT integration settings and reconfigure it
*502: Bad Gateway*
Zigbee2MQTT is still starting up, or failed to start. Zigbee2MQTT takes about 1 minute to start. The error also occurs with various addon startup errors. See the logs for Zigbee2MQTT add-on errors.
# Changelog SLZB-OS
### 📦 v3.3.5.dev1 - Release Notes
### Breaking changes in this update!
###### Please read breaking changes note before this update: [documentation](https://smlight.tech/support/manuals/books/slzb-os/page/v335dev1)
### Improvements
- The dashboard now shows a full list of IPv6 addresses when the device is in OTBR mode
- Optimized main loop
- Improved SBL synchronization for EFR32 radios
- Updated Berry ZB module
- Updated Berry HTTP module
- Updated Berry TG module
- Guarded all network-dependent Berry modules from calling before network interface is created. Now this will throw an error instead of a crash.
- MQTT client now supports MQTTS
- Logging system and syslog optimizations
- Blocking multicast traffic at the PHY layer if mDNS is disabled
- OTBR: Now you can change individual network parameters
- OTBR: Added the ability to reset the node, which may be useful if you accidentally specified a broken TLVs and the TLVs are no longer updated
- OTBR: You can change the OTBR REST API port
### Fixes
- Fixed Berry TG module not sending long messages
- Fixed Berry TG module crashing if many messages arrived while it was offline
- Fixed LTE addon not working on Ultima3
- Fixed broken transparent bridge for non-U devices (again)
- Fixed Berry HTTP.isOpened()
- Fixed memory leak in Berry HTTP module
- Fixed broken packet mode for EFR32Mg24 and Mg26
- Fixed race condition on EZSP start for IEEE read/write via web interface
### Zigbee Hub
- New pairing menu
- Experimental converter for Sonoff SMV
- Experimental converter for Third Reality 3RSB22BZ
- Converter for Tuya Zigbee Emergency SOS Button
- Converter for Tuya zy-m100 human presence sensor
- Added missing SSE subscribe for NUMBER dashboard elements
- Added min/max labels for slider elements
- Fixed permit joinig mqtt api
- Fixed broken backup restore dialogs
- Fixed Tyua data query spam that occur for some devices
---
###
### 📦 v3.3.3.dev7 - Release Notes
### Improvements
- Improved firmware rollback mechanics after OTA update. The device will roll back to the previous firmware if a crash occurs within 30 seconds after the update.
- Increased tcp keep alive timeout to prevent socket drops on unstable networks.
- New BLE page and BLE proxy for U line and Ultima devices [documentation](https://smlight.tech/support/manuals/books/slzb-os/page/bluetooth-low-energy)
- New BLE Berry module for U line devices [documentation](https://github.com/smlight-tech/slzb-os-scripts/blob/main/docs/modules/ble.md)
- All Berry scripts on U line and Ultima devices now use PSRAM by default and no longer crash when trying to access the file system.
- RAM optimization for U line and Ultima devices.
- Improved deinitialization for "Thread+OTBR running on device" mode.
### Fixes
- Fixed an issue where a user could accidentally copy the text of a crash message even if the crash did not occur.
### Zigbee Hub
- Fixed JSON validation for system\_control topic
---
### 📦 v3.3.3.dev4 - Release Notes
### Improvements
- Added the ability to select a firmware update channel on the \\"Firmware update\\" page. After selecting, you will only see firmware of the selected channel in the coordinator interface. As of now, this only applies to the coordinator interface (in Home Assistant, you can still see notifications about firmware of another channel)
- For coordinators with EFR32 radio modules, an option to clear NVM has been added to the firmware update dialog. This option is enabled by default to prevent problems when migrating between firmwares. You can still uncheck this in the dialog to not clear NVM.
- Automatic updates will now only use stable Zigbee firmware
### Fixes
- Fixed an issue where empty DNS could be assigned in some cases
- Fixed automatic OTA baudrate update issues
- Fixed IEEE read/write functionality for firmware 20260416 of the EFR32 radio module
### Zigbee Hub
- Fixed discovery payload for illuminance cluster
- Minor improvements to electric valve support
- Fixed handling of custom MQTT commands for cluster ON/OFF
---
### 📦 v3.3.3.dev1 - Release Notes
### Improvements
- Experimental support for SLZB-OS configuration backup/restore
- Optimized the processing speed of SSE messages
- Added a button to copy the device log
- Added autocomplete for TIMER module
- SUN module redesigned [documentation](https://github.com/smlight-tech/slzb-os-scripts/blob/main/docs/modules/sun.md)
- OTBR on device moves from **experimental** to **beta**
- U-series coordinators now store 12x larger device log in PSRAM (50KB vs 4KB)
- (SLZB-Ultima) New "Audio" page and MP3 audio player support!
- (SLZB-Ultima) Added new Berry audio player module [documentation](https://github.com/smlight-tech/slzb-os-scripts/blob/main/docs/modules/audio_player.md)
- (SLZB-Ultima) Added optional argument for number of repetitions for sending IR command for berry IR module [documentation](https://github.com/smlight-tech/slzb-os-scripts/blob/main/docs/modules/ir_transmitter.md)
- (SLZB-Ultima) Improved stability of Z-Wave addon
- (SLZB-Ultima) Improved 4G modem processing
- (SLZB-Ultima) The IR receiver will be disabled while transmitter active
- Added 10s timeout for OTBR startup. If after that the radio module still does not respond - you will see an error on the OTBR page
### Fixes
- Fixed an OS crash that caused OTBR in some cases
- Fixed ZigBee network scanning not working if OTBR is running on radio module 2
- Fixed DNS issues for NAPT bridge mode
- Fixed SPAM in device log when using SMLIGHT SLZB integration
### Zigbee Hub
- Added experimental ZigBee Hub backup functionality
- Added missing subscriptions to new zHub control topics. Now new topics will work (attribute read request, system\_control)
- When creating a new random network, only channels 11, 15, 25 will be used
- Automatic firmware updates of the radio module will be disabled if the Zigbee Hub is active
- Fixed an issue that caused a ZigBee network start error when the network was actually started
- Fixed issues with network key comparing
- Fixed broken Zigbee buttons triggers
---
### 📦 v3.3.1 - Release Notes
### Improvements
- OS will now reboot the EFR32 radios at startup
### Fixes
- Fixed broken static IP config for Trasparent WiFi bridge mode
### Zigbee Hub
- Added attribute read request for MQTT API: [documentation](https://smlight.tech/support/manuals/books/slzb-os/page/mqtt-api#bkmrk-read-topic-%28in%29-%28ava)
- Added new system\_control MQTT API: [documentation](https://smlight.tech/support/manuals/books/slzb-os/page/mqtt-api#bkmrk-system-control-topic)
- Added test converter for "Moes ZS-EUB\_2gang"
---
### 📦 SLZB-OS 3.2.9 - Release Notes
### Fixes
- Fixed Berry Telegram integration
- Fixed boot-loop in WiFi mode when activating OTBR on the device
- Fixed crash when ping is enabled for Wireguard
### Zigbee Hub
- Added a new tab ["Exposes"](https://smlight.tech/support/manuals/books/slzb-os/page/about-zigbee-hub-mode#bkmrk-exposes)
- Fixed crash when saving settings if Zigbee Hub is not enabled
- Fixed LQI unit warning
- Fixed Tuya DP sensor update
- Fixed: ZigBee network always reset when saving settings, even if channel/panId or key was not changed
- **Integrated [30+ services ](https://github.com/smlight-tech/slzb-os-scripts/tree/main?tab=readme-ov-file#modules)**for local automatiations, including **WLED, Telegram, Weather, Slack, Wake-on-Lan, MS Teams, E-mail, OpenWRT**, and more.
- **AI is here:** Added AI Assistant to help users write automation scripts more easily. in Beta test. *Requires AI credentials (so far - Anthropic only).* [Watch the quick 4-minute YouTube overview ](https://www.youtube.com/watch?v=gOi4dls3bGY).
- **SLZB-xU devices** can now try a new **experimental mode** with native **OTBR app** running directly on the SLZB-xU device. *Mode is still experimental, and there is reported bug in some installations - the coordinator may become unavailable after some time. Pattern is unknown, that is why still experimental status.*
### Improvements
- Moved Ethernet processing to **Core 0** for better load balancing.
- Optimized the **scripts virtual machine** for better performance.
- For **U devices**, the **BT Proxy** option now links directly to the activation manual.
- IPv6 has been temporarily disabled for rework.
- All localizations except **EN** have been moved to a cloud server to reduce firmware size. On first opening the coordinator interface, the localization will load in the browser if internet access is available. Without internet access, **EN** will be used.
### Fixes
- Fixed crash on "Playground: AI Assistant" page.
- Fixed visibility of "Playground: AI Assistant" and "Scripts Integrations" pages.
- Fixed metadata overflow crashes for older `.gbl` update files.
- **MRW10/10U** now use the **Z-Wave packet parser**, improving socket stability.
- Fixed a crash in the **hard reset handler**.
### Zigbee Hub
- Replaced the **LQI** unit with **"none"**.
- Fixed logging of values for **Tuya DP**.
- MQTT now sends correct values even for unsupported devices, allowing them to be used in automations.
- Added support for new Zigbee devices.
---
### 📦 SLZB-OS 3.2.7 - Release Notes
### Highlights
- **Integrated [30+ services ](https://github.com/smlight-tech/slzb-os-scripts/tree/main?tab=readme-ov-file#modules)**for local automatiations, including **WLED, Telegram, Weather, Slack, Wake-on-Lan, MS Teams, E-mail, OpenWRT**, and more.
- **AI is here:** Added AI Assistant to help users write automation scripts more easily. in Beta test. *Requires AI credentials (so far - Anthropic only).* [Watch the quick 4-minute YouTube overview ](https://www.youtube.com/watch?v=gOi4dls3bGY).
- **SLZB-xU devices** can now try a new **experimental mode** with native **OTBR app** running directly on the SLZB-xU device. *Mode is still experimental, and there is reported bug in some installations - the coordinator may become unavailable after some time. Pattern is unknown, that is why still experimental status.*
### Improvements
- Moved Ethernet processing to **Core 0** for better load balancing.
- Optimized the **scripts virtual machine** for better performance.
- For **U devices**, the **BT Proxy** option now links directly to the activation manual.
- IPv6 has been temporarily disabled for rework.
- All localizations except **EN** have been moved to a cloud server to reduce firmware size. On first opening the coordinator interface, the localization will load in the browser if internet access is available. Without internet access, **EN** will be used.
### Fixes
- Fixed metadata overflow crashes for older `.gbl` update files.
- **MRW10/10U** now use the **Z-Wave packet parser**, improving socket stability.
- Fixed a crash in the **hard reset handler**.
### Zigbee Hub
- Replaced the **LQI** unit with **"none"**.
- Fixed logging of values for **Tuya DP**.
- MQTT now sends correct values even for unsupported devices, allowing them to be used in automations.
- Added support for new Zigbee devices.
---
### 📦 SLZB-OS 3.2.6.dev3 - Release Notes (dev)
#### 🛠️ Improvements
- SLZB-MRW10 and MRW10U: rewritten socket handling for ZWave to improve stability
- Add Window Covering cluster (0x0102) support to Zigbee Hub mode
- Add Occupancy Sensing cluster (0x0406) support to Zigbee Hub mode
- Added speed 2400 for USB page
- Updated localizations
- Updated datapoint /ha\_sensors
- Added presets for the SLZB-Ultima3 buzzer
#### 🐛 Fixes
- ✅ Fixed logging and sending Tuya DP data for Zigbee Hub mode
- ✅ Fixed running multiple berry scripts
- ✅ Fixed Wireguard (which was broken in a previous build)
---
### 📦 SLZB-OS 3.2.6.dev2 - Release Notes (dev)
#### ✨ Thread + OTBR running on the device - update
Many users have asked for the ability to set TLVs for this mode via SLZB-OS and now you can do this on **/otbr** page!
#### 🛠️ Improvements
- New Ambilight effects for [SLZB-Ultima3](https://smlight.tech/us/slzb-ultima)
- New Berry modules and integrations ([documentation](https://github.com/smlight-tech/slzb-os-scripts))
#### 🐛 Fixes
- ✅ Fixed Zigbee automatic update ignores speed change in new firmware
- ✅ Fixed a crash in Berry error handler
---
### 📦 SLZB-OS 3.2.6.dev0 - Release Notes (dev)
#### ✨ New: Thread + OTBR running on the device (SLZB-xU only) - evaluation/beta mode.
You can now run **OpenThread Border Router (OTBR)** **directly on the SLZB device**, instead of running the OTBR add-on/app in Home Assistant.
**✅ Why this could be a no-brainer:**
- Home Assistant connects to OTBR via **network REST API**, so you no longer rely on the **Serial-over-IP** link used in *“Thread to external OTBR”* mode.
- This aims to improve reliability of Thread connectivity between Home Assistant and SLZB devices fpr those, who experiences issues with connectivity.
**🏠 Home Assistant setup:**
- OTBR REST API is available at **http://device-ip:8080**
**⚠️ Important notes / limitations:**
- **🧪 Initial (beta) integration** — may have limitations or unexpected behavior.
- **🌐 IPv6 is required** and will be **force-enabled** when this mode is activated.
- **🧠** "Thread + OTBR running on the device" mode can't work with **"router (standard)" mode for Ethernet ↔ WiFi bridge** and **Zigbee Hub mode**. To activate back these features, device mode should be othar than "Thread + OTBR running on the device".
- **"Transparent" mode for WiFi ↔ Ethernet bridge** is incompatible with "Thread + OTBR running on the device". If you need "Transparent" mode for WiFi ↔ Ethernet bridge - please use any of the previous versions of the SLZB-OS.
- **🔒 Availability:** only on **SLZB-xU series**.
- **🔁 Alternative:** you can still use **Thread + remote OTBR** mode (USB/Ethernet) if you prefer OTBR running elsewhere.
#### 🛠️ Improvements
- ⏱️ Added uptime info for **Socket2** and **Socket3** in **/ha\_sensors**
#### 🐛 Fixes
- ✅ Fixed a crash in **Zigbee Hub mode** when a received value is larger than expected
---
## 🚀 **SLZB-OS v3.2.5.dev1 - Release Notes**
---
### ✨ **New Features & Enhancements**
- ✅ Zigbee Hub mode: support for Tuya datapoint data writes.
**!BREACKING CHANGE!** Changed the format of the write topic Zigbee Hub for Tuya [Zigbee Hub MQTT API](https://smlight.tech/support/manuals/books/slzb-os/page/mqtt-api#bkmrk-cluster-ef00-%28tuya-d)
- ✅ Zigbee Hub mode: Added support for MOES Star Feather (2-key models)
- ✅ Berry: New BUZZER module for Ultima3 [documentation](https://github.com/smlight-tech/slzb-os-scripts?tab=readme-ov-file#buzzer-for-ultima3-only-available-from-v325dev1---plays-a-melody-on-the-built-in-buzzer)
- ✅ Berry: New BUTTON module [documentation](https://github.com/smlight-tech/slzb-os-scripts/blob/main/README.md#button-available-from-v325dev1---overrides-button-functions)
- ✅ Increased the web server authentication password limit length from 63 to 64 characters
---
### 🐞 **Fixes & Improvements**
- 🐞 Fixed corrupted date/time in time settings
- 🐞 Fixed script list reload on error
- 🐞 Fixed crash when parsing metadata in .gbl files
- 🐞 Fixed random ISR crash on startup
- 🐞 Fixed wrong baudrate for CC26XX radio after factory IEEE read
- 🐞 fixed EFR32 custom firmware flashing issues
- 🐞 Fixed LTE addon start on Ultima3
- 🐞 Fixed Blue LED logic on Ultima3
- 🐞 Fixed AP delay if SSID and password are empty
- 🐞 Fixed memory leak in usb\_list API
- 🐞 Fixed web server lockup when option "Disable web server when socket is connected" is active
---
## 🚀 **SLZB-OS v3.2.4 - Release Notes**
The latest version of **SLZB-OS (v3.2.4)** brings improvements to MQTT integration, internal scripting (automations), Zigbee diagnostics, and overall system stability.
---
### ✨ **New Features & Enhancements**
- ✅ Added **MQTT module** support for scripts, so internal automations can send/receive MQTT messages - [View usage examples](https://github.com/smlight-tech/slzb-os-scripts?tab=readme-ov-file#mqtt-available-from-v324---receivingsending-mqtt-messages)
- ✅ Introduced **MQTT API support for SLZB-Ultima** - control IR receiver, Transmitter, Buzzer, WS2812 via MQTT (alongside with HTTP control method) - [Read MQTT API docs](https://smlight.tech/support/manuals/books/slzb-os/page/slzb-os-api-endpoints#bkmrk-mqtt-api)
- ✅ **MQTT can now be activated independently** of Zigbee Hub
- ✅ Pinned socket tasks to **dedicated core** for improved performance
- ✅ Zigbee channel scanning added for **MR devices** (on Z2M/ZHA page)
- ✅ Display of **USB mode** added for non-U series devices
- ✅ IEEE-related controls disabled for **Thread** or **Zigbee Router** firmware
- ✅ Added **SSE module** for internal scripting
---
### 🐞 **Fixes & Improvements**
- 🐞 Fixed possible **web server overflows** during reboot waits
- 🐞 Fixed MQTT discovery crashes in **Zigbee Hub** mode
- 🐞 Optimized overall **web server performance**
- 🐞 Fixed incorrect **baudrate info** for radio3 on Ultima
- 🐞 Fixed **syslog-related crashes**
- 🐞 Hidden socket statuses for **USB mode on U devices**
- 🐞 Fixed incorrect display of **Z-W addon info** on Ultima
- 🐞 Tuned **serial settings** for improved communication
- 🐞 Fixed **router reconnect** issue on MR4
- 🐞 Fixed incorrect baudrate / crash during **.gbl metadata parsing**
- 🐞 Fixed **radio module OTA updates** in USB mode (U series)
- 🐞 Fixed **IEEE read issue** for MR1U
- 🐞 Fixed **bs-target display issue** in addons accordion
- 🐞 Fixed **socket time/status reporting**
---
## 🚀 **SLZB-OS v3.2.0 - Release Notes**
We’re happy to announce the release of **SLZB-OS v3.2.0** - a stability-focused update with new device support, major improvements for U-series USB functionality, and multiple Zigbee Hub reliability enhancements.
---
### ✨ **Highlights**
- ✅ **FULL support of SLZB-Ultima added** - [SLZB‑Ultima](https://smlight.tech/global/slzb-ultima)
- ✅ Improved **USB capabilities for U series** (new alternative driver)
- ✅ Better stability during **OTA updates** and **Zigbee Hub operation**
- ✅ Updated dashboard layout
---
### 🆕 **New Features**
- ✅ Added **Full support for the new SLZB-Ultima device** - [Learn more](https://smlight.tech/global/slzb-ultima)
- ✅ New **alternative USB driver** can be selected on the **"USB"** page (U series)
- Provides advanced USB capabilities
- ✅ USB passthrough now supports **1200 baud**
---
### 📡 **Zigbee Hub Improvements**
- ✅ Zigbee Hub now includes a **Reset option** if startup fails
- ✅ Zigbee Hub now **stops automatically** when an OTA update is in progress
- ✅ Added missing Zigbee Hub device configurations after reboot
- ✅ Added Zigbee Hub reset option for recovery when startup fails
- ✅ Fixed a Zigbee Hub crash that could occur in some situations on the **U series**
---
### 🔌 **USB & Passthrough**
- ✅ Added selectable **new alternative USB driver** on the USB settings page (U series)
- ✅ USB passthrough now supports **1200 baud**
- ✅ Zigbee OTA now working in **USB mode** on U series devices
---
### 🌐 **Wi‑Fi & Network**
- ✅ Wi‑Fi connection now checks **hidden SSIDs** when connecting
- ✅ Fixed rare crash when using Wi‑Fi in some cases
---
### ⚙️ **OTA & System Stability**
- ✅ Reboot confirmation modal is now shown **only when reboot is actually required**
- ✅ Dashboard layout updated for improved usability
- ✅ Fixed WDT (watchdog timer) triggering during OTA updates in some cases
---
### 🛠️ **Other Fixes and Improvements**
- ✅ Fixed Berry VM manager free logic
- ✅ Fixed language cache issues
- ✅ Fixed MR3U EFR32 bootloader issues
- ✅ Fixed wrong IEEE writes after reboot for CC radio modules
- ✅ SLZB‑06Mg26U now uses a **separate Zigbee OTA firmware**
---
### **SLZB-OS v3.0.9**
We’re excited to release **SLZB-OS v3.0.9**, bringing major improvements to **Zigbee Hub**, **Thread**, and **network stability**, along with performance boosts, script engine fixes, and a few critical updates.
---
#### ⚠️ **BREAKING CHANGES - ONLY FOR ZIGBEE HUB MODE USERS - NO EFFECT ON ZIGBEE2MQTT OR ZHA USERS!!!**
**If you use device as Zigbee coordinator (with Zigbee2MQTT or ZHA) / Thread router - it does not affect you. Again, this change is only for those who use device in a Zigbee Hub Mode.**
- **❗ Zigbee Hub Users:** All Zigbee devices must be **re-paired** after this update due to core changes in the Zigbee stack and API.
- **❗ MQTT Broker Format Changed:**
- Old format: '`mqtt://example.com`'
- New format: '`example.com`' (or, IP format: '`127.0.0.1`')
You can now use DNS and DDNS hostnames for your MQTT broker.
- 📘 Updated MQTT API for Zigbee Hub: [View the new MQTT API documentation](https://smlight.tech/support/manuals/books/slzb-os/page/mqtt-api)
---
#### 📡 **Zigbee Hub Improvements**
- ✅ Redesigned Zigbee Hub network startup - now significantly faster
- ✅ Hub now responds to **Time attribute** and **Identify queries**
- 🐞 Fixed: Some Zigbee devices not sending reports in Hub mode
- 🐞 Fixed: Zigbee Hub mistakenly available for EFR32 on MRx devices
#### 🌐 **MQTT & DDNS Enhancements**
- ✅ MQTT Broker now accepts plain domain names, not only IP addresses
- ✅ "IP Provider" setting for DDNS is now optional
- 🐞 Fixed DDNS update interval and max value behavior
- 🐞 Fixed excessive DNS requests from NTP client
#### ⚡ **Performance & System Stability**
- 🔧 Increased socket task priority for better responsiveness
- 🔧 Moved secondary tasks on U series to PSRAM for improved memory usage
- 🔧 Improved Thread stability for U series devices
- 🔧 Enhanced EFR32x bootloader activation routine
- 🔧 Improved USB power switch logic on U series
- 🐞 Fixed second radio status display in web interface header
#### 🧩 **Berry Script Engine (zHub)**
- 🛠 Improved support for `sendTuyaData()`
- 🛠 Fixed `readAttr()` not returning correct values
#### 🌍 **Localization**
- 📘 Updated and improved UI translations across supported languages
#### 💡 **How to Update SLZB‑OS**
You can update your coordinator using one of the following methods:
- **🔄 OTA Update (Recommended):**
Open the SLZB Web UI → `Settings and Tools → Firmware updates → Check for updates (SLZB-OS)`
- **🔌 USB Update (Manual Flash):**
Go to [smlight.tech/flasher](https://smlight.tech/flasher/#SLZB-06), select your model, and follow the flashing instructions.
# Bluetooth Low Energy
**Please note!**
Currently, the BLE proxy for SMLIGHT SLZB integration is under development and BLE proxy support is expected in the **2026.8** Home Assistant release. Therefore, by activating "Proxy advertisements" now, you will not start receiving BLE notifications inside HA until you update HA to **2026.8** release.
General information
SLZB-OS supports receiving BLE advertisements for U series and Ultima devices (ESP32-S3 devices).
**Active BLE connections are not supported.
Only support passive/active scanning.**
The system consists of two parts:
\- SLZB-OS with "Proxy advertisements" enabled. Responsible for physically receiving BLE packets and sending them to HA.
\- SMLIGHT SLZB Home Assistant integration. Manages scanning on the SLZB-OS side, receives raw BLE and forwards them to the HA core.
### BLE proxy
BLE proxy uses port **5050** so please make sure it is not blocked on your network!
SLZB-OS supports proxying BLE packets to Home Assistant using optimized UDP protocol.
To use BLE proxy you need:
1. Have SLZB-OS **v3.3.3.dev7** or later
2. Have Home Assistant **2026.8** or later
3. Have active [SMLIGHT SLZB integration](https://www.home-assistant.io/integrations/smlight)
4. Have "**BLE**" and "**Proxy advertisements**" enabled in SLZB-OS
[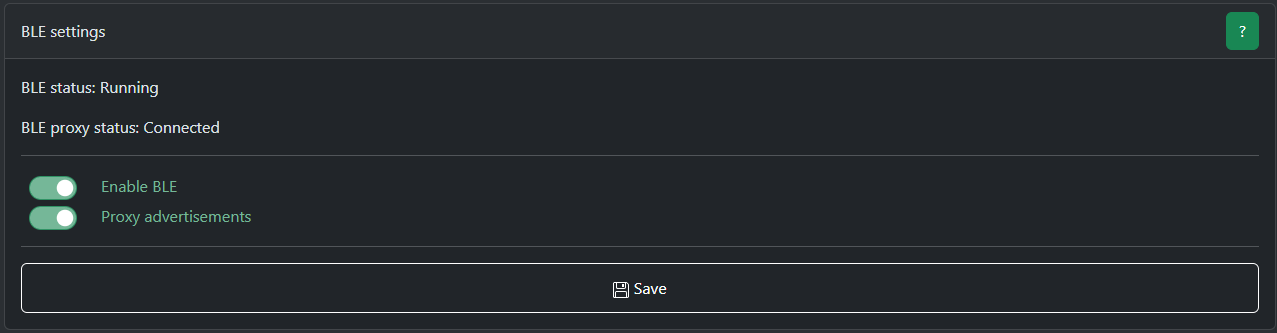](https://smlight.tech/support/manuals/uploads/images/gallery/2026-06/image.png)
# Breaking changes
# v3.3.5.dev1
### Where did the changes take place?
Zigbee Hub mode users (**Does not apply to you if you are using ZHA or Zigbee2MQTT**)
USB to Ethernet passthrough mode
Berry: HTTP and ZB modules
### Zigbee Hub mode breaking changes
Applies only to those using [Zigbee Hub mode](https://smlight.tech/support/manuals/books/slzb-os/chapter/zigbee-hub)
#### What happened?
In some cases, the ZigBee network key was written to the radio module incorrectly. We fixed this and now it will always written correctly.
#### Impact
There is a possibility that after the update your zigbee network will break because the network key will now be written correctly (not shifted) and it will not match what is your zigbee network already use.
#### Migration
All Zigbee Hub backups made before this update will become incompatible!
Please delete old backups and create a new one after update to prevent conflicts!
In most cases, the migration should go smoothly.
If you see the message:
[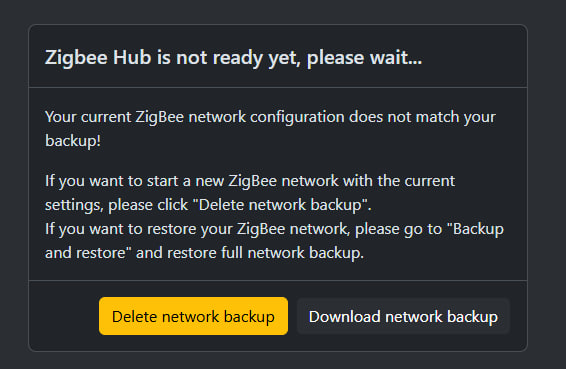](https://smlight.tech/support/manuals/uploads/images/gallery/2026-07/image.png)
Click on "Delete network backup" and restart your device. You will probably have to re-pair your devices after this.
### USB to Ethernet passthrough mode
#### What happened?
We are completely switching to a new USB host driver.
Why are we doing this?
The old driver does not provide enough stability for our users, the device can often crash or not start at all when a USB device is connected. There is also a degradation in performance over time.
Therefore, we are switching to a new improved driver that solves all these problems!
#### Impact
The old driver looked for the first available serial interface and used it automatically.
The new driver allows you to choose which interface to use (some USB devices provide more than one interface) so you will now need to choose which interface you want to use.
#### Migration
[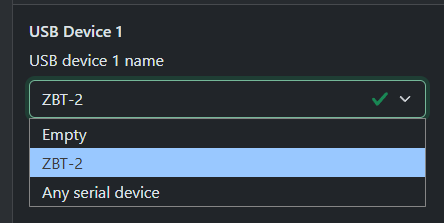](https://smlight.tech/support/manuals/uploads/images/gallery/2026-07/Pmbimage.png)
Make sure your USB device is selected
[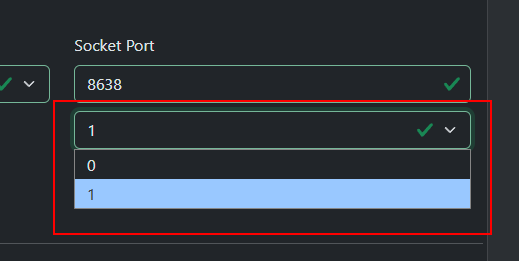](https://smlight.tech/support/manuals/uploads/images/gallery/2026-07/DDJimage.png)
From the drop-down list under Port, select the interface you want to use.
Save the settings and restart the device.
If there are several interfaces and you don't know which one you need, try them all in turn or ask the manufacturer of this USB device which interface to choose.
For ZWA-2 and ZBT-2 you need to select interface 1
### Berry: HTTP
#### What happened?
Stream mode APIs has been changed because the old one did not allow stream POST requests.
#### Impact
If you don't use HTTP stream mode, nothing impact for you.
`HTTP.open()` now requires explicit specification of whether stream mode is used (last parameter, optional). If not specified, stream mode is disabled.
For stream mode:
`HTTP.setHeader()` should be called after `HTTP.open()` but before `HTTP.completeStreamConfig()`The buffer size in `HTTP.open()` for stream mode now means how much data you are going to send in a POST.
Required `HTTP.completeStreamConfig()` call to complete configuration.
#### Migration
Update your script according to this example [https://github.com/smlight-tech/slzb-os-scripts/blob/v3.3.5.dev0/docs/modules/http.md#quick-example-1](https://github.com/smlight-tech/slzb-os-scripts/blob/v3.3.5.dev0/docs/modules/http.md#quick-example-1)
### Berry: ZB
#### What happened?
The ZB module had a significant limitation from the very beginning - it could only work with Radio1 while MR coordinators had 2 radio and Ultima3 can have 3.
Therefore, the ZB module was updated to support work with any number of radio modules.
#### Impact
**Now each ZB function requires specifying the number of the radio module to which it will be applied!**
#### Migration
Update your script according to this example: [https://github.com/smlight-tech/slzb-os-scripts/blob/v3.3.5.dev0/examples/basic/zb\_reboot\_on\_drop.be](https://github.com/smlight-tech/slzb-os-scripts/blob/v3.3.5.dev0/examples/basic/zb_reboot_on_drop.be)
New API description: [https://github.com/smlight-tech/slzb-os-scripts/blob/v3.3.5.dev0/docs/modules/zb.md](https://github.com/smlight-tech/slzb-os-scripts/blob/v3.3.5.dev0/docs/modules/zb.md)