# SMHUB
# Restore and Updating
# SMHUB OS - Update & Restore Methods
Your SMHUB can be updated or restored in **three different ways**:
1. **OTA (recommended)** – simple updates directly from the Web Interface
2. **Type-C Cable** – full recovery if the device doesn’t boot via computer
3. **SD-Card** – full recovery if the device doesn’t boot without copmuter (more reliable)
Below is a quick overview to help you choose the right method 👇
---
## 🟢 **1. Regular Update — OTA (Over-the-Air)**
**The easiest and safest method for normal updates.**
**How:**
`Web Interface → Settings → Updates & Restore → Check for Updates`
**What happens:**
SMHUB downloads and installs the newest version automatically.
✅ Simple — no cables, no drivers
✅ Keeps your data and settings
⚠️ Works only if your system boots normally
---
## ⚡ **2. Restore via Type-C Cable**
Good when OTA fails, if you need a clean reinstall, or if you want a quick setup without dealing with command-line environments.
**How:** Connect SMHUB to your PC via Type-C → Download and run the standalone [smhub-flasher](https://github.com/smlight-tech/smhub-flasher/releases) → Click to flash.
✅ Zero Configuration: No terminal commands or manual environment setups required.
✅ Always Up-to-Date: The interface automatically fetches and downloads the latest online images directly.
✅ Visual Feedback: Shows real-time progress right on your PC screen.
⚠️ Connection Requirements: Ensure you use a high-quality data cable and that your system detects the USB device.
💡 Alternative: If this fails or you prefer a different route, check the SD-Card method below.
⚠️ **IMPORTANT:** If the flashing process does not start, please disconnect POE and other Add-ons (4G/Z-Wave).
---
## 💽 **3. Restore via SD-Card (Full Recovery Method)**
**Use this if your SMHUB is “bricked” or not responding at all.**
**How:**
Copy 3 files (`emmc.img`, `fip.bin`, `partition_gpt.xml`) to a FAT32 SD card → insert into SMHUB → power on → wait ~5 min → power off → remove card → power on again
[https://smlight.tech/support/manuals/books/smhub/page/updaterestore-using-sd-card](https://smlight.tech/support/manuals/books/smhub/page/updaterestore-using-sd-card)
✅ Works even if device doesn’t boot
✅ No drivers, no software, no cables
✅ Visible progress - just wait patiently
⚠️ Remove SD before next boot (otherwise it will flash again)
**IMPORTANT: If the flashing process does not start, please disconnect POE and other Add-ons (4G/Z-Wave)**
---
## 🧭 **Which method should I use?**
| Situation | Best Option |
|---|
| Regular update | **OTA** |
| OTA failed or system unstable | **Type-C Cable** |
| Device won’t start / “bricked” | **SD-Card** |
**🛠️ Legacy Manual Method (Older Versions Only)**
The guide and video walkthrough below apply **only** if you are flashing older versions prior to v1.0.0.dev4.
**Image Compatibility:** Newer firmware images (v1.0.0.dev4 and above) use an updated format that is entirely incompatible with legacy tools in the below guide. Do not attempt to use the manual guide below on the latest images, as the flashing process will fail.
Before you begin, we highly recommend watching the **video walkthrough** — it shows the entire flashing process from start to finish in real time. In the video, you’ll see **exactly what happens on screen and on the SMHUB device**
*(The link below opens the official SMLIGHT demonstration video.)
[https://www.youtube.com/watch?v=XBcEmG1pJnw](https://www.youtube.com/watch?v=XBcEmG1pJnw)*
[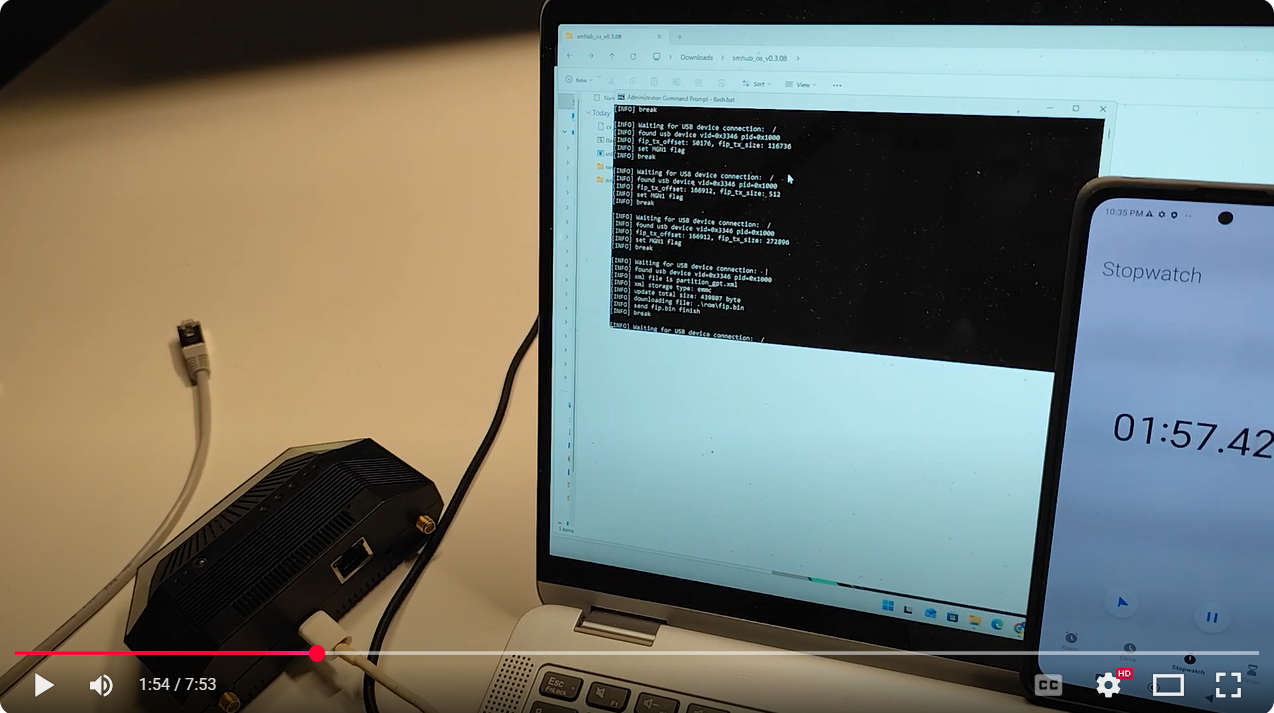](https://www.youtube.com/watch?v=XBcEmG1pJnw)
---
### ⚙️ What You’ll Do
1. Download the ZIP file with firmware
2. Unzip it
3. Install the driver
4. Open **CMD as Administrator**
5. Go to the folder with `flash.bat`
6. Run `flash.bat`
7. **Only then** connect SMHUB to the PC
8. Wait for flashing to finish
9. Wait for first boot (LED cues)
---
### 🚫 Before You Start
**You’ll need:**
- Windows 10 or 11 PC with administrator access (we did tests on Win11)
- USB-C **data** cable (not just charging)
- The firmware ZIP file (from the link below)
**Do NOT:**
- Connect the SMHUB **before** starting `flash.bat`
- Skip the driver installation
- Run CMD without Administrator rights
> 🔴 **Common user errors:**
>
> 1. Connecting SMHUB before `flash.bat` starts
> 2. Not installing the driver
> 3. Not running CMD as Administrator
---
### 1) Download the factory firmware file
- Click the firmware link latest **prod**:[os\_v0.9.9](https://updates.smlight.tech/firmware/smhub/os/smhub_os_v0.9.9.zip) , **dev**: [os\_v1.0.0.dev3](https://updates.smlight.tech/firmware/smhub/os/smhub_os_v1.0.0.dev3.zip) (previous: [os\_v0.3.11](https://updates.smlight.tech/firmware/smhub/os/smhub_os_v0.3.11.zip) | [os\_v0.3.10](https://updates.smlight.tech/firmware/smhub/os/smhub_os_v0.3.10.zip) | [os\_v0.3.7](https://updates.smlight.tech/firmware/smhub/os/smhub_os_v0.3.7.zip)) and save the ZIP file to your computer (e.g., `Downloads`).
- **PLEASE NOTE:** Sometimes version **0.3.0** (or older versions) cannot be flashed on certain devices (the pattern is not yet identified). However, users can recover by following this process: first flash **v0.1.2**, and then update to **v0.3.x** on top of it.
0.1.2 is located here: [https://updates.smlight.tech/firmware/smhub/os/smhub\_os\_v0.1.2.zip](https://updates.smlight.tech/firmware/smhub/os/smhub_os_v0.1.2.zip)
---
### 2) Unzip the archive
- ight-click the ZIP file → **Extract All…** → choose a simple path (e.g., `C:\SMHUB\firmware\`)
*(Avoid paths with non-Latin characters or very long names.)*
- You should now see these files/folders inside the extracted directory:
- `driver\smhub-driver.exe`
- `rom\emmc.img`
- `rom\fip.bin`
- `rom\partition_gpt.xml`
- `usb_dl.exe`
- `flash.bat`
- `cv_dl_magic.bin`
[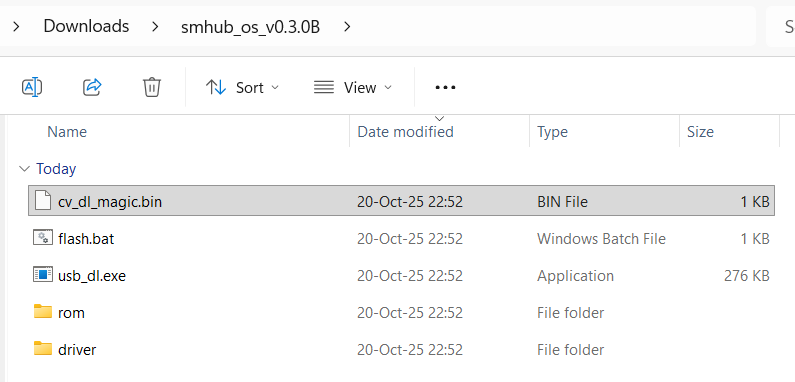](https://smlight.tech/support/manuals/uploads/images/gallery/2025-10/sbzimage.png)
---
### 3) Install the driver
1. Open the `driver` folder.
2. Double-click **`smhub-driver.exe`**.
3. Complete the installation wizard. Allow the installer in Windows security prompts if shown.
4. When it says **Finished**, close the installer.
> If Windows asks for permission to install device software, click **Install**.
>
> [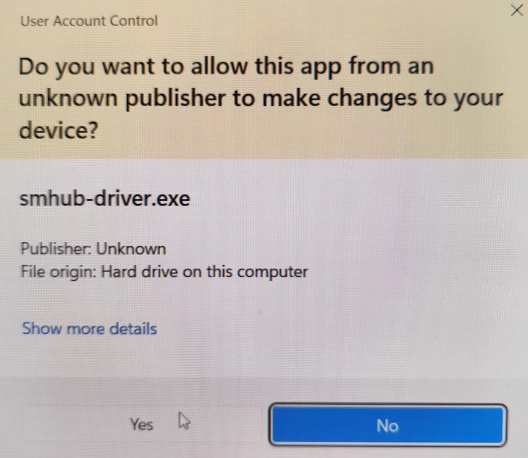](https://smlight.tech/support/manuals/uploads/images/gallery/2025-10/bFBimage.png)
>
> [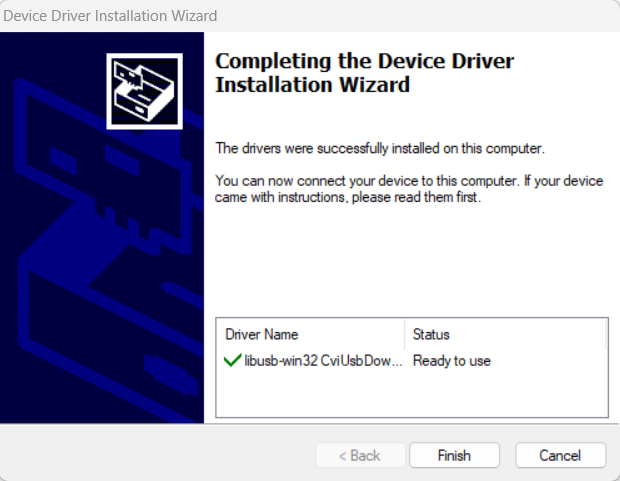](https://smlight.tech/support/manuals/uploads/images/gallery/2025-10/B2gimage.png)
---
### 4) Open **Command Prompt as Administrator**
- Press **Win** key, type **cmd**.
[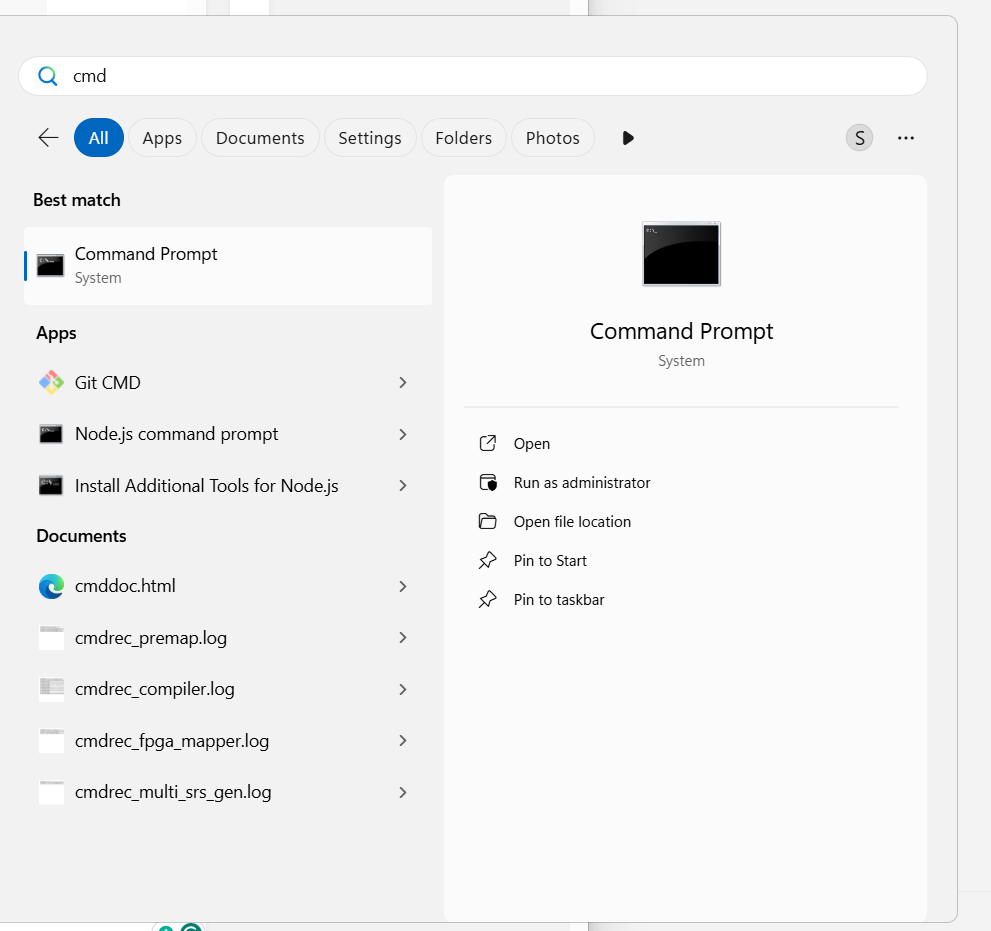](https://smlight.tech/support/manuals/uploads/images/gallery/2025-10/y1gimage.png)
- Right-click **Command Prompt** → **Run as administrator**.
[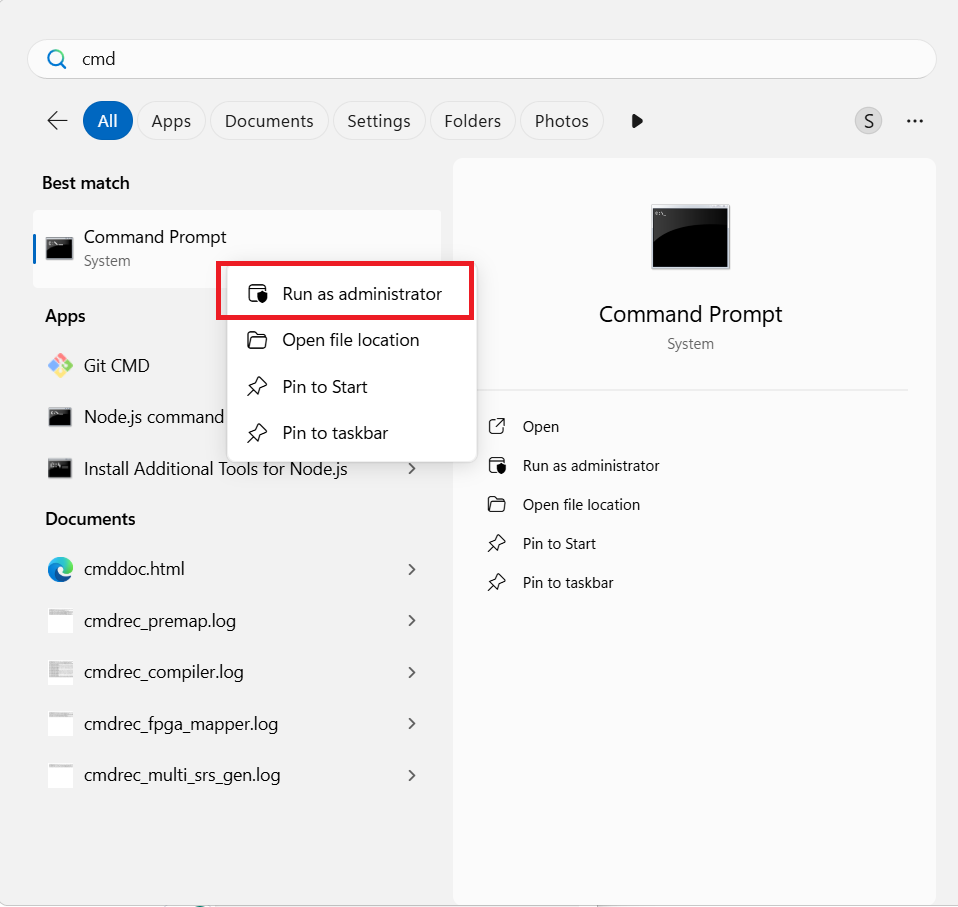](https://smlight.tech/support/manuals/uploads/images/gallery/2025-10/5B1image.png)
- The title bar must say **Administrator: Command Prompt**.
[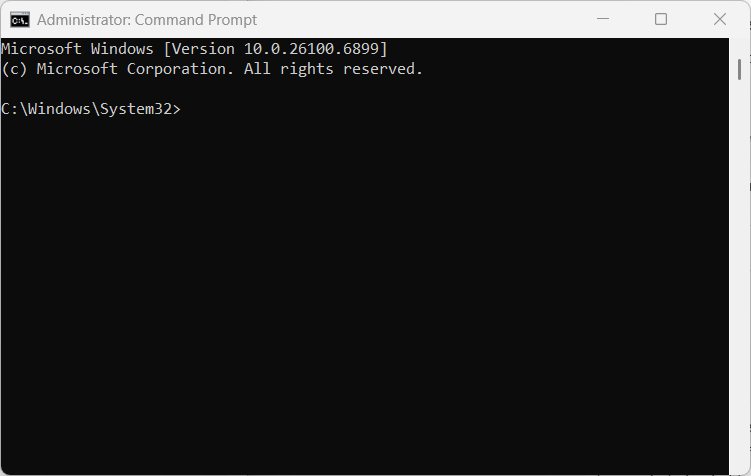](https://smlight.tech/support/manuals/uploads/images/gallery/2025-10/XLaimage.png)
You’ll know it’s correct if the window title says **Administrator: Command Prompt**.
---
### 5) Go to the extracted folder
In the admin CMD, change directory to the folder with `flash.bat`. For this purposes, type `cd C:\SMHUB\firmware` and press Enter.
Hint: if your path is long for typing, copy it, and in CMD enter cd + do right click. This will insert Clipboard content into CMD window.
[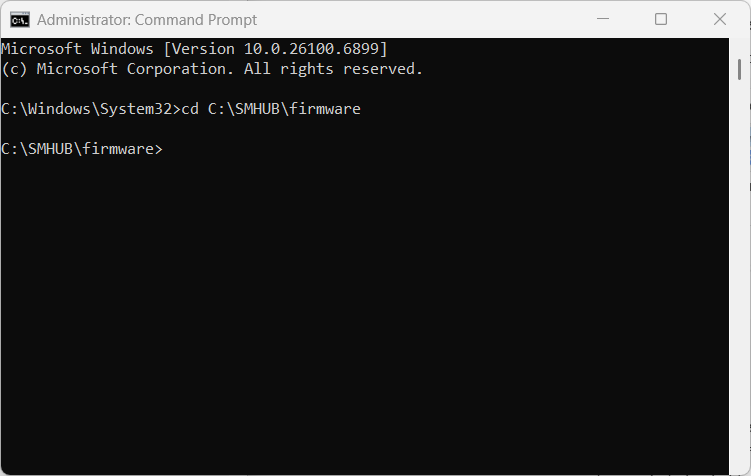](https://smlight.tech/support/manuals/uploads/images/gallery/2025-10/yfjimage.png)
---
### 6) Start the flashing script
**Important:** **Do not** connect the SMHUB yet. The script need to be run first.
Run:
`flash.bat`
By typing this command `flash.bat` and pressing **Enter** button.
[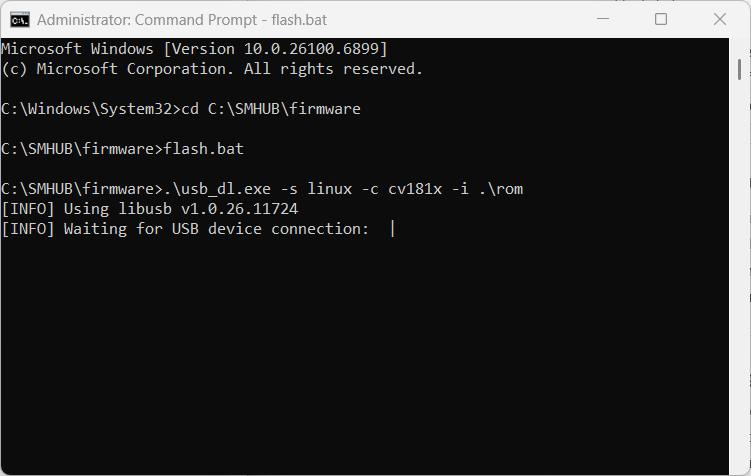](https://smlight.tech/support/manuals/uploads/images/gallery/2025-10/ncyimage.png)
---
### 7) Now connect the SMHUB
When `flash.bat` is running, **connect SMHUB to the PC via USB-C** (Type-C port on the back of SMHUB, near Ethernet port)
The script will detect the device and begin flashing automatically. You’ll see progress output in the CMD window.
> If nothing happens for ~a while, try another USB port or USB-C cable, but **keep the script running** while you reconnect the cable.
>
> [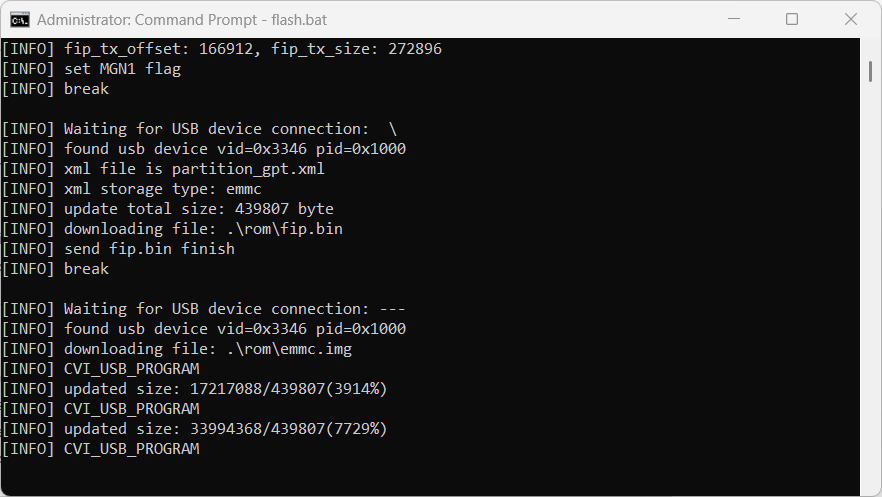](https://smlight.tech/support/manuals/uploads/images/gallery/2025-10/CArimage.png)
---
### 8) Wait for “Flashing completed” (script finishes)
- When the script completes, it will show a success message and return to the prompt or close.
[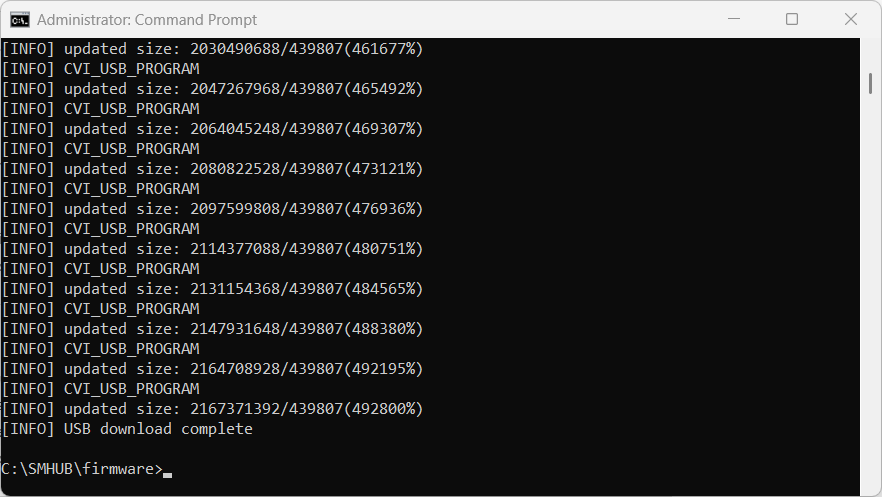](https://smlight.tech/support/manuals/uploads/images/gallery/2025-10/9NMimage.png)
- You can now safely disconnect the SMHUB from the PC and power it normally (via its regular power supply), **or** leave USB-C connected if it provides power.
---
### **8-b) IF THE FLASHING PROCESS DOES NOT START**
In some cases, removing the PoE add-on may help to start the flashing process successfully. If your device does not start flashing using either the Type-C or SD-Card method, please follow the steps below:
1. Open the enclosure (no screwdrivers are required, as the enclosure is screwless).
2. Physically disconnect the PoE add-on.
[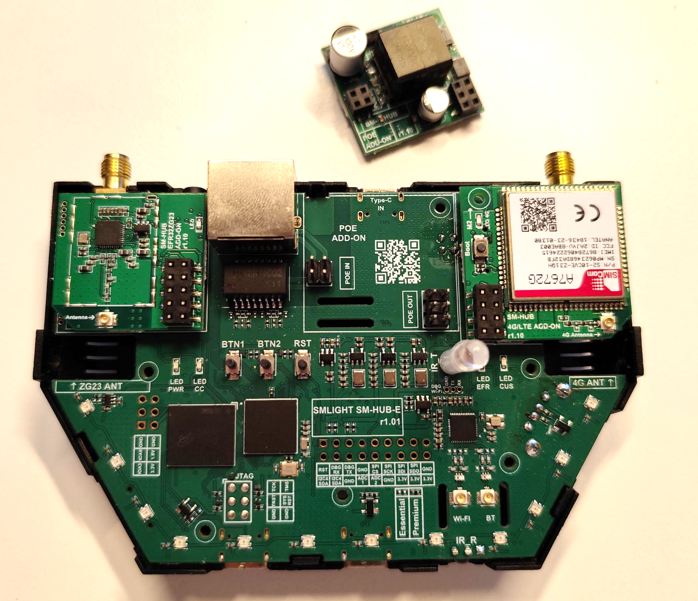](https://smlight.tech/support/manuals/uploads/images/gallery/2025-10/xfhimage.png)
3. **To be even more secure, please remove 4G and Z-Wave addons if you have them installed.**
4. Start the flashing process again.
Try to boot without the add-on first. Once the device flashes and boots successfully, you can reinstall the add-on.
---
### 9) First boot and LED cues (what “ready” looks like)
**First start takes longer than subsequent boots.** This is normal.
When the SMHUB starts up after flashing, the LEDs show you exactly what’s happening.
Here’s what to watch step by step:
1. **Power ON indicator:**
As soon as you plug in the SMHUB, the **small green LED near the buttons** (not the Ambilight LEDs) turns **ON**.
→ This simply means the device is receiving power. If you can't power your device - check [this](https://smlight.tech/support/manuals/books/smhub/page/troubleshooting#bkmrk-9.1-power-%26-boot) bug.
[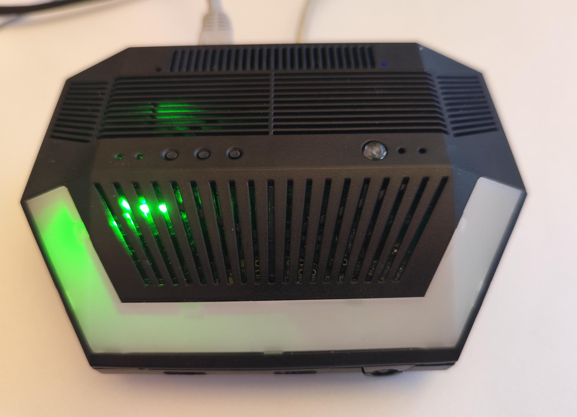](https://smlight.tech/support/manuals/uploads/images/gallery/2025-10/Lhzimage.png)
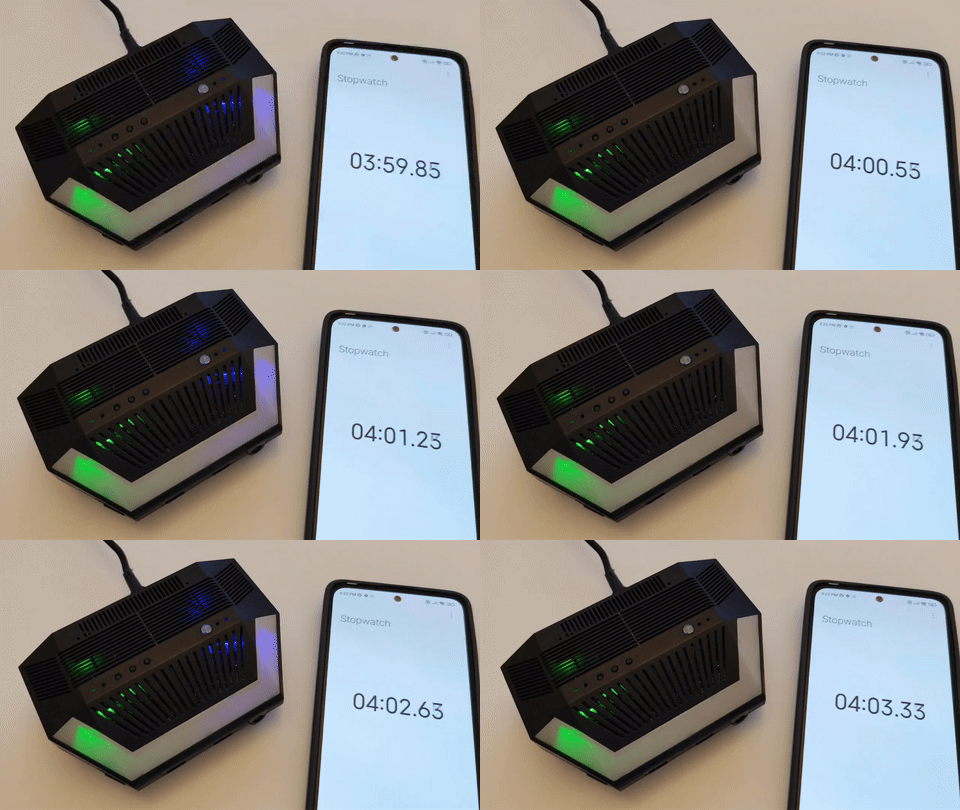
2. **Blue chase effect (Ambilight):**
Right after powering on, you’ll see a **moving blue light** (chase effect) running around the Ambilight LEDs.
→ This means the system is booting — please wait.
[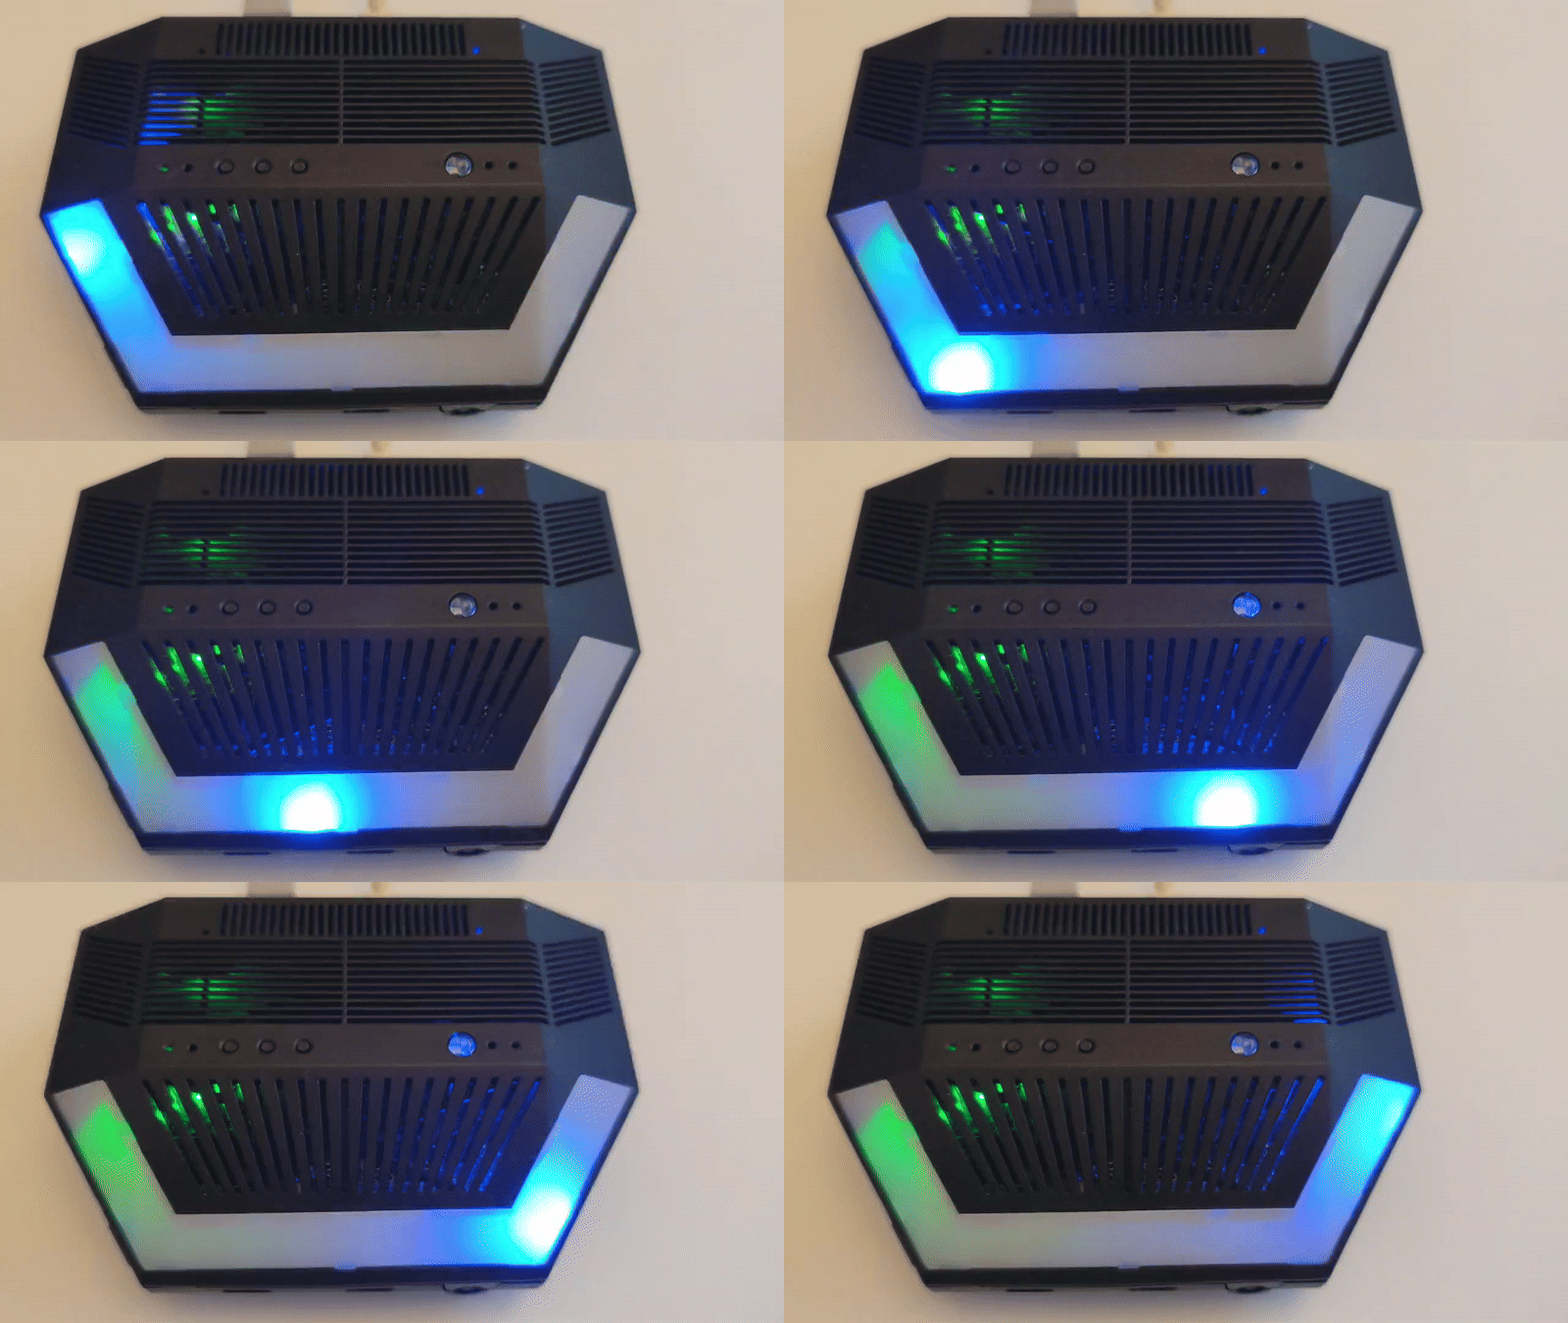](https://smlight.tech/support/manuals/uploads/images/gallery/2025-10/smhub-rotating.gif)
3. **Blue effect stops:**
When the **blue chase effect stops**, it means the **core system has finished booting** and **SSH access is available**.
→ From this point, advanced users can connect via SSH if needed.
[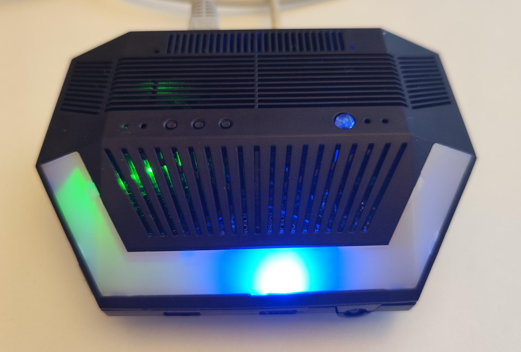](https://smlight.tech/support/manuals/uploads/images/gallery/2025-10/YAtimage.png)
1. **Green Ambilight turns on:**
After the delay (1-2 min), all **green Ambilight LEDs will light up at once.**
→ This means that **Web UI and all apps are fully loaded** and ready to use.
[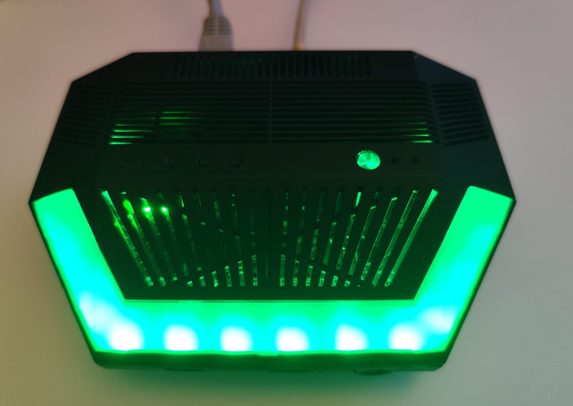](https://smlight.tech/support/manuals/uploads/images/gallery/2025-10/3wLimage.png)
The green lights will stay on for about **1 minute**, then turn off automatically.
> 💡 **In simple words:**
>
> - Blue moving lights = starting up
> - Blue stops = system ready for SSH
> - Green lights = Web interface ready to use
---
### 10) (Optional) Quick post-flash checks
**Web UI:**
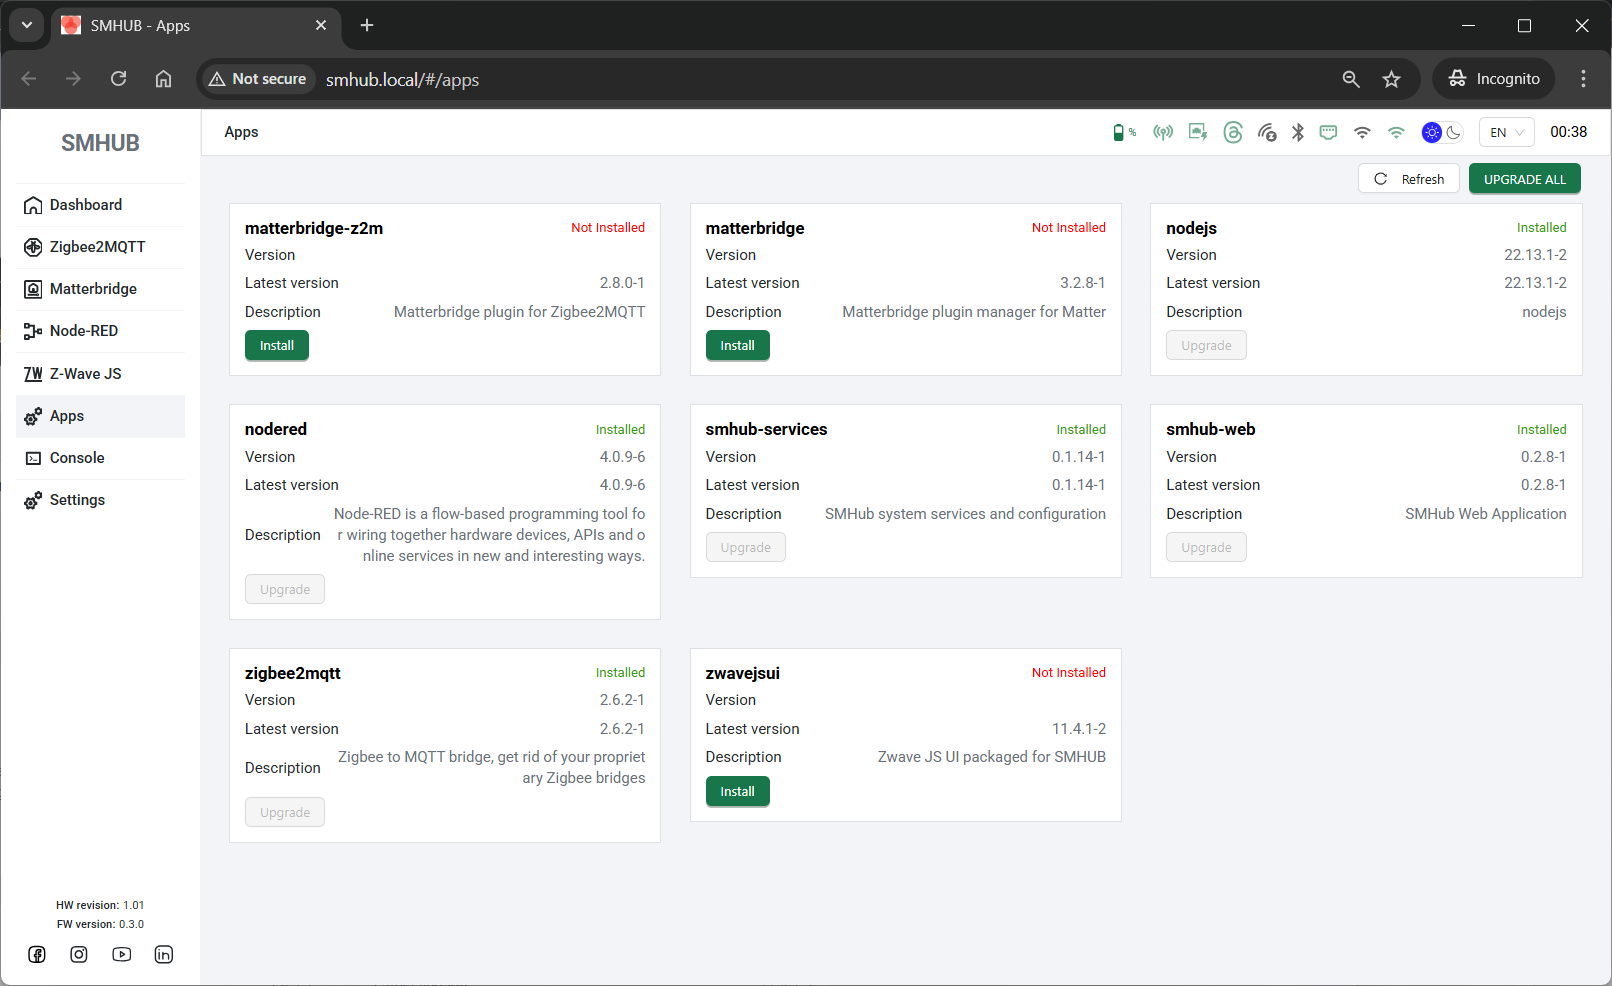
- Open a browser and go to: `http://smhub.local/` (or your device’s IP).
[](https://smlight.tech/support/manuals/uploads/images/gallery/2025-10/WeYimage.png)
**SSH (from Windows using built-in OpenSSH or PuTTY):**
- Hostname: `smhub.local` (or your device’s IP)
- Username: `smlight`
- Password: `smlight`
---
## Troubleshooting
### A) The script doesn’t detect my device
- **Most likely cause:** Device connected **before** `flash.bat`.
**Fix:** Close the script, **unplug** SMHUB, re-run steps 4–7 exactly: admin CMD → `flash.bat` → **then** connect SMHUB.
- Try a different USB port or another **data-capable** USB-C cable.
### B) Driver didn’t install or Windows blocked it
- Re-run `driver\smhub-driver.exe` as admin.
- Approve any Windows prompts.
- Reboot Windows if the installer requests it, then try again.
### C) “Access denied” or “cannot open port”
- You’re likely not in an **Administrator** CMD. Close CMD, re-open **as Administrator**, repeat from step 5.
### D) Flashing stops or errors out mid-way
- Leave the CMD window open; wait a bit to ensure it’s not still working.
- If it clearly failed, **unplug** SMHUB, close the CMD, reopen **admin** CMD, start `flash.bat` again, and **only then** plug SMHUB back in.
### E) SSH/Web UI doesn’t come up after flashing
- Give the device more time on the first boot.
- Watch the LEDs:
- **Blue ambilight LED stopped running** → SSH should be ready.
- **All ambilight greens lit** → Web UI should be ready.
- If still nothing, power-cycle the SMHUB and check your network/DHCP (try accessing by IP, not by hostname).
# Update/Restore using SD-Card
**💾 SD-Card Installation Guide Notice**
The direct SD-card installation method is **temporarily unavailable** for the latest OS images.
**Workaround:** If you must use an SD card, you can flash an older compatible image first, boot the device, and perform an OTA update to the latest version. Otherwise, we highly recommend skipping the SD card entirely and using the new [SMHUB Flasher](https://github.com/smlight-tech/smhub-flasher/releases) tool over Type-C for a direct install.
👉 **Download the firmware ZIP** from your usual link (latest):
SD-CARD RESTORE FIRMWARE: **prod**: [os\_v0.9.9](https://updates.smlight.tech/firmware/smhub/os/smhub_os_v0.9.9.zip) , **dev**: [os\_v1.0.0.dev3](https://updates.smlight.tech/firmware/smhub/os/smhub_os_v1.0.0.dev3.zip) (previous: [os\_v0.3.11](https://updates.smlight.tech/firmware/smhub/os/smhub_os_v0.3.11.zip) | [os\_v0.3.10](https://updates.smlight.tech/firmware/smhub/os/smhub_os_v0.3.10.zip) | [os\_v0.3.7](https://updates.smlight.tech/firmware/smhub/os/smhub_os_v0.3.7.zip)) and save the ZIP file to your computer (e.g., `Downloads`).
You’ll need:
- A **microSD card** (8–64 GB is ideal) + **microSD–to–SD** adapter if your PC needs it
- A Windows PC
- A way to read/write the microSD card (built-in reader or USB adapter)
### ⚙️ What You’ll Do
1. Download the ZIP file with the firmware
2. Format microSD to **FAT32**
3. Copy **three files** from the archive folder ROM onto the **root** of the card
4. Insert the card into the SMHUB (**click** fully)
5. Power on → **wait ~4 minutes** (silent)
6. Power off → **remove the card**
7. Power on → watch LED cues → open **smhub.loca**
---
## 1) Get the firmware and unzip it
1. Click the firmware link above and **download the ZIP** to your computer (e.g., Downloads).
*\[screenshot: browser download\]*
2. **Right-click** the ZIP → **Extract All…** → choose a simple folder (e.g., `C:\SMHUB\firmware\`).
Inside the unzipped folder, you’ll see these **three files** in the **rom** folder. You’ll copy them to the SD card:
- `emmc.img`
- `fip.bin`
- `partition_gpt.xml`
---
## 2) Format the microSD card to **FAT32**
> This erases the card completely. Back up anything important first.
1. Insert the **microSD** (or SD adapter with the microSD inside) into your PC.
2. Open **This PC** (Windows Explorer).
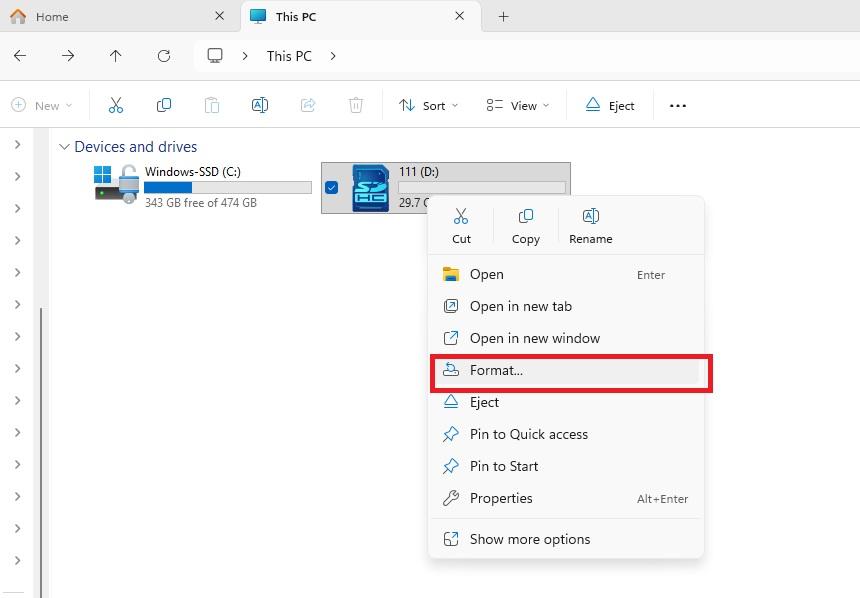
3. **Right-click** the SD card drive (e.g., “SDHC (E:)”).
4. Click **Format…**.
[](https://smlight.tech/support/manuals/uploads/images/gallery/2025-10/select-format.jpg)
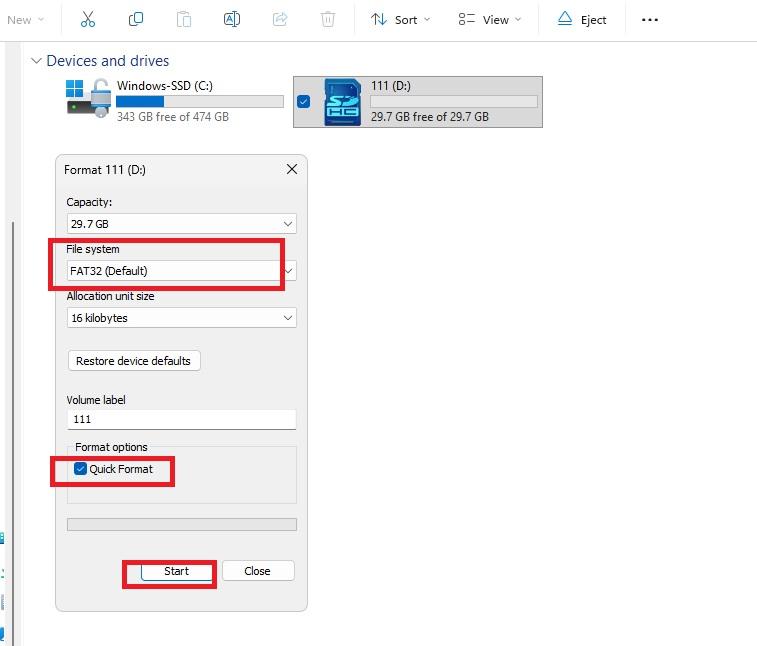
5. In the **Format** window:
- **File system:** choose **FAT32**
- **Allocation unit size:** leave **Default or 16kb**
- **Volume label:** optional (e.g., `SMHUB`)
- **Quick Format:** **checked** (recommended)
[](https://smlight.tech/support/manuals/uploads/images/gallery/2025-10/format-settings.jpg)
6. Click **Start**, then **OK/Yes** to confirm.
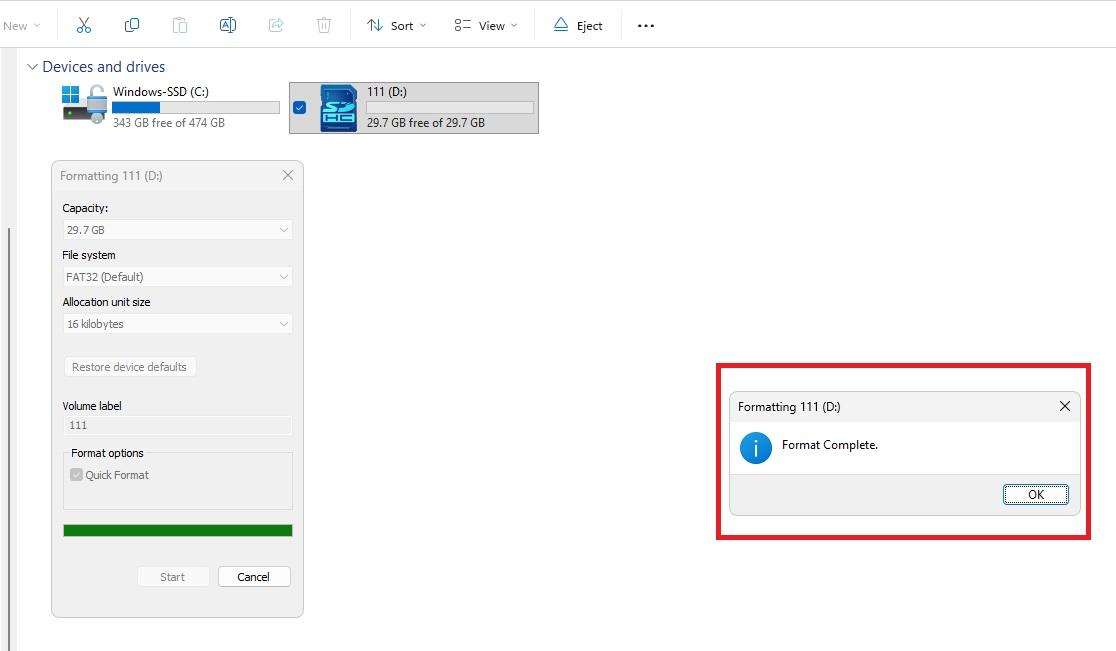
7. Wait for the **Format Complete** message → click **OK** and **Close**.
[](https://smlight.tech/support/manuals/uploads/images/gallery/2025-10/format-completed.jpg)
> **Tip:** If your SD card is larger than 32 GB and FAT32 isn’t shown, try another (smaller) card. (Advanced users: a third-party FAT32 formatter also works.).
> **Check the lock switch:** If you’re using a full-size SD adapter, make sure the **tiny switch on its side is not set to “LOCK.”** If locked, Windows won’t let you copy files.
---
## 3) Copy the **three files** to the **root** of the SD card
1. Open the folder you unzipped earlier.
2. **Select these three files:**
`emmc.img`, `fip.bin`, `partition_gpt.xml`
3. **Copy** them (Ctrl+C).
4. Open your SD card drive in **This PC** and **Paste** (Ctrl+V).
- The files must be in the **root** of the SD card (not inside any folder).
[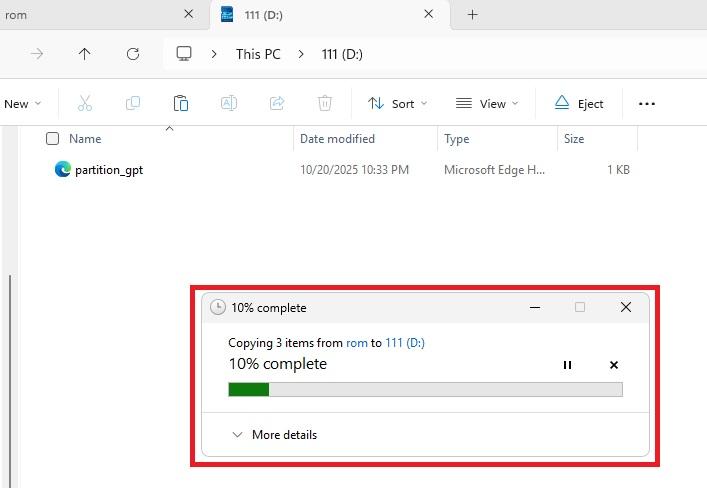](https://smlight.tech/support/manuals/uploads/images/gallery/2025-10/copying-to-sdcard.jpg)
5. When copying finishes, **right-click** the SD card drive → **Eject** → remove the card.
---
## 4) Insert the microSD card into the SMHUB
- With the SMHUB **powered OFF**, insert the microSD into the slot.
[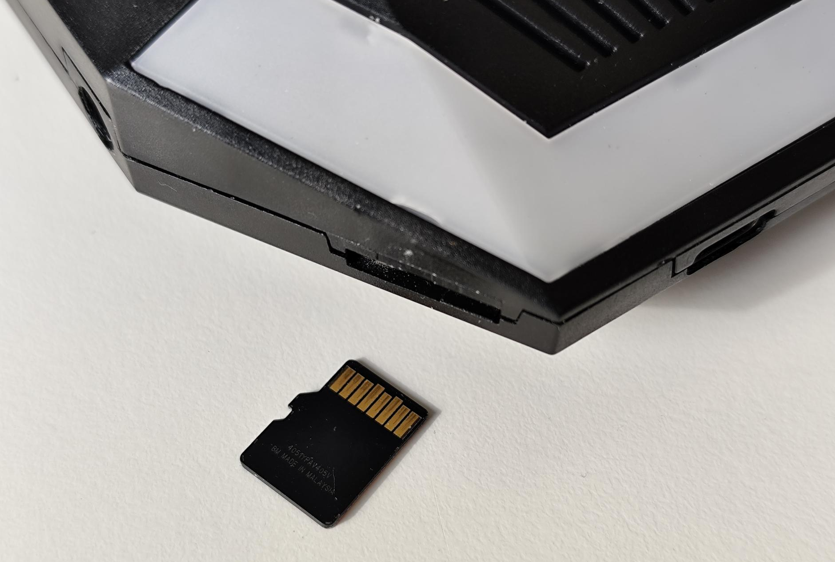](https://smlight.tech/support/manuals/uploads/images/gallery/2025-10/VTRimage.png)
- **Push until you feel a “click.”** It must be fully seated.
[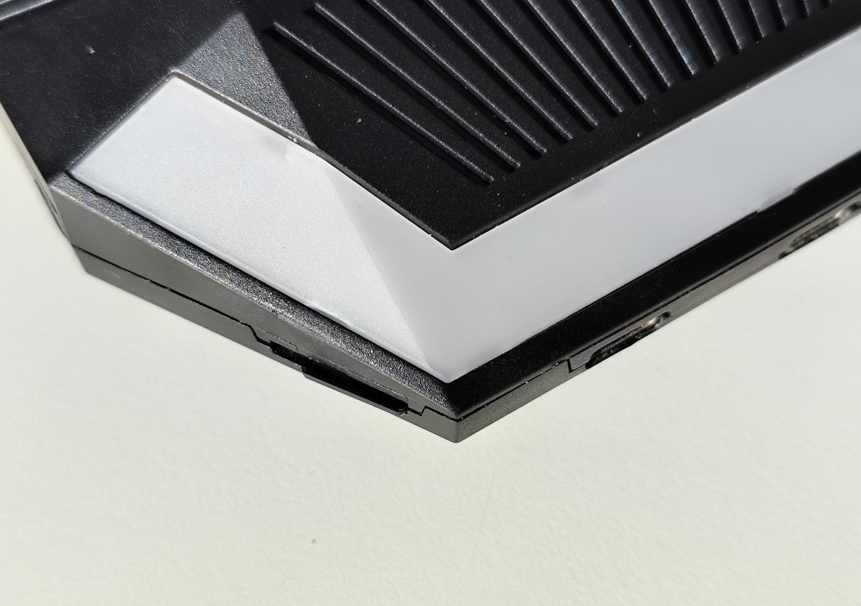](https://smlight.tech/support/manuals/uploads/images/gallery/2025-10/M5mimage.png)
---
## 5) Power ON and **wait ~4 minutes until completion**
- Connect power to the SMHUB.
- The device will automatically and silently flash itself from the SD card.
- The blue LED (located near the IR transmitter) will begin blinking slowly (approximately once every 2 seconds), indicating that the flashing process has started. Please note that LED indications during SD-card flashing are available only starting from firmware **0.3.1-dev2 (24 Oct 2025)**.
[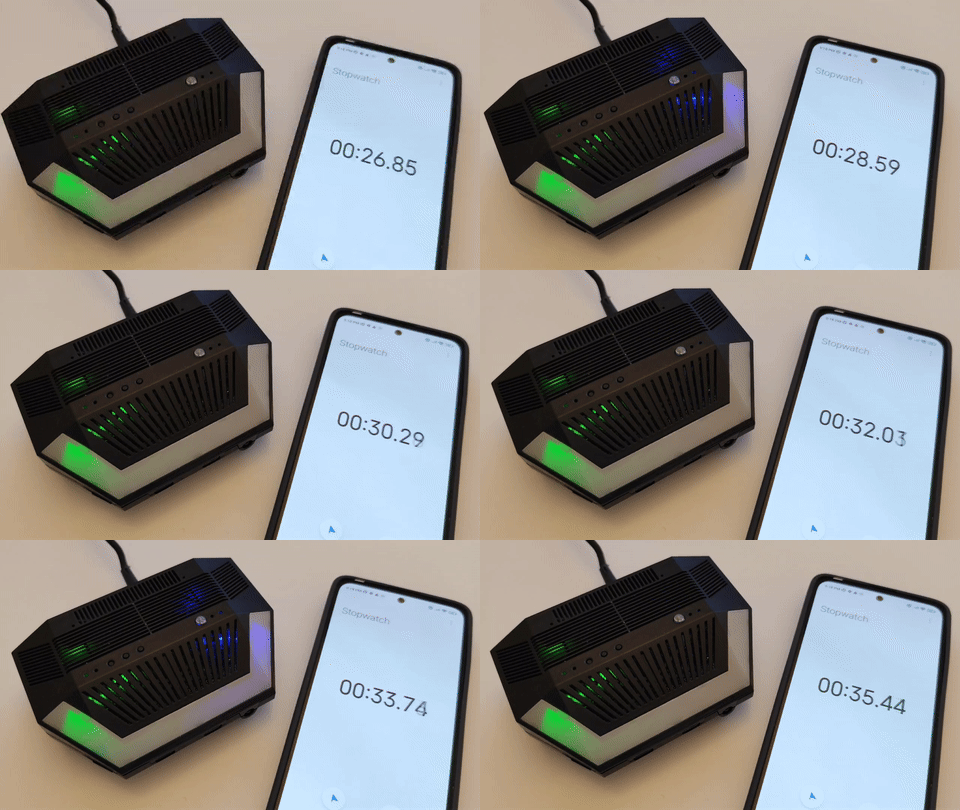](https://smlight.tech/support/manuals/uploads/images/gallery/2025-10/smhub-flashing-sd-card.gif)
- Once the process is complete, the same blue LED will start blinking faster (about 3 times per second). This means the flashing was successful. You can now disconnect the device from power (fully disconnect it — do not simply reboot). There is no need to power it on again with the SD card inserted, as the flashing process would otherwise start again.
[](https://smlight.tech/support/manuals/uploads/images/gallery/2025-10/smhub-flashing-sd-card-completed.gif)
---
## **5-b) IF THE FLASHING PROCESS DOES NOT START**
In some cases, removing the PoE add-on may help to start the flashing process successfully. If your device does not start flashing using either the Type-C or SD-Card method, please follow the steps below:
1. Open the enclosure (no screwdrivers are required, as the enclosure is screwless).
2. Physically disconnect the PoE add-on.
[](https://smlight.tech/support/manuals/uploads/images/gallery/2025-10/xfhimage.png)
3. **To be even more secure, please remove 4G and Z-Wave addons if you have them installed.**
4. Start the flashing process again.
Try to boot without the add-on first. Once the device flashes and boots successfully, you can reinstall the add-on.
---
## 6) Power OFF and **remove the SD card**
- After ~5 minutes, **power OFF** the SMHUB.
- **Remove** the microSD card.
> ⚠️ **Important:** If you **leave the SD card in** and power on, the SMHUB will **start flashing again**. Always **remove the card before** the next boot.
---
## 7) Power ON again and watch the LEDs (readiness)
Boot the SMHUB **without** the SD card:
**First start takes longer than subsequent boots.** This is normal.
When the SMHUB starts up after flashing, the LEDs show you exactly what’s happening.
Here’s what to watch step by step:
1. **Power ON indicator:**
As soon as you plug in the SMHUB, the **small green LED near the buttons** (not the Ambilight LEDs) turns **ON**.
→ This simply means the device is receiving power. If you can't power your device - check [this](https://smlight.tech/support/manuals/books/smhub/page/troubleshooting#bkmrk-9.1-power-%26-boot) bug.
[](https://smlight.tech/support/manuals/uploads/images/gallery/2025-10/Lhzimage.png)
2. **Blue chase effect (Ambilight):**
Right after powering on, you’ll see a **moving blue light** (chase effect) running around the Ambilight LEDs.
→ This means the system is booting — please wait.
[](https://smlight.tech/support/manuals/uploads/images/gallery/2025-10/smhub-rotating.gif)
3. **Blue effect stops:**
When the **blue chase effect stops**, it means the **core system has finished booting** and **SSH access is available**.
→ From this point, advanced users can connect via SSH if needed.
[](https://smlight.tech/support/manuals/uploads/images/gallery/2025-10/YAtimage.png)
1. **Green Ambilight turns on:**
After a short delay, all **green Ambilight LEDs will light up at once.**
→ This means that **Web UI and all apps are fully loaded** and ready to use.
[](https://smlight.tech/support/manuals/uploads/images/gallery/2025-10/3wLimage.png)
The green lights will stay on for about **1 minute**, then turn off automatically.
> 💡 **In simple words:**
>
> - Blue moving lights = starting up
> - Blue stops = system ready for SSH
> - Green lights = Web interface ready to use
---
### 8) (Optional) Quick post-flash checks
**Web UI:**
- Open a browser and go to: `http://smhub.local/` (or your device’s IP).
[](https://smlight.tech/support/manuals/uploads/images/gallery/2025-10/WeYimage.png)
**SSH (from Windows using built-in OpenSSH or PuTTY):**
- Hostname: `smhub.local` (or your device’s IP)
- Username: `smlight`
- Password: `smlight`
---
## Troubleshooting (quick)
- **Nothing happens after power on?**
Ensure the **three files** are on the **root** of the SD card, card is **FAT32**, and the card was **fully clicked in**.
- **Flashing loops every time I power on?**
You forgot to **remove the SD card**. Power off, **remove card**, then power on.
- **Web UI not loading yet?**
Wait for the **green Ambilight LEDs**. Blue stopped = SSH ready; Green on = Web UI ready.
- **Card won’t format / no FAT32 option?**
Try a **smaller card** (8–32 GB is easiest) or a different PC card reader.
---
# SMHUB Early Adopter – Quick Start Guide
The **SMHUB Early Adopter Version** is the first public release of our multi-radio smart hub. It’s designed for early buyers who want to explore the platform before the full release.
| **\#** | **Date** | **Type** | **Version** | **Updates / Changes** |
| 17 | 28 Feb 2026 | smhub-os
smhub-services
openthread
| 0.9.6dev0.2.11
0.3.0-1
| **smhub-services, smhub-web & SMHUB OS Released – Key Features:**
- **Linux Kernel 6.18** (upgrade from vendor kernel 5.4.x) for better stability, performance, and hardware support
- **Base for the pre-1.0.0 release candidate** (DEV channel, but recommended as a strong daily version)
- **Factory Reset via hardware button** (hold the middle button for 10 seconds on SMHUB Essentials/Premium)
- **User data backup & restore** support added
- **New “Backups” page** in the Web UI for managing backups
**For more details and to update, follow this guide**:
[https://smlight.tech/support/manuals/books/smhub/page/smhub-os-release-notes](https://smlight.tech/support/manuals/books/smhub/page/smhub-os-release-notes)
|
| 16 | 22 Jan 2026 | smhub-os
smhub-services
openthread
| 0.3.11
0.2.8
0.2.1-2
| **smhub-services, smhub-web & SMHUB OS Released – Key Features:**
- Fixed issue with `cron.daily` preventing daily package updates
- Improved kernel options required for OTBR firewall functionality
- Migrated autostart files to new structure for improved service handling
- Added support for configuring the OTBR app directly
- Improved logging and debugging output
- Improved pairing flow for new Thread devices
- Added support for firewall and NAT64 configuration
💡 **How to update:**
**SMHUB-OS:** Settings -> Update and restore **smhub-services/smhub-web:** Apps-> smhub-services/web or
via SSH (either Internal console or external SSH client - [manual is here](https://smlight.tech/support/manuals/books/smhub/page/access-smhub-via-external-ssh-client)) by executing these commands:
**For more details and to update, follow this guide**:
[https://smlight.tech/support/manuals/books/smhub/page/smhub-os-release-notes](https://smlight.tech/support/manuals/books/smhub/page/smhub-os-release-notes)
|
| 15 | 19 Jan 2026 | smhub-os
smhub-services
smhub-web
| 0.3.10
0.2.7
0.2.23
| **smhub-services, smhub-web & SMHUB OS Released – Key Features:**
- Added nftables (+ iptables compat) for Tailscale/firewall
- Auto log truncation (daily / size limit) – to resolve freezes issue
- Improved NanoMR4 EFR flashing (CC flash reset)
- Zigbee2MQTT default logs set to info
- Fixed rare boot into backup partition
- Faster startup (deferred component loading)
- Increased flasher load timeout
- Updated GPIO mapping for kernel 6.18
- Updated Buildroot to 2025.11.x
💡 **How to update:**
**SMHUB-OS:** Settings -> Update and restore **smhub-services/smhub-web:** Apps-> smhub-services/web or
via SSH (either Internal console or external SSH client - [manual is here](https://smlight.tech/support/manuals/books/smhub/page/access-smhub-via-external-ssh-client)) by executing these commands:
**For more details and to update, follow this guide**:
[https://smlight.tech/support/manuals/books/smhub/page/smhub-os-release-notes](https://smlight.tech/support/manuals/books/smhub/page/smhub-os-release-notes)
|
| 13 | 26 Nov 2025 | smhub-os
smhub-services
smhub-web
| 0.3.7
0.2.2
0.2.16
| **smhub-services, smhub-web & SMHUB OS Released – Key Features:**
- **smhub-services v0.2.2**
• Added support for reading **EEPROM v1 format**
• Radio flashing endpoints updated to support model-based flashing
• Updated **pysmlight v0.2.11** for Nano flashing
• Corrected some default Zigbee2MQTT settings
- **smhub-web v0.2.16**
• Radio page now supports **Nano Mg24** flashing
• Device **model displayed in sidebar**
• Updated default Zigbee2MQTT settings
• **App status** displayed on Apps settings page
• Progress bar + changelog displayed for **OS updates**
- **SMHUB OS v0.3.7**
• Added hooks enabling **model-specific features**
• **Nano boot LED indicators** enabled
• Fixed duplicate services appearing after OTA restart
💡 **How to update:**
**SMHUB-OS:** Settings -> Update and restore **smhub-services/smhub-web:** Apps-> smhub-services/web or
via SSH (either Internal console or external SSH client - [manual is here](https://smlight.tech/support/manuals/books/smhub/page/access-smhub-via-external-ssh-client)) by executing these commands:
**For more details and to update, follow this guide**:
[https://smlight.tech/support/manuals/books/smhub/page/smhub-os-release-notes](https://smlight.tech/support/manuals/books/smhub/page/smhub-os-release-notes)
|
| 12 | 22 Nov 2025 | smhub-os
smhub-services
smhub-web
| 0.3.6
0.2.1
0.2.15
| **smhub-services v0.2.0 & smhub-web v0.2.14 – Key Features**
- **CC Radio Flashing:**
Added full support for flashing TI CC radios (CC26xx) directly from the Web UI.
- **Improved Radio Flashers:**
Better progress bar behaviour and clearer error messages during flashing of CC and EFR32 radios.
- **App Logs & Restart Buttons:**
Iframe improvements and new App Logs + Restart controls added for supported apps.
- **Run/Stop App Fixes:**
Run/Stop buttons now work more reliably across all apps.
- **Log Formatting Fix:**
Resolved issue where logs were incorrectly rendered in Title Case.
- **Backend Flashing Support (services):**
Added *smlight-cc-flasher* and integrated flashing logic into the backend.
- **Zigbee2MQTT Defaults Fix:**
Corrected default settings in the Web UI configuration form.
- **Node-RED Logs Fix:**
Fixed Node-RED log handling so logs display properly.
- **OS Base Image Updated:**
OS v0.3.6 now uses Buildroot v2025.08.1 and includes correct paths for CC and Silabs flashers.
💡 **How to update:**
**SMHUB-OS:** Settings -> Update and restore **smhub-services/smhub-web:** Apps-> smhub-services/web or
via SSH (either Internal console or external SSH client - [manual is here](https://smlight.tech/support/manuals/books/smhub/page/access-smhub-via-external-ssh-client)) by executing these commands:
**For more details and to update, follow this guide**:
[https://smlight.tech/support/manuals/books/smhub/page/smhub-os-release-notes](https://smlight.tech/support/manuals/books/smhub/page/smhub-os-release-notes)
|
| 11 | 15 Nov 2025 | smhub-services
smhub-web
| 0.2.0
0.2.14
| **smhub-services v0.2.0 & smhub-web v0.2.14 – Key Features**
- **EFR32 Firmware Flashing:**
Built-in flasher for Silicon Labs radios, fully integrated into the UI.
- **New Radio Page:**
Central place to manage radios and perform flashing operations.
- **Run/Stop App Controls:**
Start or stop apps directly from the Apps page.
- **OpenThread Support:**
SMHUB can now be configured as an **OpenThread Border Router** via the UI (flashing + app installation + launch).
💡 **How to update:**
**smhub-services/smhub-web:** Apps-> smhub-services/web or
via SSH (either Internal console or external SSH client - [manual is here](https://smlight.tech/support/manuals/books/smhub/page/access-smhub-via-external-ssh-client)) by executing these commands:
**For more details and to update, follow this guide**:
[https://smlight.tech/support/manuals/books/smhub/page/smhub-os-release-notes](https://smlight.tech/support/manuals/books/smhub/page/smhub-os-release-notes)
|
| 10 | 09 Nov 2025 | smhub-os
| 0.3.4
| **smhub-os Released – Key Features:**
**🔹SMHUB OS v0.3.4**
- Set the default **apps update channel** to *stable*
- Fixed **OTA upgrade issue** affecting users on firmware v0.3.2/v0.3.3 (update to v0.3.4 now available and functional across all installations)
- Fixed **UART communication** for baud rates above **115200**
💡 **How to update:**
**SMHUB-OS:** Settings -> Update and restore
**For more details and to update, follow this guide**:
[https://smlight.tech/support/manuals/books/smhub/page/smhub-os-release-notes#bkmrk-smhub-os-0.3.3%2C-smhu](https://smlight.tech/support/manuals/books/smhub/page/smhub-os-release-notes#bkmrk-smhub-os-0.3.3%2C-smhu)
|
| 9 | 07 Nov 2025 | smhub-services
smhub-web
| 0.1.20
0.2.12
| **smhub-services, smhub-web Released – Key Features:**
🔹 **smhub-web v0.2.12**
- Added Timezone Selector in *Settings → General*
- LTE page fixes: corrected status display and connectivity info
- Z-Wave JS page: now indicates if module is installed
- App tiles: fixed version comparison bug on app overview page
🔹 **smhub-services v0.1.19**
- Timezone management: added backend support for listing and setting timezone
- EEPROM integration: added support to read product data from device EEPROM
- App update stability: fixed bugs related to version comparison and update channel logic
💡 **How to update:**
**smhub-services/smhub-web:** Apps-> smhub-services/web or
via SSH (either Internal console or external SSH client - [manual is here](https://smlight.tech/support/manuals/books/smhub/page/access-smhub-via-external-ssh-client)) by executing these commands:
**For more details and to update, follow this guide**:
[https://smlight.tech/support/manuals/books/smhub/page/smhub-os-release-notes#bkmrk-smhub-services-v0.1.-1](https://smlight.tech/support/manuals/books/smhub/page/smhub-os-release-notes#bkmrk-smhub-services-v0.1.-1)
|
| 8 | 03 Nov 2025 | smhub-os
smhub-services
smhub-web
| 0.3.3
0.1.18
0.2.11
| **smhub-os, smhub-services, smhub-web Released – Key Features:**
🔹 **smhub-web v0.2.11-1**
• New Ethernet settings page
• New 4G/LTE management page
🔹 **smhub-services v0.1.18-1**
• Added backend support for 4G/LTE
• Added peripheral backend layer for future hardware features
🔹 **SMHUB OS v0.3.3**
• Added timezone data to the base system *(frontend integration coming soon)*
• Added 4G/LTE modem support
💡 **How to update:**
**SMHUB-OS:** Settings -> Update and restore **smhub-services/smhub-web:** Apps-> smhub-services/web or
via SSH (either Internal console or external SSH client - [manual is here](https://smlight.tech/support/manuals/books/smhub/page/access-smhub-via-external-ssh-client)) by executing these commands:
**For more details and to update, follow this guide**:
[https://smlight.tech/support/manuals/books/smhub/page/smhub-os-release-notes#bkmrk-smhub-services-v0.1.-1](https://smlight.tech/support/manuals/books/smhub/page/smhub-os-release-notes#bkmrk-smhub-services-v0.1.-1)
|
| 7 | 28 Oct 2025 | smhub-os
smhub-services
smhub-web
| 0.3.2
0.1.17
0.2.10
| **smhub-os, smhub-services, smhub-web Released – Key Features:**
🔹 **Wi-Fi setup in UI** – scan & connect to 2.4 GHz networks (5 GHz in testing mode – IPv6 works so far)
🔹 **USB Device/Host selector** – switch modes in Settings *(requires reboot)*
🔹 **USB device list** – view connected devices (up to 127 supported)
🔹 **Change device hostname** – directly from the Web UI
🔹 **WireGuard** – now supports hostnames + IPv4 and IPv6
🔹 **Improved recovery** – fixed Type-C / SD-Card flashing, added U-Boot realignment & auto-reinstall scripts
🔹 **Wi-Fi MAC fix** – persistent across reboots
🔹 Added **gpiod** utilities
🔹 **Blue LED** indicators during **Type-C / SD flashing**
💡 **How to update:**
**SMHUB-OS:** Settings -> Update and restore **smhub-services/smhub-web:** Apps-> smhub-services/web or
via SSH (either Internal console or external SSH client - [manual is here](https://smlight.tech/support/manuals/books/smhub/page/access-smhub-via-external-ssh-client)) by executing these commands:
**For more details and to update, follow this guide**:
[https://smlight.tech/support/manuals/books/smhub/page/smhub-os-release-notes#bkmrk-2025-oct-28%3A](https://smlight.tech/support/manuals/books/smhub/page/smhub-os-release-notes#bkmrk-2025-oct-28%3A)
|
| 6 | 24 Oct 2025 | smhub-service
smhub-web
| 0.1.16
0.2.9
| **smhub-services, smhub-web Released – Key Features:**
- **💾 Wireguard client Settings in UI:** Configure SMHUB’s internal Wireguard client from the UI (Settings → Wireguard).
- 🔄 Small, but helpful tweak - Reboot button at the left bottom corner of the UI :)
**Important**:
Please update via SSH (either Internal console or external SSH client - [manual is here](https://smlight.tech/support/manuals/books/smhub/page/access-smhub-via-external-ssh-client)) by executing these commands:
**For more details and to update, follow this guide**:
[https://smlight.tech/support/manuals/books/smhub/page/smhub-os-release-notes#bkmrk-2025-oct-13%3A](https://smlight.tech/support/manuals/books/smhub/page/smhub-os-release-notes#bkmrk-2025-oct-13%3A)
|
| 5 | 18 Oct 2025 | OS
smhub-service
smhub-web
| 0.3.0
0.1.13
0.2.8
| **New SMHUB-OS, smhub-services, smhub-web Released – Key Features:**
- 🧠 **MQTT Broker Settings:** Configure SMHUB’s internal MQTT broker directly from the UI (Settings → Mqtt) or link it to an external broker in bridge mode.
- 💾 **Read-only RootFS:** The system partition is now read-only for higher reliability; all settings remain saved after OS updates.
- ⚙️ **Improved Stability:** Fixed MQTT user saving, web upgrade errors, and refined translations and form handling.
- 🪄 **Improved Resets:** Deleting the overlay restores system defaults instantly.
Important:
Please update via SSH (either Internal console or external SSH client - [manual is here](https://smlight.tech/support/manuals/books/smhub/page/access-smhub-via-external-ssh-client)) by executing these commands:
**For more details and to update, follow this guide**: [https://smlight.tech/support/manuals/books/smhub/page/smhub-os-release-notes#bkmrk-smhub-os-v0.2.2-%2B%C2%A0sm](https://smlight.tech/support/manuals/books/smhub/page/smhub-os-release-notes#bkmrk-smhub-os-v0.2.2-%2B%C2%A0sm)
|
| 4 | 13 Oct 2025 | smhub-service
smhub-web
| 0.1.9
0.2.5
| **New SMHUB Services v0.1.9 & SMHUB Web v0.2.5 Released – Key Features:**
- 🖥 **Web Console (Console Tab):** Run Linux commands directly from the Web UI — no SSH required.
- ⚙️ **Improved Logs:** Fixed log visibility for Web and Z-Wave apps.
- 🛠 **Fixed Service Installation Hang:** Updates now install reliably via Web UI.
- 🚫 **401 Error Fix:** Prevented HEAD request spam in system logs.
- 🔄 **Added `opkg update` Endpoint:** Enables smoother package refresh via backend.
- 👤 Web terminal now logs in as `smlight` with color-enabled shell.
**For more details and to update, follow this guide:**
[https://smlight.tech/support/manuals/books/smhub/page/smhub-os-release-notes#bkmrk-smhub-services-v0.1](https://smlight.tech/support/manuals/books/smhub/page/smhub-os-release-notes#bkmrk-smhub-services-v0.1).
|
| 3 | 12 Oct 2025 | OS
smhub-service
smhub-web
| 0.2.2
0.1.7-1
0.2.3-1
| **New SMHUB OS 0.2.2 Released – Key Features:**
- **Full Kernel OTA Support:** Until now, only WebUI and backend (smhub-services, smhub-web) could be updated via OTA. Starting with version **0.2.2**, the **Linux kernel** is now also OTA-upgradable - no Type-C flashing needed.
- **New Logs Tab:** Apps such as **Zigbee2MQTT** now have live log viewing directly in the Web UI.
- **Improved System Boot:** Fixed Z-Wave JS startup issue.
- **Dashboard Improvements:** Added explanatory notes for clarity.
- **Settings Layout Update:** Disabled not-yet-available pages.
- **Firmware Version Display:** Added version indicator to the bottom-left corner.
- **Coming Soon:** Web console for running Linux commands from **Settings → Console**.
**Update Sequence (Required):**
1️⃣ Update **OS to 0.2.1c**
2️⃣ Update **smhub-services** and **smhub-web** to latest versions
3️⃣ Then check **Settings → Update and Backup** to update **OS to 0.2.2**
To update, follow this guide: [https://smlight.tech/support/manuals/books/smhub/page/smhub-os-release-notes#bkmrk-smhub-os-v0.2.2-%2B%C2%A0sm](https://smlight.tech/support/manuals/books/smhub/page/smhub-os-release-notes#bkmrk-smhub-os-v0.2.2-%2B%C2%A0sm)
**IMPORTANT: if you updated via the UI button, and the UI hangs/freezes, please read the link above for the solution.**
|
| 2 | 06 Oct 2025 | OS
| 0.2.1c
| **New SMHUB OS 0.2.1c Released - Key Features**:
- **Kernel OTA Support**: Previously, only the WebUI, backend, and apps supported OTA updates - the kernel did not. Starting with version 0.2.1c, kernel updates now work as well. After this update, the entire system can be updated via OTA, with no need for USB flashing.
- **LED Animation During Boot**: After powering on (in about 3–5 seconds), the LEDs display a blue chasing animation. When this animation stops, it indicates that the device is accessible via SSH. Shortly after, all green LEDs turn on, meaning that the Web UI is also accessible.
- **Other Internal Improvements and Bug Fixes**
To update, please follow this manual: [https://smlight.tech/support/manuals/books/smhub/page/smhub-early-adopter-quick-start-guide#bkmrk-updating-smhub-firmw](https://smlight.tech/support/manuals/books/smhub/page/smhub-early-adopter-quick-start-guide#bkmrk-updating-smhub-firmw)
|
| 1 | 26 Sep 2025 | OS | 0.2.0 | Initial release |
---
## What’s Already Installed (Ready to Use)
- **Zigbee2MQTT** (for CC26XX or EFR32XX radios)
- **Mosquitto MQTT broker**
- **Matterbridge**
- **Node-RED**
---
## Hardware – Working Now
- CC26XX radio
- EFR32MGXX radio
- 100 Mb Ethernet port
- 12× WS2812B RGB LEDs (Ambilight effects)
- eMMC storage
- PoE module support (optional)
- Z-Wave module support (optional)
---
## Hardware – Present but Still in Development
- Wi-Fi 6 (2.4 / 5 GHz) and Bluetooth (currently CLI only, UI support coming)
- IR receiver and transmitter
- USB ports: 2× USB-C (1 for power/upstream, 1 downstream), 1× USB-A
- SD card slot
- 3.5 mm audio jack
- 4× Service LEDs
- 3× Hardware buttons
- Expansion connectors: UART, I²C, SPI, DIY pinouts
---
## Updates & Roadmap
- More hardware functions will be enabled gradually via **SMHUB-OS updates**.
- New features will roll out continuously (but availability is not guaranteed).
- **Early adopters receive updates and improvements first**.
---
## Updating SMHUB Firmware
This section is moved to the dedicated page here [https://smlight.tech/support/manuals/books/smhub/page/smhub-os-update-restore-methods](https://smlight.tech/support/manuals/books/smhub/page/smhub-os-update-restore-methods)
---
## Updating Zigbee Firmware
### EFR32
1. Connect to device via SSH terminal [https://smlight.tech/support/manuals/books/smhub/page/3-getting-started#bkmrk-ssh-access](https://smlight.tech/support/manuals/books/smhub/page/3-getting-started#bkmrk-ssh-access)
2. Type following commands:
3. ```shell
sudo pip install python_magic~=0.4.27 && sudo pip install pysmlight~=0.1.3 && sudo pip install universal-silabs-flasher
cd /home/
sudo wget -O ncp-uart-hw-v7.4.1.0-slzb-07-115200.gbl http://updates.smlight.tech/firmware/slzb-07/ncp-uart-hw-v7.4.1.0-slzb-07-115200.gbl
sudo wget -O efr_btl_enabler.sh http://updates.smlight.tech/firmware/smhub/utils/efr_btl_enabler.sh
sudo chmod 777 efr_btl_enabler.sh
sudo ./efr_btl_enabler.sh
universal-silabs-flasher --device /dev/ttyS2 --probe-method bootloader flash --firmware ncp-uart-hw-v7.4.1.0-slzb-07-115200.gbl
```
EFR32 firmware will be updated to **v7.4.1.0**
## Accessing the Web Interface
- Open: **[http://smhub.local](http://smhub.local)**
[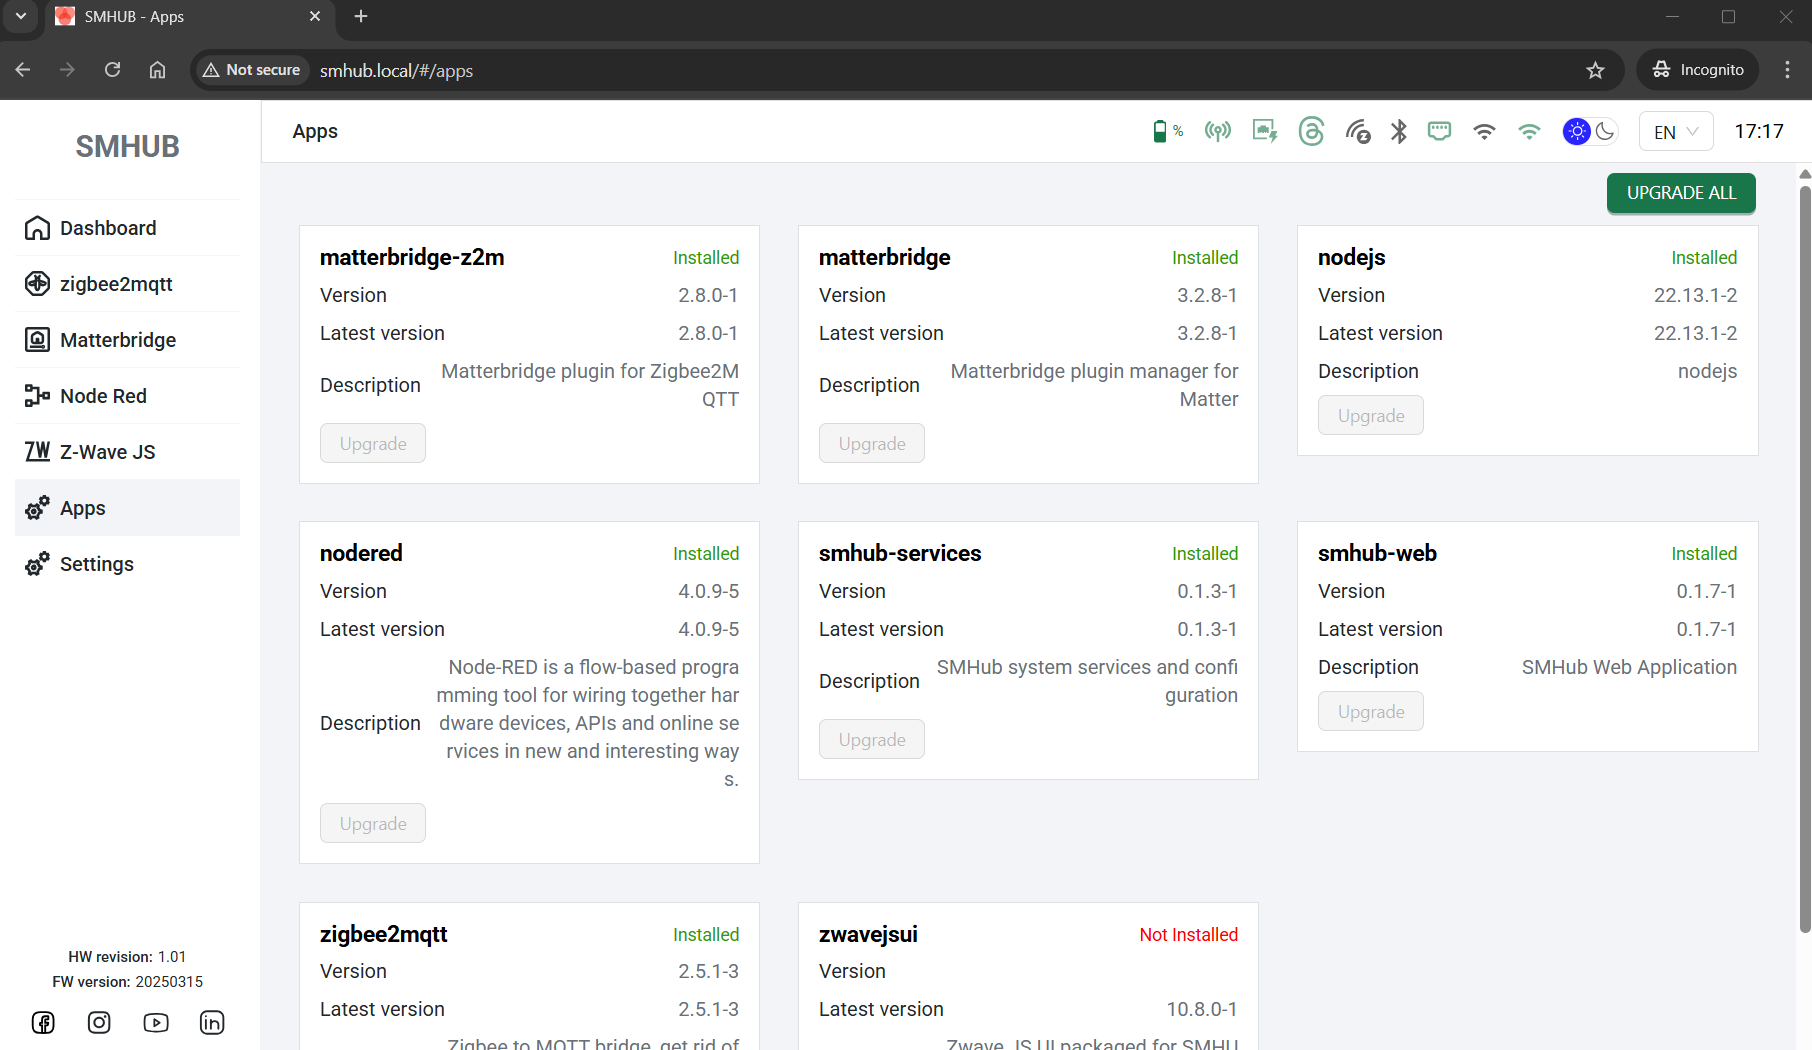](https://smlight.tech/support/manuals/uploads/images/gallery/2025-09/hyKimage.png)
On first boot, **no apps are running**. You must enable them.
---
## Running Apps (Example: Zigbee2MQTT)
1. Open the **Apps tab**.
2. In **Z2M app settings**:
- Choose your Zigbee chip:
- `ttyS1` → CC26XX SoC
- `ttyS2` → EFR32XX SoC
- Configure MQTT broker if needed.
3. Toggle:
- **Enabled** → allows the app to run.
- **Start on boot** → app starts automatically after reboot.
[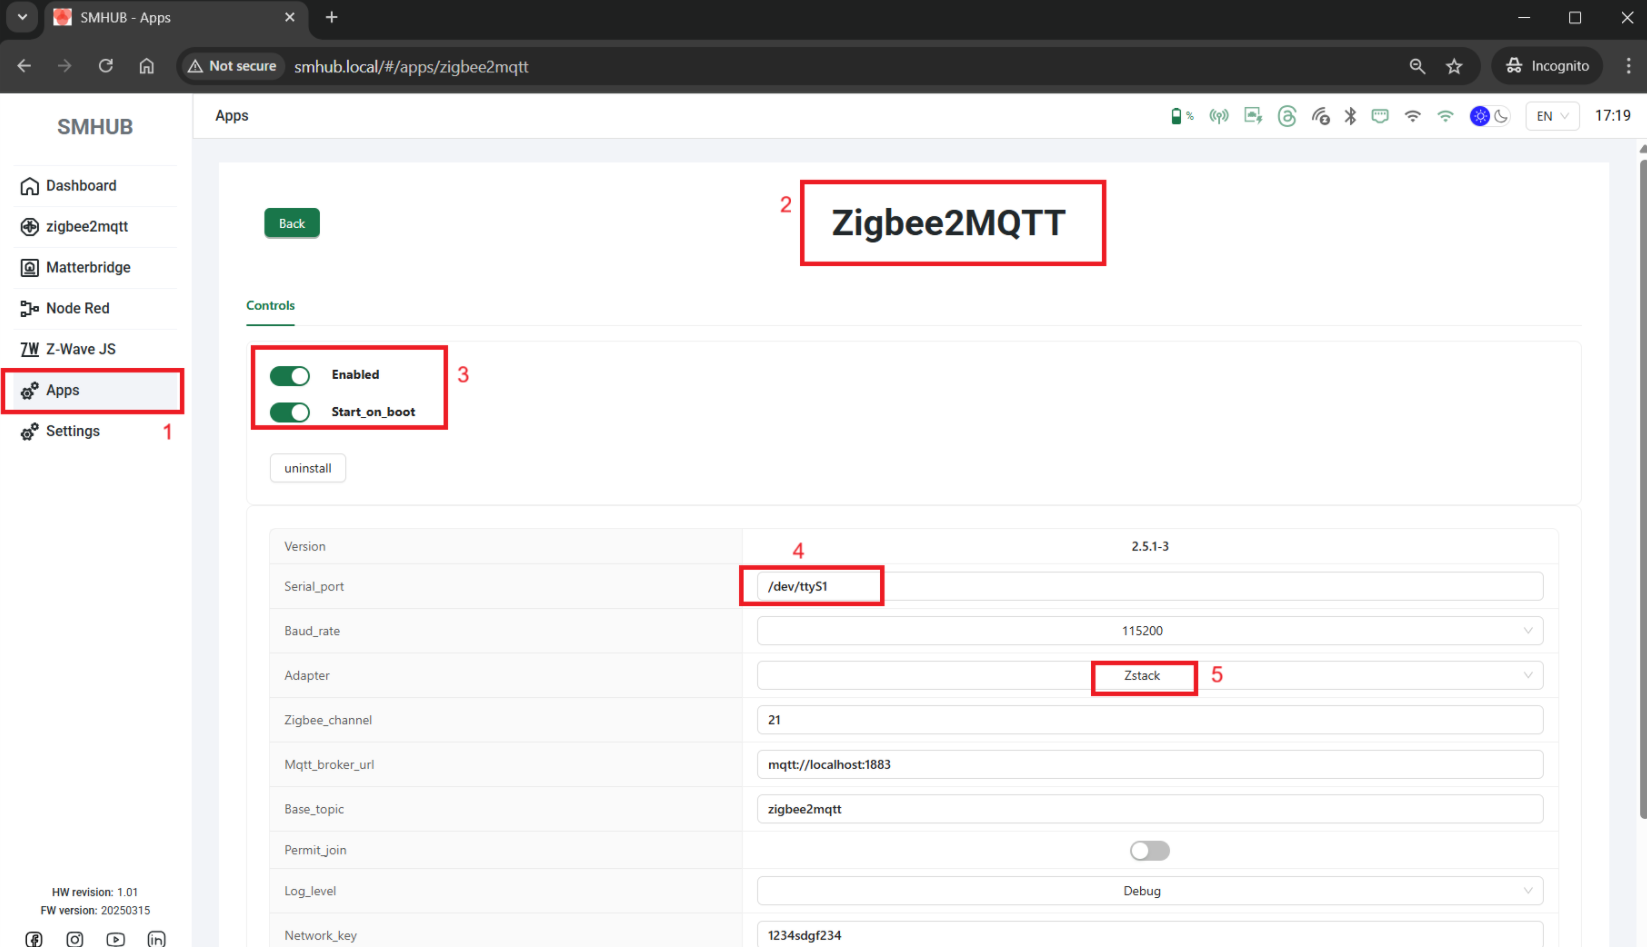](https://smlight.tech/support/manuals/uploads/images/gallery/2025-09/SDximage.png)
4. **Reboot SMHUB** (press Reset or power cycle).
5. Once booted, open the **Zigbee2MQTT tab** – you’ll see the configuration page.
[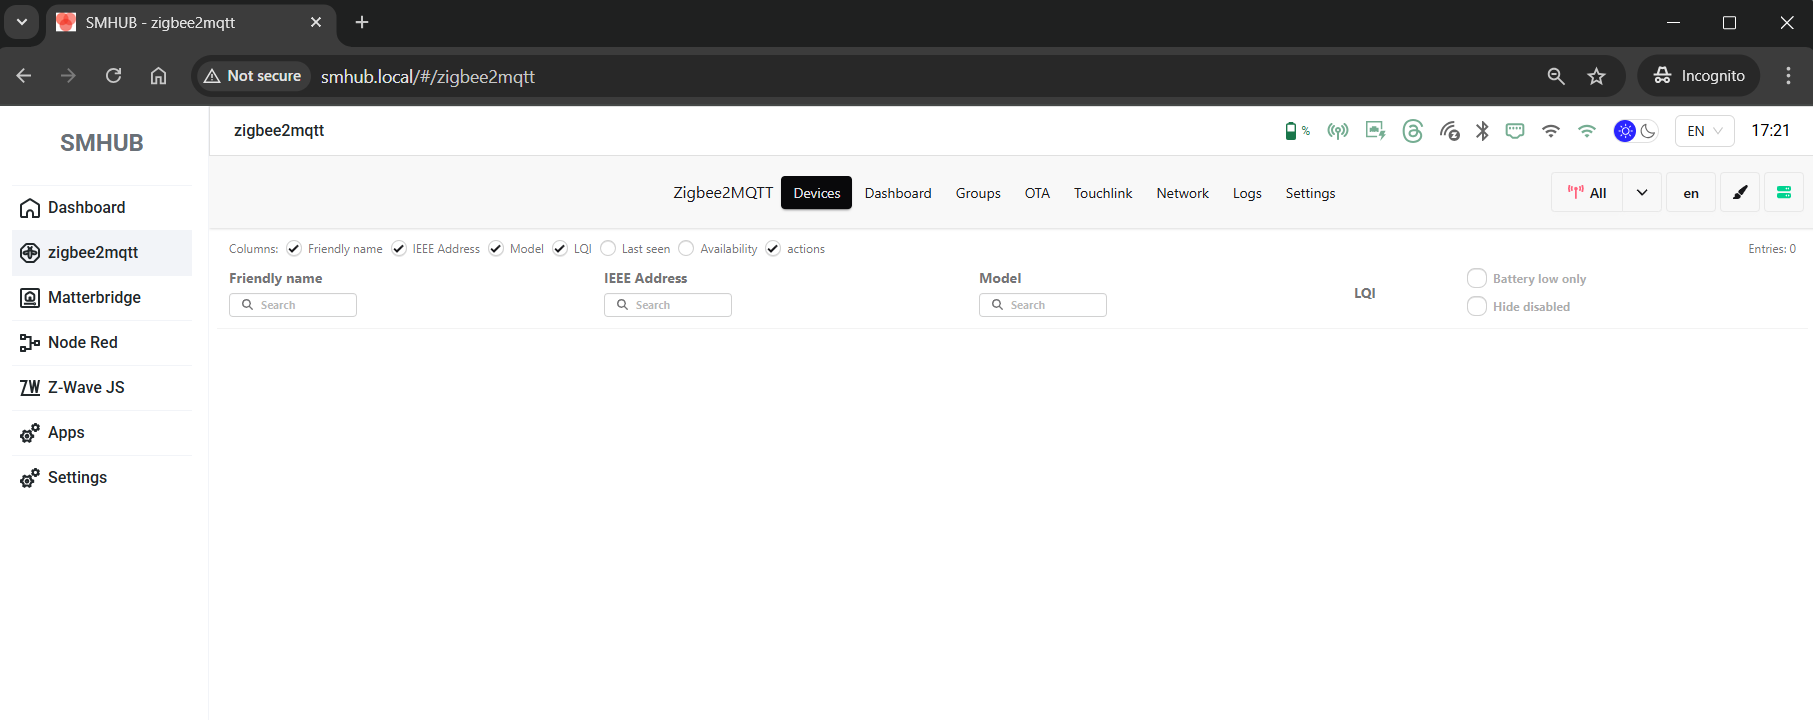](https://smlight.tech/support/manuals/uploads/images/gallery/2025-09/Do6image.png)
You can repeat the same steps for:
- **Matterbridge**
- **Node-RED**
[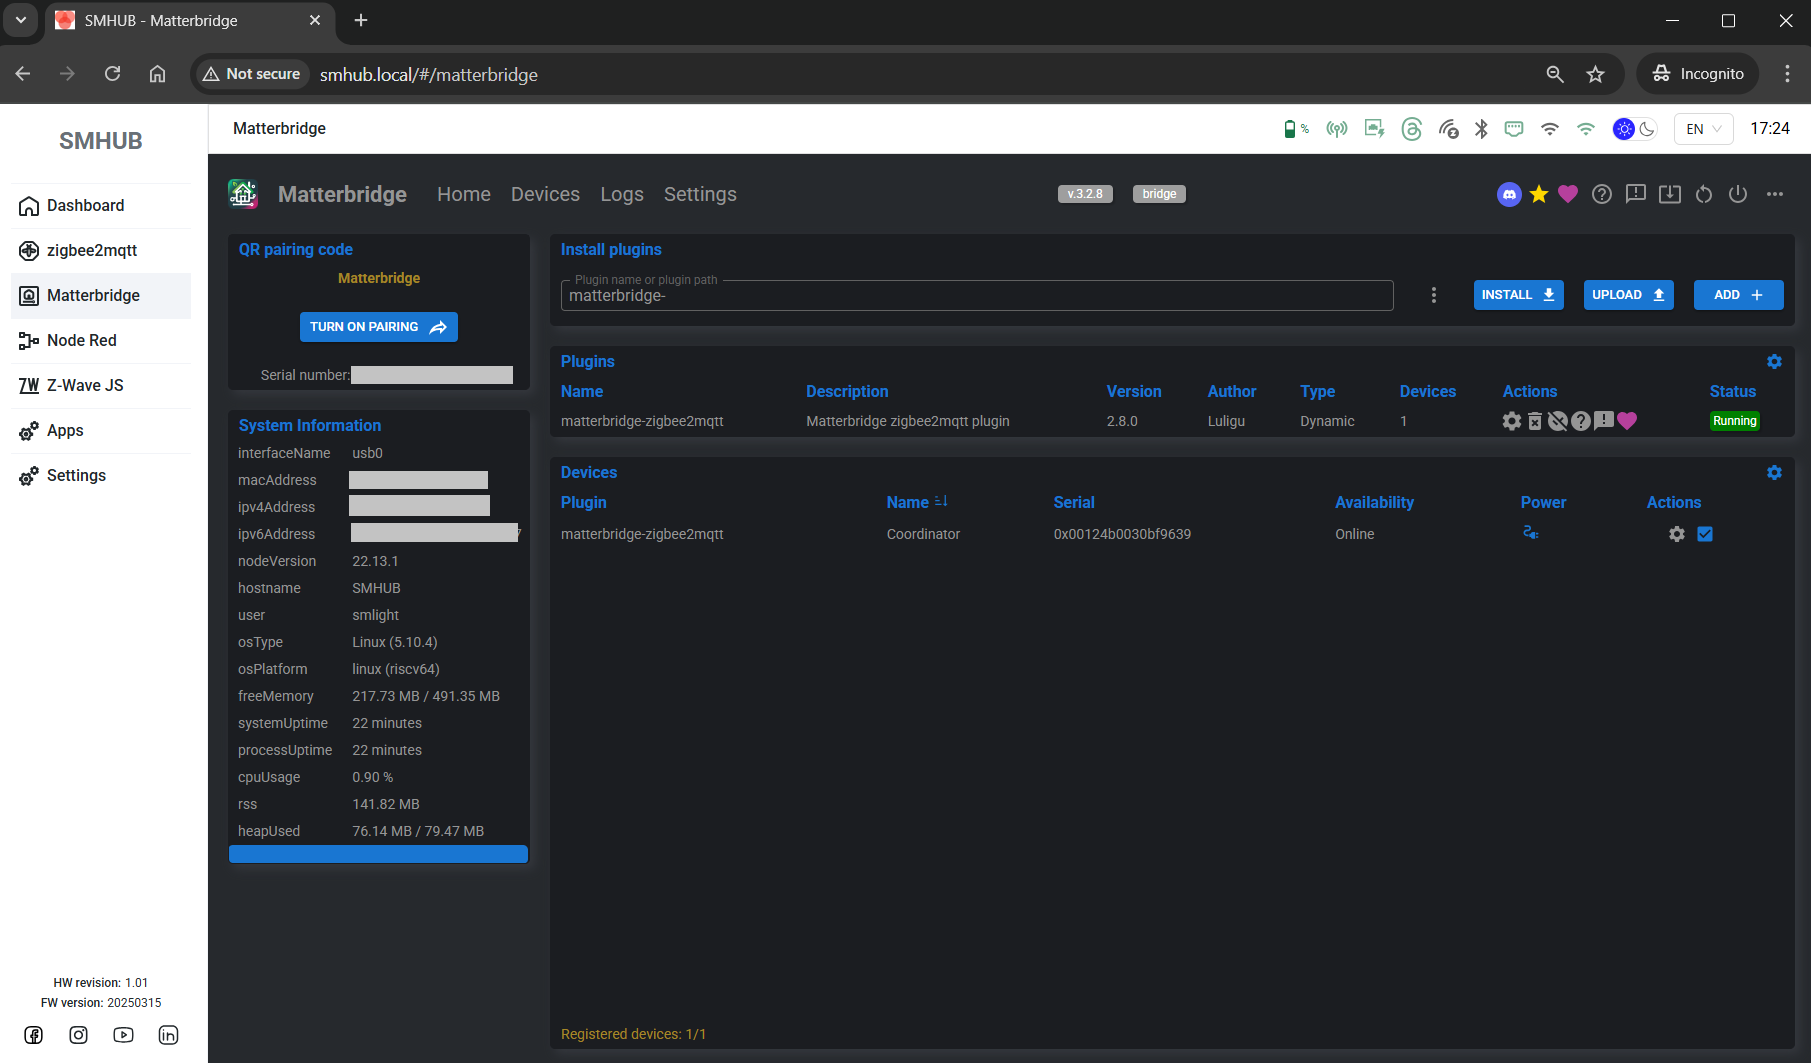](https://smlight.tech/support/manuals/uploads/images/gallery/2025-09/cOMimage.png)
[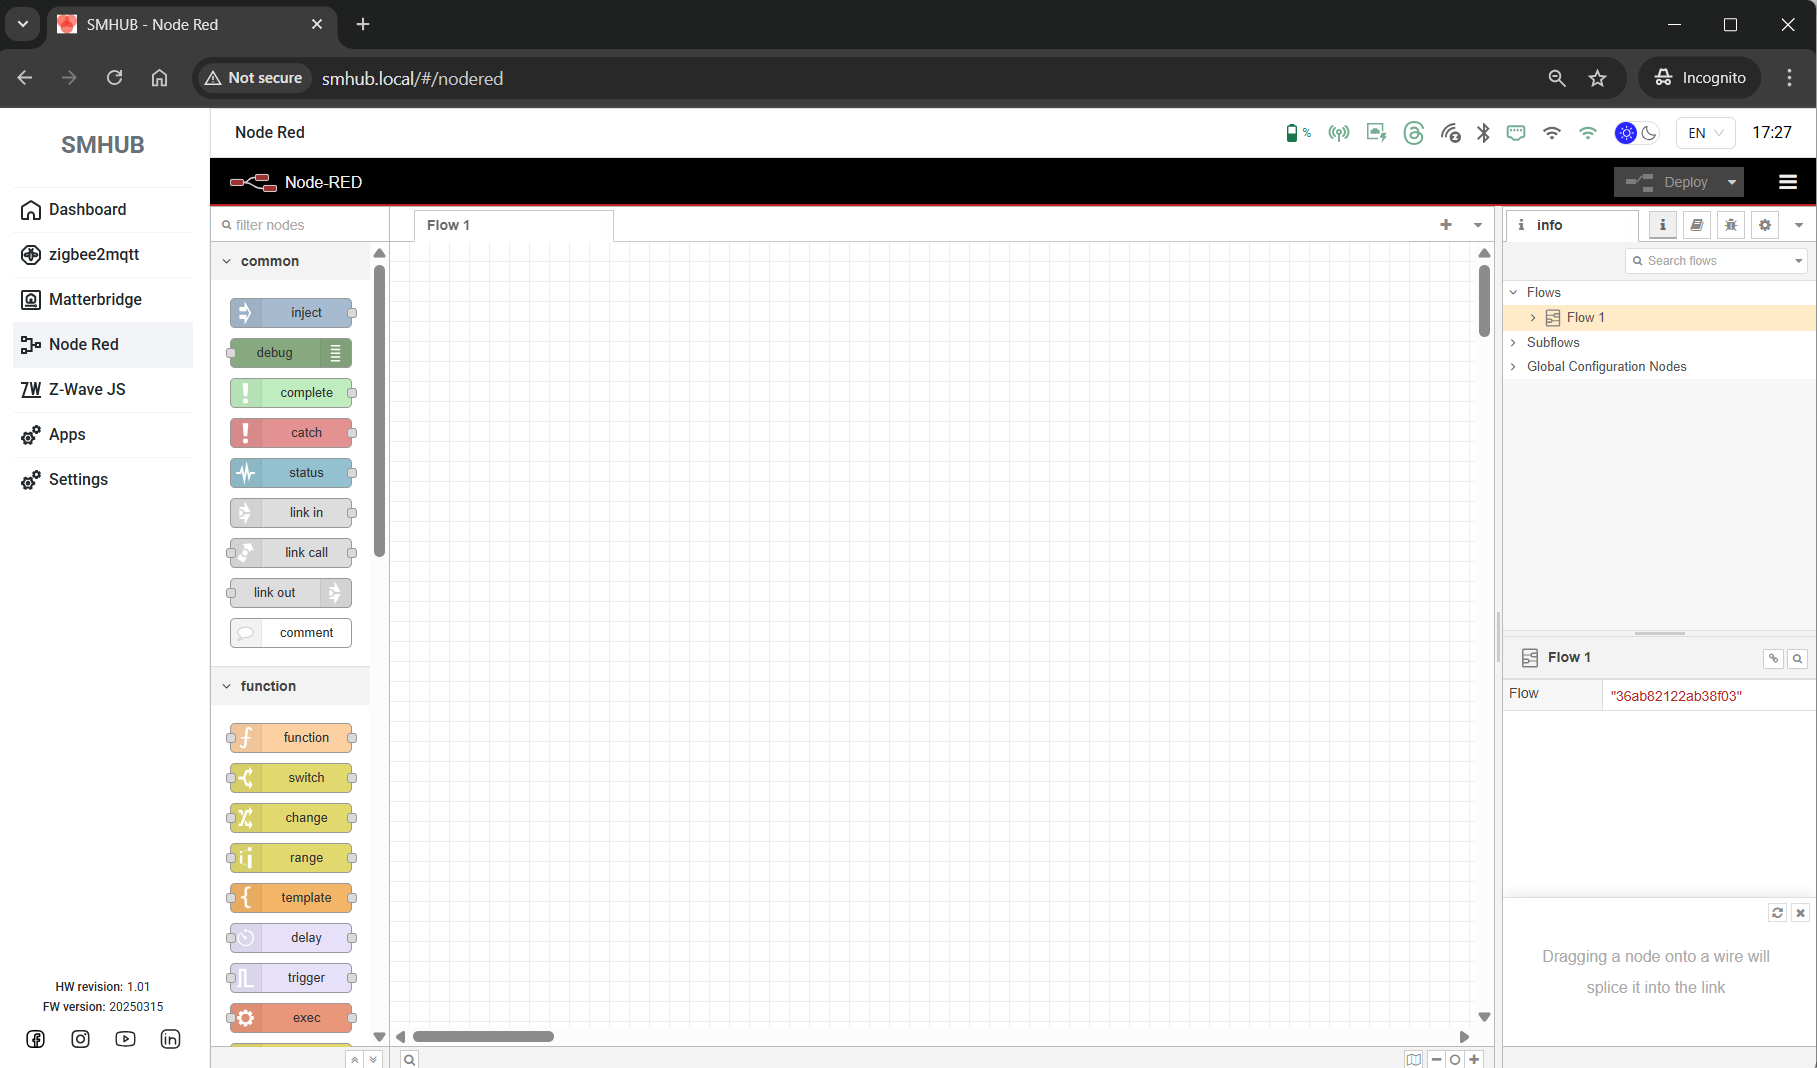](https://smlight.tech/support/manuals/uploads/images/gallery/2025-09/CRLimage.png)
---
## Note 1
- The **Settings tab** is under development – more options will appear in future updates.
- Once per day, the device automatically runs `opkg update` to check for available updates.
- If you do not see package updates in the web interface, you can force an update manually:
1. Connect to the device using an **SSH terminal** (e.g., PuTTY).
2. Log in with credentials:
- **User:** `smlight`
- **Password:** `smlight`
3. Run the command:
4. Return to the web interface and **refresh the Apps page**.
5. Please note that this update feature is applicable only for packages (apps) and is not applicable for SMHUB-OS.
SMHUB-OS OTA is planned to be released in the coming weeks.
## Note 2
If you cannot flash the device and the `flash.bat` window disappears, follow the steps below to get more information about why the process stops. This can help in troubleshooting:
1. **Check drivers**
Make sure the required drivers are installed (see the manual above).
2. **Open Command Prompt as Administrator**
- Click the **Windows button**, type **CMD**.
- Right-click **Command Prompt** and select **Run as Administrator**.
3. **Navigate to the flash.bat folder**
Type the following command:
Replace `full_path_to_the_file_flash_bat` with the actual folder path where `flash.bat` is located.
*Example:*
4. **Run the flashing script**
Type:
and press **Enter**.
5. **Check the error message**
Review the output in the Command Prompt window to identify the error.
# Access SMHUB via External SSH client
# 🧭 How to Access SMHUB via SSH (Using PuTTY)
> ⚙️ This guide helps you connect to your SMHUB device remotely using **SSH** (Secure Shell) and update it via two simple commands.
---
## 🪄 Step 1: Download PuTTY
1. Open this link in your browser: [https://putty.org/index.html](https://putty.org/index.html)
2. Click the **“Download PuTTY”** link.
3. Choose the correct installer for your computer:
- **Windows 64-bit** (most common): `putty-64bit-installer.msi`
- **Windows 32-bit** (older PCs): `putty-32bit-installer.msi`
4. Download and run the installer.
Keep all default settings and finish the installation.
[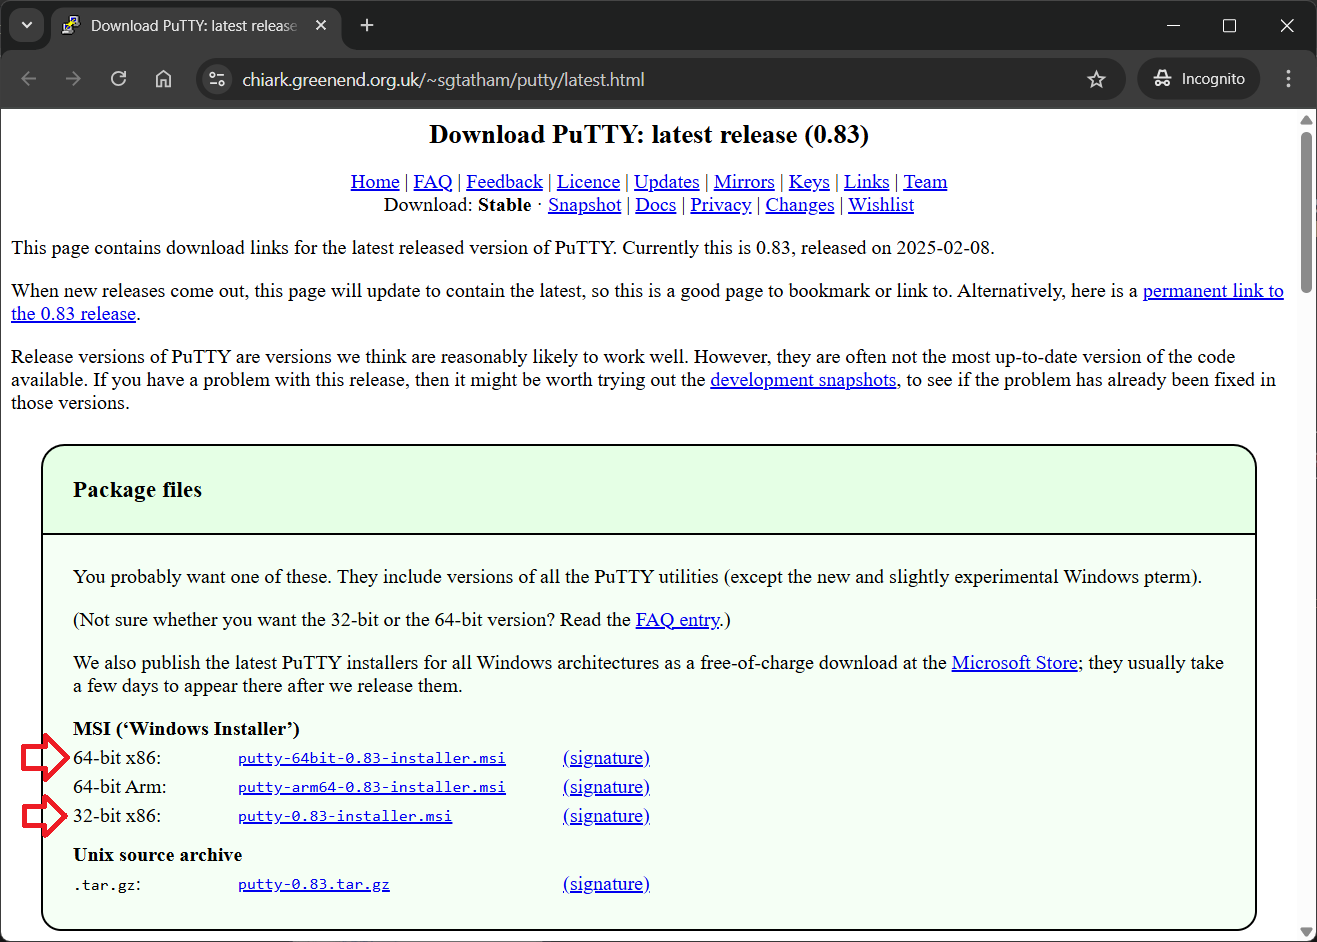](https://smlight.tech/support/manuals/uploads/images/gallery/2025-10/EmMimage.png)
---
## 🪪 Step 2: Open PuTTY
1. After installation, open the **PuTTY** program.
You will see the main configuration window.
[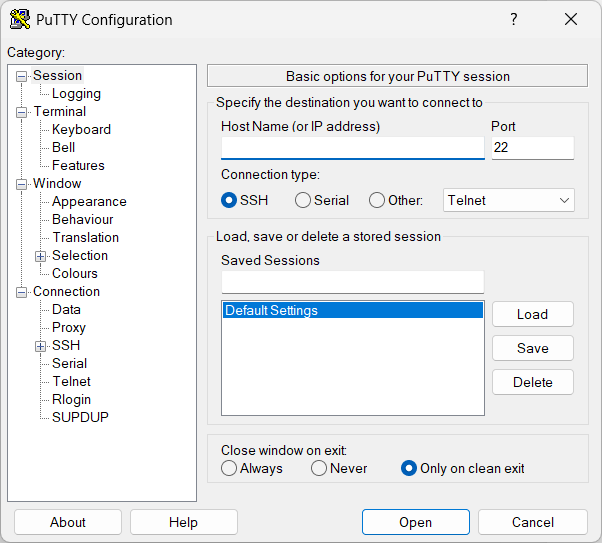](https://smlight.tech/support/manuals/uploads/images/gallery/2025-10/Nl4image.png)
---
## 🌐 Step 3: Enter SMHUB IP Address
1. Start your SMHUB. Wait until Blue LED chase effect stops (for firmwares >0.2.x). This means that SMHUB is ready for SSH connection.
2. In the **“Host Name (or IP address)”** field, type your SMHUB’s IP address.
- Example: `192.168.1.115`
3. Make sure **Port** is set to **22**.
4. Ensure **Connection type** is set to **SSH**.
5. Click the **“Open”** button.
6. Optionally, Save your settings for future use.
[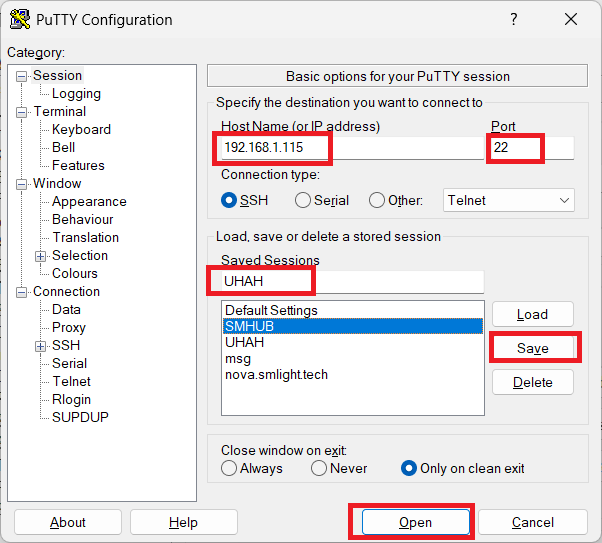](https://smlight.tech/support/manuals/uploads/images/gallery/2025-10/p6Rimage.png)
> 💡 *If you don’t know your SMHUB IP, you can usually find it in your router’s “Connected Devices” list, under a name like `smhub.local`. Instead of IP address, in PuTTY Host Name, you can enter `smhub.local` . It will work, if your network supports mDNS. If your network does not support mDNS, IP address like `192.168.1.115` should be used.*
---
## 🔐 Step 4: Accept Security Warning
1. The first time you connect, a **security alert** may appear.
Click **“Yes”** to trust this device.
---
## 👤 Step 5: Log In
When the black terminal window opens:
1. At the prompt **`login as:`**, type:
2. When asked for **password**, type:
(Note: you will not see any stars or dots while typing - that’s normal.)
[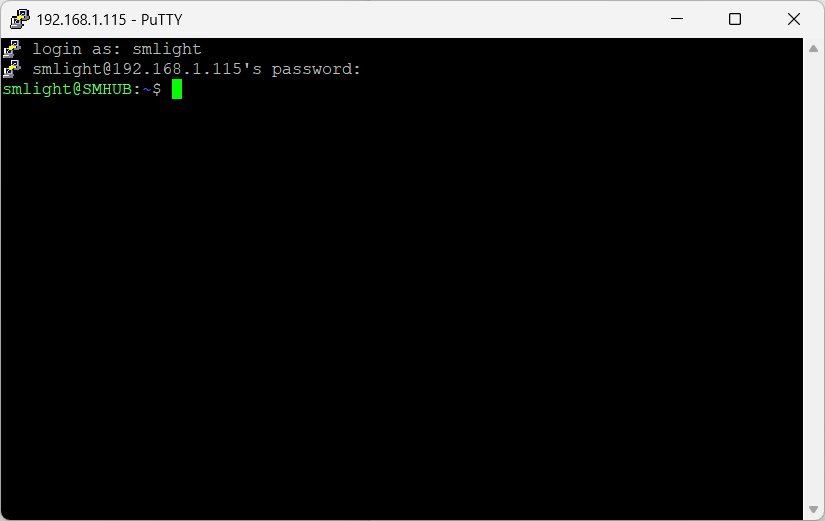](https://smlight.tech/support/manuals/uploads/images/gallery/2025-10/Jxbimage.png)
---
## 🧱 Step 6: Update SMHUB Software
Once logged in, run the following two commands one by one:
### 1️⃣ Update the package list:
Wait until the command finishes (you will see lines of text ending with “done”). System will ask for password. Please use the same password `smlight`
[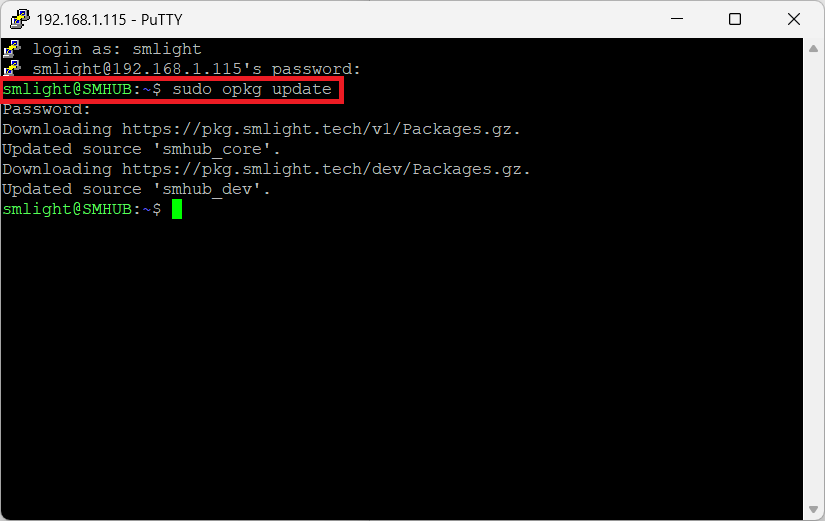](https://smlight.tech/support/manuals/uploads/images/gallery/2025-10/sc5image.png)
### 2️⃣ Upgrade all installed packages:
This may take a few minutes - don’t close the window during the process.
[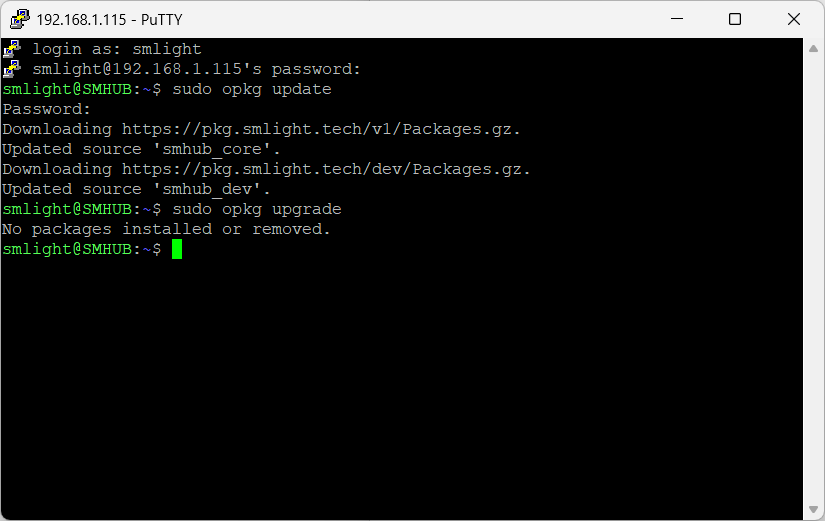](https://smlight.tech/support/manuals/uploads/images/gallery/2025-10/jR7image.png)
---
## ✅ Step 7: Done!
Once finished, type: `sudo reboot now`
You can close the window without any commands as well.
Your SMHUB will reboot.
Your SMHUB is now updated and ready to use 🎉
---
## 💡 Quick Summary
| Action | Command / Button |
|---|
| Login username | `smlight` |
| Login password | `smlight` |
| Update packages | `sudo opkg update` |
| Upgrade packages | `sudo opkg upgrade` |
| Exit session | `exit` |
- -web and -services apps: UI update or Console update:
- UI (smhub-services restart after update can take up to 4 minutes):
**Web **→ Apps** → Refresh → smhub-services/smhub-web → Upgrade**
- Console (smhub-services restart after update can take up to 4 minutes):
`sudo opkg update`
`sudo opkg upgrade`
- Can be updated via Type-C or SD-Card flashing methods - please read here: [https://smlight.tech/support/manuals/books/smhub/chapter/restore-and-updating](https://smlight.tech/support/manuals/books/smhub/chapter/restore-and-updating). After such an update, all apps are updated automatically.
---
# **2026-Jan-22:**
### **smhub-services 0.2.8-1, openthread 0.3.1-2, OS 0.3.11 Released**
---
### 🚀 **Key Highlight**
- Fixed issue with `cron.daily` preventing daily package updates
- Enabled kernel options required for OTBR firewall functionality
- Migrated autostart files to a new structure for improved service handling
- Updated system-config to v0.1.16
- Added support for configuring the OTBR app directly
- Added full configuration support for OpenThread from the web UI
- Improved logging and debugging output
- Improved pairing of new Thread devices in some cases
- Added support for firewall and NAT64 configuration
### ⚙️ **Update Instructions**
- OS: Setting -> Update and Restore -> Update
- -web and -services apps: UI update or Console update:
- UI (smhub-services restart after update can take up to 4 minutes):
**Web **→ Apps** → Refresh → smhub-services/smhub-web → Upgrade**
- Console (smhub-services restart after update can take up to 4 minutes):
`sudo opkg update`
`sudo opkg upgrade`
- Can be updated via Type-C or SD-Card flashing methods - please read here: [https://smlight.tech/support/manuals/books/smhub/chapter/restore-and-updating](https://smlight.tech/support/manuals/books/smhub/chapter/restore-and-updating). After such an update, all apps are updated automatically.
---
# **2025-Dec-12:**
### **smhub-services 0.2.5, smhub-web 0.2.18 + Openthread app 0.3.0-3 Released**
---
### 🚀 **Key Highlight**
- **MQTT (Mosquitto) Improvements**
- - Fixed **MQTT settings pages** in the Web UI.
- Fixed **MQTT bridge mode** configuration for connecting SMHUB to external brokers.
📘 Manual:[ https://smlight.tech/support/manuals/books/smhub/page/connecting-zigbee2mqtt-on-smhub-to-home-assistant](https://smlight.tech/support/manuals/books/smhub/page/connecting-zigbee2mqtt-on-smhub-to-home-assistant)
- **App Settings & Configuration**
- - Fixed saving of **numeric values** in app settings forms.
- Improved app configuration forms with additional options:
- MQTT credentials fields added where applicable
- **Home Assistant enablement** option added to Zigbee2MQTT settings
These changes make app configuration more reliable and reduce the need for manual edits.
- **Openthread App Updates (v0.3.0-3)**
- - Fixed **Run** and **Stop** buttons in the OpenThread app.
- Corrected **OpenThread port settings** for **SMHUB Nano series** devices.
📘 Manual:[ https://smlight.tech/support/manuals/books/smhub/page/using-smhub-as-thread-border-router-for-matter-devices](https://smlight.tech/support/manuals/books/smhub/page/using-smhub-as-thread-border-router-for-matter-devices)
### ⚙️ **Update Instructions**
- -web and -services apps: UI update or Console update:
- UI (smhub-services restart after update can take up to 4 minutes):
**Web **→ Apps** → Refresh → smhub-services/smhub-web → Upgrade**
- Console (smhub-services restart after update can take up to 4 minutes):
`sudo opkg update`
`sudo opkg upgrade`
---
# **2026-Jan-19:**
### **smhub-services 0.2.7, smhub-web 0.2.23, OS 0.3.10 Released**
---
### 🚀 **Key Highlight**
- **Added nftables (+ iptables compat) for Tailscale/firewall**
- **Optimized startup: faster boot time by about 30 sec.**
- **Auto log truncation (daily / size limit) – to resolve freezes issue**
- **Improved NanoMR4 EFR flashing (CC flash reset)**
- **Zigbee2MQTT default logs set to info**
- **Fixed rare boot into backup partition**
- **Faster startup (deferred component loading)**
- **Increased flasher load timeout**
- **Updated GPIO mapping for kernel 6.18**
- **Updated Buildroot to 2025.11.x**
### ⚙️ **Update Instructions**
- OS: Setting -> Update and Restore -> Update
- -web and -services apps: UI update or Console update:
- UI (smhub-services restart after update can take up to 4 minutes):
**Web **→ Apps** → Refresh → smhub-services/smhub-web → Upgrade**
- Console (smhub-services restart after update can take up to 4 minutes):
`sudo opkg update`
`sudo opkg upgrade`
- Can be updated via Type-C or SD-Card flashing methods - please read here: [https://smlight.tech/support/manuals/books/smhub/chapter/restore-and-updating](https://smlight.tech/support/manuals/books/smhub/chapter/restore-and-updating). After such an update, all apps are updated automatically.
---
# **2025-Dec-12:**
### **smhub-services 0.2.5, smhub-web 0.2.18 + Openthread app 0.3.0-3 Released**
---
### 🚀 **Key Highlight**
- **MQTT (Mosquitto) Improvements**
- - Fixed **MQTT settings pages** in the Web UI.
- Fixed **MQTT bridge mode** configuration for connecting SMHUB to external brokers.
📘 Manual:[ https://smlight.tech/support/manuals/books/smhub/page/connecting-zigbee2mqtt-on-smhub-to-home-assistant](https://smlight.tech/support/manuals/books/smhub/page/connecting-zigbee2mqtt-on-smhub-to-home-assistant)
- **App Settings & Configuration**
- - Fixed saving of **numeric values** in app settings forms.
- Improved app configuration forms with additional options:
- MQTT credentials fields added where applicable
- **Home Assistant enablement** option added to Zigbee2MQTT settings
These changes make app configuration more reliable and reduce the need for manual edits.
- **Openthread App Updates (v0.3.0-3)**
- - Fixed **Run** and **Stop** buttons in the OpenThread app.
- Corrected **OpenThread port settings** for **SMHUB Nano series** devices.
📘 Manual:[ https://smlight.tech/support/manuals/books/smhub/page/using-smhub-as-thread-border-router-for-matter-devices](https://smlight.tech/support/manuals/books/smhub/page/using-smhub-as-thread-border-router-for-matter-devices)
### ⚙️ **Update Instructions**
- -web and -services apps: UI update or Console update:
- UI (smhub-services restart after update can take up to 4 minutes):
**Web **→ Apps** → Refresh → smhub-services/smhub-web → Upgrade**
- Console (smhub-services restart after update can take up to 4 minutes):
`sudo opkg update`
`sudo opkg upgrade`
---
# **2025-Nov-26:**
### **smhub-services 0.2.2, smhub-web 0.2.16, OS 0.3.7 Released**
---
### 🚀 **Key Highlight**
- **Improved Radio Flashing & Model Handling - smhub-services v0.2.2**
- Added support for **reading EEPROM v1 format**.
- Radio flashing endpoints now adapt automatically based on the EEPROM model (better model-aware flashing).
- Updated `pysmlight` to **v0.2.11** adding support for **Nano** flashing.
- Corrected default configuration values for **Zigbee2MQTT**.
[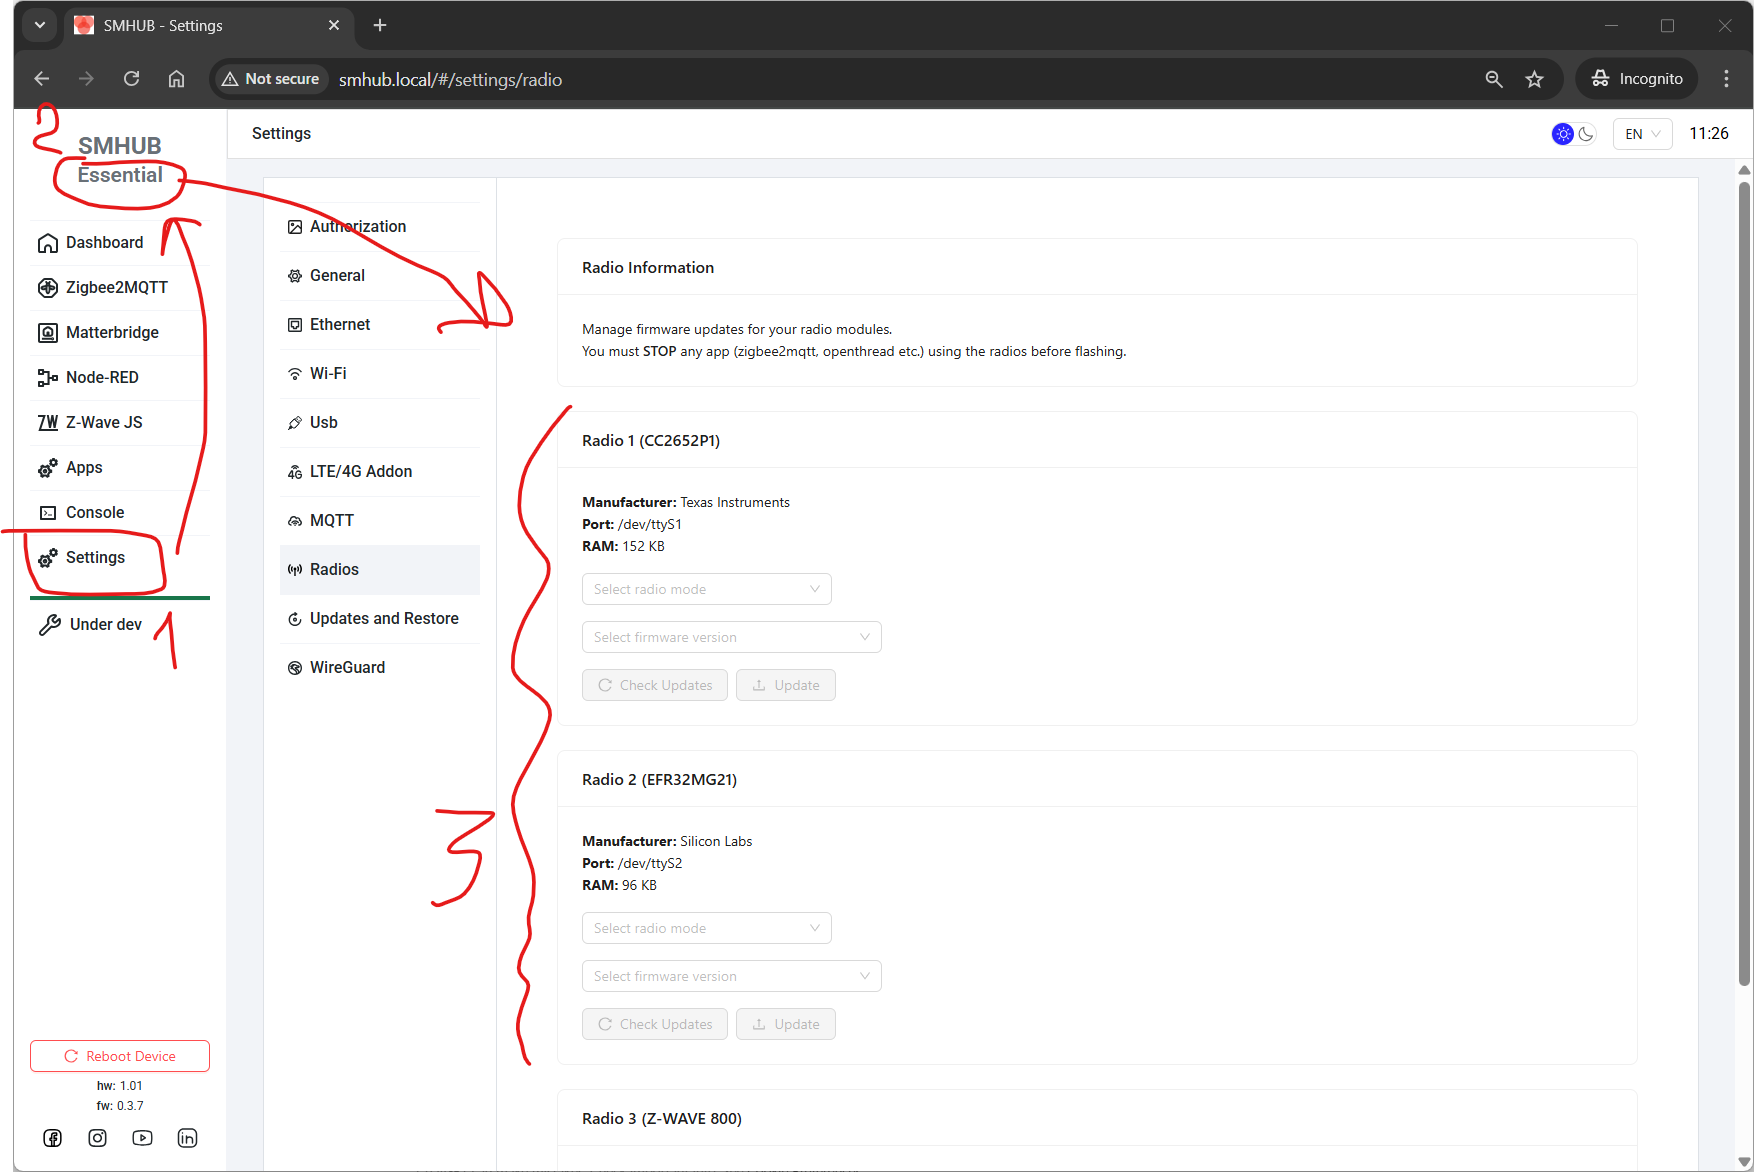 ](https://smlight.tech/support/manuals/uploads/images/gallery/2025-11/dVSimage.png)[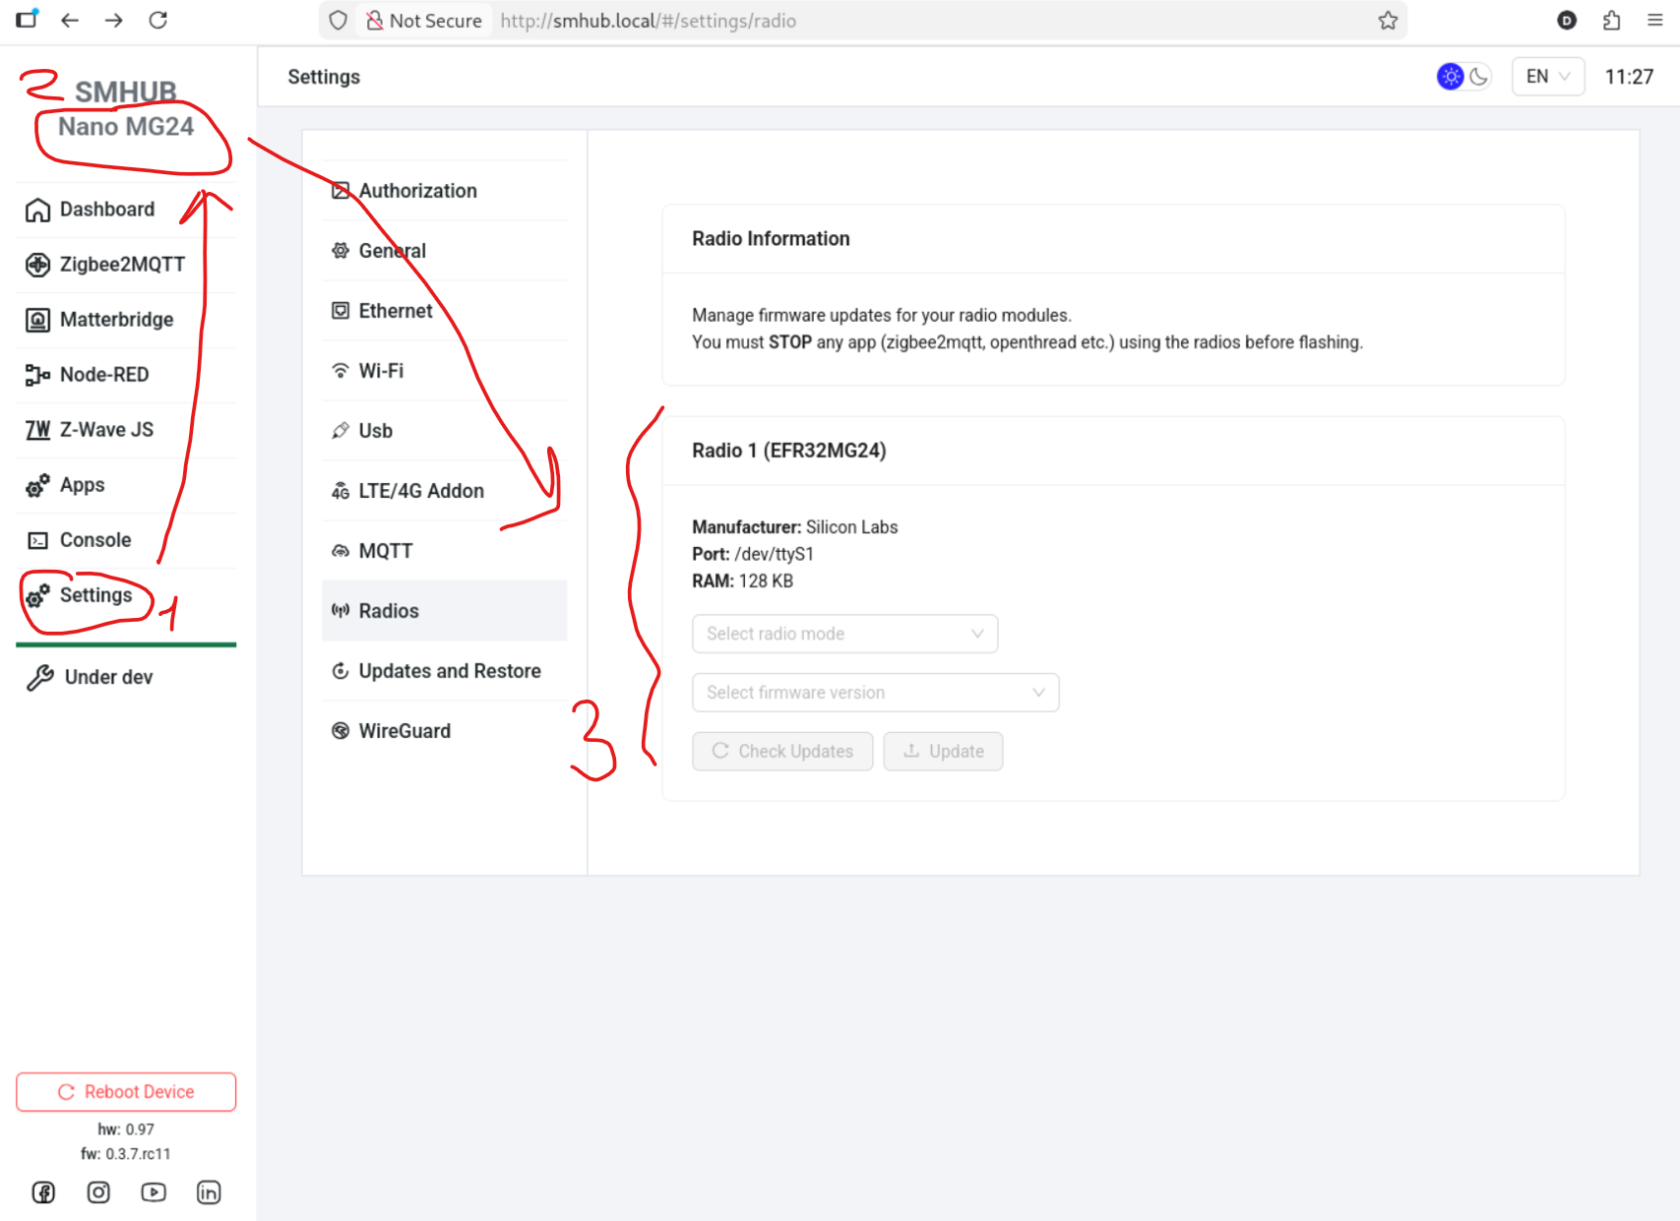](https://smlight.tech/support/manuals/uploads/images/gallery/2025-11/xINimage.png)
- **Web UI Improvements - smhub-web v0.2.16**
- Updated Radio page to support **Nano Mg24** flashing.
- The device **model is now displayed in the sidebar** for quick identification.
[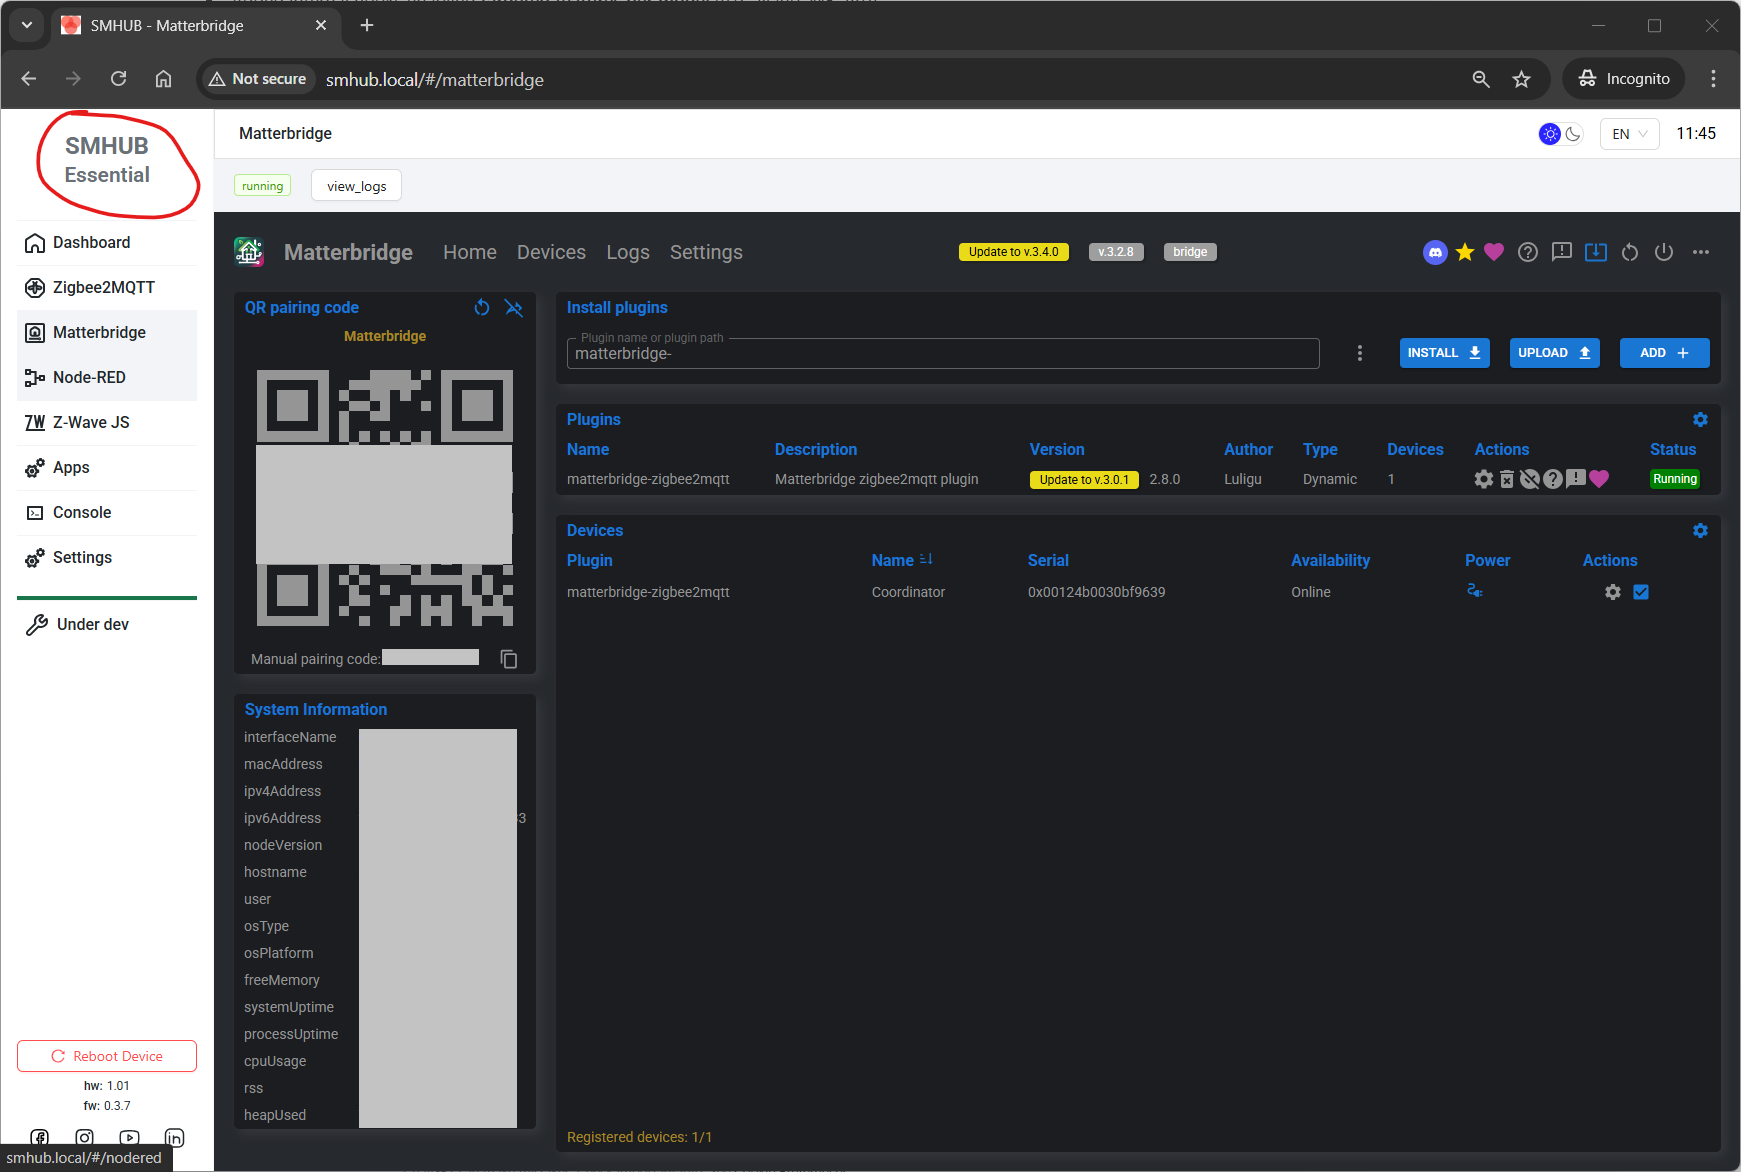](https://smlight.tech/support/manuals/uploads/images/gallery/2025-11/6LDimage.png)
- Updated default Zigbee2MQTT settings.
- **App status** (running/stopped) now shown inside Apps settings.
[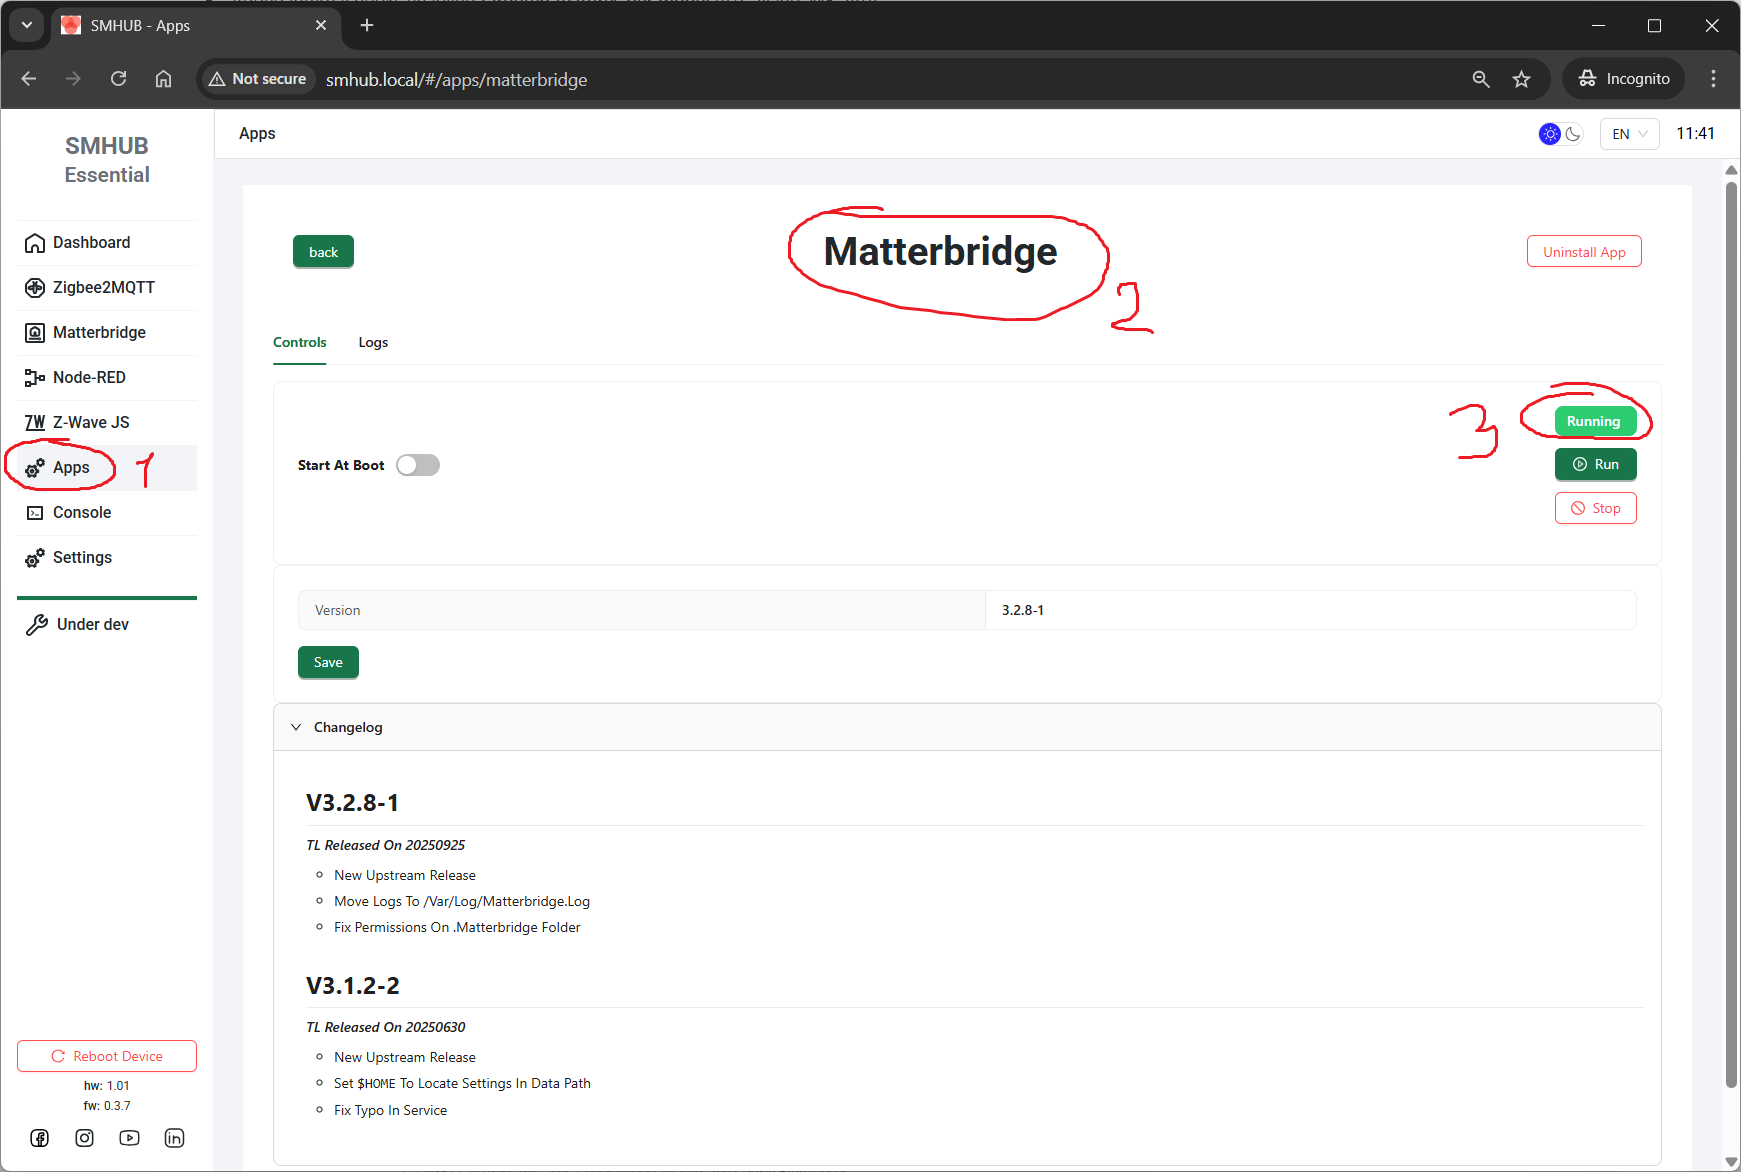](https://smlight.tech/support/manuals/uploads/images/gallery/2025-11/vXOimage.png)
- **Progress bar for OS updates** added.
[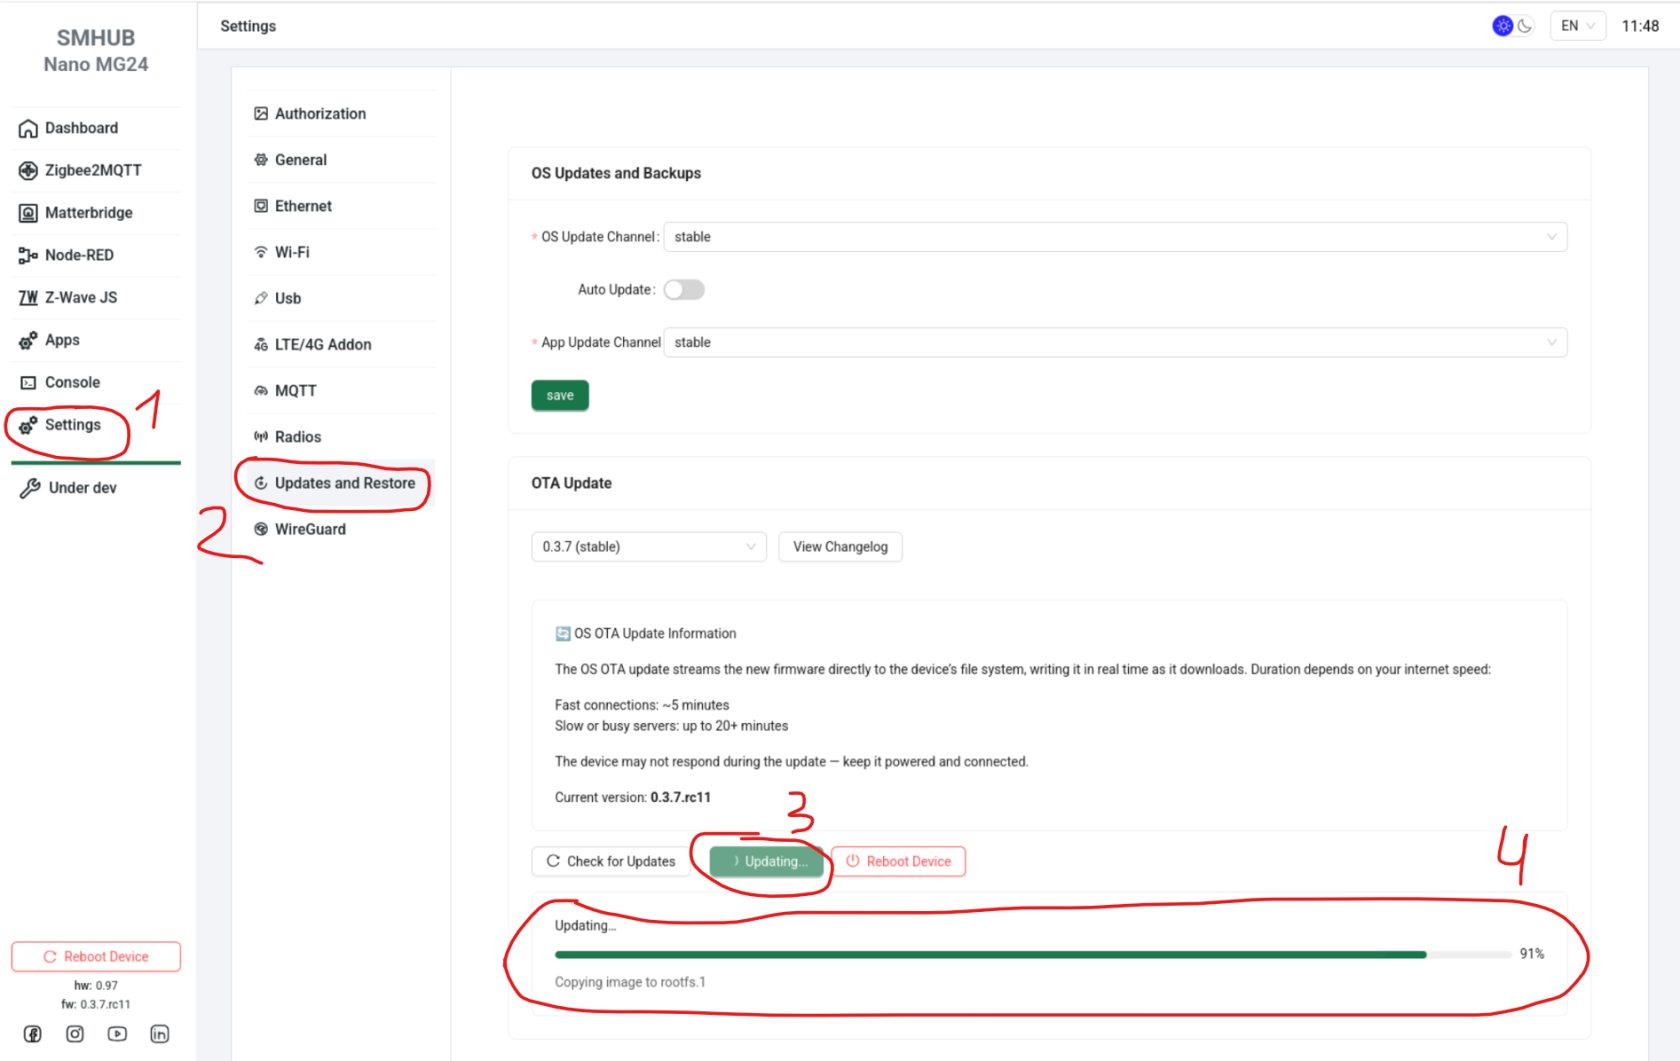](https://smlight.tech/support/manuals/uploads/images/gallery/2025-11/666image.png)
- OS **changelogs now appear in UI** before updating.
[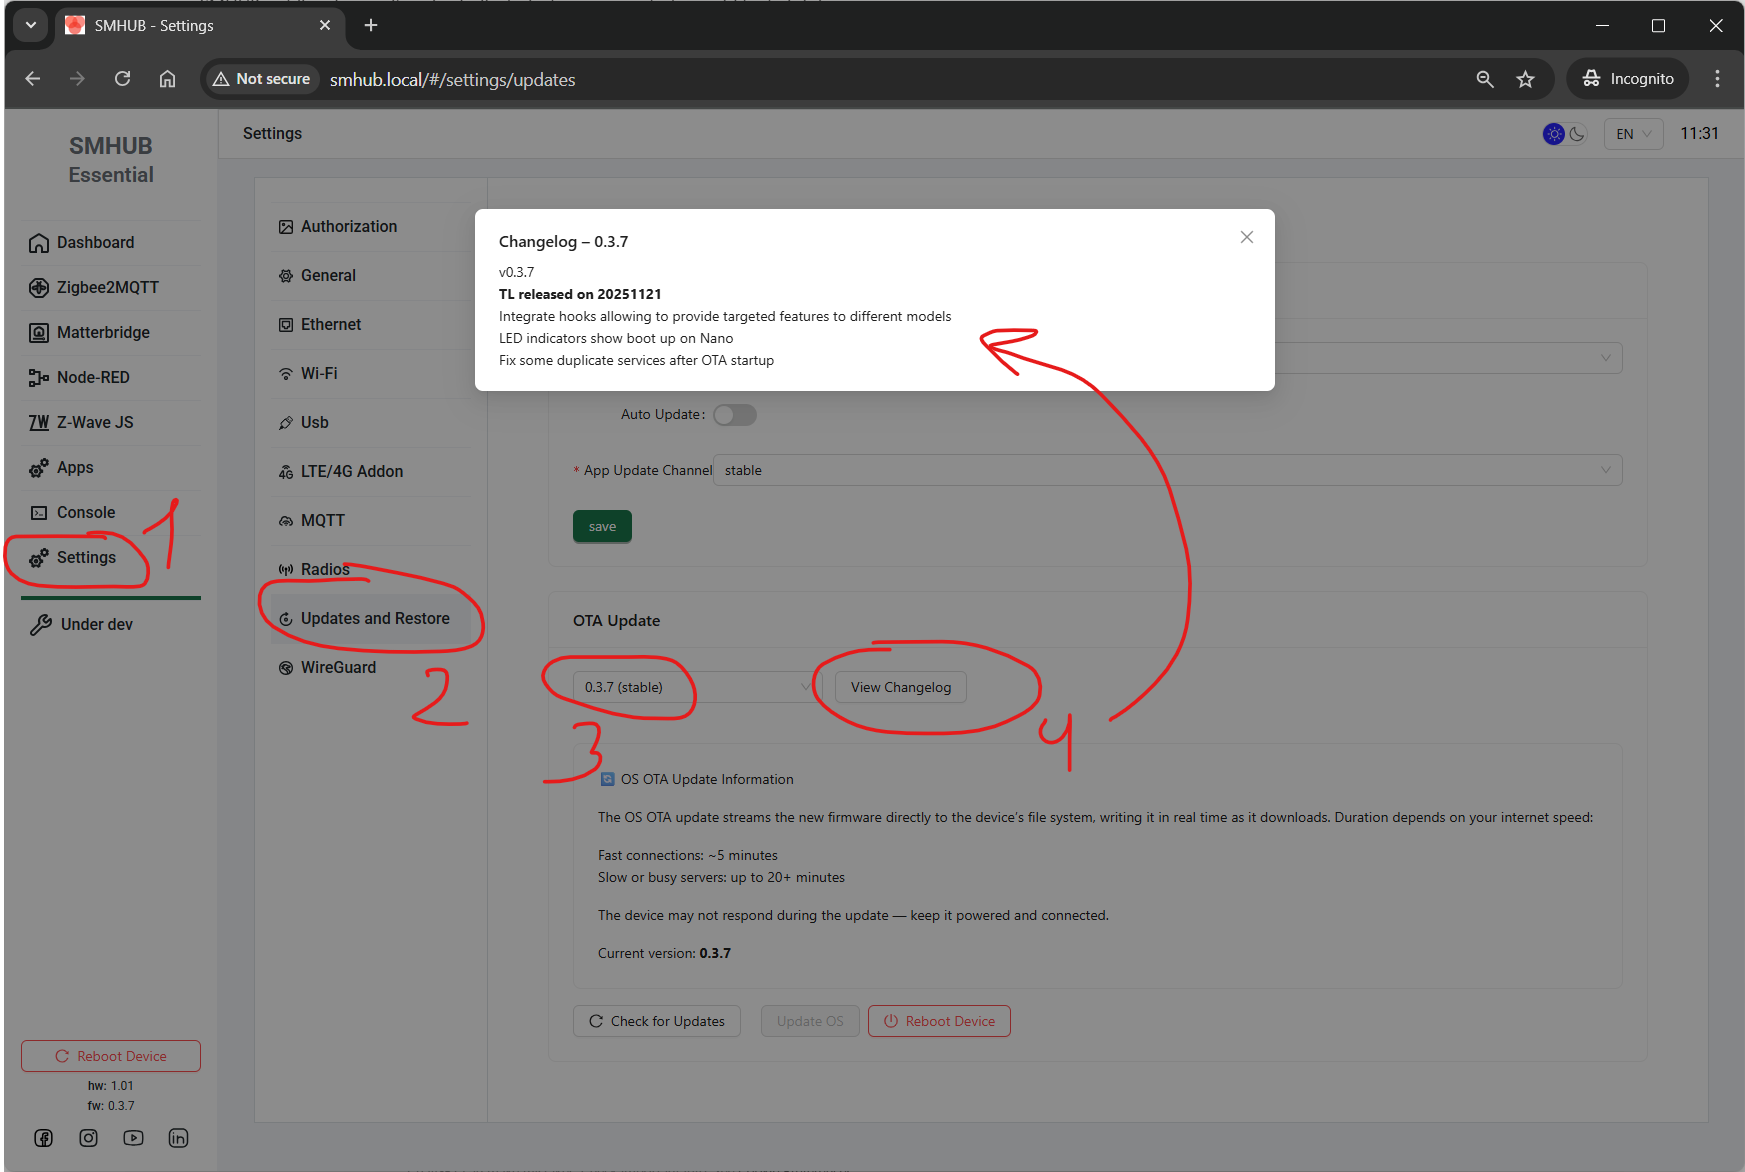](https://smlight.tech/support/manuals/uploads/images/gallery/2025-11/936image.png)
- **OS Enhancements - smhub-os v0.3.7**
- Added internal hooks enabling **targeted features per model** (e.g., Nano, Essentials etc).
- **LED indicators now display boot sequence** on Nano devices.
- Fixed duplicated services that sometimes appeared after OTA updates.
[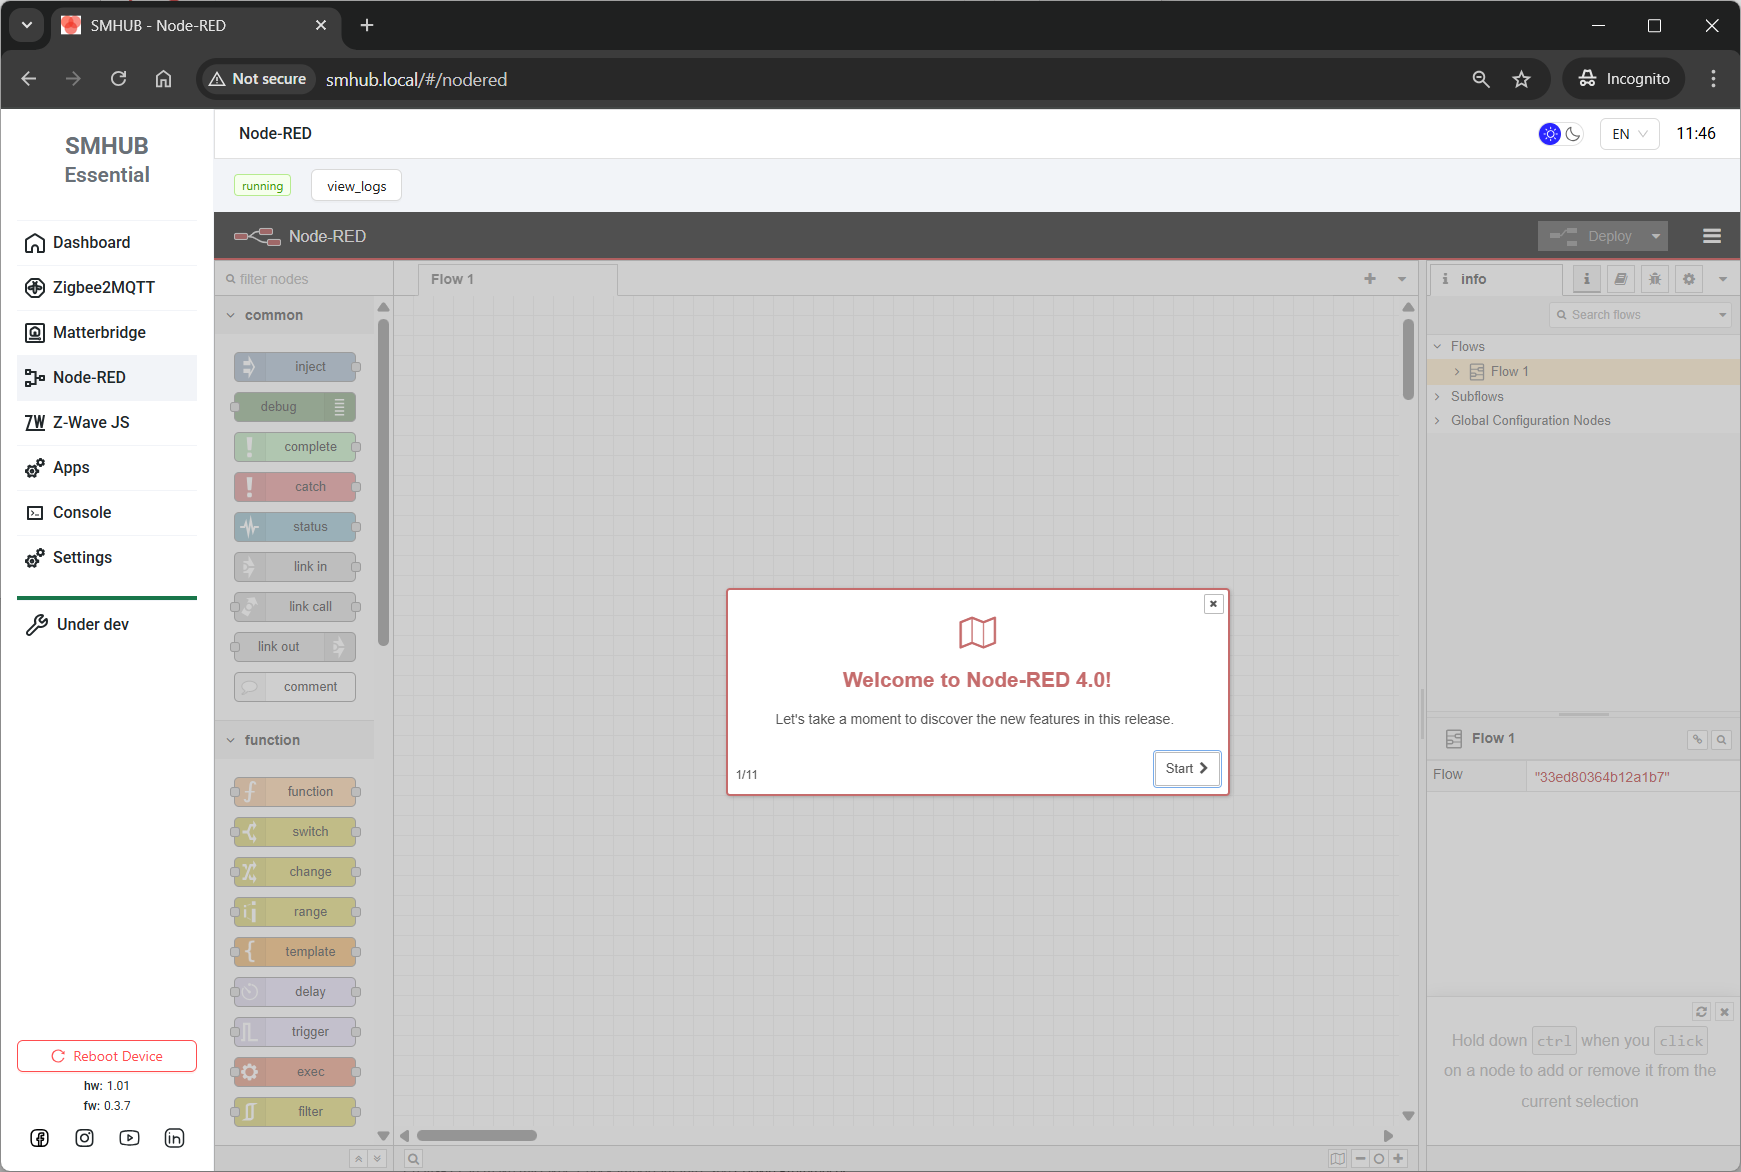](https://smlight.tech/support/manuals/uploads/images/gallery/2025-11/Wjwimage.png)
### ⚙️ **Update Instructions**
- OS: Setting -> Update and Restore -> Update
- -web and -services apps: UI update or Console update:
- UI (smhub-services restart after update can take up to 4 minutes):
**Web **→ Apps** → Refresh → smhub-services/smhub-web → Upgrade**
- Console (smhub-services restart after update can take up to 4 minutes):
`sudo opkg update`
`sudo opkg upgrade`
---
# **2025-Nov-22:**
### **smhub-services 0.2.1, smhub-web 0.2.15, OS 0.3.6 Released**
---
### 🚀 **Key Highlight**
- **CC Radio Flashing Added**
SMHUB now supports flashing **Texas Instruments CC26xx/CC13xx radios** directly from the Web UI.
No external tools or scripts required - everything is handled via the integrated flasher inside the Radio page.
[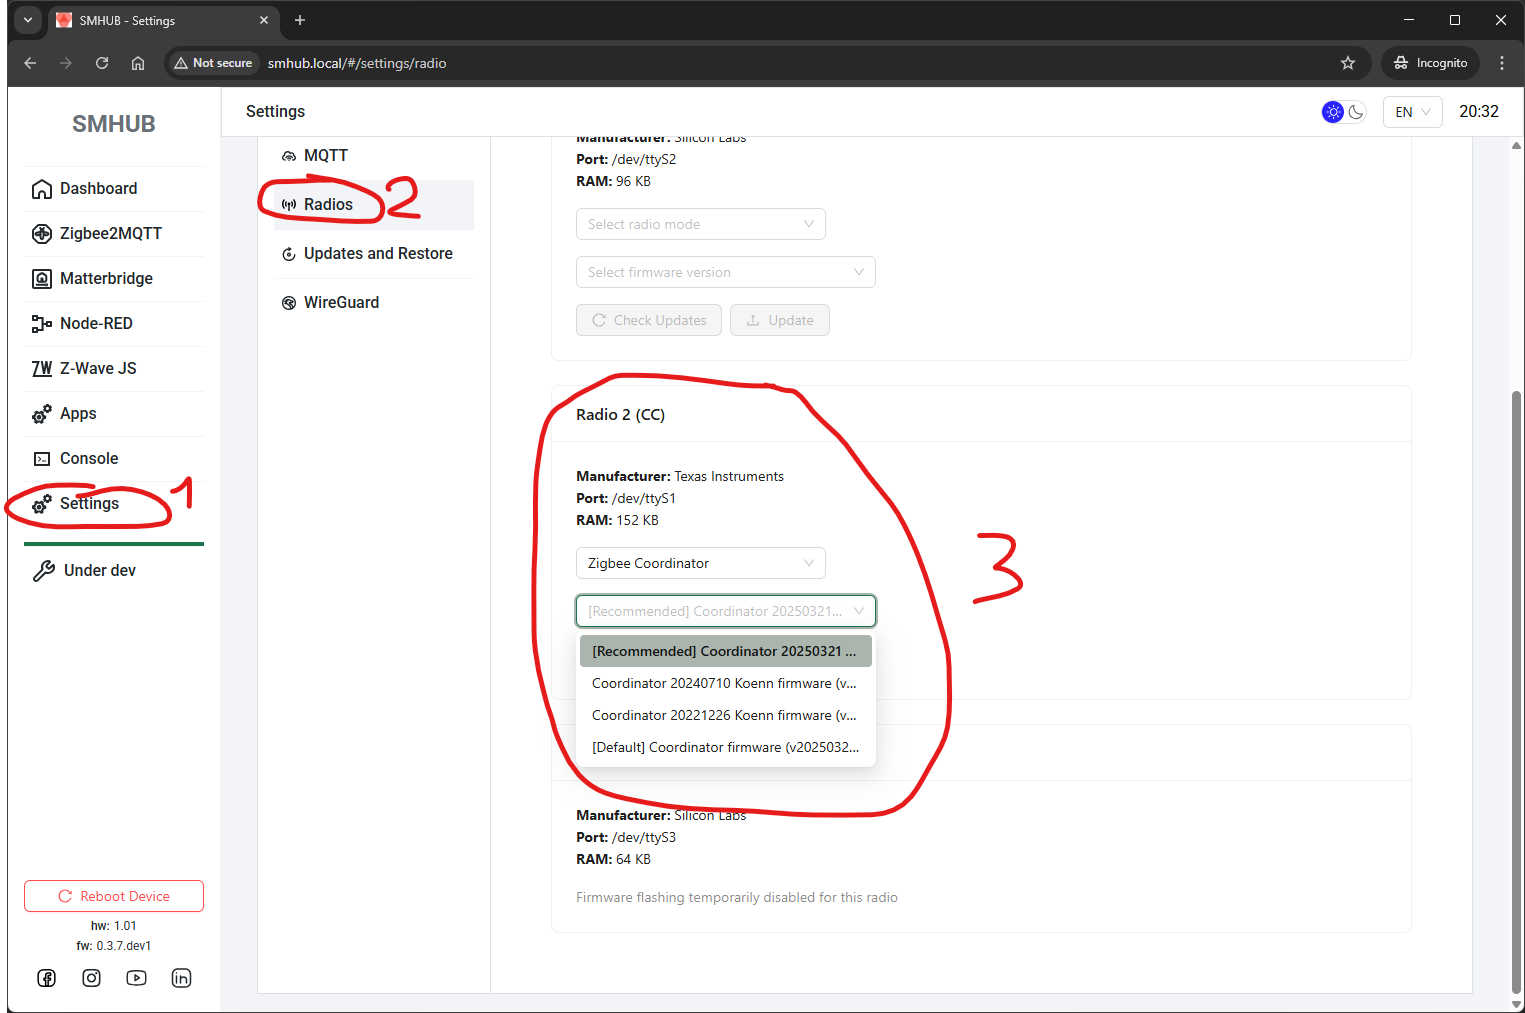](https://smlight.tech/support/manuals/uploads/images/gallery/2025-11/xrMimage.png)
- **Improved Flashing UX**
Flashers for both **CC** and **EFR32** radios now provide:
- smoother and more accurate progress bar updates
- clearer and more detailed error messages
- improved reliability during flashing operations
[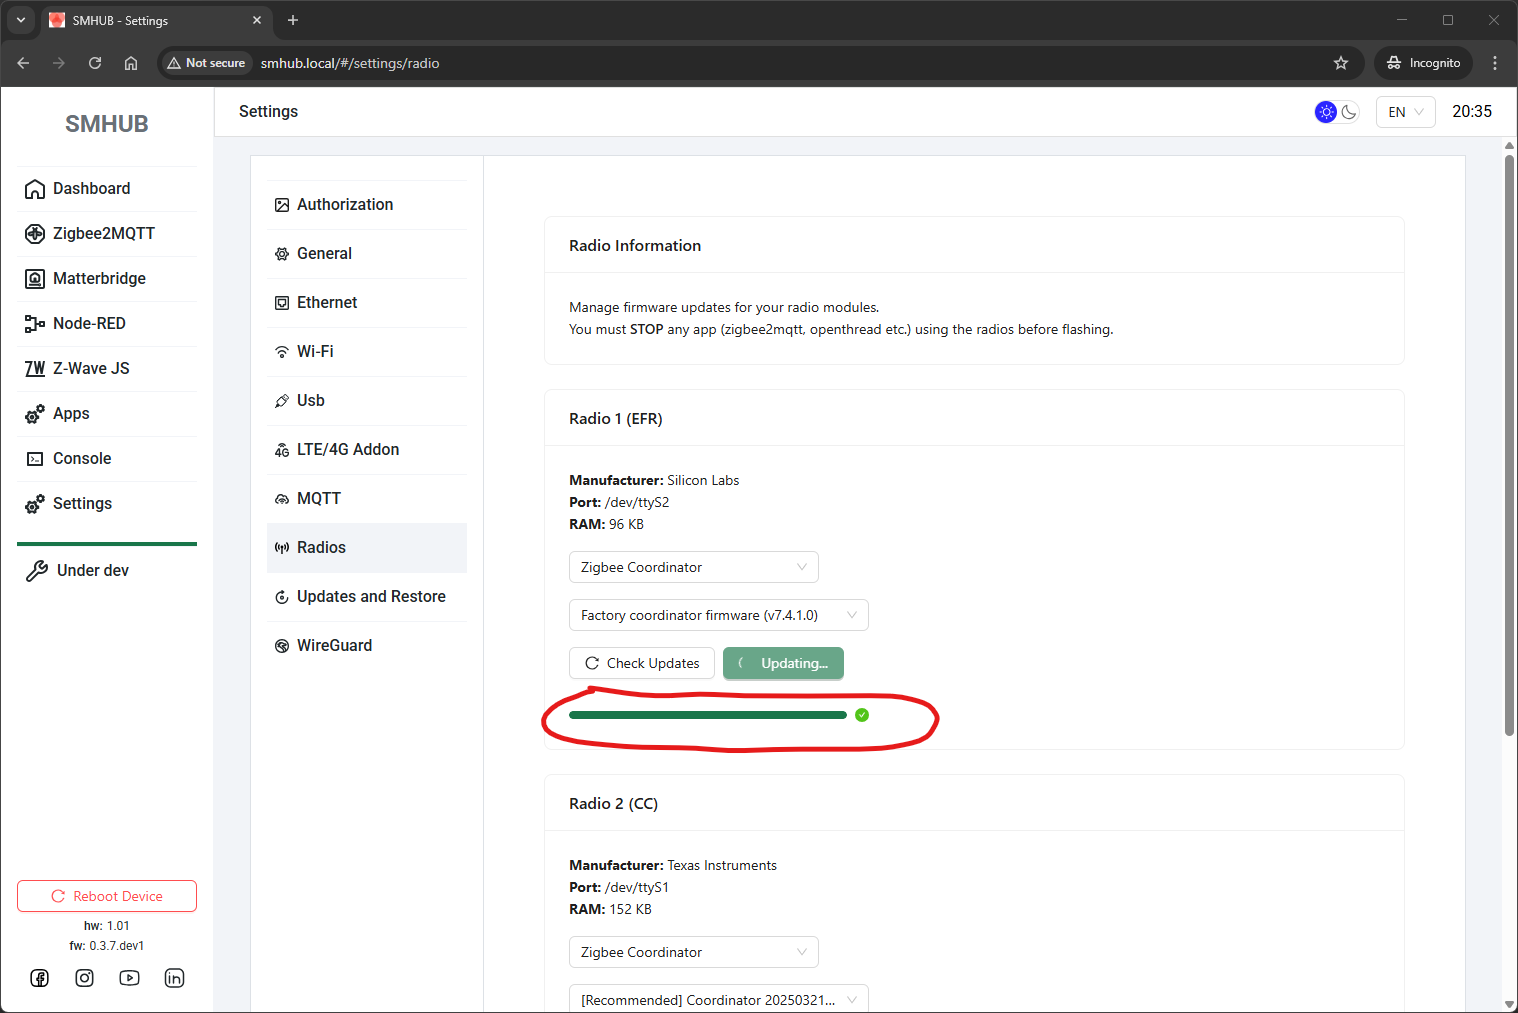](https://smlight.tech/support/manuals/uploads/images/gallery/2025-11/F5iimage.png)
- **App Logs + Restart Buttons**
The Web UI now includes:
- **App Logs** (accessible directly inside the app iframe)
- **Restart** buttons for supported apps
[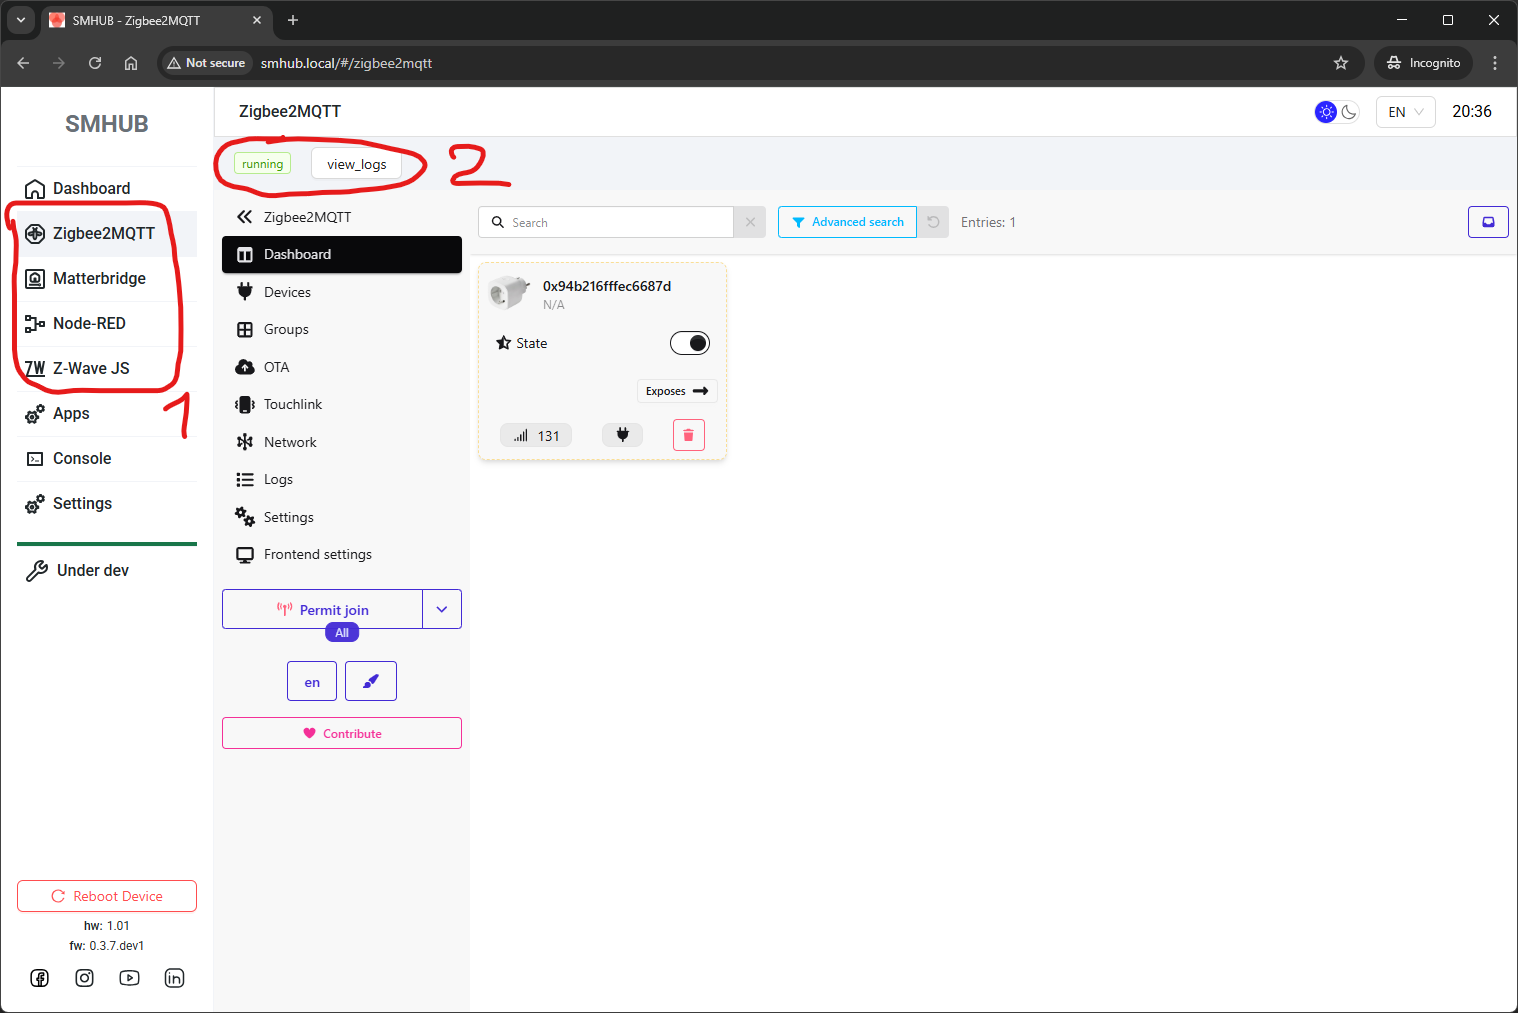](https://smlight.tech/support/manuals/uploads/images/gallery/2025-11/Nv7image.png)
These make debugging and managing apps significantly easier, without leaving the Web UI.
- **Run/Stop App Control Fixes** Run/Stop buttons have been refined to work more consistently across all app types.
A more user-friendly and reliable experience when managing your apps.
- **Log Formatting Fix** Resolved the issue where logs were incorrectly displayed in **Title Case**.
Logs now appear in their original formatting for easier reading and debugging.
[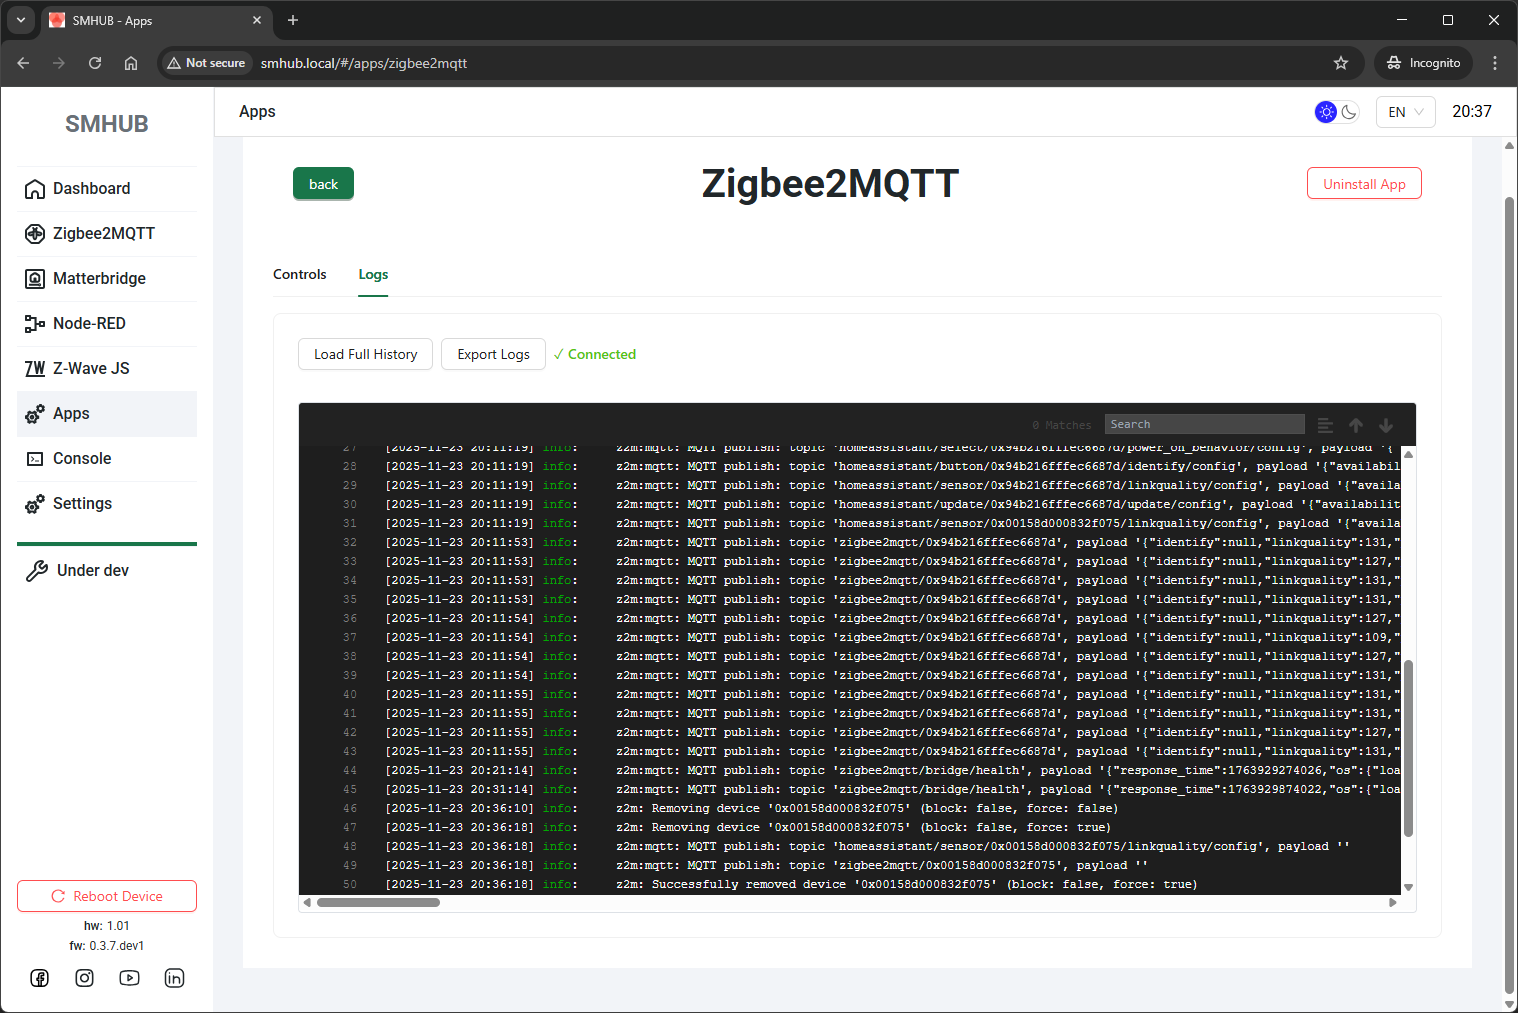](https://smlight.tech/support/manuals/uploads/images/gallery/2025-11/PGmimage.png)
- **Backend Updates (smhub-services)**
- Added **smlight-cc-flasher** with full integration for CC radio flashing
- Corrected Zigbee2MQTT default values shown in the Web UI
- Fixed Node-RED logs not being displayed properly
- **OS Updates (v0.3.6)**
- Configured correct system paths for:
- `smlight_cc_flasher`
- `universal-silabs-flasher`
- Upgraded the base OS image to **Buildroot v2025.08.1** for improved stability and future compatibility.
### ⚙️ **Update Instructions**
- UI update or Console update:
- UI (smhub-services restart after update can take up to 4 minutes):
**Web **→ Apps** → Refresh → smhub-services/smhub-web → Upgrade**
- Console (smhub-services restart after update can take up to 4 minutes):
`sudo opkg update`
`sudo opkg upgrade`
---
# **2025-Nov-09:**
### **smhub-os 0.3.4 Released**
---
### 🚀 **Key Highlight**
- **Set default apps channel to “stable”**
All devices now default to the **stable** application update channel. This guarantees that future OTA updates for core apps (Web, Services, etc.) are synchronized and verified before deployment.
- **Fixed SMHUB-OS OTA issues for firmware v0.3.2 / v0.3.3**
Some users experienced incomplete or failed OTA updates to OS v0.3.3 due to variations in installed app sets. The update logic has been reworked - upgrading to **v0.3.4** now works seamlessly for **all installations**, regardless of configuration.
- **Fixed UART baud rate handling above 115200**
Resolved communication issues affecting high-speed UART configurations. The serial subsystem now correctly supports and maintains baud rates higher than **115200 bps**.
### ⚙️ **Update Instructions**
- OS: Setting -> Update and Restore -> Update
---
# **2025-Nov-16:**
### **smhub-service 0.2.0, smhub-web 0.2.14 Released**
---
### 🚀 **Key Highlight**
- **Radio Page Added**
A dedicated **Radio** page is now available in the Web UI for managing and monitoring connected radios (so far - EFR32).
[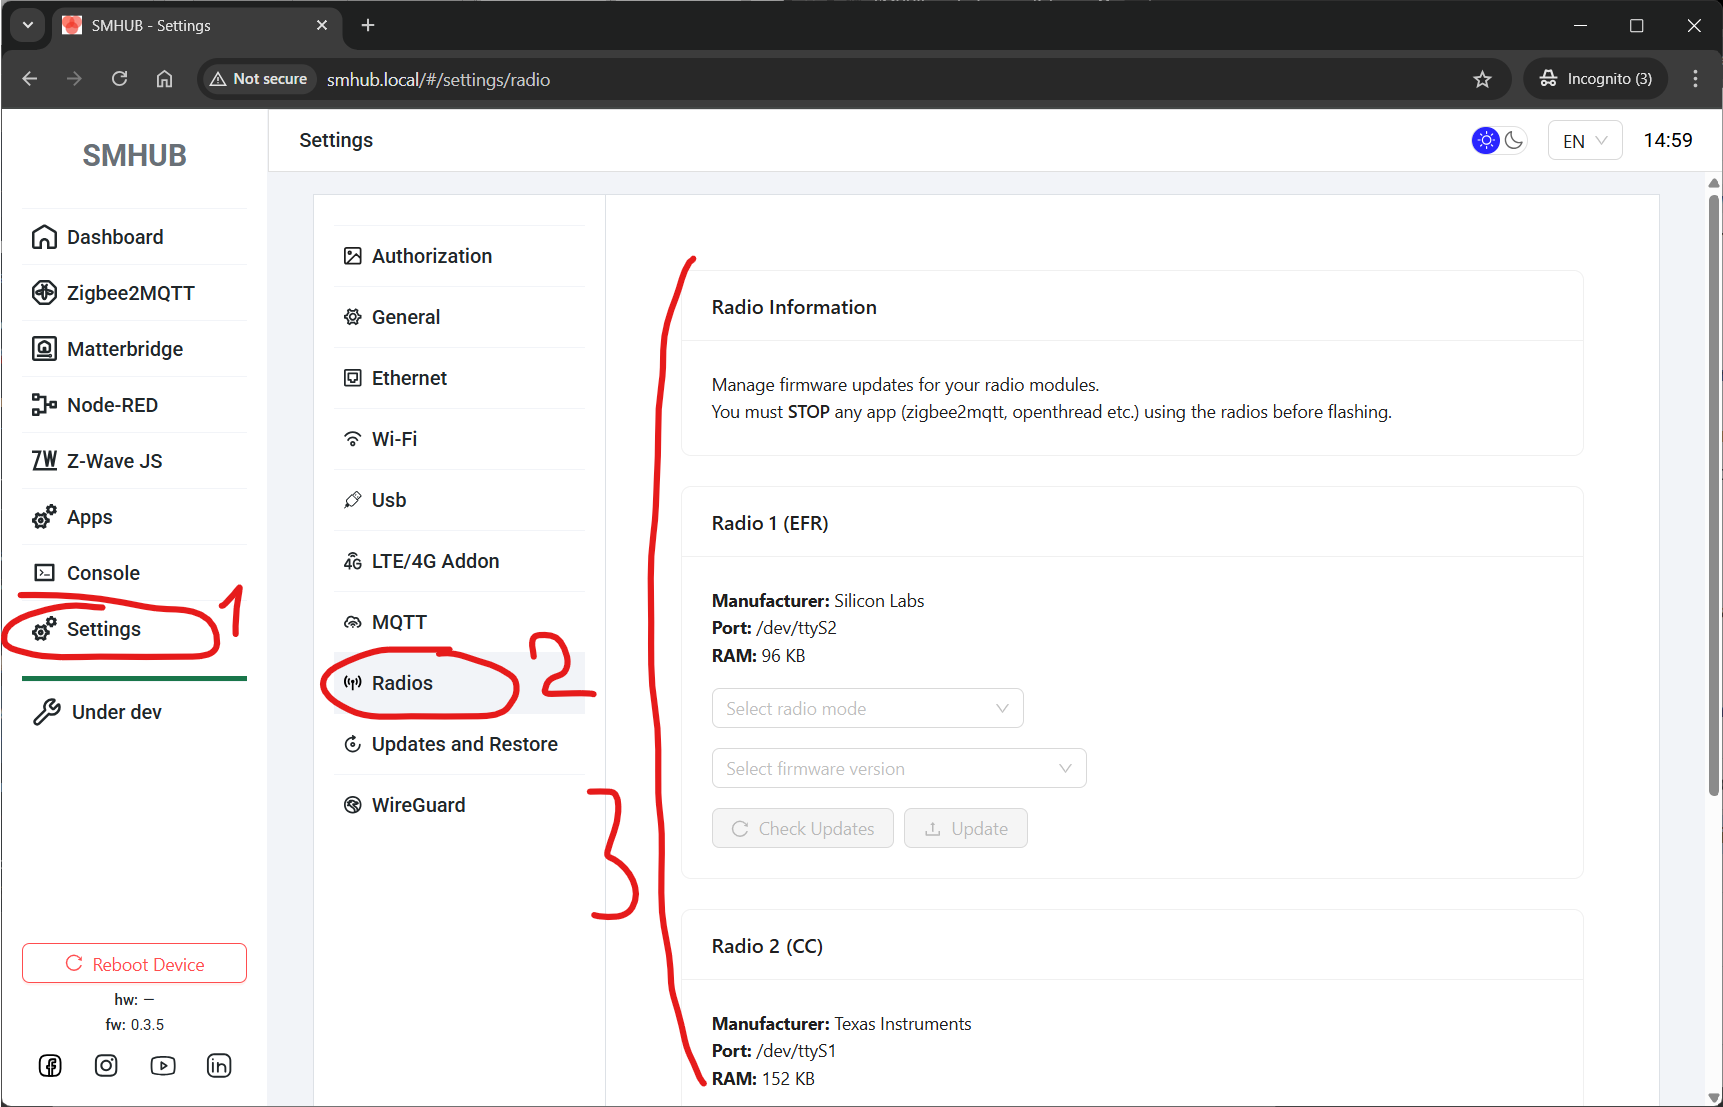](https://smlight.tech/support/manuals/uploads/images/gallery/2025-11/d2gimage.png)
- **EFR32 Firmware Flashing**
Added built-in support for flashing EFR32 radio firmware directly from the SMHUB interface.
No external tools or manual commands needed - handled via the new integrated flasher.
[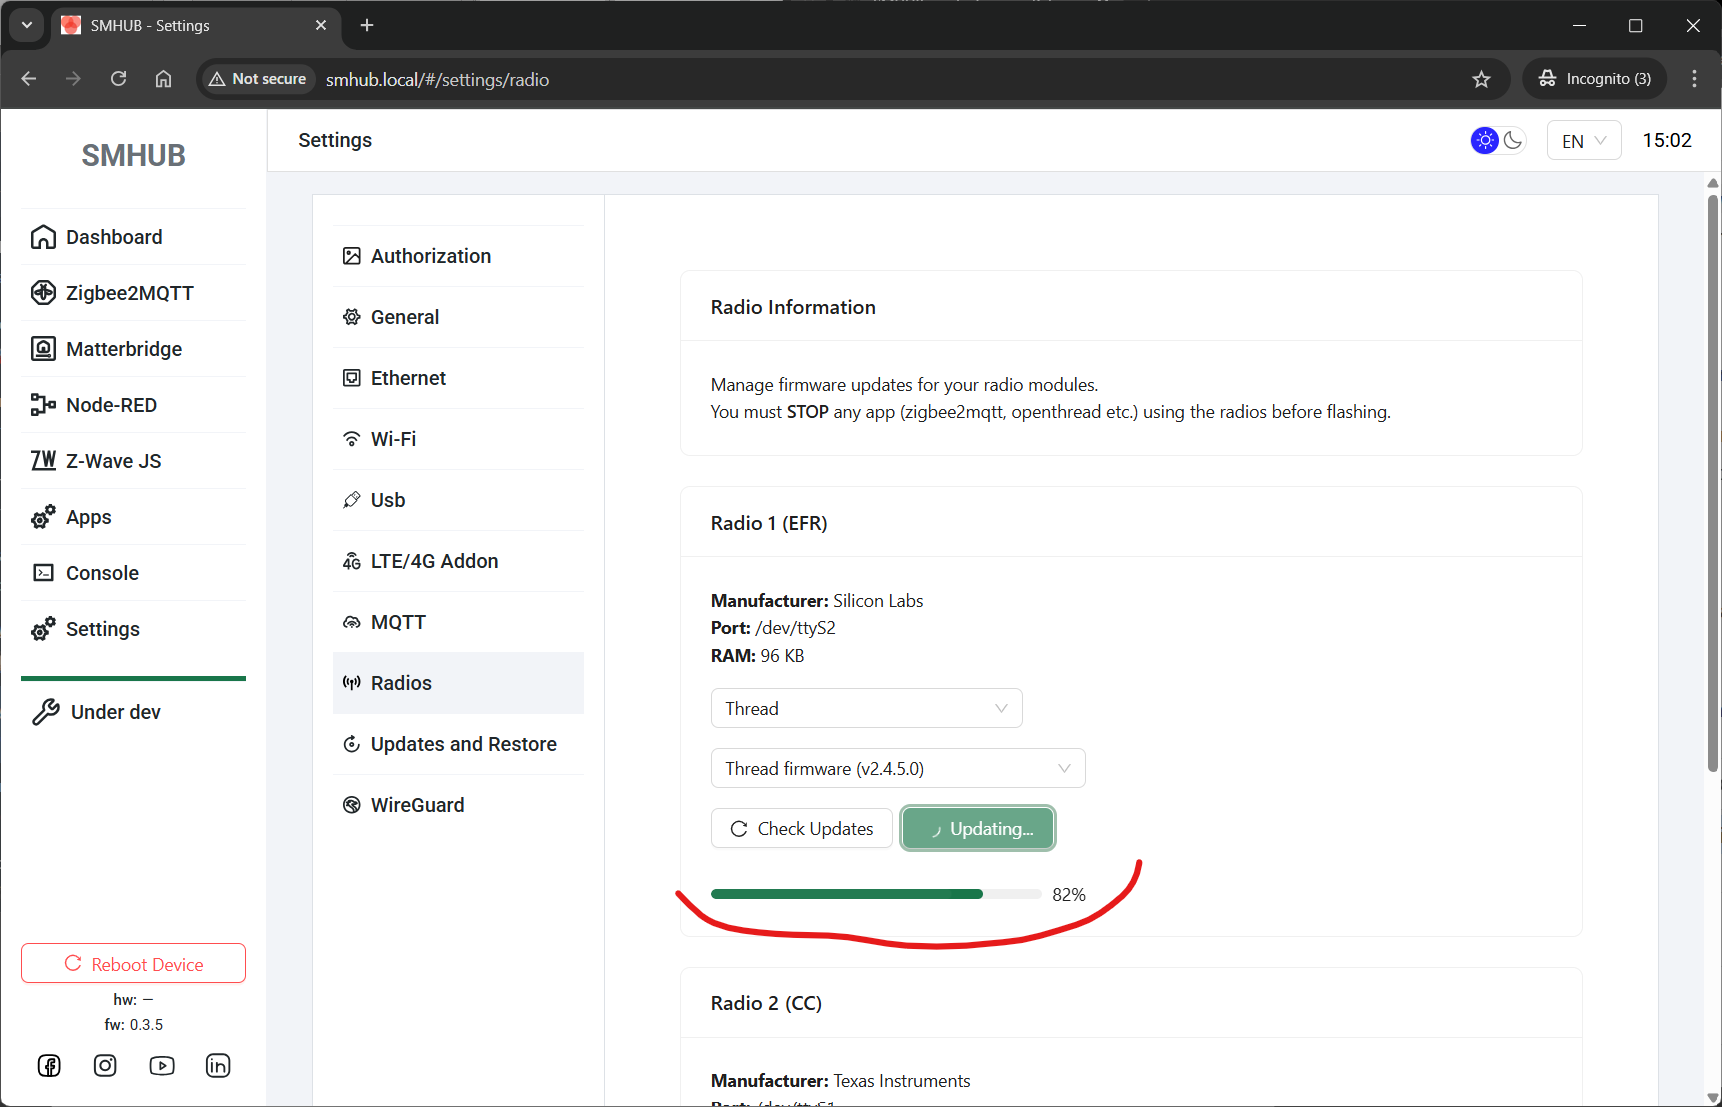](https://smlight.tech/support/manuals/uploads/images/gallery/2025-11/yXZimage.png)
- **Firmware Look-up Utility**
A new backend utility has been added to enable fast and proper firmware look-up for further updating and flashing.
- **App Control Buttons** New **Run** and **Stop** buttons allow you to start or stop apps directly from the Apps section - more user friendly and no console access required.
[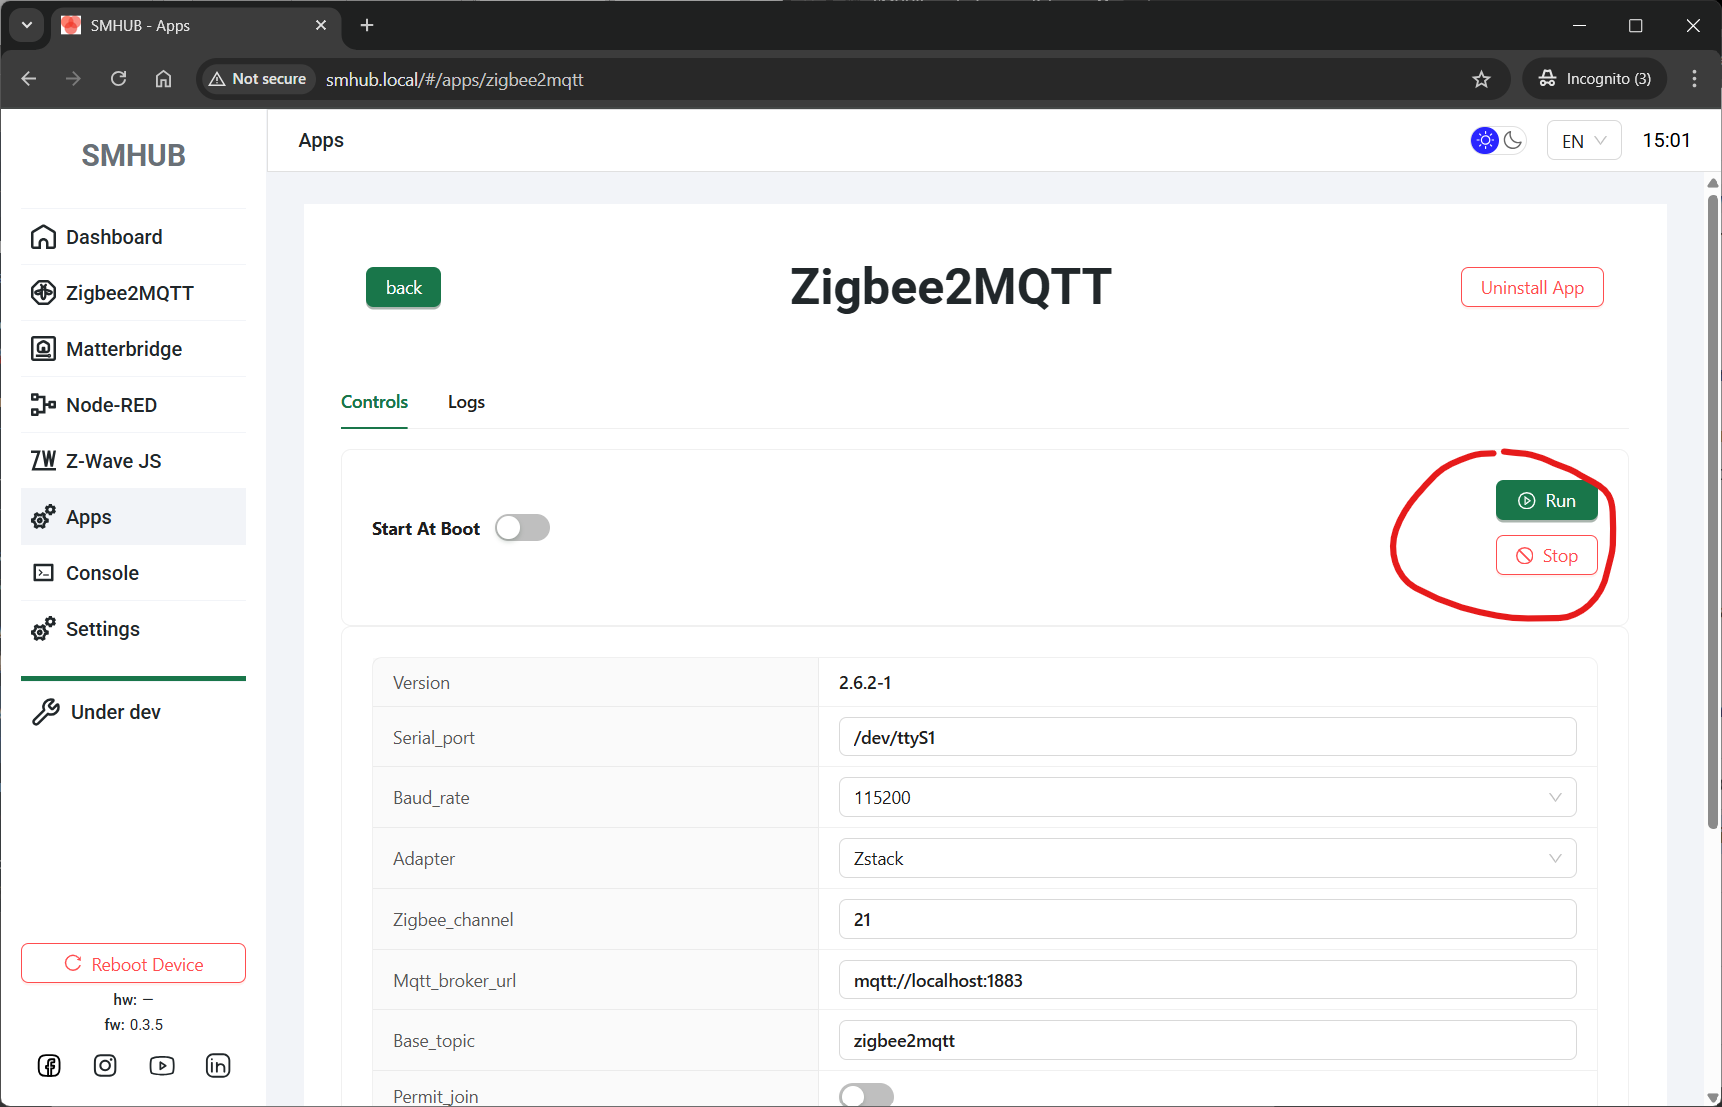](https://smlight.tech/support/manuals/uploads/images/gallery/2025-11/ncbimage.png)
- **OpenThread App Added** SMHUB can now be configured as an **OpenThread Border Router** directly through the UI.
The system handles:
- flashing the required EFR32 Thread firmware,
- installing the OpenThread app,
- launching and managing it.
No manual/console setup needed - all actions are available from the Web UI now.
[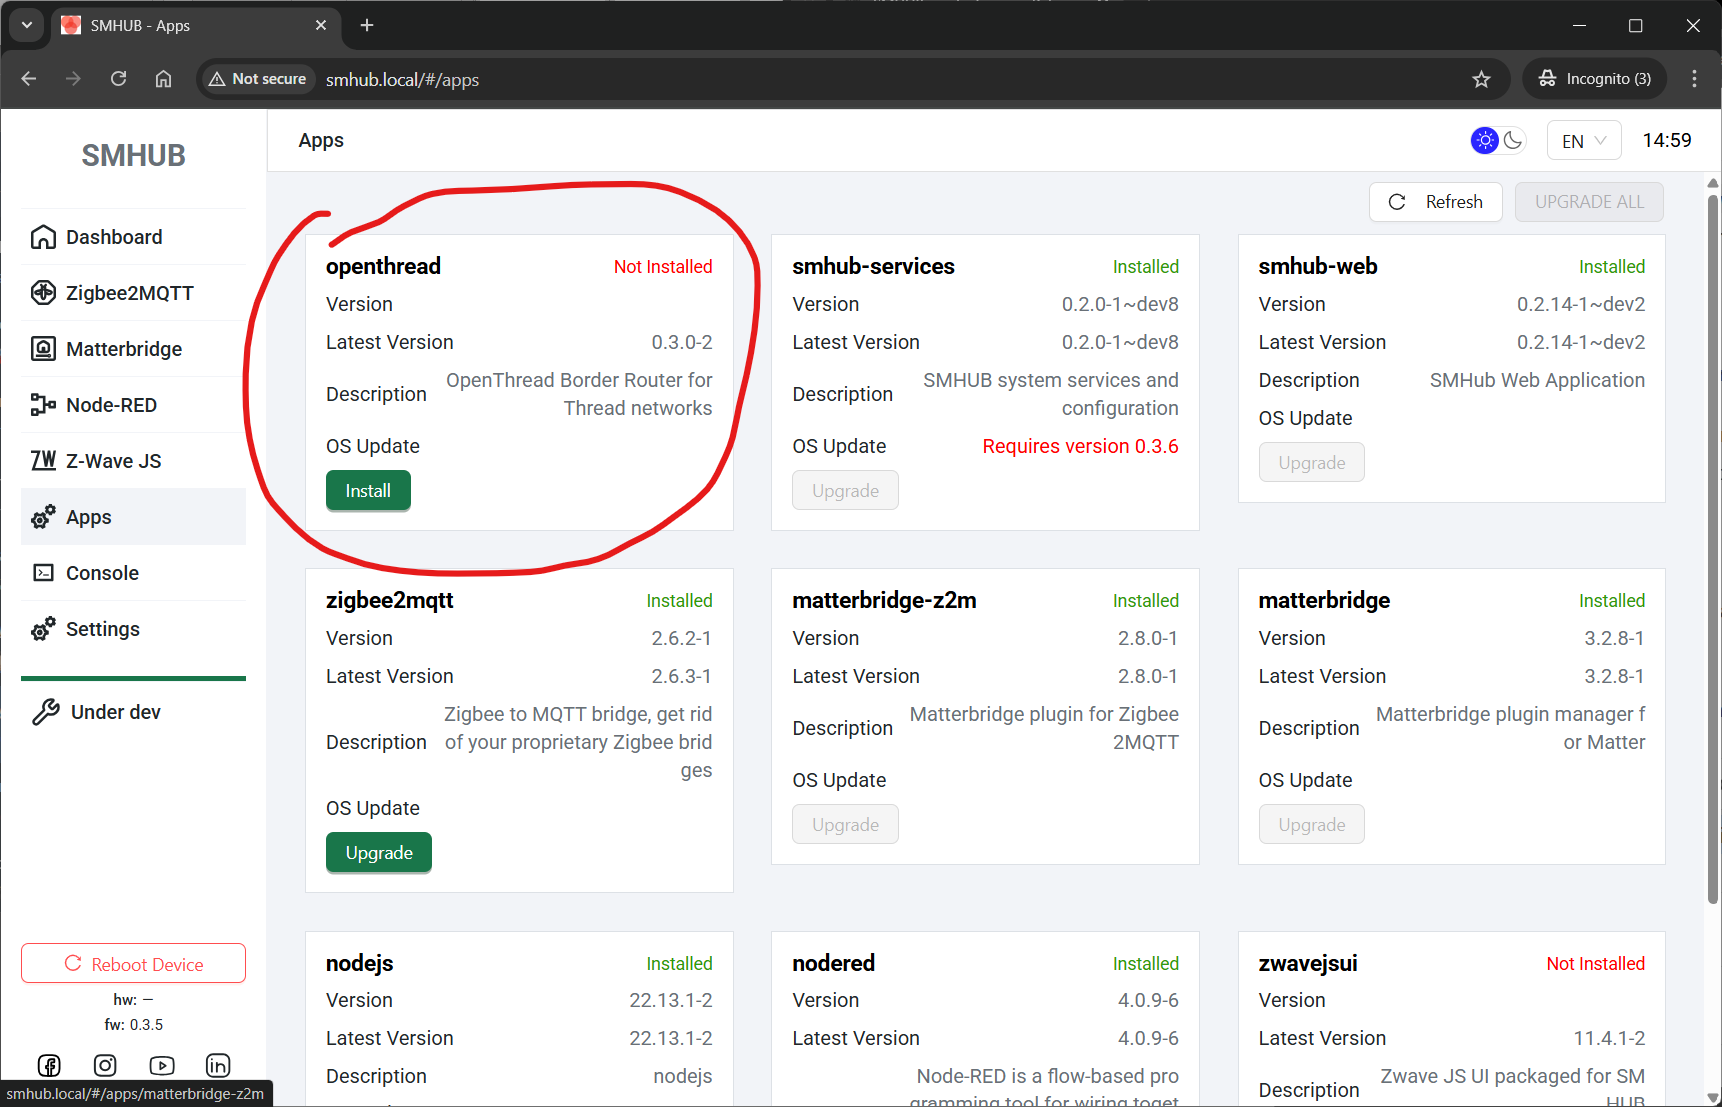](https://smlight.tech/support/manuals/uploads/images/gallery/2025-11/RO3image.png)
### ⚙️ **Update Instructions**
- UI update or Console update:
- UI (smhub-services restart after update can take up to 4 minutes):
**Web **→ Apps** → Refresh → smhub-services/smhub-web → Upgrade**
- Console (smhub-services restart after update can take up to 4 minutes):
`sudo opkg update`
`sudo opkg upgrade`
---
# **2025-Nov-09:**
### **smhub-os 0.3.4 Released**
---
### 🚀 **Key Highlight**
- **Set default apps channel to “stable”**
All devices now default to the **stable** application update channel. This guarantees that future OTA updates for core apps (Web, Services, etc.) are synchronized and verified before deployment.
- **Fixed SMHUB-OS OTA issues for firmware v0.3.2 / v0.3.3**
Some users experienced incomplete or failed OTA updates to OS v0.3.3 due to variations in installed app sets. The update logic has been reworked - upgrading to **v0.3.4** now works seamlessly for **all installations**, regardless of configuration.
- **Fixed UART baud rate handling above 115200**
Resolved communication issues affecting high-speed UART configurations. The serial subsystem now correctly supports and maintains baud rates higher than **115200 bps**.
### ⚙️ **Update Instructions**
- OS: Setting -> Update and Restore -> Update
---
# **2025-Nov-07:**
### **smhub-service 0.1.19, smhub-web 0.2.12 Released**
---
For those, who can't update, please flash 0.3.3 via Type-C or SD-Card and than update smhub-web and smhub-services. Here is the source for smhub-os 0.3.3: [https://updates.smlight.tech/firmware/smhub/os/smhub\_os\_v0.3.3.zip](https://updates.smlight.tech/firmware/smhub/os/smhub_os_v0.3.3.zip)
This release focuses on **localization, system transparency, and stability improvements** — adding timezone management, EEPROM hardware data access, and UI refinements across 4G/LTE and Z-Wave JS UI pages.
### 🚀 **Key Highlight**
- Added **timezone selector** in General Settings
[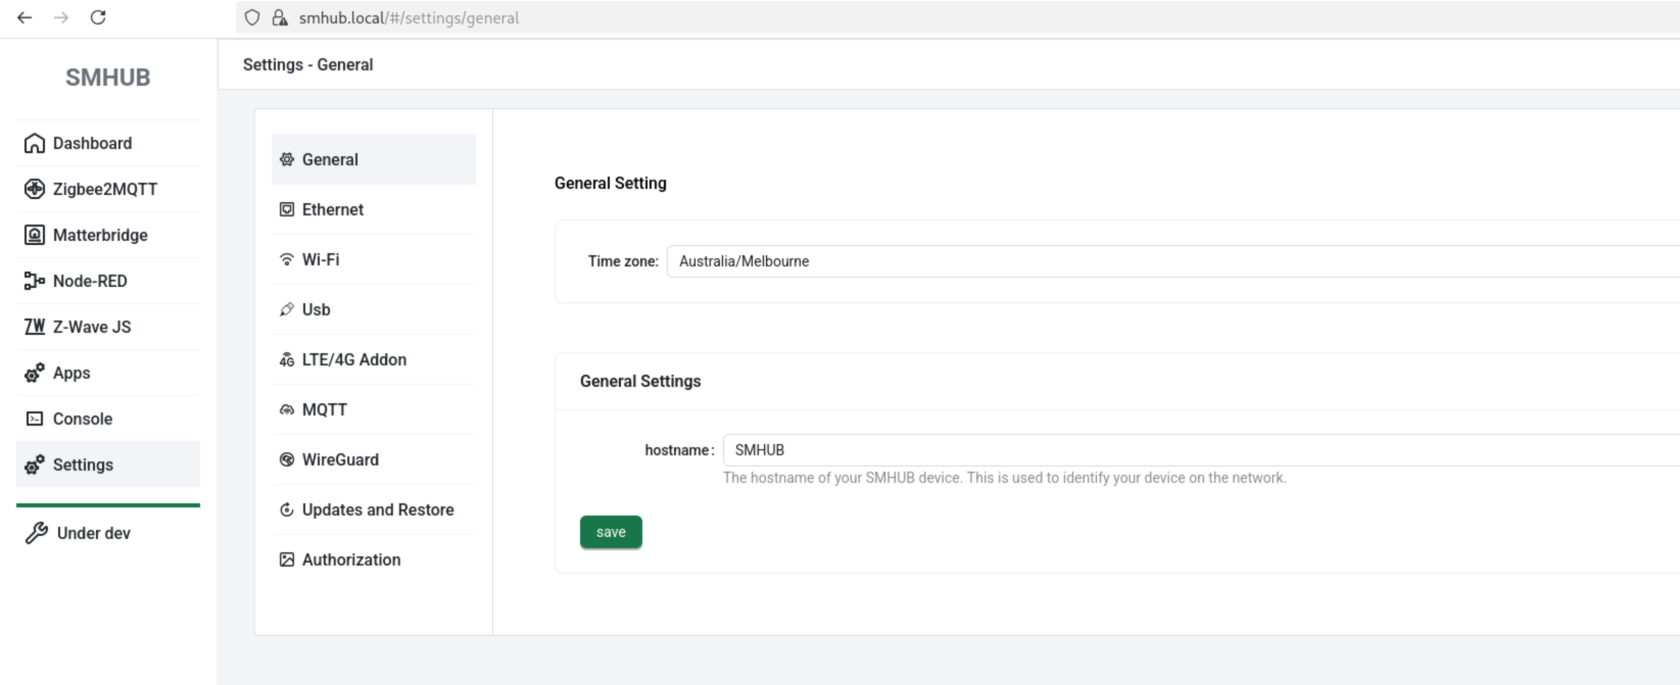](https://smlight.tech/support/manuals/uploads/images/gallery/2025-11/dmAimage.png)
- Added support for listing and setting **timezone**
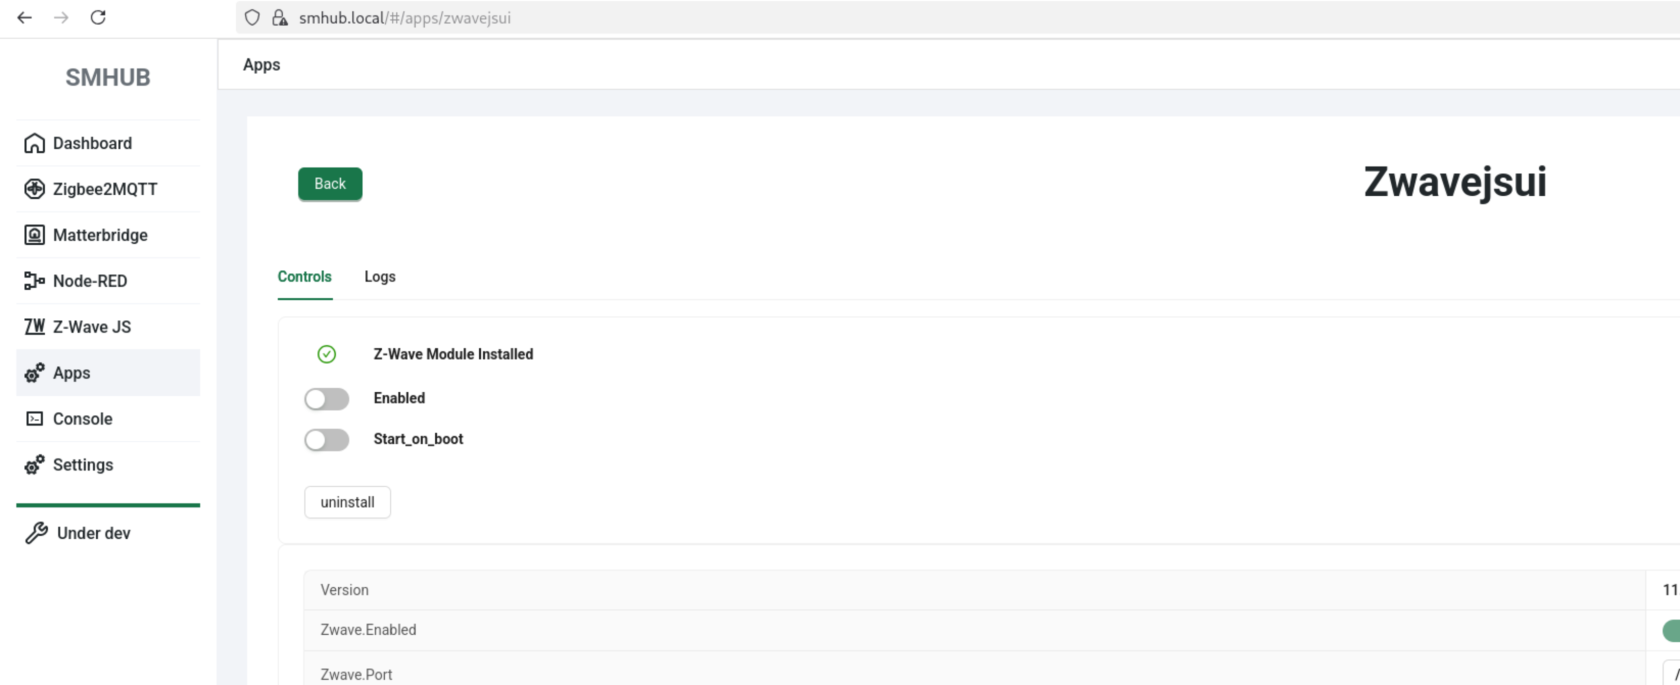
- **Z-Wave JS settings page** now shows if addon (hardware) is installed
[](https://smlight.tech/support/manuals/uploads/images/gallery/2025-11/2SDimage.png)
- Added support to read **product data from EEPROM**
- Fixed status display issues on **4G/LTE pages**
- Fixed **version comparison** and **update channel logic** for apps - become broken with previous release (please update with `sudo opkg update` and `sudo opkg upgrade`.
- Fixed version comparison bug on **apps tile page**
### ⚙️ **Update Instructions**
- UI update or Console update:
- UI (smhub-services restart after update can take up to 4 minutes):
**Web **→ Apps** → Refresh → smhub-services/smhub-web → Upgrade**
- Console (smhub-services restart after update can take up to 4 minutes):
`sudo opkg update`
`sudo opkg upgrade`
---
# **2025-Nov-04:**
### **smhub-os 0.3.3, smhub-service 0.1.17, smhub-web 0.2.10 Released**
---
### 🚀 **Key Highlight**
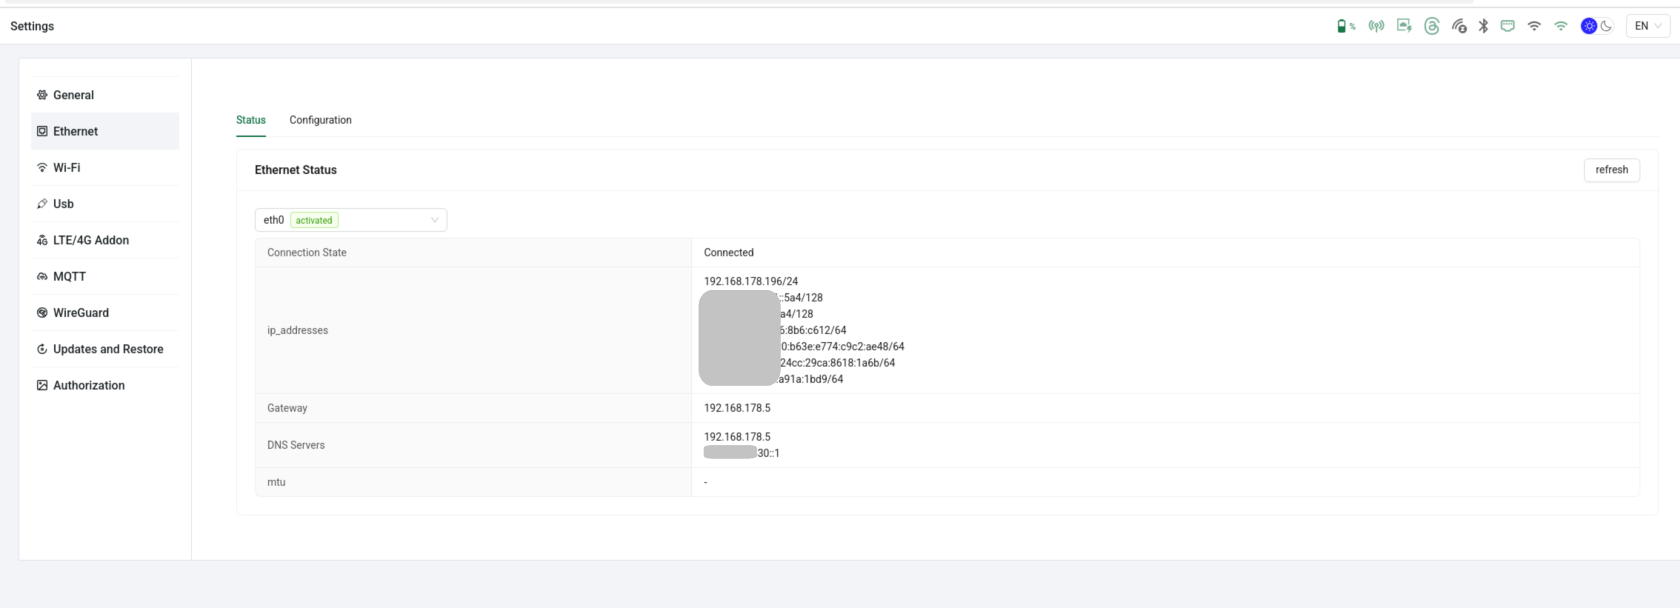
- Added **Ethernet configuration page** — manage wired network settings directly from the Web UI.
[](https://smlight.tech/support/manuals/uploads/images/gallery/2025-11/image.png)
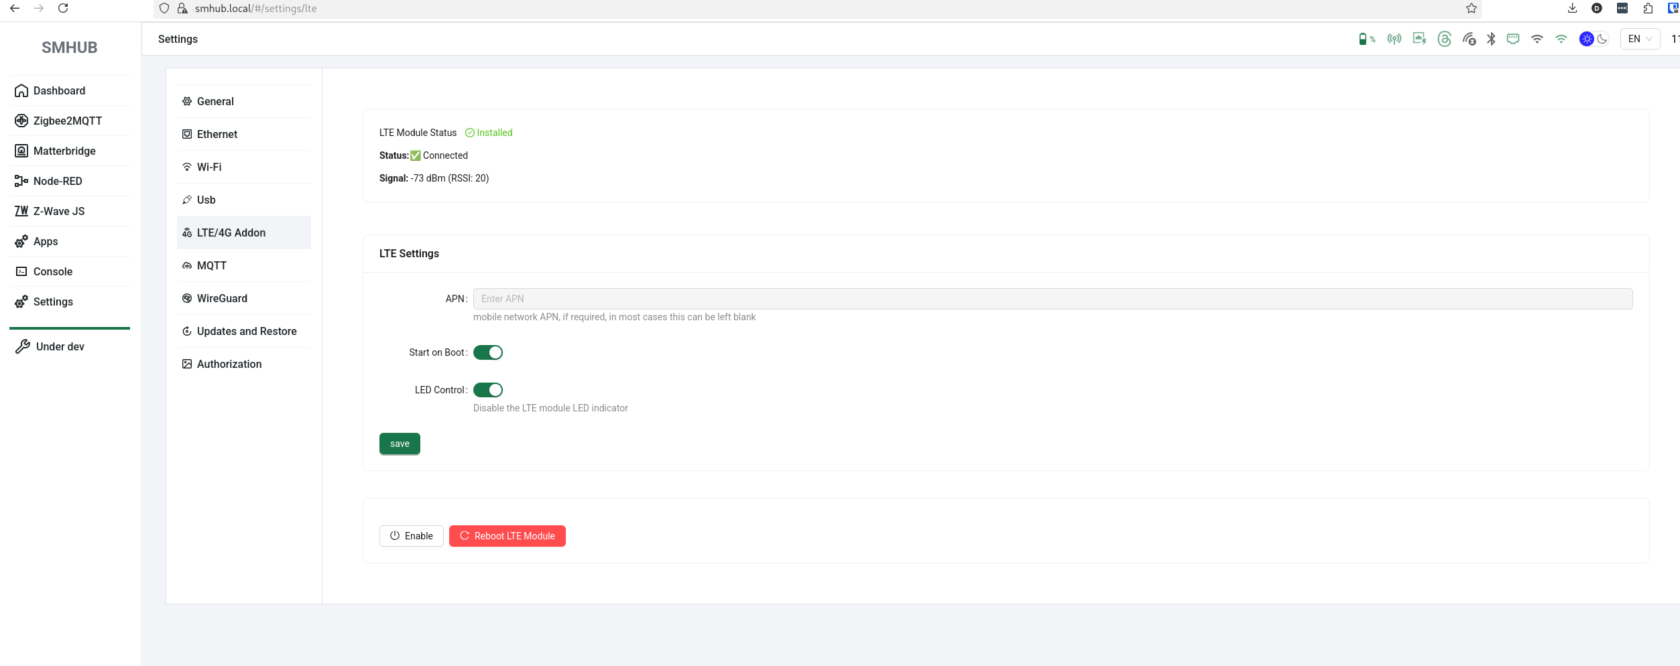
- Added ****4G/LTE support**** - added modem integration across the system.
[](https://smlight.tech/support/manuals/uploads/images/gallery/2025-11/jklimage.png)
- **Peripherals backend added** - foundation for future hardware and peripheral control
- **Timezone data** added to the OS/backend system (UI integration coming soon)
### ⚙️ **Update Instructions**
- OS: Setting -> Update and Restore -> Update
- UI update or Console update:
- UI (smhub-services restart after update can take up to 4 minutes):
**Web **→ Apps** → Refresh → smhub-services/smhub-web → Upgrade**
- Console (smhub-services restart after update can take up to 4 minutes):
`sudo opkg update`
`sudo opkg upgrade`
---
# **2025-Oct-28:**
### **smhub-service 0.1.17, smhub-web 0.2.10 Released**
---
### 🚀 **Key Highlight**
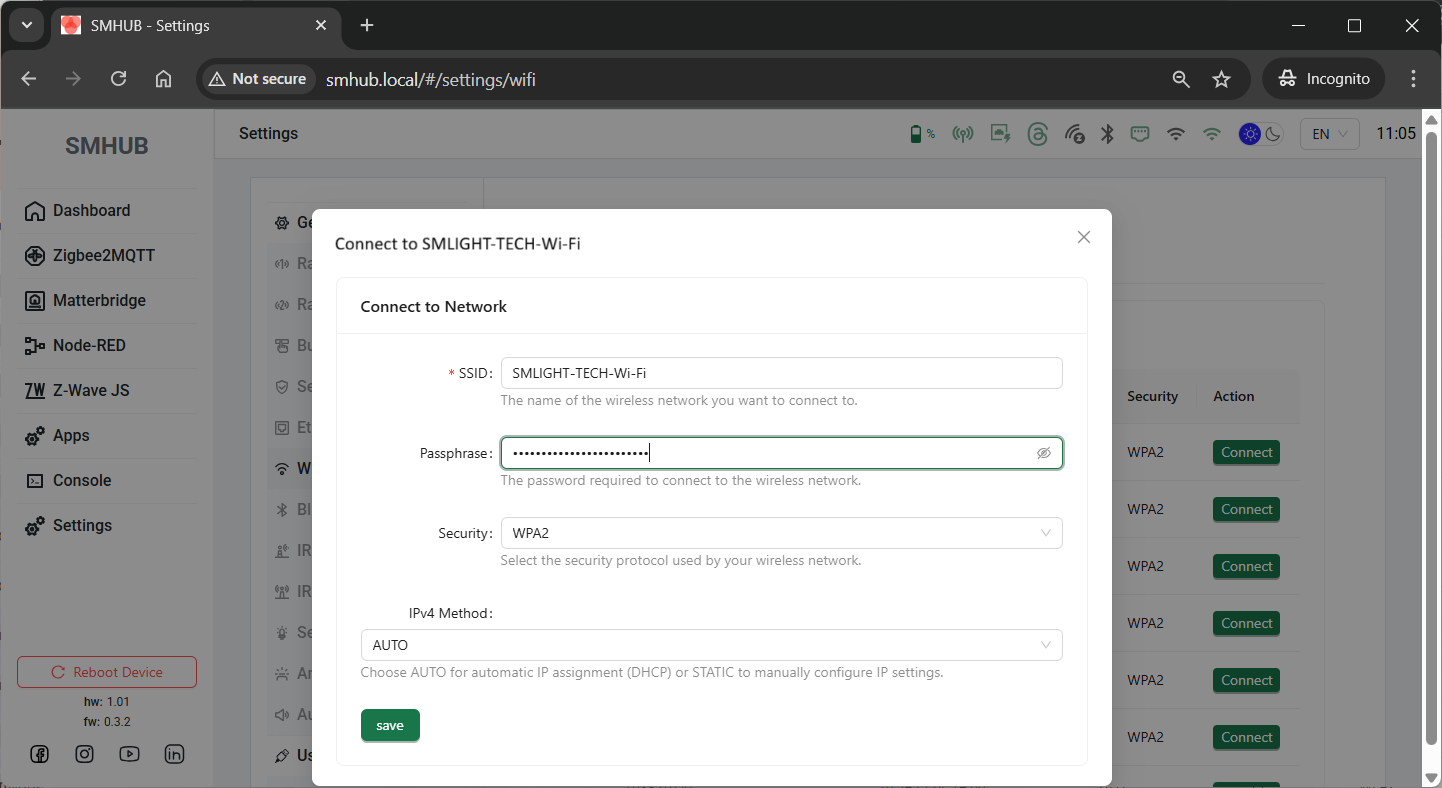
- Added **Wi-Fi settings** to the UI – scan 2.4 GHz/5 GHz networks and connect to listed or hidden ones.
[](https://smlight.tech/support/manuals/uploads/images/gallery/2025-10/CaHimage.png)
[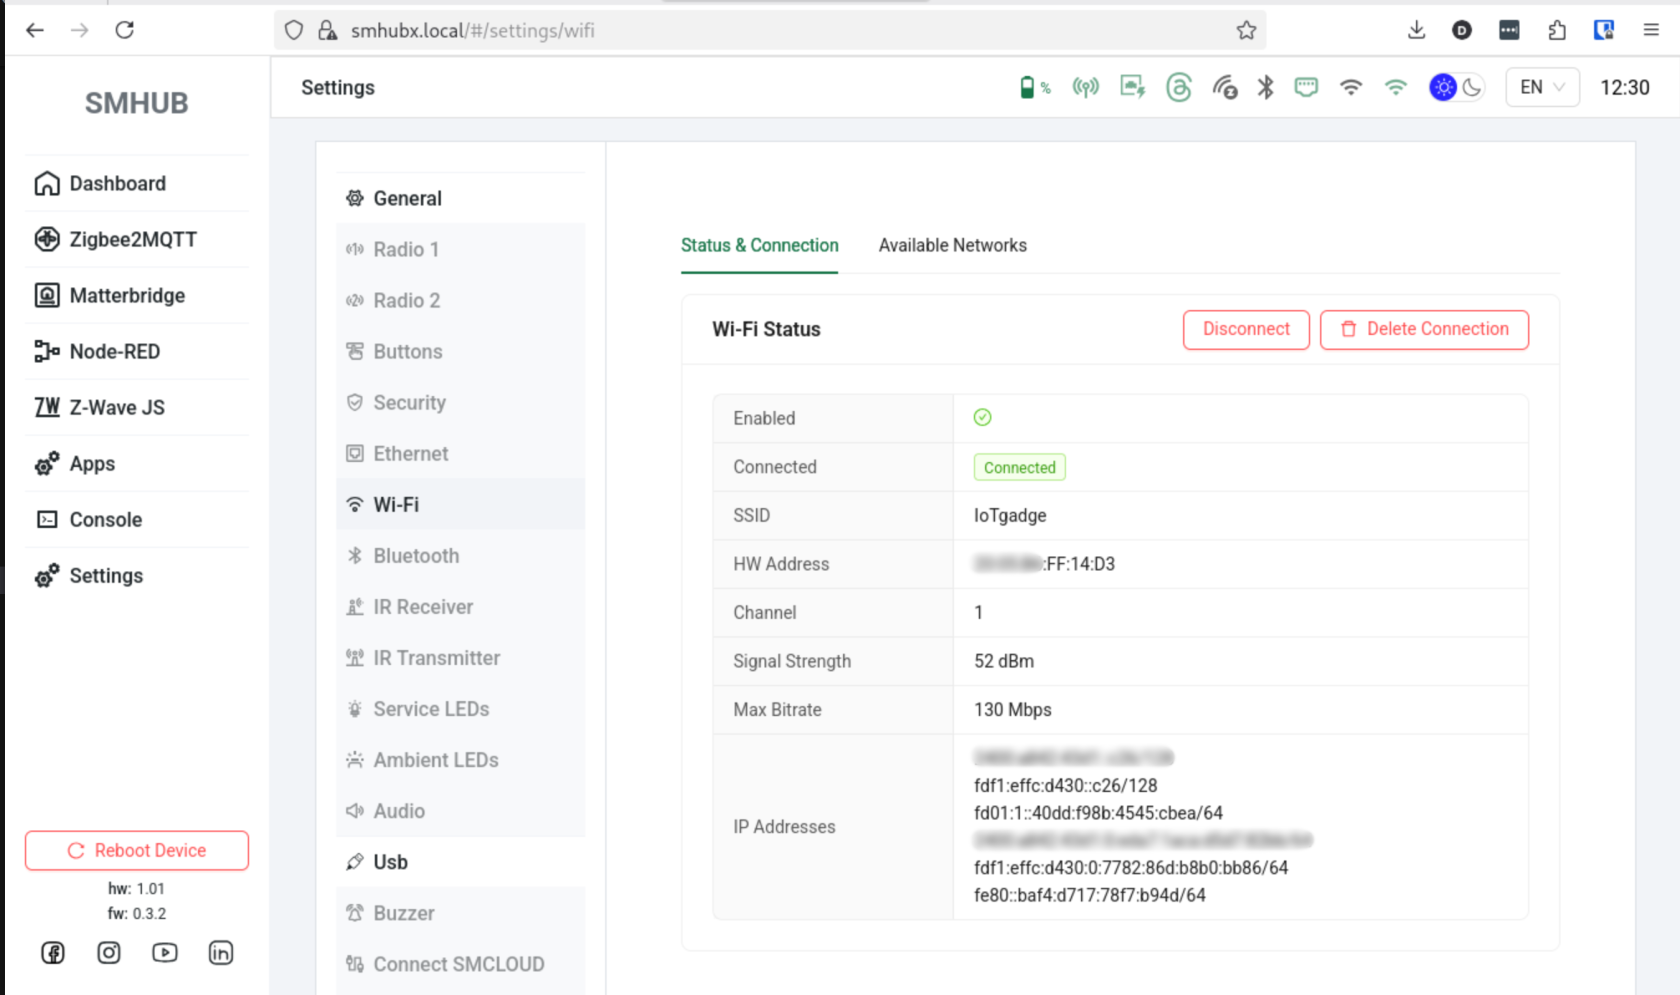](https://smlight.tech/support/manuals/uploads/images/gallery/2025-10/XCBimage.png)
- Added **USB Device/Host mode selector** in USB settings *(requires reboot)*.
- Added **USB device list** for Host mode.
[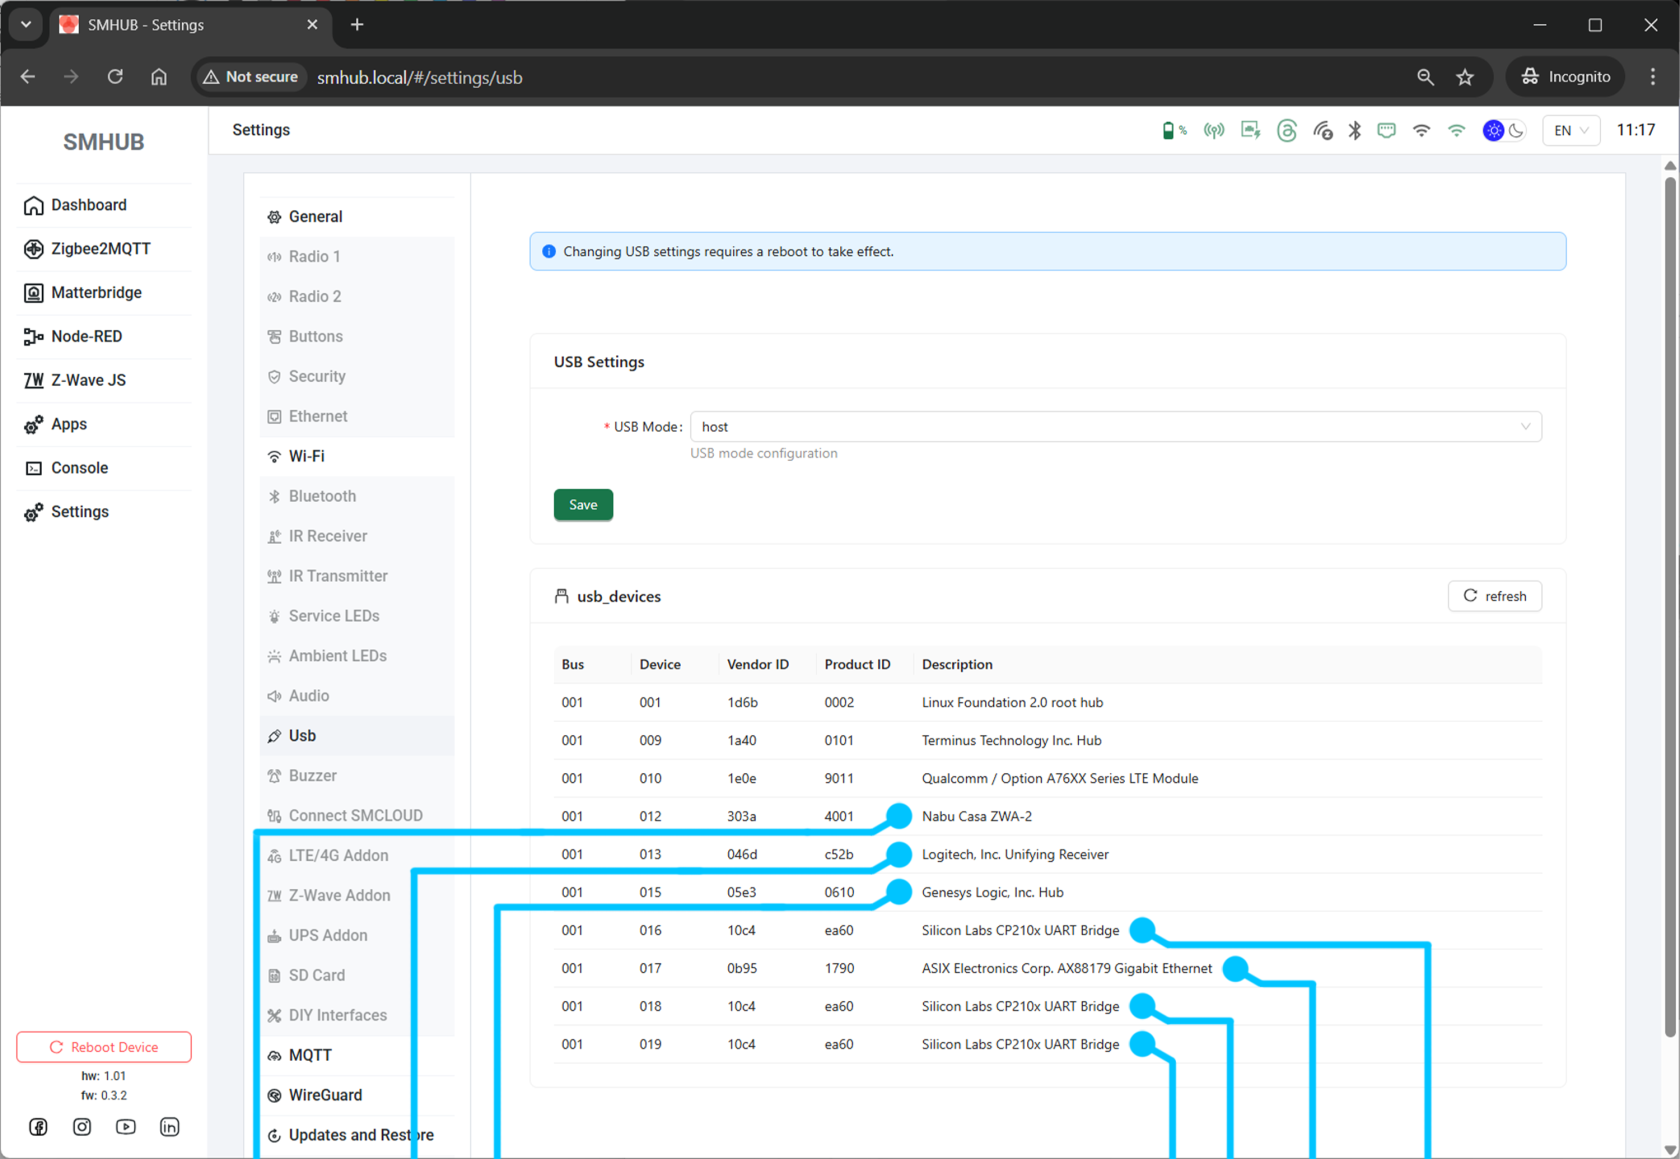](https://smlight.tech/support/manuals/uploads/images/gallery/2025-10/lp5image.png)
[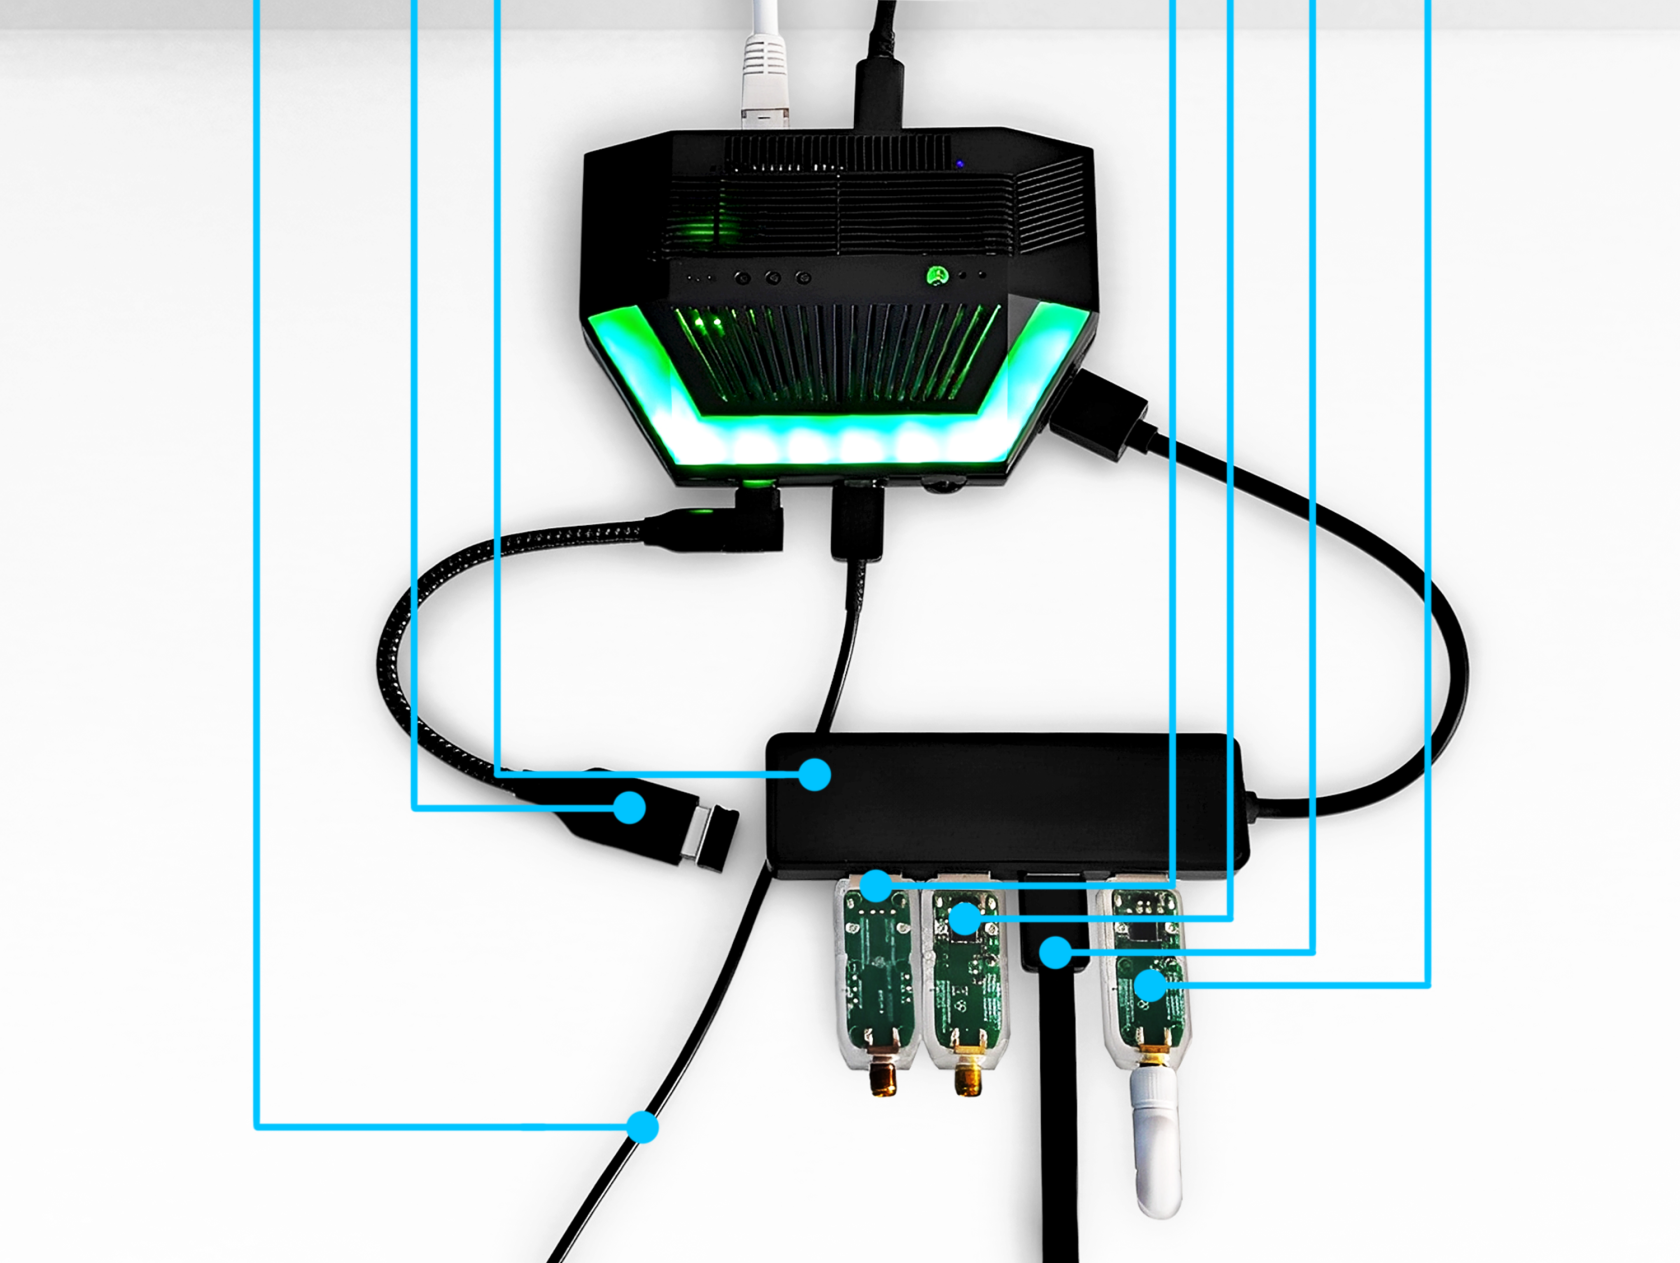](https://smlight.tech/support/manuals/uploads/images/gallery/2025-10/1vcimage.png)
- Added ability to **change the device hostname** on the local network.
[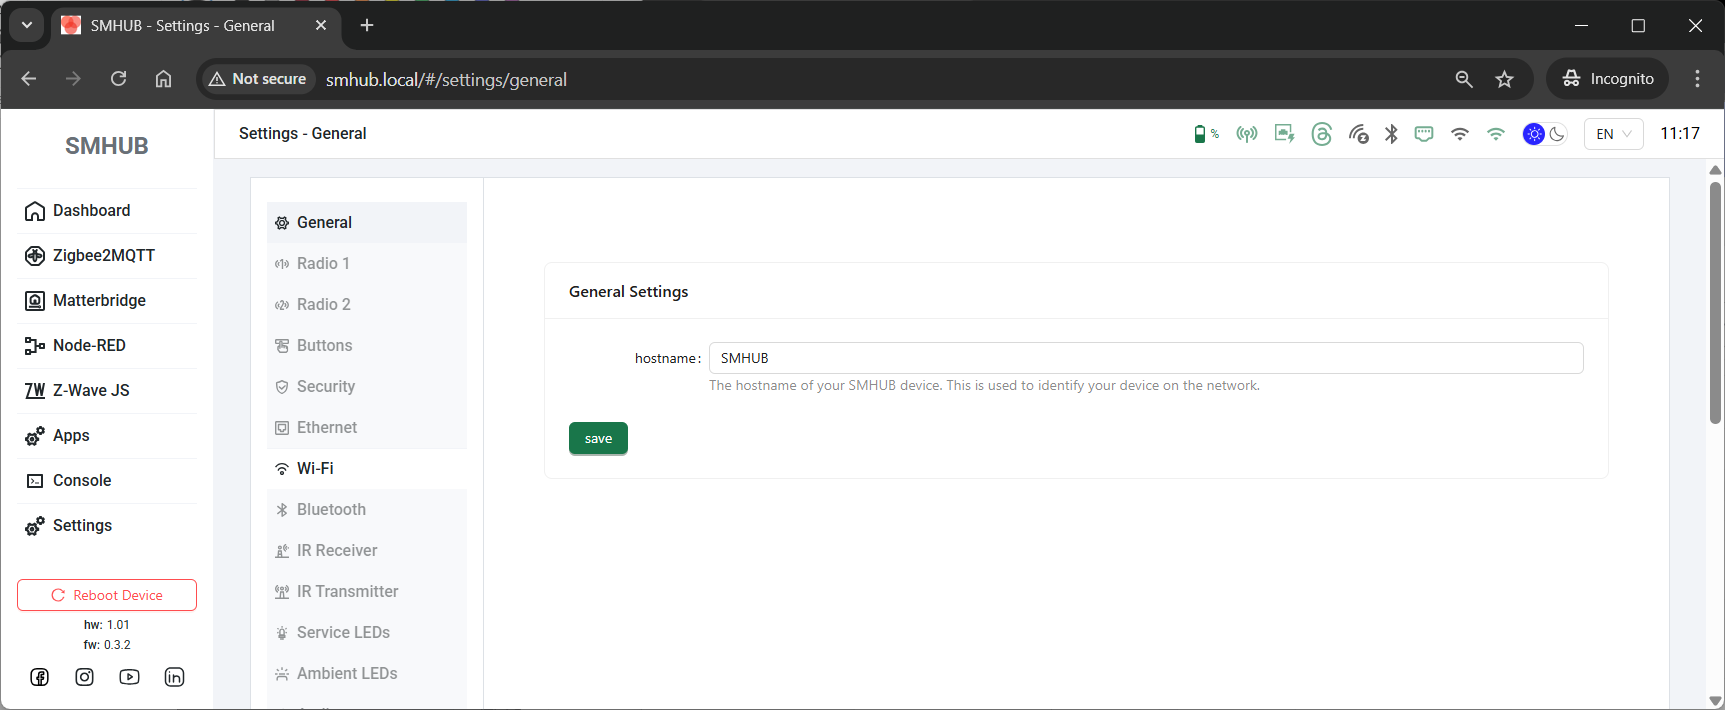](https://smlight.tech/support/manuals/uploads/images/gallery/2025-10/IImimage.png)
- **WireGuard** now supports **hostnames**.
- **WireGuard** now supports both **IPv4 and IPv6**.
[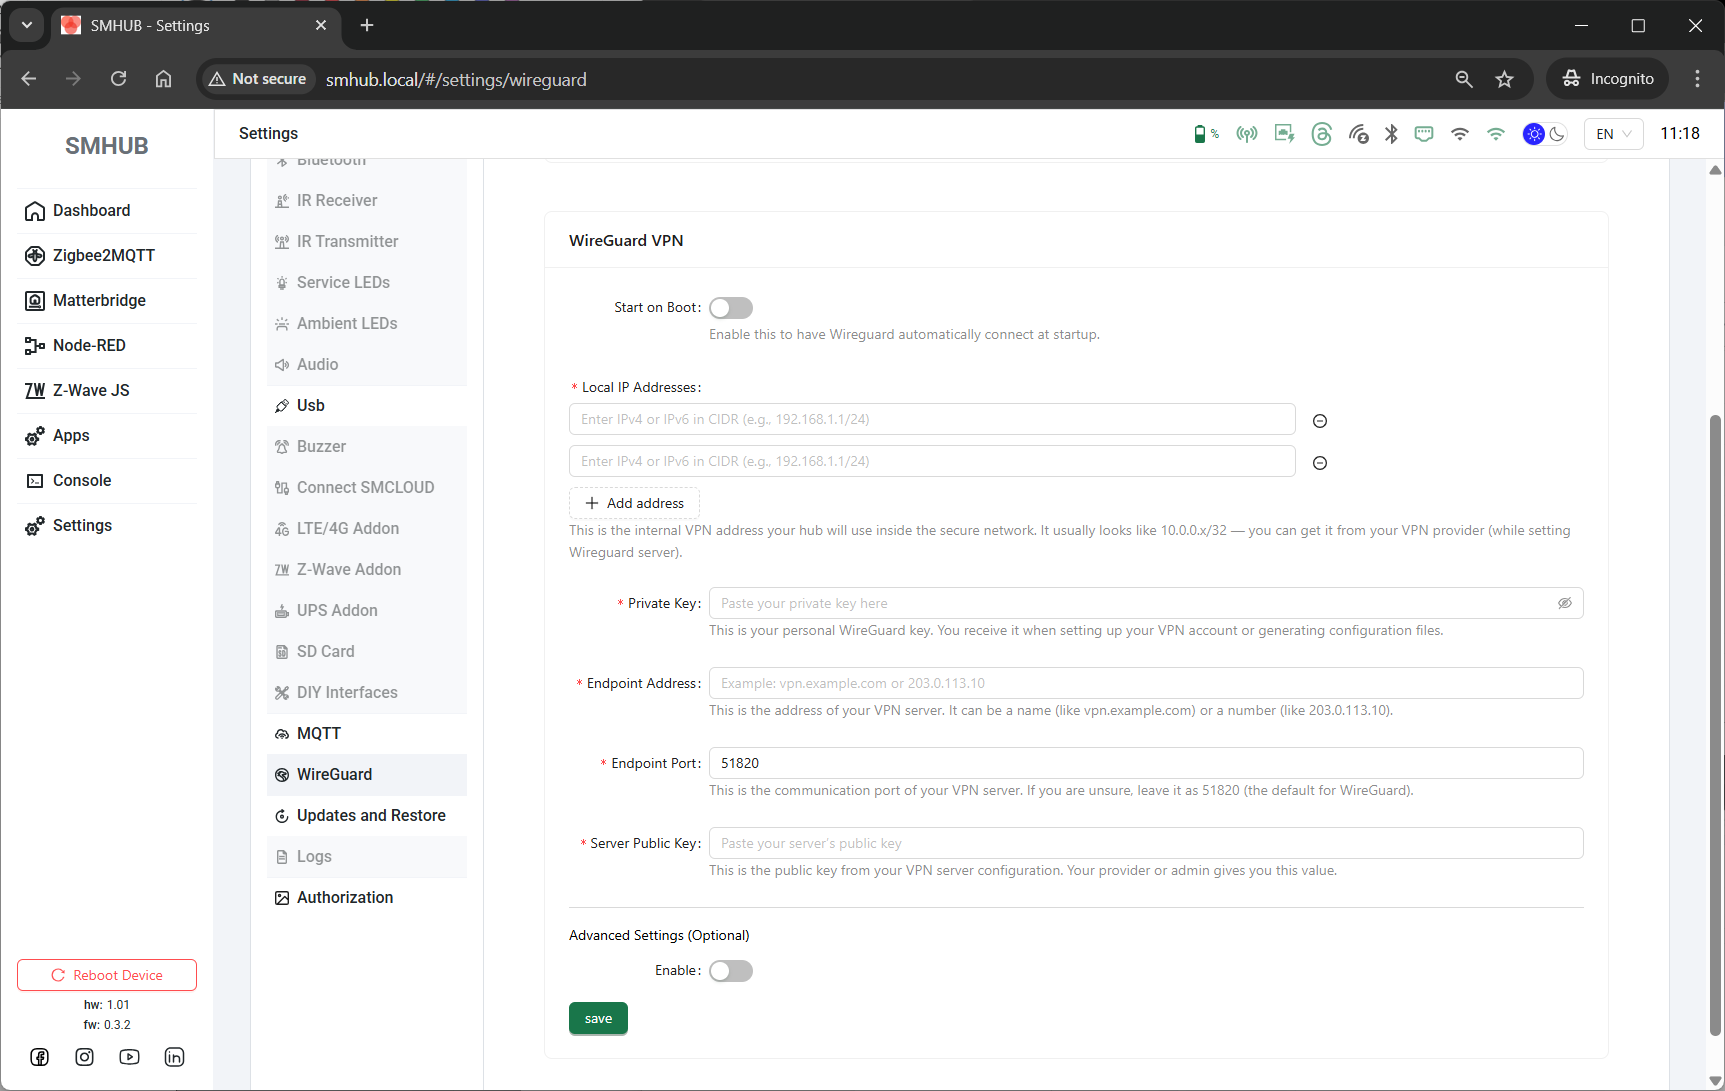](https://smlight.tech/support/manuals/uploads/images/gallery/2025-10/mw1image.png)
### ⚙️ **Update Instructions**
- UI update or Console update:
- UI (smhub-services restart after update can take up to 4 minutes):
**Web **→ Apps** → Refresh → smhub-services/smhub-web → Upgrade**
- Console (smhub-services restart after update can take up to 4 minutes):
`sudo opkg update`
`sudo opkg upgrade`
---
# **2025-Oct-26:**
### **SMHUB-OS v0.3.2 Released**
---
### 🚀 **Key Highlight (0.3.0 -> 0.3.2)**
- **Fix Type-C or SD-Card flashing from the "brick" state.**
- Add script to realign U-Boot partition on existing installs.
- Reset U-Boot env when type-c or SD-Card flashing.
- Add scripts to install new bootloader after OTA (if required, ie, new version).
- Wi-Fi fix to ensure a constant MAC address across reboots.
- Installed gpiod utils.
- LED indicators (Blue LED) when flashing Type-c/SD.
- smhub-services and smhub-web are preinstalled with the latest versions as of today.
### ⚙️ **Update Instructions**
Files for Type-C or SD-Card updates: [https://updates.smlight.tech/firmware/smhub/os/smhub\_os\_v0.3.2.zip](https://updates.smlight.tech/firmware/smhub/os/smhub_os_v0.3.2.zip)
- Type-C flashing manual: [https://smlight.tech/support/manuals/books/smhub/page/updaterestore-using-type-c](https://smlight.tech/support/manuals/books/smhub/page/updaterestore-using-type-c)
- SD-Card flashing manual: [https://smlight.tech/support/manuals/books/smhub/page/updaterestore-using-sd-card](https://smlight.tech/support/manuals/books/smhub/page/updaterestore-using-sd-card)
- UI update: **Web **→** Interface** **Settings → Upgrades and Restore**.
---
# **2025-Oct-24:**
### **SMHUB-Services v0.1.16 &
SMHUB-Web v0.2.9 Released**
---
PLEASE UPDATE smhub-services and smhub-web via SSH (either Console in the web interface or external SSH client - [SSH manual is here](https://smlight.tech/support/manuals/books/smhub/page/access-smhub-via-external-ssh-client)) - please do not use webUI button for this.
If you have updated via Web UI and SMHUB hangs after the update of smhub-services, please connect to SMHUB via SSH and run these two commands manually (this overrides the UI update process and makes it 100% correct):
### 🚀 **Key Highlight - Wireguard seting page**
New **Wireguard client page** added under **Settings → Wireguard**.
You can now configure SMHUB’s built-in Wireguard client directly from the interface.
You can find it under:
**Main menu → Settings → Wireguard**
[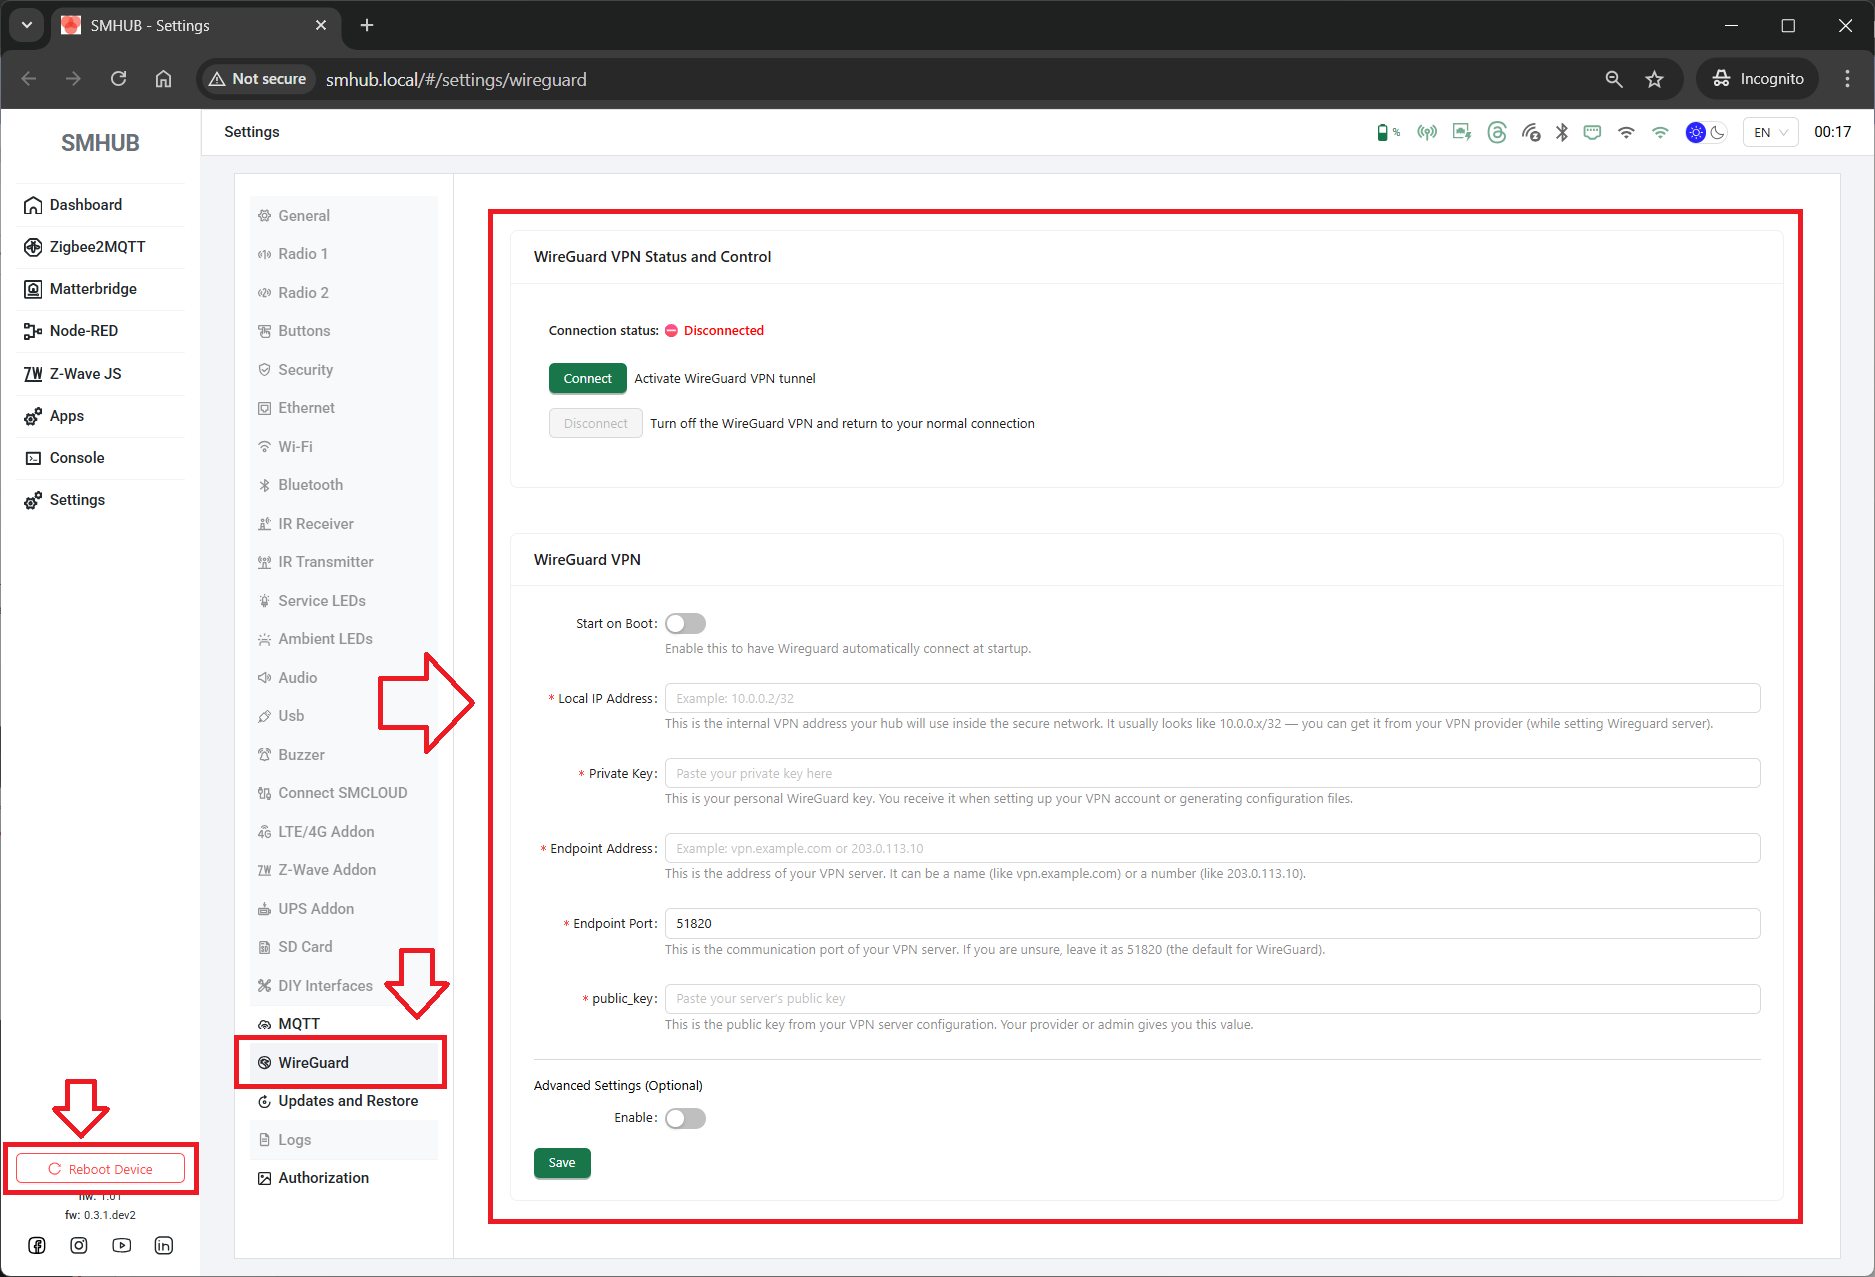](https://smlight.tech/support/manuals/uploads/images/gallery/2025-10/04himage.png)
### ⚙️ **Update Instructions**
You can update both packages directly from the **Web Interface** via
**Apps → Upgrade** specific app.
If your device becomes unresponsive or the Web UI hangs during update,
please connect via SSH and run these two commands manually:
---
# **2025-Oct-18:**
# 🧩 SMHUB 0.3.0 Release
**Includes:**
- **OS:** 0.3.0
- **smhub-services:** 0.1.13
- **smhub-web:** 0.2.8
### ⚙️ **Update Instructions**
PLEASE UPDATE smhub-services and smhub-web via SSH (either Console in the web interface or external SSH client - [SSH manual is here](https://smlight.tech/support/manuals/books/smhub/page/access-smhub-via-external-ssh-client)) - please do not use webUI button for this. **OS** is updatable via `**Settings**` - `**Update and Restore**`
If you have updated via Web UI and SMHUB hangs after the update of smhub-services, please connect to SMHUB via SSH and run these two commands manually (this overrides the UI update process and makes it 100% correct):
---
## 🔑 Highlights
### 🧠 MQTT Broker Settings
New **MQTT page** added under **Settings → Mqtt**.
You can now configure SMHUB’s built-in MQTT broker directly from the interface — or connect it to an external one in **bridge mode**.
> MQTT is the communication layer used by apps like Zigbee2MQTT, Node-RED and MatterBridge.
[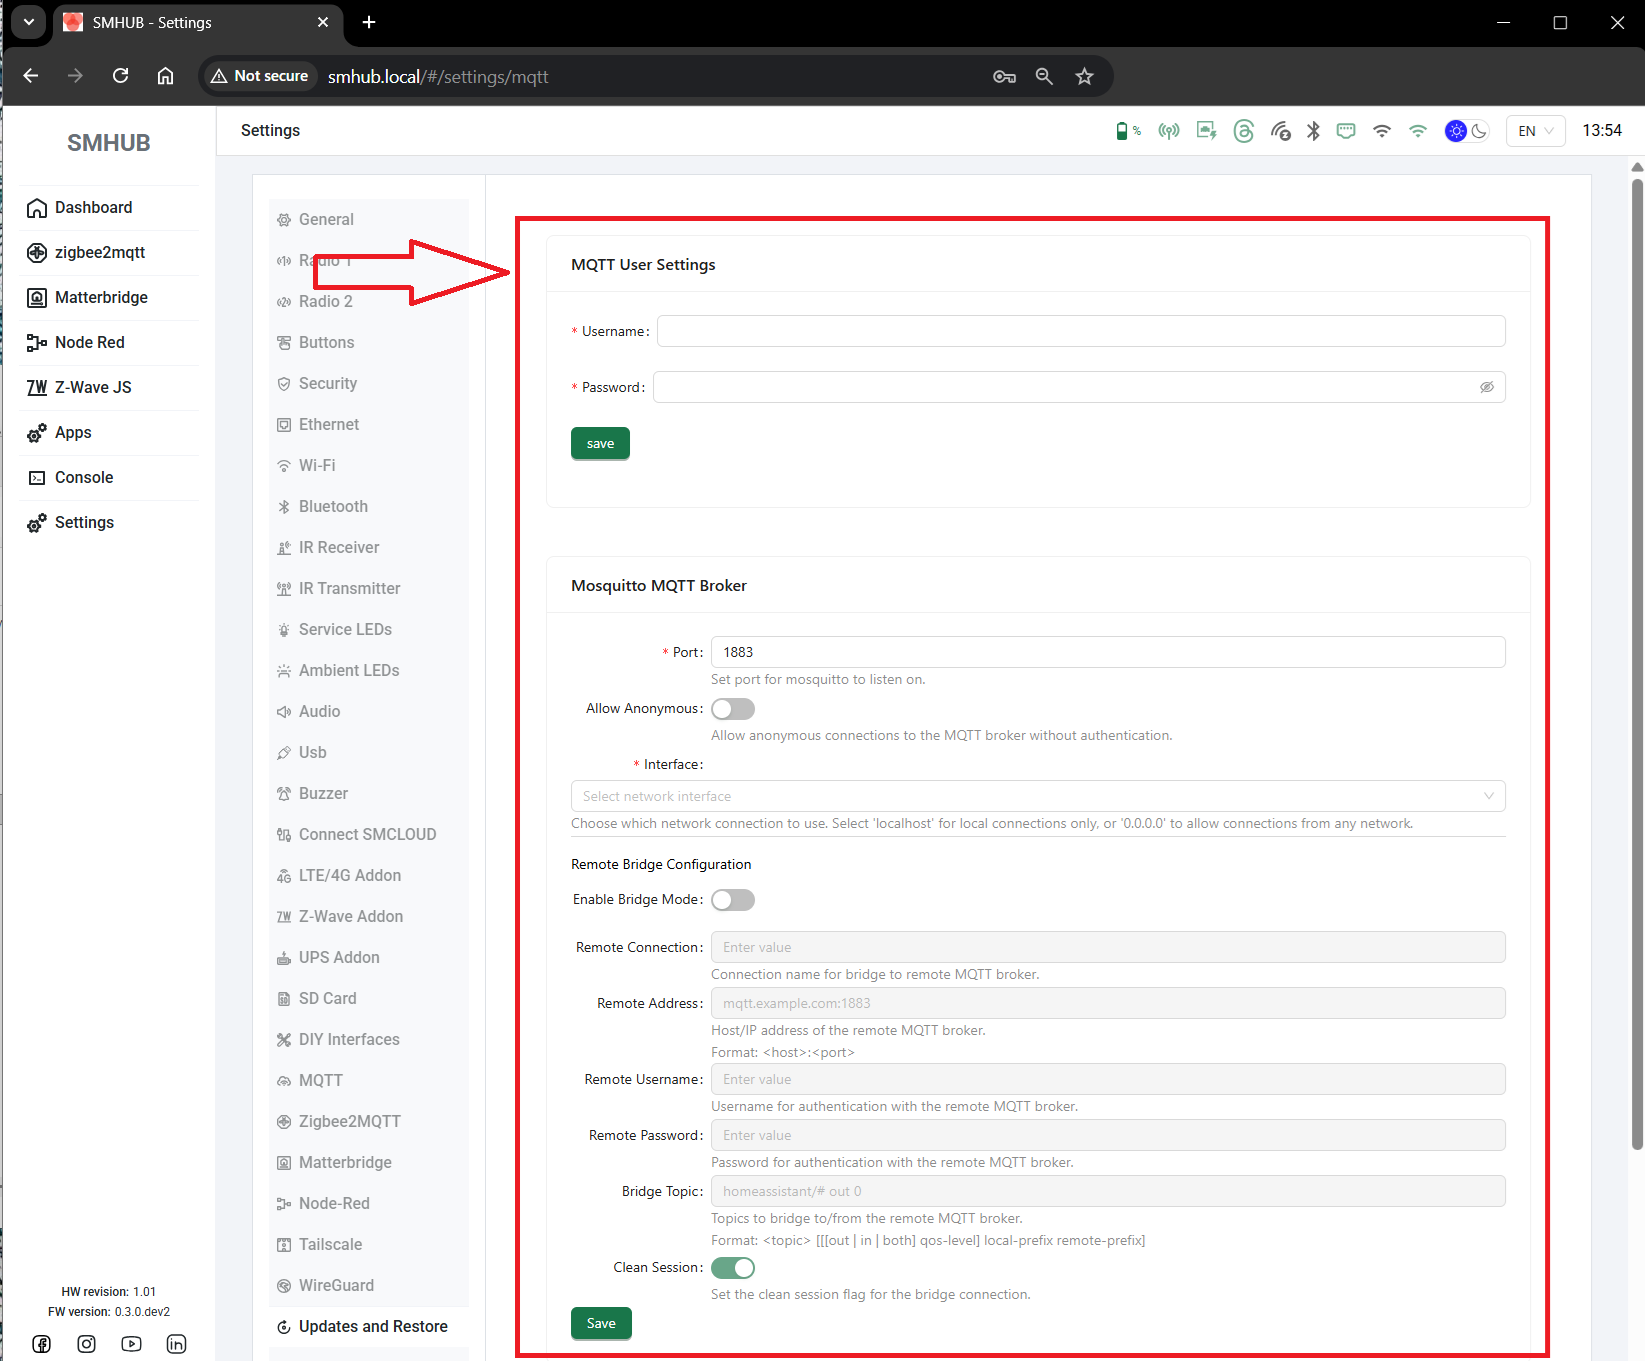](https://smlight.tech/support/manuals/uploads/images/gallery/2025-10/0YKimage.png)
---
## 🧩 Fixes & Improvements
### 💻 Web Interface
- Added the new MQTT settings page.
- Fixed saving of MQTT user accounts (credentials now stored correctly).
- Fixed occasional errors during web update.
- Improved form texts and translations.
- Settings are now saved properly (reading back will be added later).
### ⚙️ Services & System
- Better stability and reliability across all background services.
- Backend support for the new MQTT configuration.
### 🧠 OS Core
- The system is now **read-only** by default for improved safety.
- Configuration changes are stored separately so they **survive updates**.
- A **factory reset** can now easily restore defaults if needed.
---
## 🔄 How to Update
### From Web Interface
- **OS:** `Settings → Updates and Restore → SLZB-OS v0.3.0`
- **Services / Web:** `Apps → smhub-services / smhub-web → Upgrade` or **Upgrade all**
### From Console / SSH
`sudo opkg upgrade`
---
# **2025-Oct-13:**
### **SMHUB Services v0.1.9 & SMHUB Web v0.2.5 Released**
---
### 🚀 **Key Highlight - Web Console is Here**
The SMHUB Web Interface now includes a **built-in Console**, allowing you to execute Linux commands directly from the browser.
This feature brings full terminal access to your device **without SSH**, making it easier to troubleshoot, manage packages, and perform advanced configuration tasks.
You can find it under:
**Main menu → Console**
[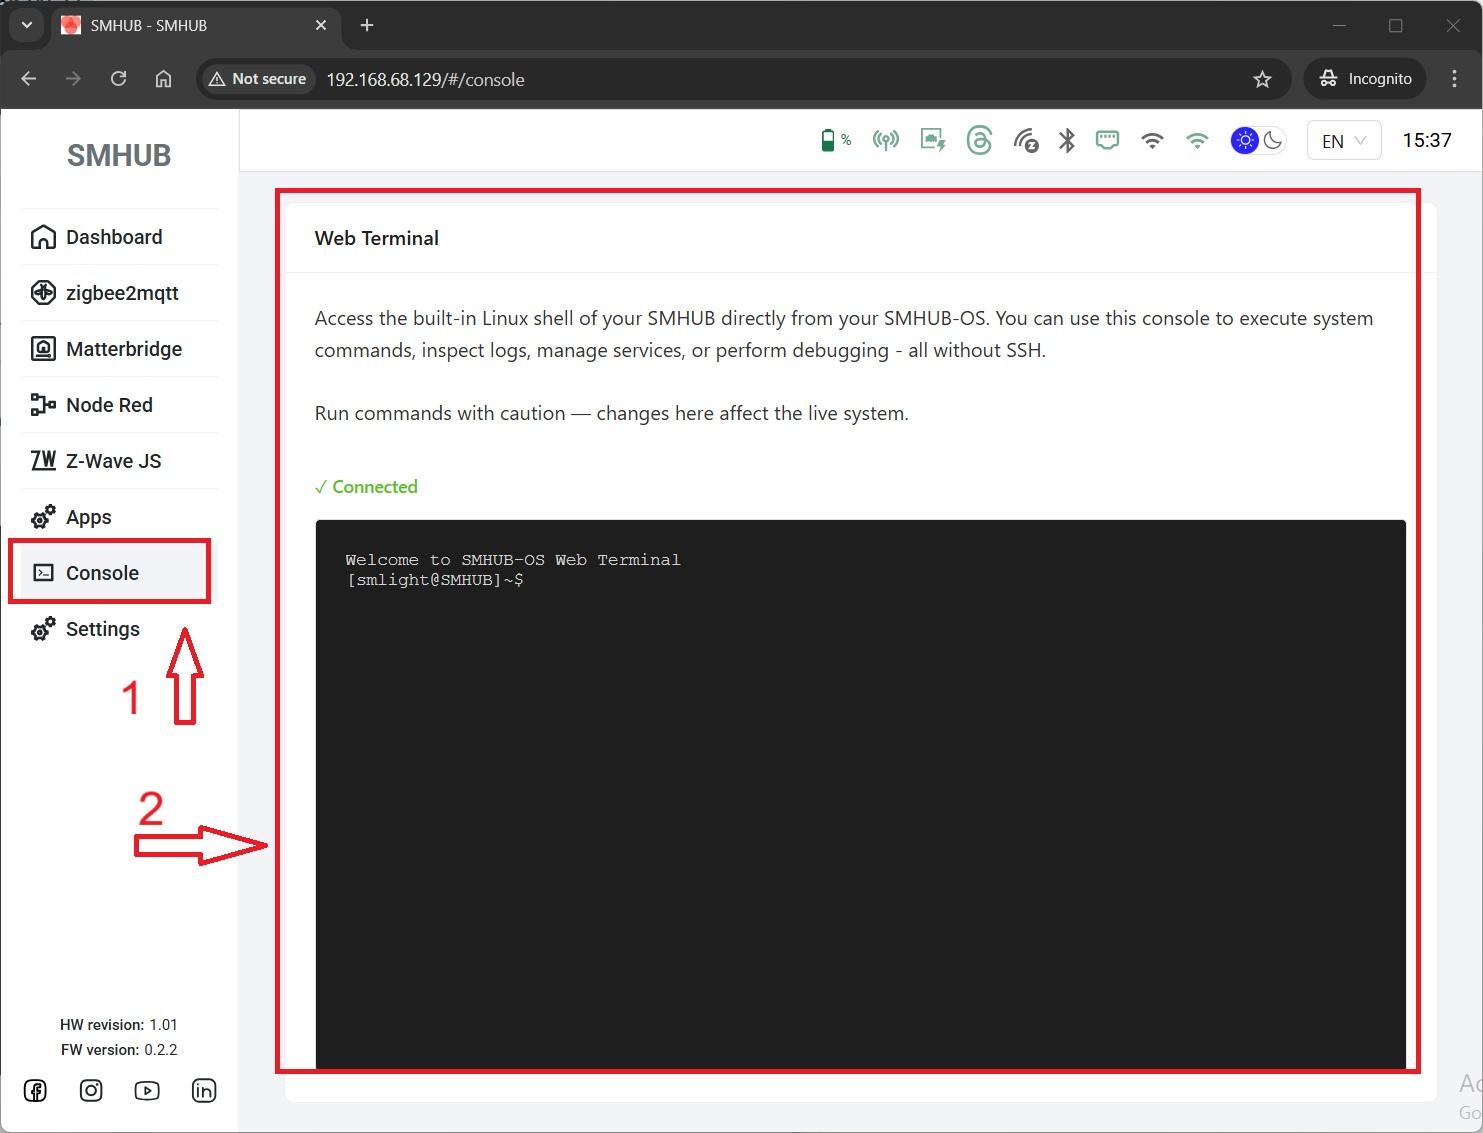](https://smlight.tech/support/manuals/uploads/images/gallery/2025-10/smhub-ui-console.jpg)
---
### 🧩 **smhub-services v0.1.9**
- 🖥 **Added backend for the web terminal**
- 🧾 Fixed **application logs** for Web and Z-Wave apps
- ⚙️ Fixed **installation hang** of `smhub-services` via Web UI
- 🛠 Fixed **401 error** on HEAD requests (previously filling logs)
- 🔄 Added **API endpoint for `opkg update`**
- 👤 Web terminal now logs in as user `smlight`
- 🌈 Ensured **color output** for terminal commands
---
### 🌐 **smhub-web v0.2.5**
- 🧠 **Added Web Terminal (Console)** accessible directly from the UI
---
### ⚙️ **Update Instructions**
You can update both packages directly from the **Web Interface** via
**Settings → Updates and Backup**.
If your device becomes unresponsive or the Web UI hangs during update,
please connect via SSH and run these two commands manually:
---
### 🧱 **Summary**
This release brings the **first fully functional web console** to SMHUB,
turning the browser into your direct control point for diagnostics and management.
It also refines app logging, service handling, and system-level package management —
paving the way for deeper interaction and future maintenance tools.
# **2025-Oct-12:**
# **smhub-os v0.2.2 +**
**smhub-service 0.1.7-1+**
**smhub-web v0.2.3-1**
Today’s release marks a **big step forward** in the SMHUB platform — a major shift in how updates are delivered and managed.
While the visible feature list may seem short, this release is **fundamentally important**: it establishes the **core OTA infrastructure** that will power all future SMHUB updates.
From now on, **SMHUB updates will happen entirely via the web interface**, without the need for Type-C flashing or manual intervention.
---
## 🧩 SMHUB System Architecture
SMHUB is built as a modular software stack with three key subsystems working together:
| Subsystem | Description |
|---|
| **smhub-os** | Core Linux system — provides the kernel, drivers, and low-level environment. |
| **smhub-services** | Backend layer handling configuration, networking, and communication between OS and the web interface. |
| **smhub-web** | Front-end web interface for interacting with the device, viewing system state, and adjusting settings. |
| Component | Version | Description |
|---|
| **smhub-os** | `0.2.2` | Updated kernel and file system with full OTA kernel flashing support. |
| **smhub-services** | `0.1.7-1` | Improved backend management of configuration and processes. |
| **smhub-web** | `0.2.3-1` | Updated UI with new dashboard and refined settings layout. |
On the first SMHUB models (with old firmware) the web interface will be on port **3000**
To it access use: `http://smhub.local:3000`**If you have such a device, we strongly recommend that you immediately update it via USB according to [this guide](https://smlight.tech/support/manuals/books/smhub/page/smhub-early-adopter-quick-start-guide#bkmrk-updating-smhub-firmw)** Old firmware has critical issues that have been fixed in the new version!
- Open a browser and go to:
- `http://smhub.local` (mDNS)
- or the IP address assigned via DHCP.
### SSH Access
- Connect from a terminal: `ssh smlight@smhub.local`
- Default credentials are user: **smlight**, password: **smlight**
- Use SSH for advanced configuration and Wi-Fi setup until the web Wi-Fi interface is fully implemented.
### USB-C Upstream Mode
- If connected via the **USB-C upstream port**, SMHUB may appear as a network device to your host machine.
- This allows direct connection without a router.
---
## 3.5 First Boot Behavior
- The system automatically starts **Zigbee2MQTT** service. Other services like **Matterbridge** and **Node-RED** could be run manually afterwards.
- Service LEDs and RGB LEDs will indicate boot sequence and status.
- On first login, you should:
1. Change the default password (via web UI or SSH).
2. Configure your preferred network connection (Ethernet or Wi-Fi).
3. Update system software (see Section 4).
---
## 3.6 Safety Notes
- Always use certified power supplies when running from USB-C.
- If using the UPS module, only install **good quality18650 cells**.
- Ensure proper ventilation - SMHUB is designed for continuous 24/7 operation.
# 4. Software & System
SMHUB is powered by a **Linux-based operating system** with an integrated **Node.js runtime** and a suite of **smart home applications**. This software foundation provides both **enterprise-grade stability** and **DIY flexibility**.
---
## 4.1 Operating System
- **Base:** Lightweight Linux distribution optimized for embedded controllers.
- **Runtime:** Node.js preinstalled for native execution of Node.js applications.
- **Package Management:** Extendable via Linux packages and Python scripts.
- **Update System:**
- Secure firmware updates.
- Individual application updates independent of OS.
---
## 4.2 Preinstalled Applications
### Zigbee2MQTT (Z2M)
- **Preinstalled by default**.
- Works with onboard CC26xx or EFR32XX Zigbee radios.
- Publishes device data to MQTT.
- Compatible with Home Assistant, OpenHAB, Node-RED, etc.
- Local dashboard for Zigbee pairing and monitoring.
### Matterbridge
- **Preinstalled by default**.
- Bridges Zigbee/Thread devices into the Matter ecosystem.
- Compatible with Google Home, Apple Home, Amazon Alexa, SmartThings.
### Node-RED
- **Preinstalled by default**.
- Visual, flow-based automation editor.
- Includes libraries for MQTT, Z2M, and Matterbridge.
- Accessible via web browser.
### Mosquitto MQTT Broker
- **Preinstalled and running by default**.
- Provides the MQTT backbone for Zigbee2MQTT, Node-RED, and Matterbridge.
- Allows additional MQTT clients to integrate seamlessly with SMHUB.
---
## 4.3 System Services
- **Networking**
- Ethernet (default).
- Wi-Fi 2.4 GHz and 5 GHz (AP and Client modes).
- Bluetooth 5.0 with BLE.
- **VPN Support**
- WireGuard preinstalled.
- Secure remote access tunnels.
- **USB Passthrough**
- Full passthrough of USB dongles to the host stack.
- USB protection logic for safe host/device switching.
---
## 4.4 Built-In Visual System
- **Ambilight System**
- Runs continuously by default.
- Uses 12 × WS2812B RGB LEDs for system visualization, notifications, or ambient effects.
- User-configurable patterns and colors.
- **Service LEDs**
- Indicate power, network status, and radio activity.
---
## 4.5 Features in Development
- **Buzzer Control**
- System and user notifications.
- **Audio Output (3.5 mm jack)**
- System alerts, notifications, and future media playback.
- **IR Transmitter & Receiver**
- IR learning and replay for remote-controlled devices.
- **Extended LED Controls**
- Custom animations and media sync in Ambilight.
---
## 4.6 Developer Options
- Full **SSH access**.
- Node.js environment ready.
- Support for Python scripting and Linux daemons.
- Exposed GPIO, UART, I²C, and SPI for DIY hardware extensions.
# 5. Network & Connectivity
SMHUB provides robust and flexible networking options to ensure reliable operation in both **enterprise environments** and **home setups**. It can connect via **Ethernet, Wi-Fi (2.4/5 GHz), Bluetooth**, and optionally via **VPN tunnels and DDNS services** for secure remote access.
---
## 5.1 Ethernet
- **Primary interface** for stable operation.
- Supports **100Mb Ethernet** via onboard RJ-45 port.
- Recommended for enterprise and multi-device deployments.
- Provides lowest latency and highest reliability compared to wireless options.
---
## 5.2 Wi-Fi
SMHUB includes **dual-band Wi-Fi** with both **2.4 GHz** and **5 GHz** support.
- **2.4 GHz**
- Longer range, higher wall penetration.
- Ideal for IoT-heavy environments with many legacy devices.
- **5 GHz**
- Higher throughput.
- Less interference in crowded environments.
- Suitable for high-speed data transfers and local automations.
**Operating Modes:**
- **Client Mode**
- SMHUB connects to an existing Wi-Fi network.
- Configurable via CLI (`nmcli`) or SSH.
- Web UI configuration will be available in upcoming updates.
- **Access Point Mode (in development)**
- SMHUB creates its own Wi-Fi network.
- Default SSID: `SMHUB-XXXX` (last 4 MAC digits).
- Default password: `smhub1234`.
- Useful for first-time setup or when no LAN is available.
---
## 5.3 Bluetooth
- **Bluetooth 5.0** with **BLE (Bluetooth Low Energy)** support.
- Future updates will expand Bluetooth integration into the web interface.
---
## 5.4 VPN (WireGuard)
SMHUB includes **WireGuard VPN** for secure tunneling.
- Provides encrypted remote access to SMHUB and connected devices.
- Suitable for enterprise remote deployments or secure home use.
- Configuration available via CLI or SSH.
- Can be combined with DDNS for access without a static IP.
---
## 5.5 USB Networking
When connected via **USB-C upstream**, SMHUB can act as a **network device** to the host PC:
- Appears as an Ethernet-over-USB adapter.
- Provides direct access without needing an external router or switch.
- Useful for initial setup, debugging, or portable use cases.
# 6. Radios & Protocols
SMHUB integrates multiple radios to support a **broad range of smart home and IoT protocols**, making it a true **multi-radio coordinator and Matter bridge**.
---
## 6.1 Zigbee
- **Chipset:** TI CC26xx series.
- **Port:** /dev/ttyS1
- **Baudrate**: 115200
- **RTS/CTS**: false
- **Protocol:** Zigbee 3.0 and legacy devices.
- **Software:** Zigbee2MQTT (Z2M).
- **Integration:**
- Pairs and manages Zigbee devices directly.
- Publishes states/events via the preinstalled **Mosquitto MQTT broker**.
- Compatible with Home Assistant, OpenHAB, Node-RED, and other MQTT platforms.
- **Coordinator Mode:** Can operate as a standalone Zigbee coordinator, without additional servers.
---
## 6.2 Thread
- **Chipset:** Silicon Labs EFR32MG series.
- **Port:** /dev/ttyS2
- **Baudrate**: 115200
- **RTS/CTS**: false
- **Protocol:** Thread 1.1/1.2.
- **Integration:**
- Acts as an **OpenThread Border Router (OTBR)**.
- Works with **Matterbridge**, exposing Thread/Zigbee devices into Matter.
- **Use Cases:**
- Bridging Zigbee sensors to Matter.
- Running mixed Zigbee + Thread networks.
---
## 6.3 Z-Wave
- **Radio Module:** EFR32ZG23 expansion module.
- **Port:** /dev/ttyS3
- **Baudrate**: 115200
- **RTS/CTS**: false
- **Protocol:** Z-Wave 700/800 series, including **Z-Wave Long Range (LR)**.
- **Software:** Managed via Z-Wave JS (installable).
- **Integration:**
- Local Z-Wave or Z-Wave LR networks.
- Automation via Node-RED and MQTT.
- **Hardware:** Dedicated LED and reset/flash pins for diagnostics and firmware updates.
---
## 6.4 4G/LTE (in development)
- **Module:** SIM7672G LTE modem.
- **Port:** /dev/ttyS4
- **Baudrate**: 115200
- **RTS/CTS**: false
- **Capabilities:**
- LTE Cat 1 connectivity.
- Interfaces: USB, debug UART.
- Antenna connectors for LTE and GNSS.
- SIM slot with SIM detection.
- **Status:** Hardware fully integrated, **software support is in active development**.
- **Planned Functions:**
- LTE fallback connectivity.
- Remote site deployments without Ethernet/Wi-Fi.
---
## 6.5 Wi-Fi
- **Bands:** Dual-band **2.4 GHz** and **5 GHz**.
- **Modes:** Access Point (AP) and Client.
- **Use Cases:**
- 2.4 GHz: long range, high compatibility.
- 5 GHz: higher bandwidth, reduced interference.
- **Integration:** Used for device connectivity and as a network backbone when Ethernet is not available.
---
## 6.6 Bluetooth
- **Version:** Bluetooth 5.0.
- **Support:** Bluetooth Low Energy (BLE).
---
## 6.7 Multi-Radio Operation
- Zigbee + Thread + Wi-Fi + Bluetooth operate simultaneously out of the box.
- Z-Wave and 4G/LTE are available via expansion modules.
- Hardware and firmware are designed to minimize interference and ensure stable concurrent radio operations.
---
## 6.8 Matter Bridge
SMHUB can function as a **Matter bridge**, allowing non-Matter devices to join modern ecosystems:
- Bridges Zigbee and Thread devices into Matter.
- Compatible with Google Home, Apple Home, Amazon Alexa, SmartThings.
- Entirely **local bridging** — no third-party cloud services required.
# 7. User Interface
The SMHUB web interface is the primary way to configure and manage the system. It provides access to dashboards, built-in applications, and detailed system settings.
---
## 7.1 Dashboard
The **Dashboard** is the starting page of the interface and shows an overview of the hub:
- **System Information**
- Device model, firmware version, uptime.
- CPU load, memory usage, and storage status.
- **Network Status**
- Ethernet/Wi-Fi interfaces with IP addresses.
- VPN (WireGuard) status.
- **Radio Status**
- Zigbee, Thread, Z-Wave (if installed), Bluetooth.
- Service LED indicators and Ambilight effects.
- **Service Overview**
- Running state of **Zigbee2MQTT, Matterbridge, Node-RED, Mosquitto MQTT broker**.
- Quick buttons to start/stop services.
---
## 7.2 Zigbee2MQTT
- Direct integration with the **Zigbee2MQTT frontend**.
- Allows pairing, removing, and managing Zigbee devices.
- Displays a network map, device states, and logs.
- Zigbee devices are automatically published to the local **Mosquitto MQTT broker**.
---
## 7.3 Matterbridge
- Provides direct access to the **Matterbridge frontend**.
- Manages bridging between Zigbee/Thread devices and Matter ecosystems (Google Home, Apple Home, Alexa, SmartThings).
- Allows configuration of bridge modes and Matter controllers.
---
## 7.4 Node-RED
- Opens the **Node-RED frontend**, a visual automation editor.
- Users can create and deploy flows combining Zigbee2MQTT, Matterbridge, MQTT, HTTP APIs, or custom integrations.
- Pre-installed flows include templates for MQTT and device automation.
---
## 7.5 Apps
The **Apps** section acts as a package manager for SMHUB applications.
- **App Management**
- Install, uninstall, or update applications.
- Configure settings per application.
- Start/stop applications with one click.
- **Preinstalled Apps**
- Zigbee2MQTT
- Matterbridge
- Node-RED
- Mosquitto MQTT broker
- **Additional Apps**
- Future apps (e.g., Z-Wave JS, custom services) can be added here.
- Apps can be distributed as packages and installed via this page.
---
## 7.6 Settings
The **Settings** section contains all configuration options for SMHUB. It is divided into modules, each with tabs for **configuration, telemetry, and debug** where available.
### System
- Hostname, time zone, system info.
- User management (accounts, passwords).
- Updates (firmware & app updates).
- Backup & restore.
- Factory reset.
### Network
- Ethernet (DHCP/static).
- Wi-Fi (2.4/5 GHz, AP/Client mode).
- VPN (WireGuard).
- DDNS configuration (DuckDNS, others).
- USB-over-network.
### Radios
- Zigbee: coordinator settings, pairing mode, diagnostics.
- Thread: OTBR management, Matterbridge integration.
- Z-Wave (if module installed): inclusion/exclusion, network management.
- Bluetooth: enable/disable, scanning, BLE integrations.
- 4G/LTE (in development): SIM/APN settings, LTE telemetry, GPS data.
### Audio & Buzzer
- Volume control (3.5 mm output).
- Enable/disable system notification sounds.
- Buzzer toggle and test alerts.
### LEDs
- Service LED control.
- Ambilight modes (status, animations, user-defined patterns).
### IR
- IR transmitter: configure/send commands.
- IR receiver: learn remote commands and store them.
### Storage
- SD card and eMMC info.
- Format, mount/unmount.
- Telemetry: usage stats.
### Security
- User authentication settings.
- SSH toggle.
- VPN certificates and DDNS keys.
- Firewall and remote access rules.
# 8. Modules & Extensions
SMHUB is designed to be modular. The **main board** provides essential radios, networking, and I/O, while additional **hardware modules** extend functionality for power resilience, connectivity, and advanced integrations.
---
## 8.1 USB Passthrough
- **Purpose:** Enables SMHUB to act either as a **USB host** (powering connected peripherals) or as a **USB device** (connected to a PC or another host).
- **Logic:**
- Automatically decides whether to supply or draw power.
- Prevents reverse powering through integrated FET switching.
- **Use Cases:**
- Attach Z-Wave or extra Zigbee dongles, printers, audio devices, storage etc.
- Connect SMHUB to a PC for development/debugging.
- Power downstream devices safely.
---
## 8.2 SD Card
- **Slot:** Standard microSD slot on the main board.
- **Purpose:** Expand storage for logs, app data, or backups.
- **Integration:**
- Mounted automatically by the Linux OS.
- Users can format, mount/unmount, and monitor usage from the UI.
- Support up to 2Tb volume.
---
## 8.3 PoE Module
- **Standard:** IEEE 802.3af-compliant.
- **Input:** Power delivered via Ethernet cable from a PoE-enabled switch or injector.
- **Output:** Stable **5V regulated** supply to the hub.
- **Protection:** Surge and ESD protection integrated.
- **Monitoring:** “PoE Power Check” exposed in the system for telemetry.
- **Use Case:** Ideal for enterprise deployments where powering over Ethernet is standard.
---
## 8.4 UPS Module
- **Battery:** Supports **18650 Li-ion cells** (user-installed).
- **Charger:** advanced circuit with overcharge/undervoltage protection.
- **Conversion:** Step-up/step-down converters to maintain **5V, 3.3V, 1.8V** rails.
- **Telemetry:**
- Monitors voltage/current
- Provides battery health and charge state in the UI.
- **Inputs:** Can also accept **DC power** or **solar panels**, making SMHUB deployable off-grid.
- **Use Case:** Ensures uninterrupted operation during outages.
---
## 8.5 4G/LTE Module
- **Connectivity:** LTE Cat 1 with fallback modes.
- **Interfaces:**
- Main UART.
- USB.
- Debug UART.
- **SIM Slot:** NanoSIM with detection circuitry.
- **Antennas:** Dedicated connectors for LTE and GNSS.
- **UI Integration:**
- Settings → Radios → 4G/LTE.
- SIM/APN configuration, LTE signal telemetry.
- **Status:** Hardware available, **software support in development**.
---
## 8.6 DIY Pinouts & Interfaces
For advanced users and developers, SMHUB exposes additional hardware interfaces:
- **GPIO pins** for general use.
- **UART, SPI, and I²C** buses.
- **Custom module connectors** for prototyping or specialized hardware.
- **Use Case:** Attach sensors, control boards, or experimental expansions not covered by official modules.
---
## 8.7 Integrated Peripherals
While not separate modules, the following are considered part of SMHUB’s extension capabilities:
- **IR Transmitter & Receiver**
- Control TVs, AC units, and IR-based devices.
- Capture IR codes for learning mode.
- **Audio Output (3.5 mm)**
- System alerts and future media/streaming support.
- **Buzzer**
- Local audible notifications.
- **LED Systems**
- **12 WS2812B RGB LEDs (Ambilight)** – running by default, user configurable.
- **4 Service LEDs** – network, power, radio status.
# 10. Glossary
**Ambilight** – Integrated RGB LED ring used for status indication and visual effects.
**Apps** – Modular software packages (e.g., Zigbee2MQTT, Node-RED) that can be installed/uninstalled independently on SMHUB.
**BLE (Bluetooth Low Energy)** – Energy-efficient version of Bluetooth for sensors, tags, and small IoT devices.
**DDNS (Dynamic DNS)** – A service that maps a dynamic IP to a permanent domain name for remote access.
**Matter** – A connectivity standard that allows devices from different ecosystems (Google, Apple, Amazon, SmartThings) to interoperate.
**Matterbridge** – An application that bridges Zigbee/Thread devices to the Matter ecosystem.
**MQTT (Message Queuing Telemetry Transport)** – A lightweight messaging protocol used for IoT communications. SMHUB includes a built-in **Mosquitto MQTT broker**.
**Node-RED** – A flow-based programming tool for IoT automation, preinstalled on SMHUB.
**OTBR (OpenThread Border Router)** – Service that connects Thread devices to IP networks.
**PoE (Power over Ethernet)** – A method of delivering power and data over the same Ethernet cable.
**UPS (Uninterruptible Power Supply)** – Add-on module with 18650 cells providing backup power during outages.
**WireGuard** – A modern VPN protocol, preinstalled on SMHUB for secure remote access.
**Zigbee2MQTT (Z2M)** – Application that connects Zigbee devices to MQTT brokers, enabling integration with multiple smart home platforms.
**Z-Wave JS** – An open-source software stack for managing Z-Wave devices.
# Run Thread networks
The following guide explains how to enable **Thread networking** on your **SMLIGHT SMHUB** device.
This process involves updating the operating system, flashing Thread firmware to the radio module, and installing the OpenThread Border Router (OTBR) app.
> ⚠️ **Note:** This is an *early-access feature*. Future (expected v0.3.5+ versions) of SMHUB-OS will make it fully automatic.
> For now, please follow the steps carefully in the order below.
#### A new complete manual is created here: [https://smlight.tech/support/manuals/books/smhub/page/using-smhub-as-thread-border-router-for-matter-devices](https://smlight.tech/support/manuals/books/smhub/page/using-smhub-as-thread-border-router-for-matter-devices)
---
## 🔹 A. Update SMHUB-OS to v0.3.4dev2
Before enabling Thread, update your device to the latest development version supporting Thread services.
1. **Download the update file**
- Open a terminal on your SMHUB or connect via SSH.
- Run:
2. **Install the update**
After installation, please reboot your device.
---
## 🔹 B. Flash Thread Firmware to the EFR32 Chip
The EFR32 radio inside your SMHUB needs a special firmware to operate as a **Thread radio co-processor (RCP)**.
1. **Install the flashing tool:**
2. **Download the flashing script:**
[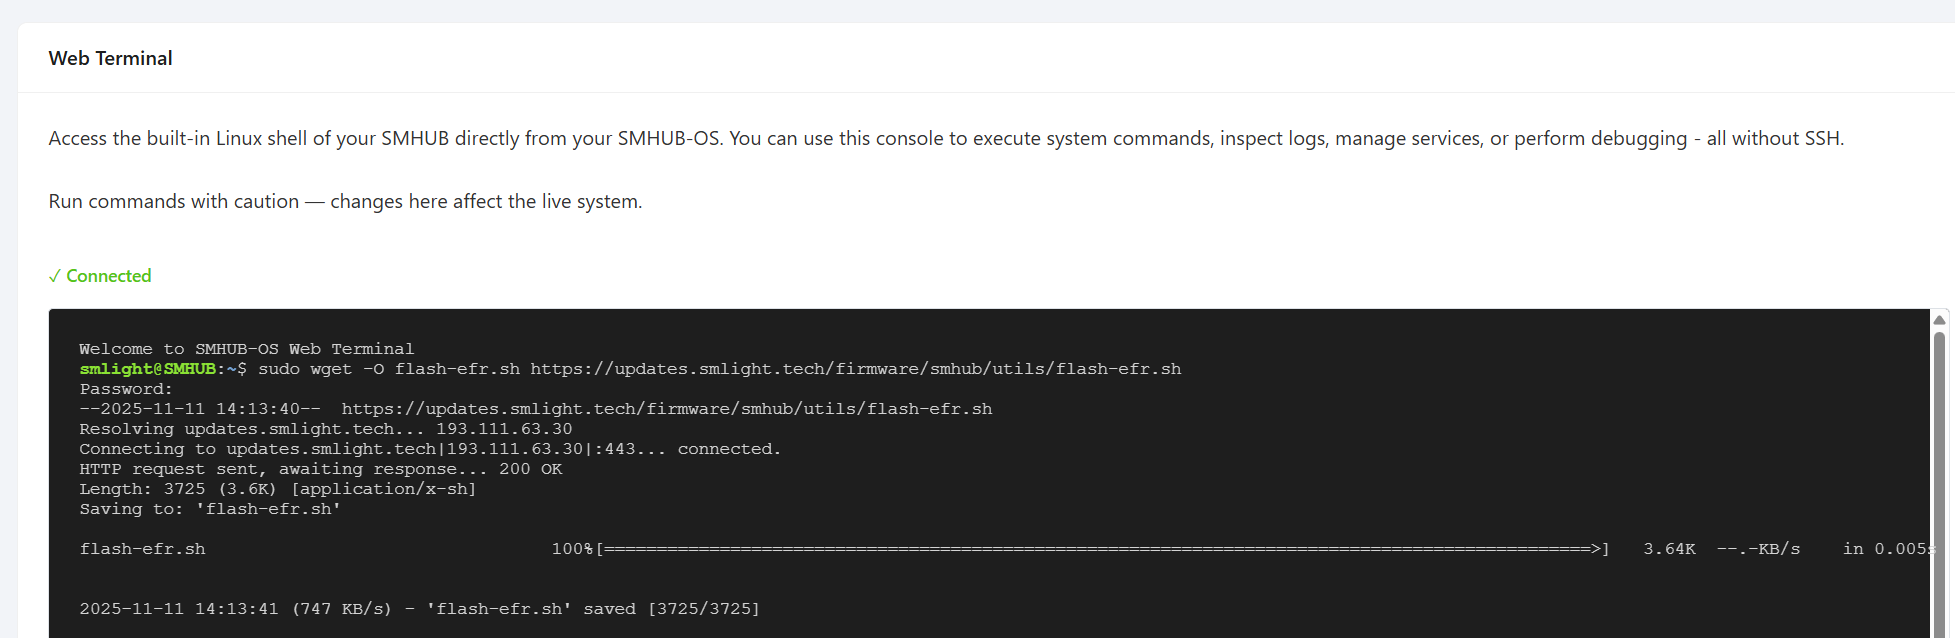](https://smlight.tech/support/manuals/uploads/images/gallery/2025-11/COKimage.png)
3. **Make the script executable:**
4. **Run the flasher script and select Thread firmware:**
[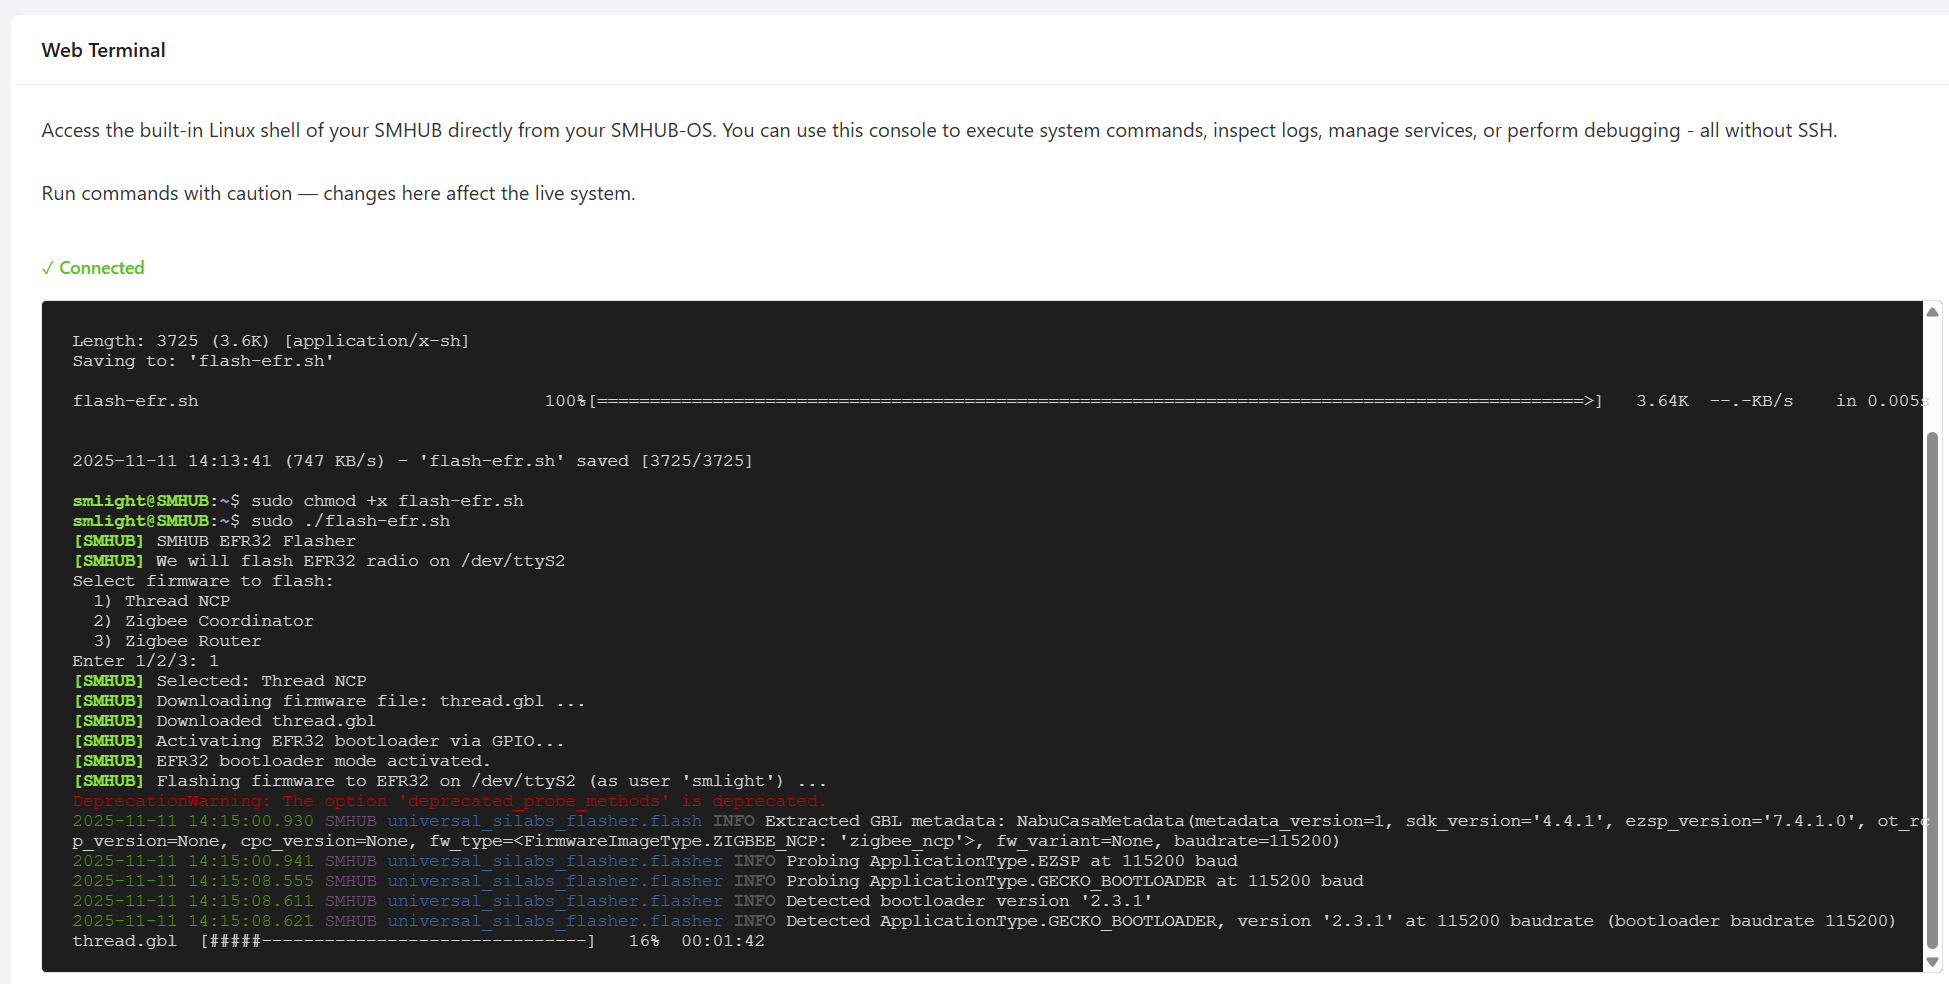](https://smlight.tech/support/manuals/uploads/images/gallery/2025-11/d6aimage.png)
---
## 🔹 C. Install the OpenThread Border Router (OTBR) App
This application enables SMHUB to act as a **Thread Border Router**, bridging your Thread network with Ethernet or Wi-Fi.
1. **Download the OTBR package:**
2. **Install it:**
3. **Start the OTBR service:**
4. **Check OTBR logs (optional):**
If the service starts successfully, your SMHUB is now broadcasting as a Thread Border Router.
---
## 🔹 D. Integrate with Home Assistant
To connect your Thread network to **Home Assistant**:
1. Open **Home Assistant → Devices & Services**.
2. Search for **“Open Thread Border Router”** and install it.
3. In the configuration, enter:
*(replace `` with your actual device IP address)*
4. Add the **Thread integration**.
5. Open its settings and confirm a **Preferred Thread Network** appears.
Once visible, your SMHUB is successfully integrated with Home Assistant as a Thread Border Router.
You can now pair **Thread or Matter** devices through the standard Home Assistant interface.
# Troubleshooting
This section lists common issues that may occur during the installation or operation of SMHUB and their solutions.
---
## IP Conflict When Using Multiple SMHUB Devices
**Issue**
If you have two (or more) SMHUB devices connected to the same network and both receive the **same IP address**, this is caused by a **MAC address conflict**.
**Root Cause**
In early SMHUB-OS versions, the MAC address was cached by the firmware during the initial flashing process and cache not cleared. As a result, multiple devices could end up using the **same MAC address**, causing network conflicts.
**How to Fix**
1. **Ensure SMHUB-OS version is at least 0.3.7**
2. **Ensure your SMHUB model** (e.g. SMHUB Essential, SMHUB Nano) is shown in the top-left corner of the web interface
- If not, please fix that first: [https://smlight.tech/support/manuals/books/smhub/page/troubleshooting#bkmrk-smhub-nano-mg24-mode](https://smlight.tech/support/manuals/books/smhub/page/troubleshooting#bkmrk-smhub-nano-mg24-mode)
3. Open **Console**
4. Run the following command (recommended on both conflicting devices): `sudo fw_setenv ethaddr` Password: `smlight`
5. **Reboot** the device
6. **Check the IP address** - each SMHUB should now have its own IP
Do this on both (or more) conflicting devices.
**Result**
Each SMHUB will generate a **unique MAC address**, eliminating IP conflicts on your network.
---
## Power & Boot
The first batch of SMHUBs with 4G add-ons did not include the screw with a ring, which was meant to be placed between the add-on and the main PCB.
[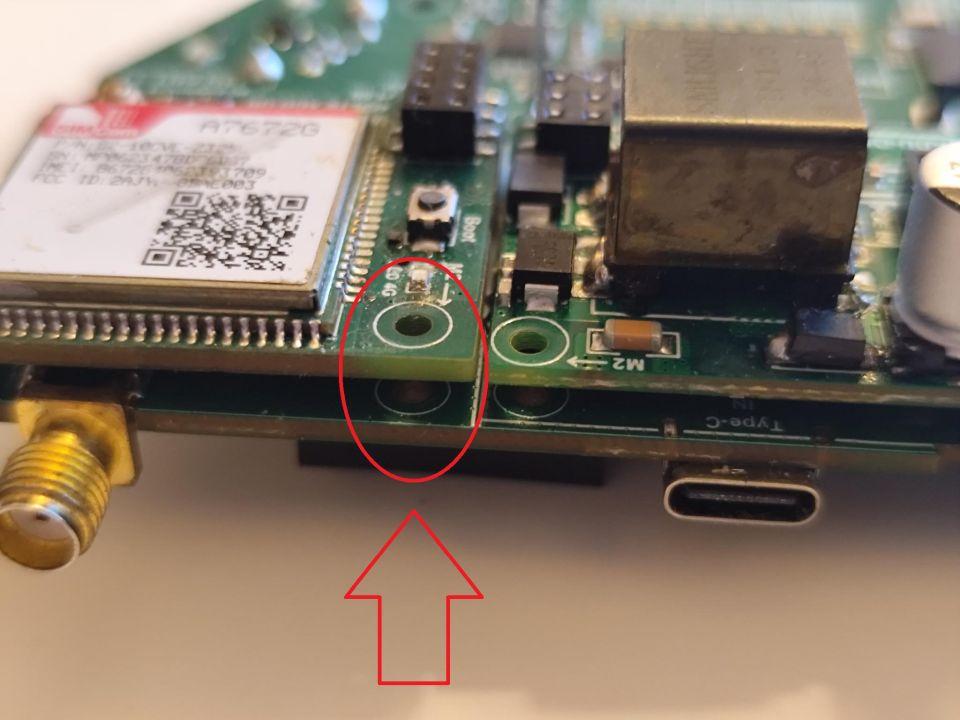](https://smlight.tech/support/manuals/uploads/images/gallery/2025-10/screw-4g-addon.jpg)
For some users, this caused a short circuit that prevented the hub from turning on.
To fix this, follow the steps below:
1. Remove the 4G add-on
2. Stick insulating tape to the SIM card slot or place a layer of paper between the PCB and the 4G add-on
[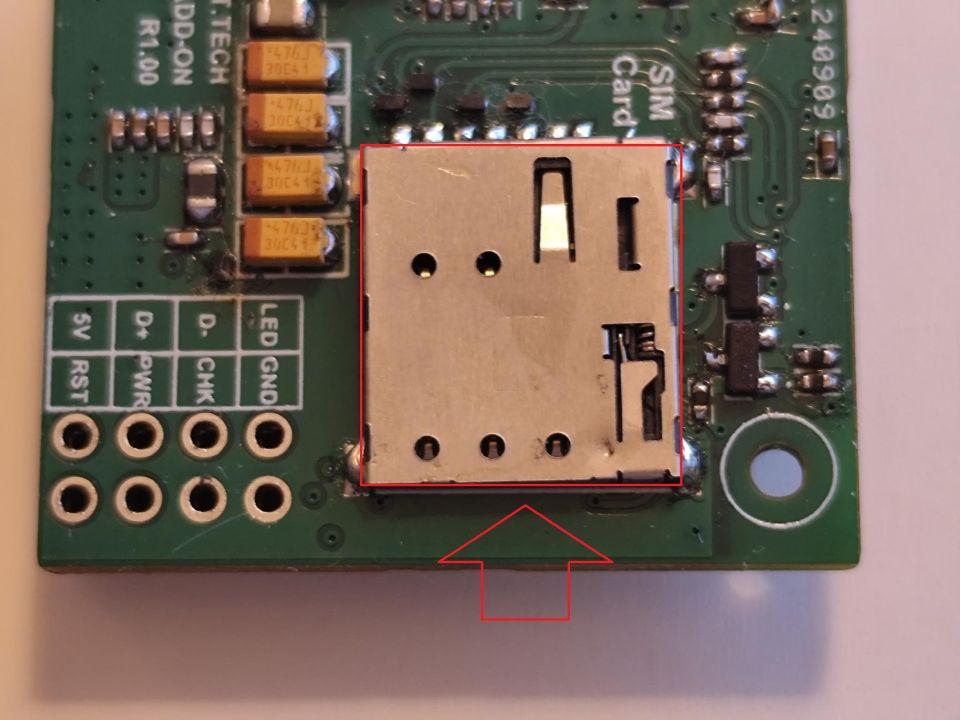](https://smlight.tech/support/manuals/uploads/images/gallery/2025-10/sticker-sim-card-addon.jpg)
3. Install the 4G add-on
---
This section lists common issues that may occur during the installation or operation of SMHUB and their solutions.
---
## Feedbacks from users
- **Issue**: ... nothing on the webUI is loading. the Settings page stays completely blank, doesn't matter which setting I choose.
**Resolution**: And I have to admit, the problem was not the hub, it was me - Firefox & AdBlock will break the UI, at least in my case.
---
## Device bricked with SMHUB-OS v2.x
Some users experienced a *"soft bricked"* device after updating over any method (Type-C / SD-Card or through the web UI). This issue appeared because of U-Boot changes introduced in version **0.2.0**, when the Robust Auto-Update Controller ("**RAUC**") was introduced.
Users who experienced that were able to recover their "bricked" device by flashing back **0.1.2** via Type-C (because it did not contain the new RAUC changes \[by the way, it is here [smhub-os-v0.1.2](https://updates.smlight.tech/firmware/smhub/os/smhub_os_v0.1.2.zip)\]) and then updating directly to a **0.3.x** version via Type-C.
Below is a simple explanation of what happened and how it was fixed.
When the device turns on, the very first piece of software that runs is called **U-Boot**. You can think of it like the **“starter”** or **boot manager** of the device. Before anything else loads, U-Boot reads some **settings** (called “environment variables”) from the internal storage (the MMC). These settings tell it *how to start the system*.
At some point, **RAUC** (stands for "Robust Auto-Update Controller" - **the Linux update system on SMHUB**) accidentally **damaged/corrupted those settings**. When U-Boot tried to read them, it got confused and didn't know how to continue booting properly, and the device failed to boot - which looked like it was “bricked.” (for regular start, or for Type-C/SD-Card updates).
**What Was Changed**:
To prevent this from ever happening again, we made two fixes:
1. **Automatically reset U-Boot's settings** whenever they are detected as corrupted. In simple terms: If U-Boot sees that its configuration is broken, instead of crashing or getting stuck, it will throw away the bad settings and restore working default settings - before any damage happens.
2. We also corrected how RAUC marks a software update as “successful.” It will now only do that **after an update actually happens**, instead of doing it on **every boot**. The old behavior is likely what caused the corruption.
**Simple Analogy:** - Imagine a PC that reads its BIOS settings when it powers on.
- If the BIOS settings get corrupted, the PC might not start.
- The fix is to detect the bad BIOS settings and **automatically reset to “factory defaults”** so the computer can continue to boot normally.
This is exactly what we are doing here, but for an embedded device.
**The good news**: starting from SMHUB-OS **v0.3.2**, the fix is now built-in. You can simply update and recover your device via Type-C / SD-Card.
(See details below [https://smlight.tech/support/manuals/books/smhub/page/smhub-os-release-notes#bkmrk-smhub-services-v0.1.-1](https://smlight.tech/support/manuals/books/smhub/page/smhub-os-release-notes#bkmrk-smhub-services-v0.1.-1))
**Your device is now**:
**- More robust - Self-recovering - Protected** from this type of failure in the future
---
## Zigbee2MQTT
**z2m: Error: \[BACKUP\] Current backup file is not for EmberZNet stack.**
> This means that you have previously run Z2M for Radio1 (CC26XX).
> Unfortunately Z2M does not support restoring backups between CC and EFR Zigbee chips, so to run Z2M for EFR radio you will have to delete the backup, which means you will have to re-pair all Zigbee devices.
Following the steps below means you will have to re-pair your Zigbee devices.
Hint: You can press the \[TAB\] key to autocomplete paths/file names.
1. Open console[](https://smlight.tech/support/manuals/uploads/images/gallery/2025-11/nCBimage.png)
2. Type: `cd /opt/zigbee2mqtt/data`
3. (optional) Type: `ls` to show filelist
4. Type `rm coordinator_backup.json`
5. (optional) Type: `ls` to show updated filelist
6. Go to "Apps" -> "Zigbee2MQTT" and press "Run" button
[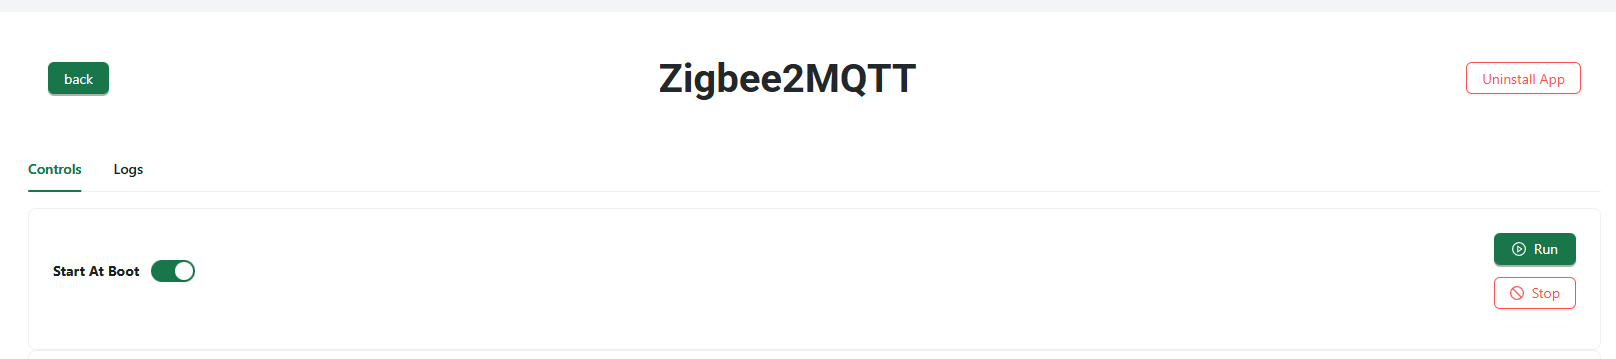](https://smlight.tech/support/manuals/uploads/images/gallery/2025-11/nndimage.png)
7. Now you can go to the Z2M interface, it will launch soon
Screenshot with a list of commands:
[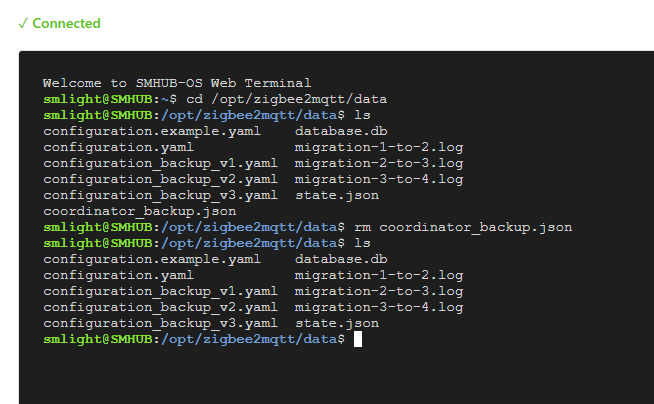](https://smlight.tech/support/manuals/uploads/images/gallery/2025-11/tWLimage.png)
## SMHUB Nano Mg24 model ID and radio flashing not-accessible
Model ID is not identifiable and Radio updates do not work properly.
[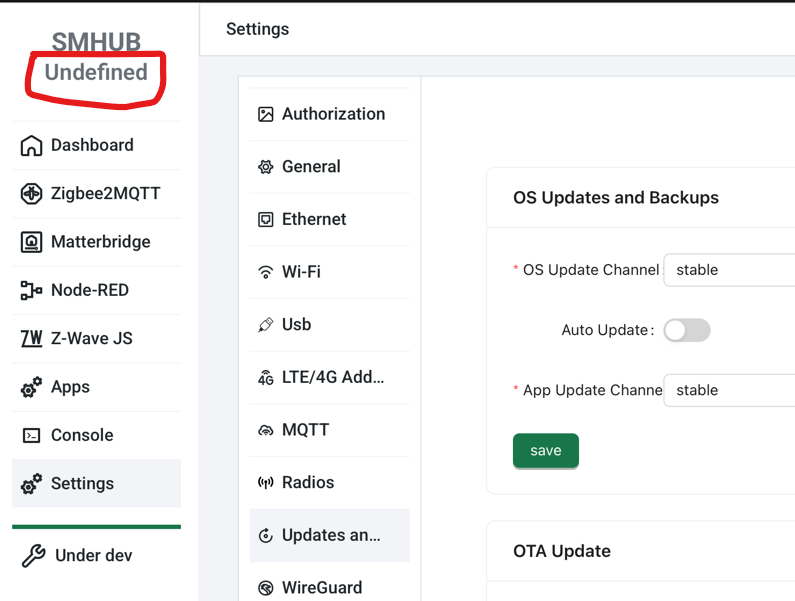](https://smlight.tech/support/manuals/uploads/images/gallery/2026-01/Fipimage.png)
To fix this, please
1. Go to Console and execute this command: `sudo bash /usr/lib/eeprom/eeprom-lib.sh --model nanomg24 --hw 0.97 --force` (password for sudo is smlight). IMPORTANT: option --hw 0.97 relates to hardware revision. You can see it on the PCB.
2. Reboot and check. It should work
3. Please also update OS, smhub-services, and smhubos to the latest versions afterwards.
4. Please check that LOG level in Zigbee2MQTT settings is set to INFO or WARNING; the level DEBUG overspams the device.
# Connecting Zigbee2MQTT on SMHUB to Home Assistant
This guide explains how to connect any **SMHUB Series** device to **Home Assistant** using **Zigbee2MQTT**.
---
## Requirements
- Any **SMHUB** model (Essential, Premium, Nano, etc.)
- **Home Assistant** running in your network
- Minimum SMHUB firmware:
- `smhub-os` ≥ **0.3.7**
- `smhub-services` ≥ **0.2.4**
- `smhub-web` ≥ **0.2.18**
> 💡 Tip: You can check and update these versions in the SMHUB web interface
>
> - smhub-os: under **Settings → Updates and Restore**.
> - smhub-services and smhub-web: under **Apps** → **Refresh** → **Upgrade smhub-services** and **smhub-web**.
> - z2m - please update like this: go to **Console** tab and type `**curl -fsSL https://updates.smlight.tech/z2m.sh | sudo sh**`, password is `**smlight**`) - this is one-off action, Zigbee23MQTT will be moved to release on 13 December 2025)
---
## Connection options
You can use Zigbee2MQTT on SMHUB in **two ways**:
- **Option 1 (simple):**
Zigbee2MQTT connects directly to Home Assistant’s MQTT broker
- **Option 2 (advanced):**
Zigbee2MQTT uses SMHUB’s local MQTT broker, which is bridged to MQTT on Home Assistant
---
## **Option 1 – Direct Z2M connection to Home Assistant**
### What to do
- Open **SMHUB Web UI**
- Go to **Apps → Zigbee2MQTT**
Configure the following:
- **MQTT Broker URL** `mqtt:`
- **MQTT User / MQTT Password**
Use your Home Assistant MQTT credentials (often the same as Home Assistant login)
- In **Home Assistant Settings** → **Enable**
- Enable **Experimental Events**
[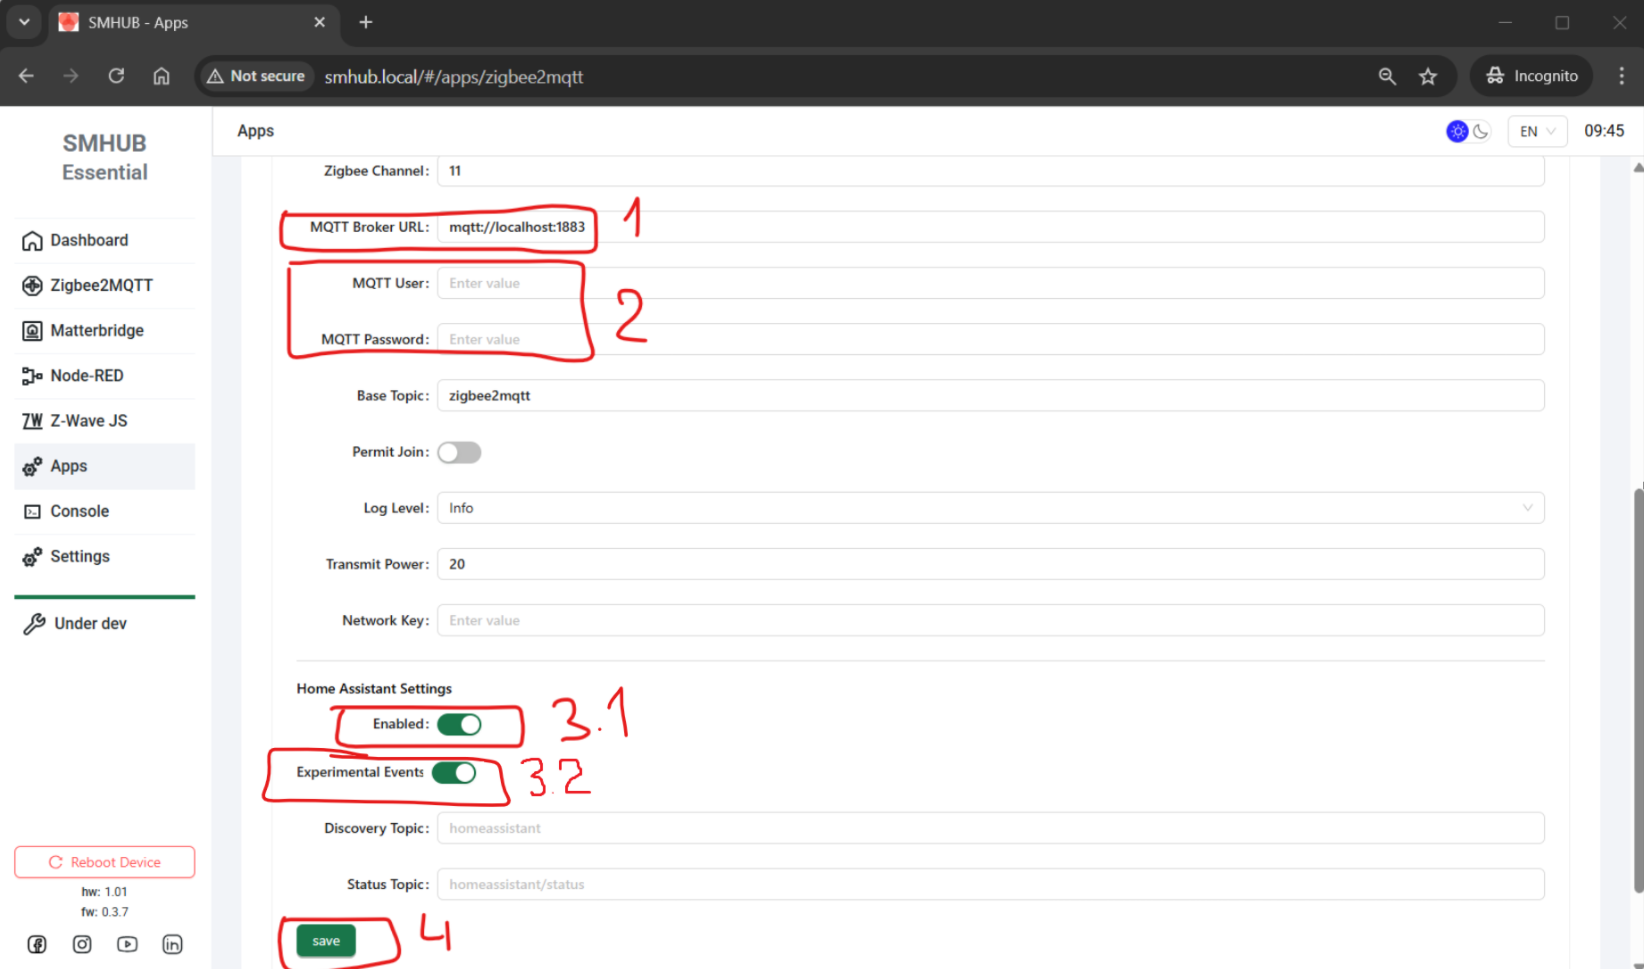](https://smlight.tech/support/manuals/uploads/images/gallery/2025-12/EfNimage.png)
Then:
- Click **Save**
- Stop and start **Zigbee2MQTT**
*(or simply reboot SMHUB)*
### Result
- Zigbee2MQTT on SMHUB connects directly to MQTT on Home Assistant
- Zigbee devices appear automatically in Home Assistant
- Multiple SMHUBs can connect to the same Home Assistant
---
## **Option 2 – Local MQTT on SMHUB with bridge to Home Assistant's MQTT**
### What to do
- Open **SMHUB Web UI**
- Go to **Apps → Zigbee2MQTT**
- Enable **Home Assistant Settings**
- Click **Save**
****[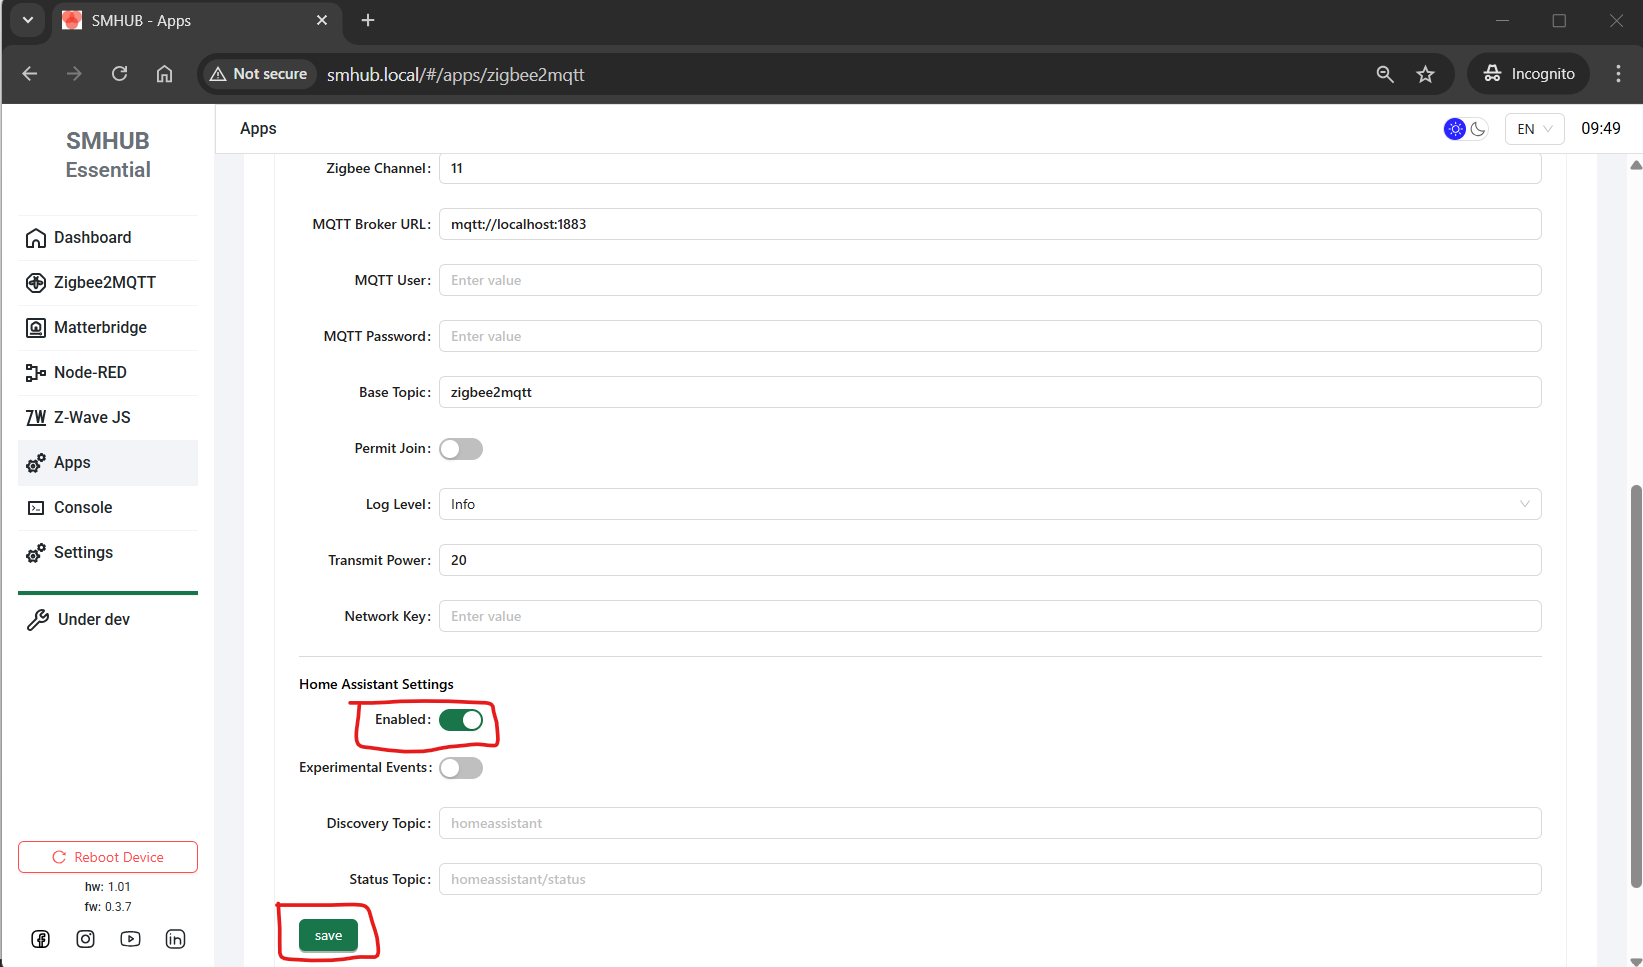](https://smlight.tech/support/manuals/uploads/images/gallery/2025-12/4Ijimage.png)****
Then configure MQTT bridge:
- Go to **Settings → MQTT**
Set the following:
- **Allow External** → Enabled. This lets the remote broker send MQTT messages to SMHUB's broker.
- **Allow Anonymous** → Enabled *(simplest option) - but be careful. You can tweak this by adding credentials and making the respective settings on the remote broker.*
- **Enable Bridge Mode** → True
Remote broker settings:
- **Remote Address** `HOME_ASSISTANT_IP:1883`
- **MQTT User / MQTT Password**
Home Assistant MQTT credentials
- **Bridge Topic** `# both 1`
[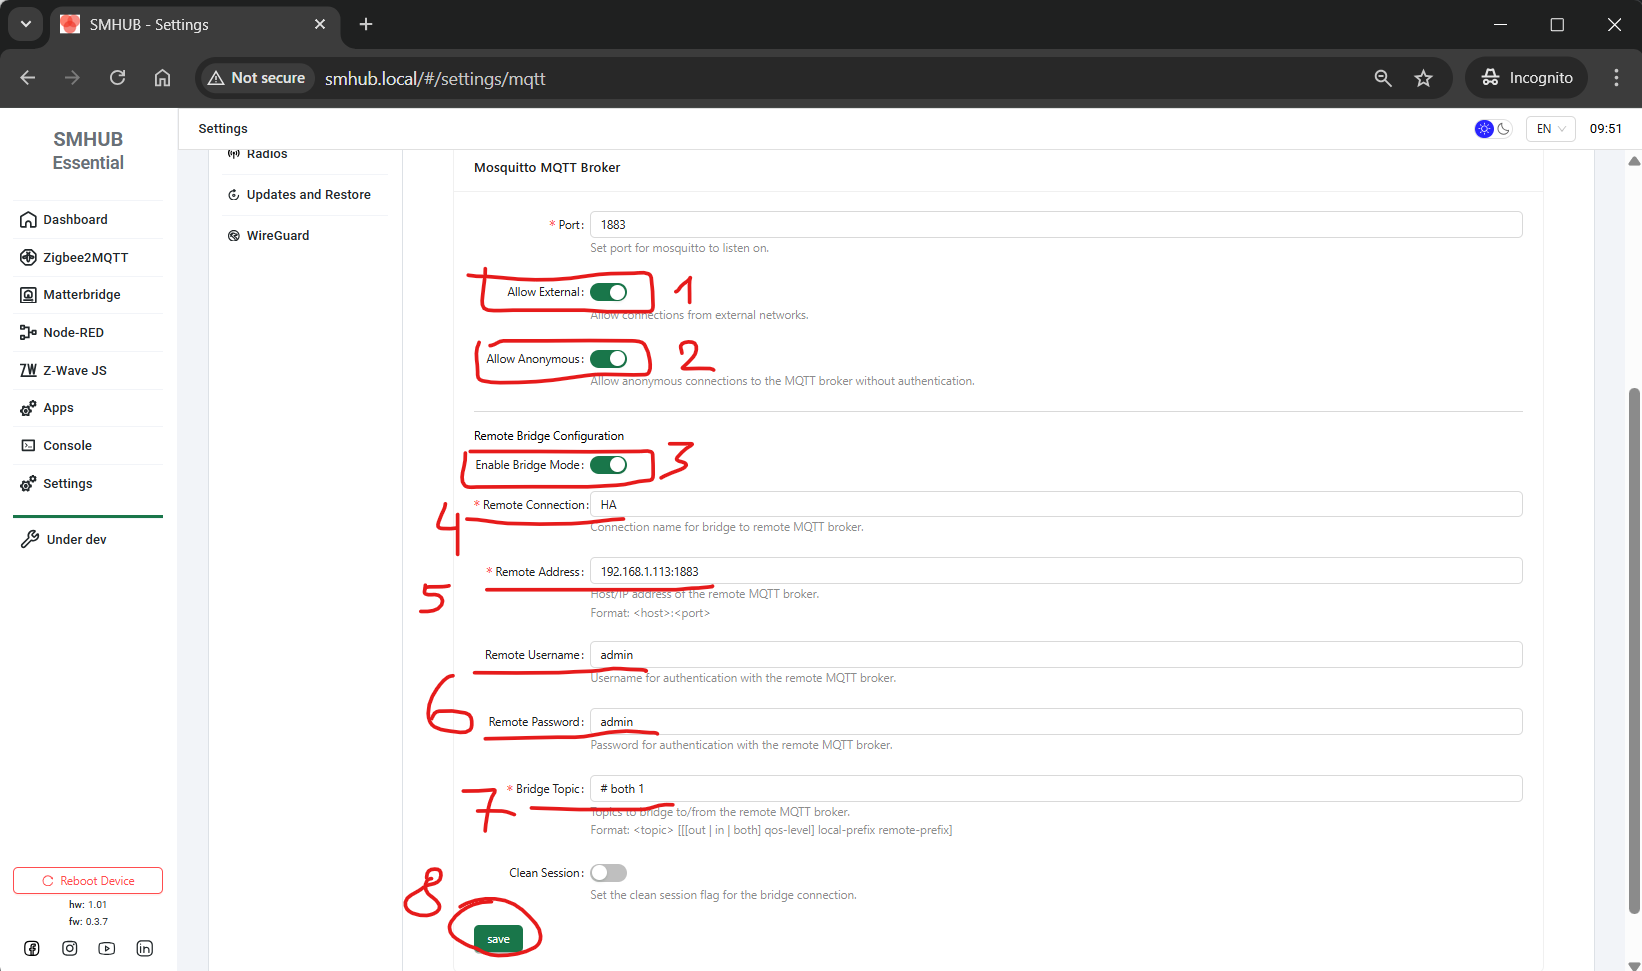](https://smlight.tech/support/manuals/uploads/images/gallery/2025-12/6zOimage.png)
Then:
- Click **Save**
- Reboot SMHUB *(recommended)*
### Result
- SMHUB keeps its own MQTT broker
- MQTT data is bridged to Home Assistant
- Zigbee devices appear in Home Assistant
- Multiple SMHUBs can connect to one Home Assistant
---
## Which option should I choose?
- Choose **Option 1** if you want the simplest and fastest setup
- Choose **Option 2** only if you need local MQTT on SMHUB
# Using SMHUB as Thread Border Router for Matter devices
This guide explains how to run an **OpenThread Border Router (OTBR)** on **SMHUB** and connect it to **Home Assistant** for **Matter-over-Thread** devices.
---
## Requirements
### Hardware
- Any **SMHUB** model (Essential, Premium, Nano, etc.)
### Firmware & apps (tested on)
- **smhub-os** ≥ **0.3.11**
- **smhub-services** ≥ **0.2.8**
- **smhub-web** ≥ **0.2.23**
- **OpenThread app** ≥ **0.3.1-2**
---
## Important note about radios
- **SMHUB Essential/Premium**:
- Use **Radio 2 (EFR32MG21 / EFR32MG24)** for Thread
- **CC26XX** is **not supported yet** for Thread *(support will be added later)*
- **SMHUB NanoMg24**
- Use Radio 1 (EFR32MG24) for Thead
---
## Prepare SMHUB for Thread
### Flash Thread firmware to the radio
Do the following in the **SMHUB Web UI**:
- Go to **Settings → Radio**
- Select **Radio mode: Thread**
- Select a **Thread firmware version**
- Click **Update**
[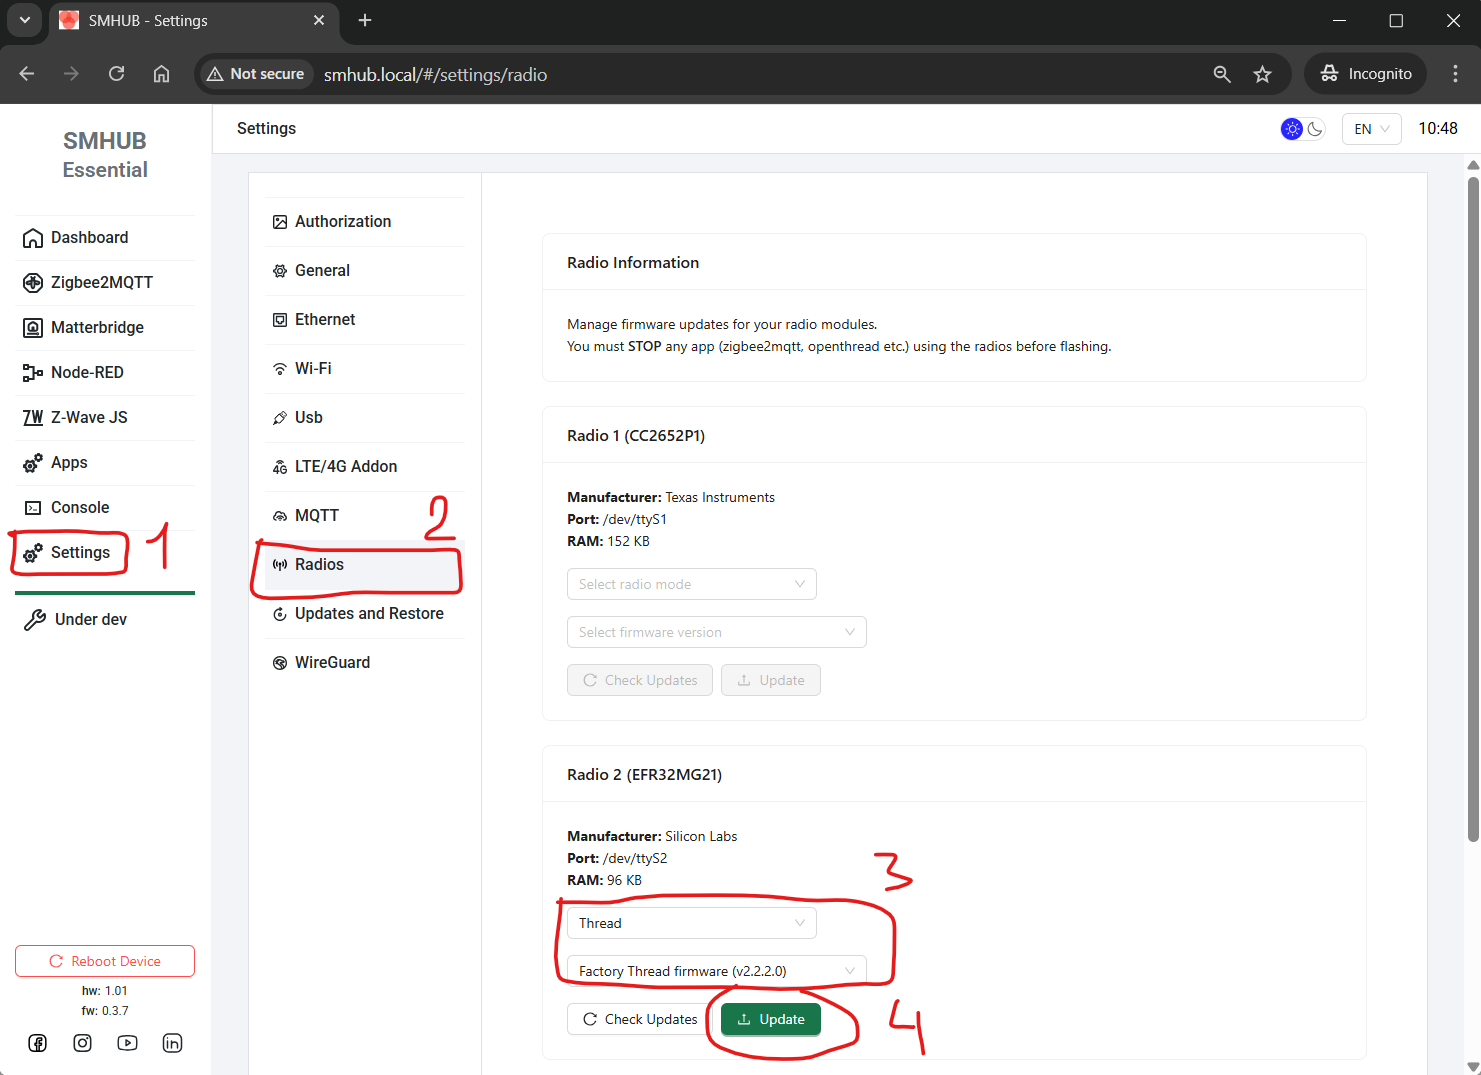](https://smlight.tech/support/manuals/uploads/images/gallery/2025-12/iKYimage.png)
✅ The radio is now prepared for Thread networks.
---
## Install and start OpenThread Border Router on SMHUB
### What to do
- Go to **Apps**
- Click **Refresh**
- Install or upgrade **Openthread Border Router**
- Latest version: **0.3.0-2**
- Enable **Start on boot**
- **Reboot** the SMHUB device or press **Stop**, wa,it until it stops, and then **Run** buttons.
[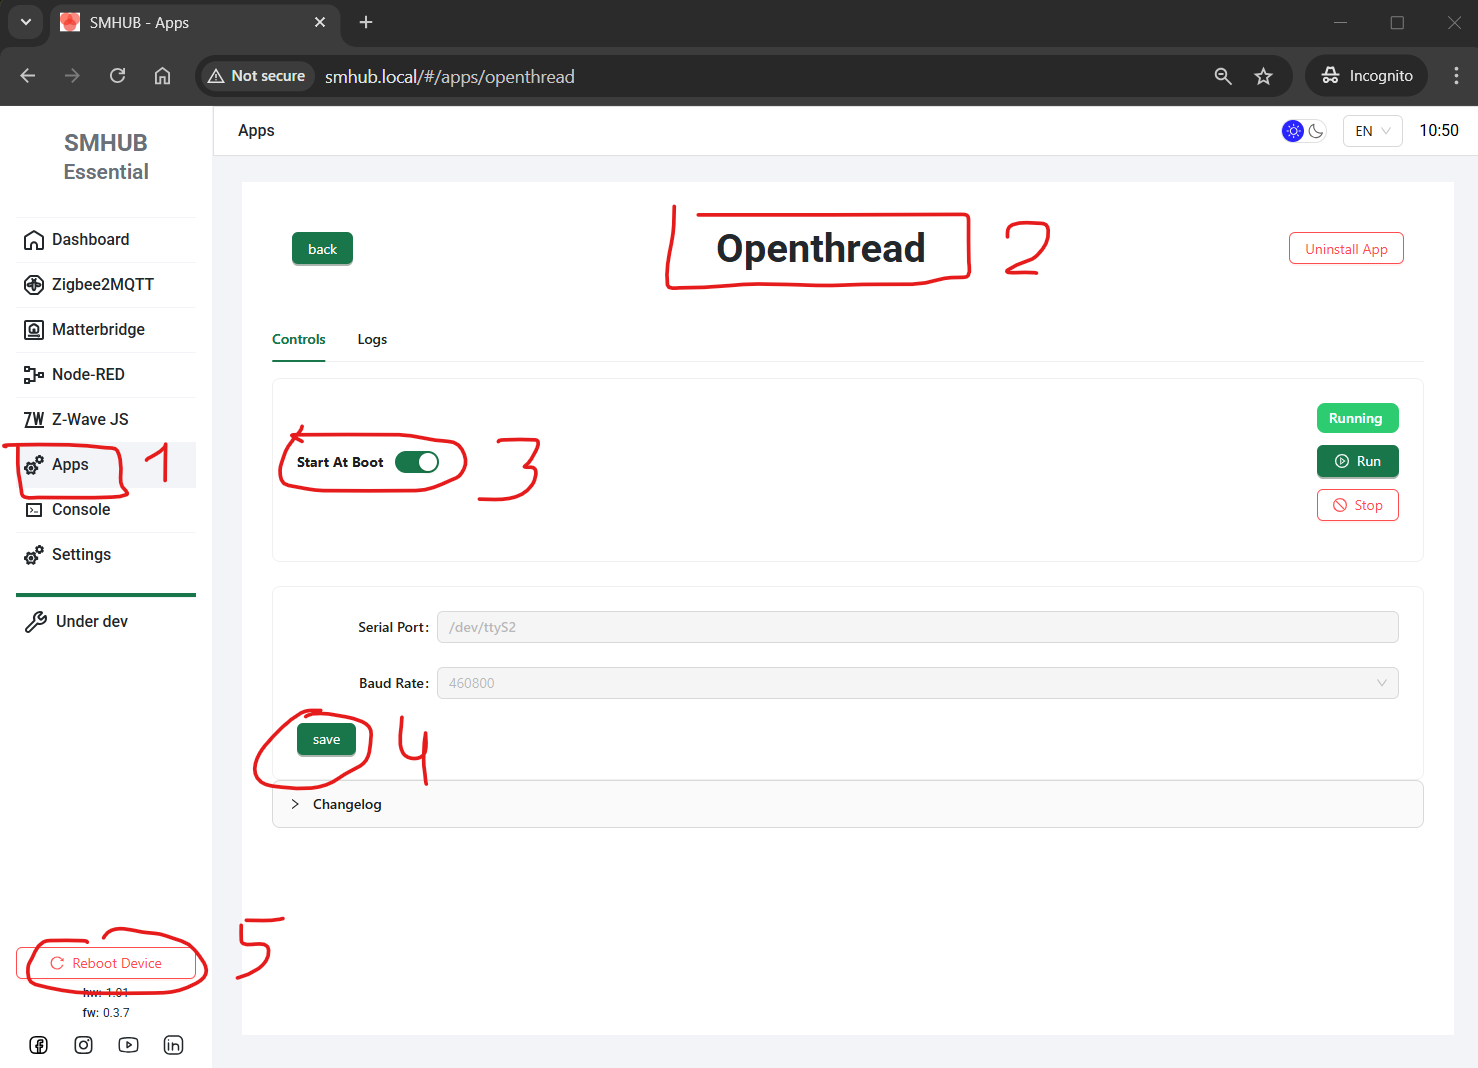](https://smlight.tech/support/manuals/uploads/images/gallery/2025-12/xpCimage.png)
After reboot or re-launching the app:
- Go to **Apps → Openthread**
- Verify that Status = **Running**
[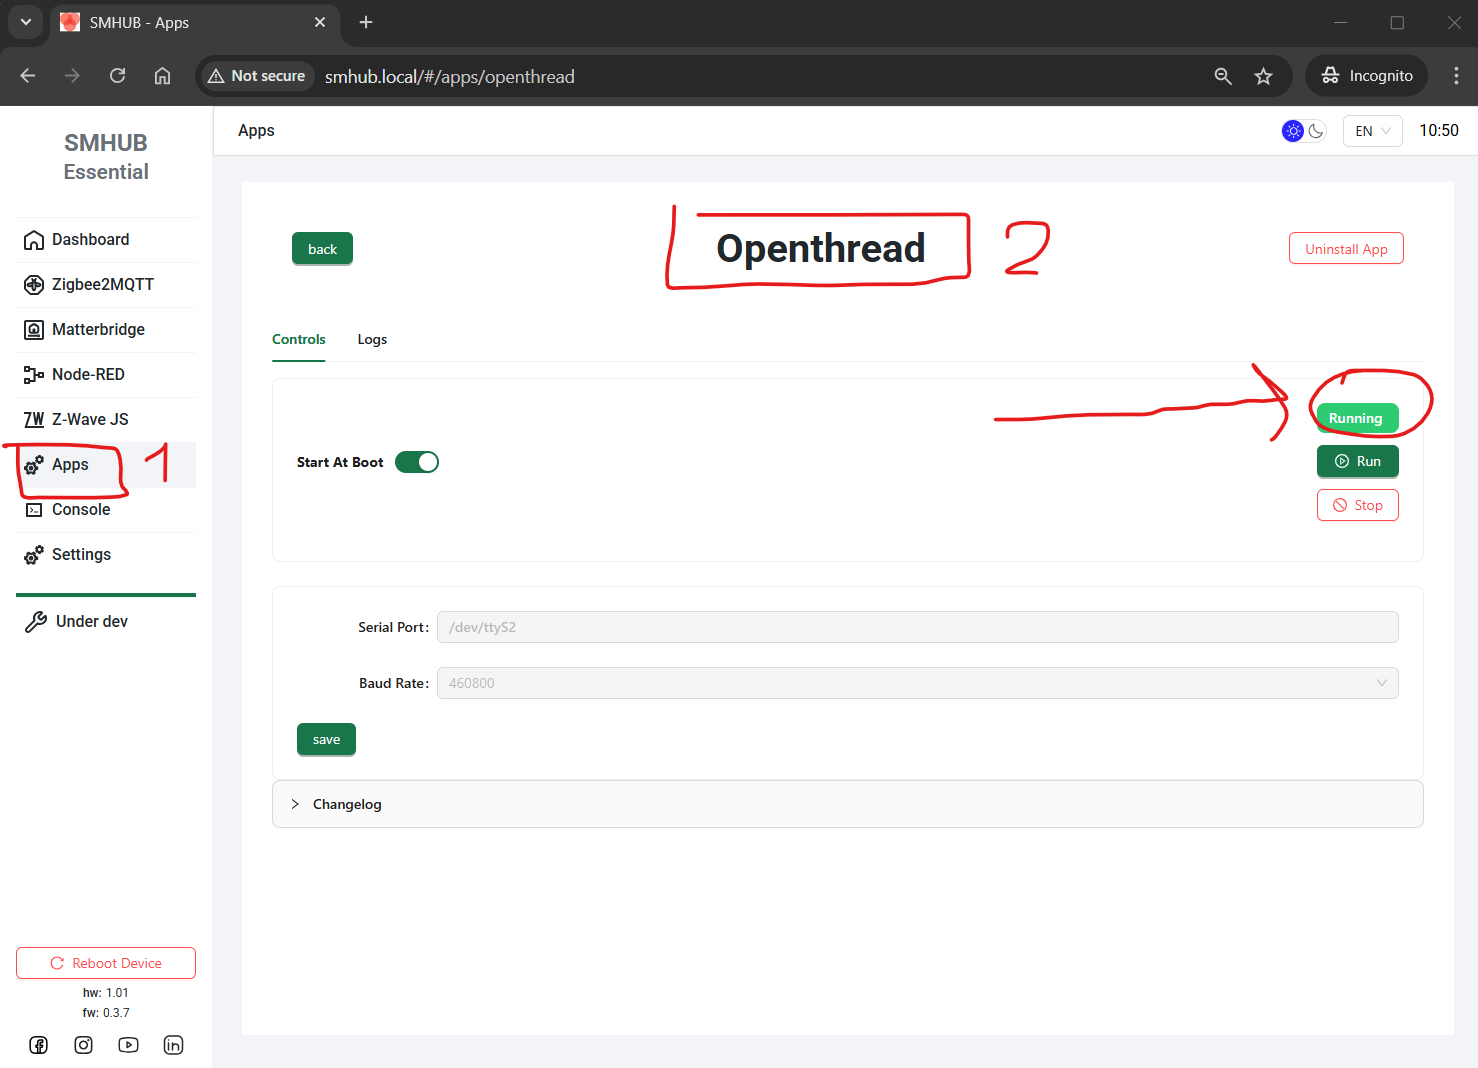](https://smlight.tech/support/manuals/uploads/images/gallery/2025-12/Mhkimage.png)
---
## Connect OpenThread Border Router to Home Assistant
### Add the integration in Home Assistant
In **Home Assistant**:
- Go to **Settings → Devices & Integrations**
- Click **Add Integration**
- Search for **OpenThread Border Router**
In the connection dialog, enter: `tcp:`
Example: `tcp:`
[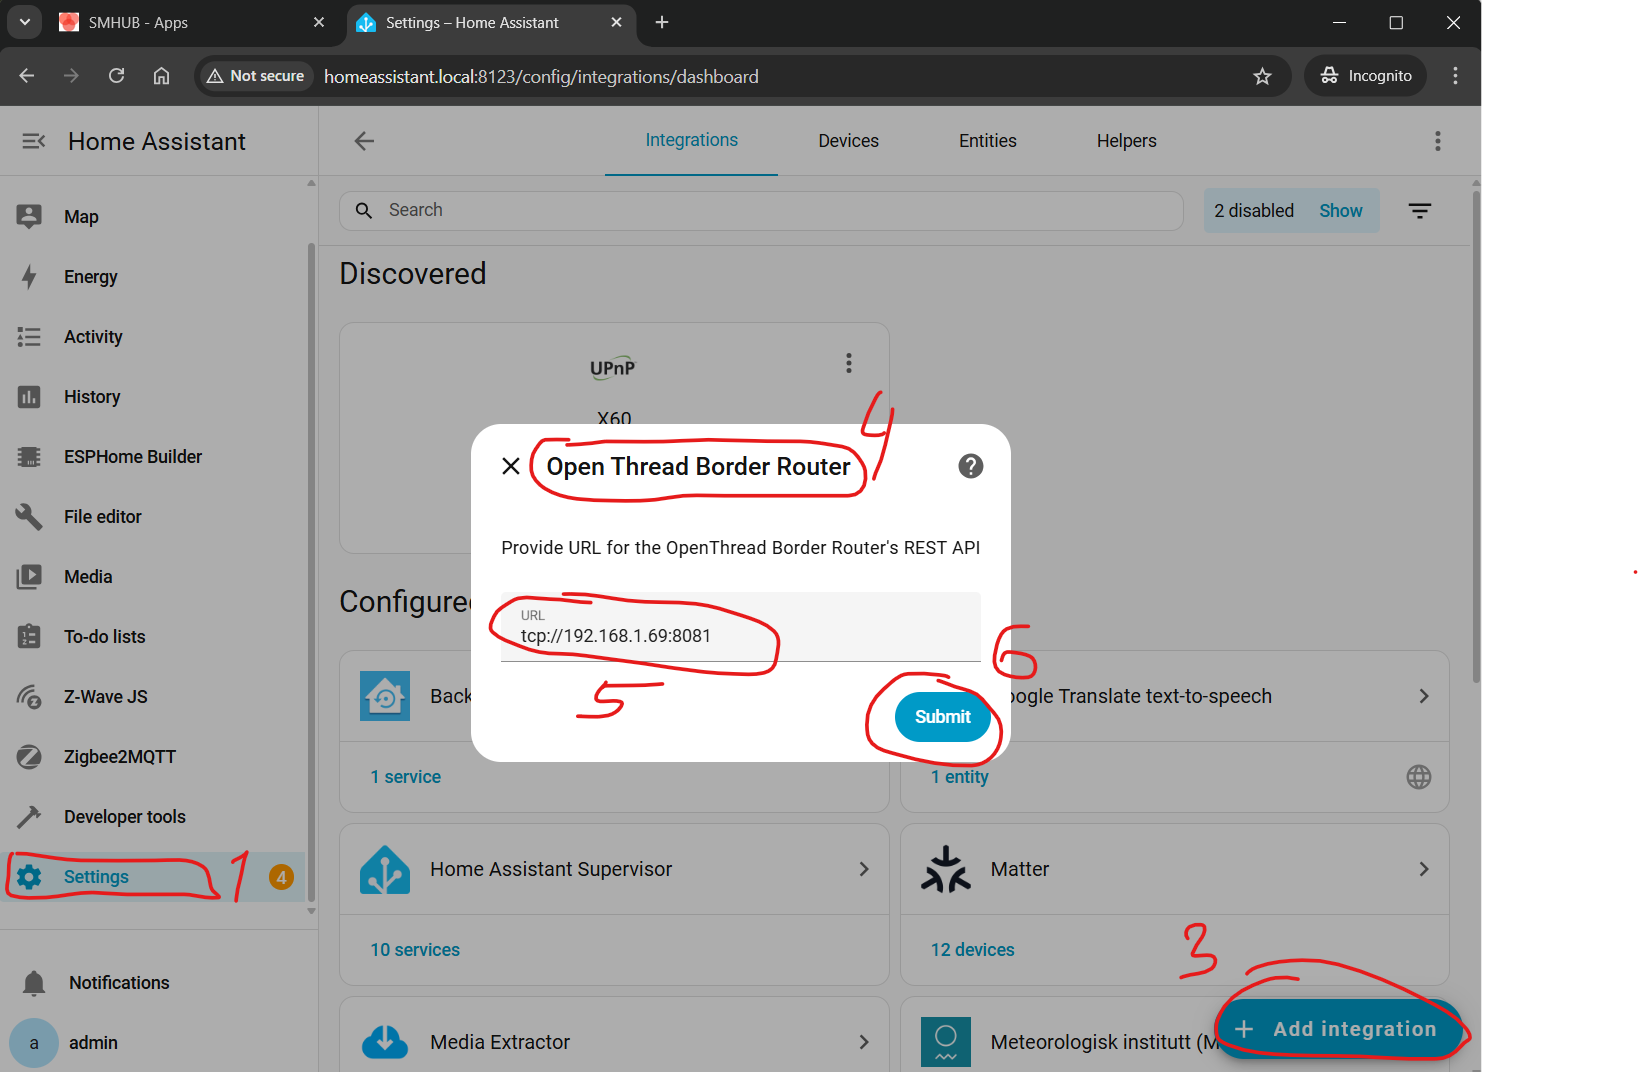](https://smlight.tech/support/manuals/uploads/images/gallery/2025-12/3uAimage.png)
- Confirm and wait for successful connection
[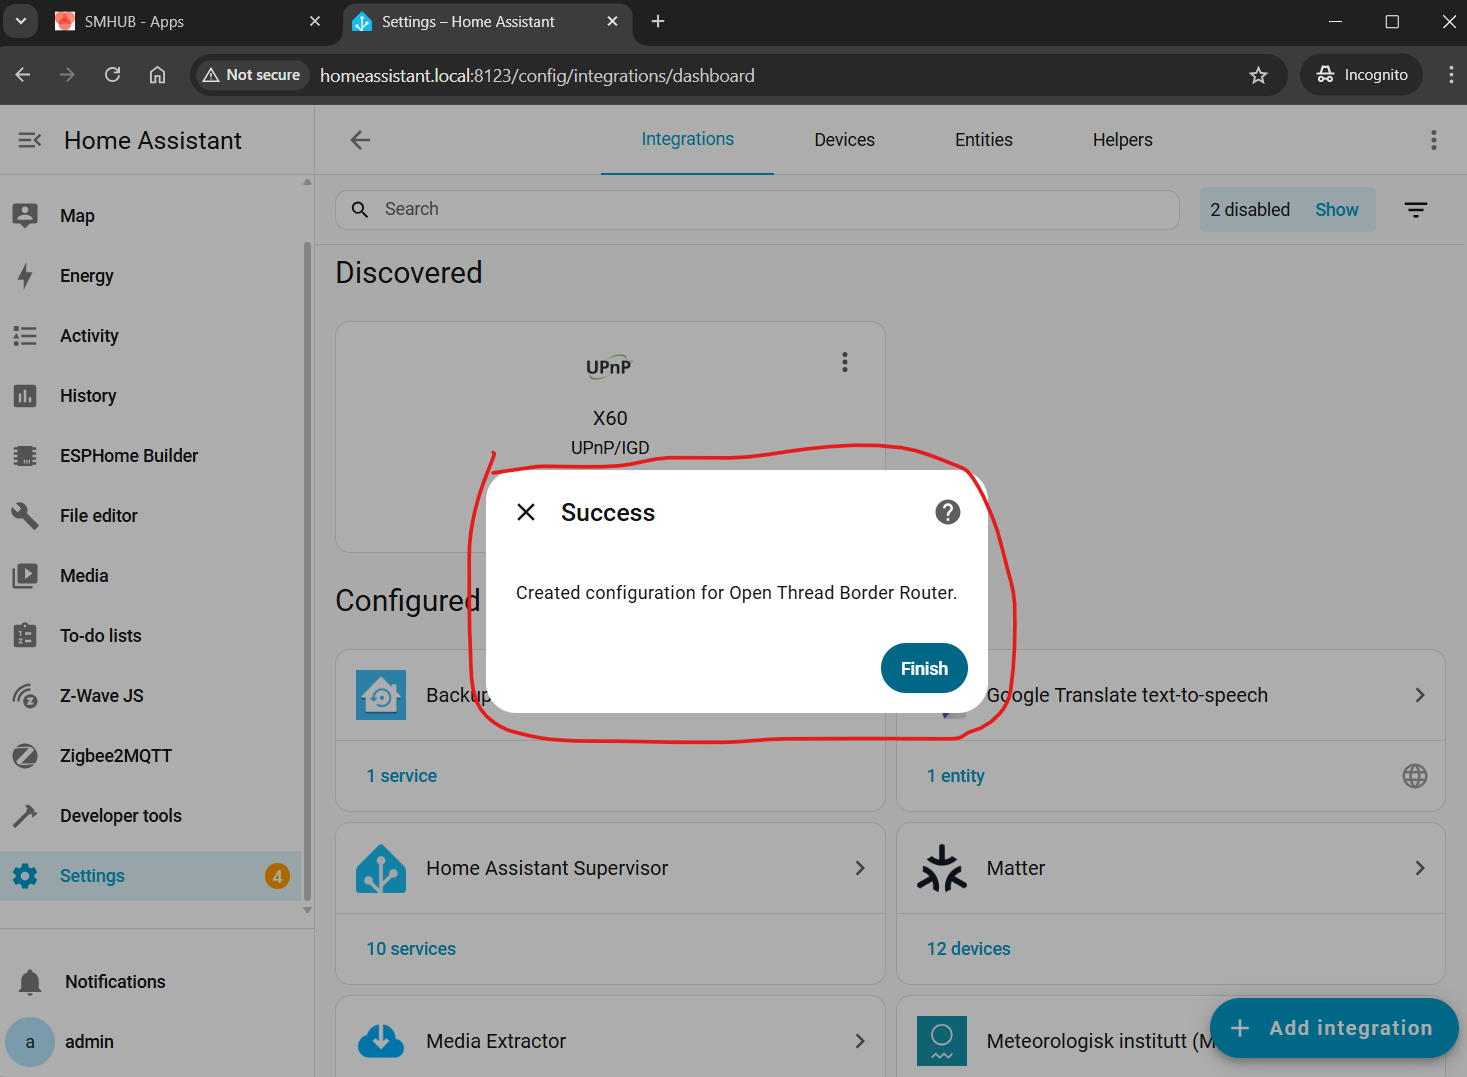](https://smlight.tech/support/manuals/uploads/images/gallery/2025-12/NzRimage.png)
---
### Verify Thread integration
- Home Assistant should automatically install the **Thread** integration
- If it does not:
- Go to **Settings → Devices & Integrations**
- Manually add **Thread** (no settings required)
[](https://smlight.tech/support/manuals/uploads/images/gallery/2025-12/mDRimage.png)
---
### Home Assistant Settings
All the information below relates to setting up a Matter-over-Thread controller (in this particular case, Home Assistant) and is outside the scope of SMHUB functionality (i.e., this is a third-party configuration topic). Therefore, the instructions below may change over time, and we do not track or maintain updates.
#### Setting Up the Matter add-on and Integration
While Thread is a physical network, to control Matter-over-Thread devices, users need to installa Matter server on Home Assistant.
1. Go to the Home Assistant interface and navigate to `Settings` > `Devices & Services`.
2. Click on `Add integration` and search for `Matter`.
3. Keep checkbox `Use the official Matter Server Supervisor add-on` and click `Submit`.
4. Wait untill installation of Matter Integration and Matter Server add-on is completed.
5. Head over to the Left panel within Home Assistant and Click `Settings` and choose `Add-ons`. Go to the Matter Server add-on. Start the Matter Server add-on. Here we would suggest as well to click both `Start on boot` and `Watchdog`.
#### Set-up and configuring the Integrations
1. Thread Integration – click `Configure` and make sure you have `OpenThread Border Router` under `Preferred network` line, and it contains an icon with key+phone.
[](https://smlight.tech/support/manuals/uploads/images/gallery/2026-01/ftZimage.png)
2. If not, do the following:
- click three dots on the right to `OpenThread Border Router`, choose `Add to preferrede network`.
- Under the preferred network now, click again three dots on the right to `OpenThread Border Router`, and choose `Use router for Android + iOS credentials`.
#### Reboot your Home Assistant server
1. Once all Home Assistant components are installed, we reccomend to reboot your Home Assistant server.
## Result
- SMHUB is running an **OpenThread Border Router**
- Home Assistant is connected to it
- Your system is ready for **Matter-over-Thread** devices
---
## Pairing Matter-over-Thread devices
### Pre-set up your phone
This paragraph is an extended version of the official documentation Home Assistant: https://www.home-assistant.io/integrations/thread/#to-make-home-assistant-your-first-thread-network
1. Install `Home Assistant` App on your Android phone from the Play Store. At the time of this video, we were unable to pair a Matter-over-Thread device via iPhone.
2. Install `Google Home` app from the Play Store. It is recommended by `Home Assistant` developers and we were not able to pair our Thread devices without installed Google Home app.
3. Open `Home Assistant` app and sync it with your Home Assistant server. Your phone and Home Assistant server should be in the same Wi-Fi network.
4. In the app, go to `Settings` – `Companion app` -> Click `Troubleshooting` and click `Sync Thread Credentials`.
5. Wait until the message `Home Assistant and this device use the same network`. If you see another message, namely `Added network from Home Assistant to this device` – You need to click on `Sync Thread Credentials` again until you get that message about the same network.
6. If you are not getting my message `Home Assistant and this device use the same network` - try to reset your Google Play Services (remove all data, usually by App settings -> Erase data -> Clear All Data, but names depend on the smartphone model).
### Adding the Matter Device
1. With the Matter integration set up, grab your Matter device and Android smartphone. Make sure Bluetooth is enabled on your phone.
2. Open the Home Assistant app and navigate to `Settings` > `Devices & Services` -> `Devices` Tab.
3. Click the `+ ADD DEVICE` button at the bottom right part of the screen to add a device, choose `Add Matter device`.
4. Follow the on-screen instructions in the app. You'll likely need to scan a QR code located on your Eve Energy socket or enter the pairing code manually. We did it with QR-code scanning.
5. Home Assistant app on your phone can as which app to open? Select `other` and then `Home assistant`.
6. The app will guide you through pairing the device with your Thread network. It should pass through this satuses:
- Connecting to device...
- Generating Matter credentials...
- Connecting device to network...
- Checking netwoek connectivity...
- Connecting device to Home Assistant...
- Device connected!
7. Note:
- If a Matter-over-Thread end-device has been powered up for a long time, it may require a reset of device to put back into pairing mode.
- In case you have Google home devices (Nest hub) and experiances issues with pairing, try to turn them off before starting OpenThread Border router add-on on your Home Assistant and your Home Assistant app.
### Verifying Connection and Control
1. Once the pairing is complete, head back to the Home Assistant interface. You should see your Eve Energy socket listed on your `Dashboard` or under the `Devices` section .
[](https://smlight.tech/support/manuals/uploads/images/gallery/2026-01/uKOimage.png)
2. Click on the device to access its controls. You should be able to turn the socket on and off remotely within the Home Assistant interface.
**Congratulations**! You've successfully connected your Matter-over-Thread device to Home Assistant using the OpenThread Border Router and Matter Integrations. Now you can enjoy the benefits of Matter's secure and interoperable smart home ecosystem, connected via SMHUB.
## OTBR Safe Reflash Procedure (Type-C)
**Important:** Reflashing SMHUB via Type-C may wipe OTBR (Thread) data. If you don’t back it up, you will most likely need to **re-pair all Thread/Matter devices** again.
### Recommended Safe Steps
1. **Stop OTBR app**
- Go to **Apps → OTBR**
- Click **Stop**
2. **Backup OTBR database**
- Open **Console**
- Backup the OTBR data folder:
- `/var/lib/thread/*`
3. **Re-flash OS**
- Reflash SMHUB using **Type-C** as usual.
4. **Restore OTBR database**
- After the OS is reflashed, restore the backup to:
- `/var/lib/thread/*`
### ⚠️ What happens if you skip backup?
If OTBR data is lost during reflash, you will likely need to:
- reset OTBR configuration
- **pair all Thread devices again** (Matter/Thread network rebuild)
# Tailscale set-up
## Tailscale on SMHUB (Quick Setup Guide)
**Applies to all SMHUB models:** Professional, Essential, Nano Mg24
**Tested with:**
- SMHUB-OS **v0.3.10**
- smhub-services **v0.2.7**
- smhub-web **v0.2.23**
- Tailscale app **v1.78.1-2**
---
### 1. Install Tailscale
- Open **Apps**
- Install the **Tailscale** app
---
### 2. Start Tailscale (Optional: Enable Autostart)
- Go to **Apps → Tailscale**
- Click **Run**
- *(Optional)* Enable **Start on boot** if you want Tailscale to start automatically after reboot
---
### 3. Authenticate Device
In **Console**, run: `sudo /opt/bin/tailscale up`
The system will print a login URL (for example): `https:`
Open the link in your browser and authorize the device.
---
### 4. Connect Another Device
- Install Tailscale on your PC
- Log in with the **same account**
- Authorize the device
Once both devices are in the same tailnet, they can communicate securely.
---
### Notes
- Authentication is **interactive** (browser required)
- After authorization, the terminal is no longer needed
- Tailscale reconnects automatically on reboot
- No port forwarding or firewall changes required
# Change IEEE address on SMHUB radio
## EFR32 IEEE Address change
**Minimum firmware requirements for this change**:
- smhub-os: 0.3.11 (prod) or 0.9.3 (dev)
- smhub-services: 0.2.8-1
- smhub-web: 0.2.24-1
1. **Stop all applications using the EFR32 SoC**, including internal apps on SMHUB (e.g. Zigbee2MQTT) or any external applications if the EFR32 is used remotely (for example, Zigbee2MQTT running on another server).
2. Open **SMHUB-OS Console** (main Menu, tab Console).
3. Run the command below (replace the IEEE address `00124b1209d43d4f` if needed):
**SMHUB Nano Mg24**:
`universal-silabs-flasher --device /dev/ttyS1 write-ieee --ieee 00124b1209d43d4f`
**SMHUB Essential/Premium**:
`universal-silabs-flasher --device /dev/ttyS2 write-ieee --ieee 00124b1209d43d4f`
4. Wait until the EFR32 SoC is detected and the IEEE address is written.
5. Confirm the operation by checking the output.
```bash
INFO Probing ApplicationType.EZSP at 115200 baud
INFO Detected ApplicationType.EZSP, version: 8.0.2.0
INFO Current device IEEE: ec:f6:4c:ae:fe:21:ae:12
INFO Wrote new device IEEE: 00:12:4b:12:09:d4:3d:4f
```
[](https://smlight.tech/support/manuals/uploads/images/gallery/2026-02/image-2026-02-03-16-12-57.png)
6. Should work without a restart, but if not, please reboot with a power cycle (e.g., power off from the power and then power it on).
## CC26xx IEEE Address change
**Minimum firmware requirements for this change**:
- smhub-os: 0.3.11 (prod) or 0.9.3 (dev)
- smhub-services: 0.2.9-1
- smhub-web: 0.2.24-1
1. **Stop all applications using the CC26xx chip**, including internal apps on SMHUB (e.g. Zigbee2MQTT) or any external applications if the CC26xx is used remotely.
2. Open **SMHUB-OS Console** (main Menu, tab Console).
3. Choose the required operation and run **one** of the commands below depending on the variant you have:
| **SMHUB Essential, SMHUB NanoP7** (CC2652X SoC) | **SMHUB Premium** (CC2674X SoC) |
| **Set IEEE only** (works only if custom IEEE is blank, e.g. custom IEEE never set before):
**Set IEEE and flash firmware** (can change IEEE even if already set):
where `znp.hex` is a CC firmware file.
| **Set IEEE only** (works only if custom IEEE is blank, e.g. custom IEEE never set before):
**Set IEEE and flash firmware** (can change IEEE even if already set):
where `znp.hex` is a CC firmware file.
|
4. Wait until flashing completes and verify that the operation finished without errors.
5. If required by your SMHUB-OS version, add the correct bootloader reset option:
- **SMHUB-OS 0.9.x**
- **SMHUB-OS 0.3.x**
The IEEE address is stored permanently on the CC26xx chip.
Always ensure the IEEE address is **unique** within your Zigbee network.
# SMHUB Peripheral (IR, Buzzer, Ambilight) Control Guide
# 🎛️ SMHUB Peripheral Control Guide
**IR • Buzzer • WS2812 (Ambilight)**
This page documents how to control SMHUB peripherals via CLI (recommended) and IPC (advanced).
---
## 🌈 WS2812 LED Control (Ambilight)
**Daemon:** `smhub-ambilight-daemon`
**CLI:** `smhub-ambilightctl`
**Socket:** `/run/smhub-ambilight.sock`
### CLI Commands
#### Turn LEDs Off
```
smhub-ambilightctl off
```
#### Set Solid Color
```
# RGB
smhub-ambilightctl color 255 0 0
# RGB + brightness
smhub-ambilightctl color 255 0 0 128
```
**Parameters:** R/G/B (0–255), optional brightness (1–255).
#### Start an Effect
```
# Effect only (defaults)
smhub-ambilightctl effect breathe
# Effect + RGB
smhub-ambilightctl effect breathe 0 255 0
# Effect + RGB + brightness + speed
smhub-ambilightctl effect breathe 0 255 0 128 -S 100
```
**Effects:** `blink`, `breathe`, `wipe`, `chase`, `theater`, `rainbow`
#### Trigger Notification Preset
```
# Default TTL
smhub-ambilightctl notify success
# Custom TTL (ms)
smhub-ambilightctl notify error 500
```
**Presets:** `booting`, `boot_success`, `success`, `error`, `warn`, `busy`, `pair`, `update`, `button_feedback`
#### Set Global Brightness
```
smhub-ambilightctl brightness 128
```
#### Night Mode
```
# Enable (default dim cap)
smhub-ambilightctl night on
# Enable with custom dim cap
smhub-ambilightctl night on 30
# Disable
smhub-ambilightctl night off
```
#### Status & List
```
smhub-ambilightctl status
smhub-ambilightctl list
```
---
## 📡 IR Control (Infrared)
**Daemon:** `smhub-ir-daemon`
**CLI:** `smhub-irctl`
**Socket:** `/run/smhub-ir.sock`
### CLI Commands
#### Status
```
smhub-irctl status
```
#### Learn a Command
```
# Learn with default timeout
smhub-irctl learn tv_power
# Learn with custom timeout (seconds)
smhub-irctl -t 20 learn ac_mode
```
#### Send a Saved Command
```
smhub-irctl send tv_power
```
#### One-shot Capture (No Save)
```
smhub-irctl receive
```
#### List / Delete Commands
```
smhub-irctl list
smhub-irctl delete tv_power
```
#### Send Raw Data
```
smhub-irctl send_raw /tmp/ir_data.json
```
#### Use Custom Socket Path
```
smhub-irctl -s /run/smhub-ir.sock status
```
---
## 🔔 Buzzer Control
**Daemon:** `smhub-buzzer-daemon`
**CLI:** `smhub-buzzerctl`
**Socket:** `/run/smhub-buzzer.sock`
### Built-in Sounds
- `click`
- `success`
- `startup`
- `shutdown`
- `warning`
- `error`
### CLI Commands
#### Play Built-in Sound
```
smhub-buzzerctl play builtin success
smhub-buzzerctl play builtin warning -p 8
```
#### Play RTTTL Melody
```
smhub-buzzerctl play rtttl "Melody:d=4,o=5,b=120:c,d,e,f,g"
```
#### Stop Playback
```
smhub-buzzerctl stop
smhub-buzzerctl stop -q # stop + clear queue
```
#### Mute / Unmute
```
smhub-buzzerctl mute 5
smhub-buzzerctl mute 5 -m 300 # mute for 5 minutes
smhub-buzzerctl unmute
```
#### Status & List
```
smhub-buzzerctl status
smhub-buzzerctl list
```
---
## 🧩 Advanced: IPC JSON via Unix Sockets
All peripherals support newline-delimited JSON over a Unix socket. Use this for automation scripts or integrations.
### Ambilight (example)
```
echo '{"cmd":"color","r":255,"g":0,"b":0}' | socat - UNIX-CONNECT:/run/smhub-ambilight.sock
```
### IR (example)
```
echo '{"cmd":"status"}' | socat - UNIX-CONNECT:/run/smhub-ir.sock
```
### Buzzer (example)
```
echo '{"cmd":"list"}' | socat - UNIX-CONNECT:/run/smhub-buzzer.sock
```
---