SLZB-07/Px/MGx
USB coordinators SLZB-07x series
Zigbee2MQTT setup
Prerequisites:
- SLZB-07x Zigbee USB coordinator.
- Computer or Raspberry Pi where Zigbee2MQTT or Home Assistant with ZHA will run.
- Home Assistant + ZHA or Zigbee2MQTT software installed.
Steps:
- Install Zigbee2MQTT
Follow the installation instructions for Zigbee2MQTT based on your system: https://www.zigbee2mqtt.io/guide/installation/ - Connect the Zigbee USB Coordinator:
Plug the SLZB-07x Zigbee USB coordinator into an available USB port on your computer or Raspberry Pi - Configure Zigbee2MQTT:
– Open the Zigbee2MQTT configuration file (usually located at /opt/zigbee2mqtt/data/configuration.yaml or similar).
– Find the section related to the coordinator configuration:
Configuration for SLZB-07/MGx
serial:
  port: /dev/ttyUSB0 # Specify the correct serial port for your coordinator
  rtscts: true
  adapter: ember
Some SLZB-07 dongles may have adapter: ezsp from facrory, you can update dongle to use ember
Configuration for SLZB-07pX
serial:
  port: /dev/ttyUSB0 # Specify the correct serial port for your coordinator
  rtscts: false
  adapter: zstack
– Ensure that the port matches the serial port where your coordinator is connected. The port might be different based on your system.TIP:
For homeassistant: Go to "Settings" → "System" → "Hardware" → Select the 3 dot menu in the upper right corner → "All Hardware" → Scroll to "ttyUSB" and find your adapter → Copy Device path like "/dev/serial/by-id/usb-*"
For linux: list USB devices via command: ls /dev/ttyUSB* - Start Zigbee2MQTT Service:
Start or restart the Zigbee2MQTT service to apply the changes made to the configuration file. - Pairing Devices:
Once Zigbee2MQTT is running and configured with the coordinator, you can start pairing Zigbee devices:
– Put your Zigbee devices (sensors, bulbs, etc.) into pairing mode according to their respective instructions.
– Use Zigbee2MQTT’s interface or command-line tools to initiate the pairing process. Follow the Zigbee2MQTT documentation for the specific commands or steps required. - Device Control and Monitoring:
After successfully pairing your devices, you can control and monitor them using Zigbee2MQTT’s interface or via MQTT messages, depending on your setup.
Additional Resources:
- Zigbee2MQTT Documentation: The official Zigbee2MQTT documentation provides detailed guides, troubleshooting tips, and a list of compatible devices https://www.zigbee2mqtt.io/
Device update
Update using the web tool
SLZB-07/MGx:
- Go to https://smlight.tech/flasher/
- Press Update SLZB-07 Firmware button
- Select SLZB-07x/MGx dongle serial port
- Wait for connection
- Select firmware (Coordinator/Router/Thread)
- Flash firmware
If you get an error:
- Unplug your coordinator
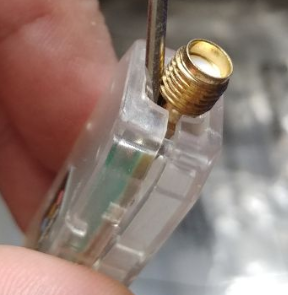
- Open enclosure
- Connect pad FLSH with the GND or any metal part of the antenna (you can use tweezers or scissors)
- Plug the coordinator to your PC (keep FLSH connected to the GND)
- Run flashing
TIP: You can insert a screwdriver near the antenna to make it easier to disassemble the case.

SLZB-07pX:
- Go to https://smlight.tech/flasher/
- Press Update SLZB-07pX Firmware button
- Select SLZB-07pX dongle serial port
- Wait for connection
- Select firmware (Coordinator/Router/Thread)
- Flash firmware
If you get error:

- Refrash page
- Click on Update SLZB-07pX Firmware button again
Update using third-party tools
Flashing via Home Assistant addons
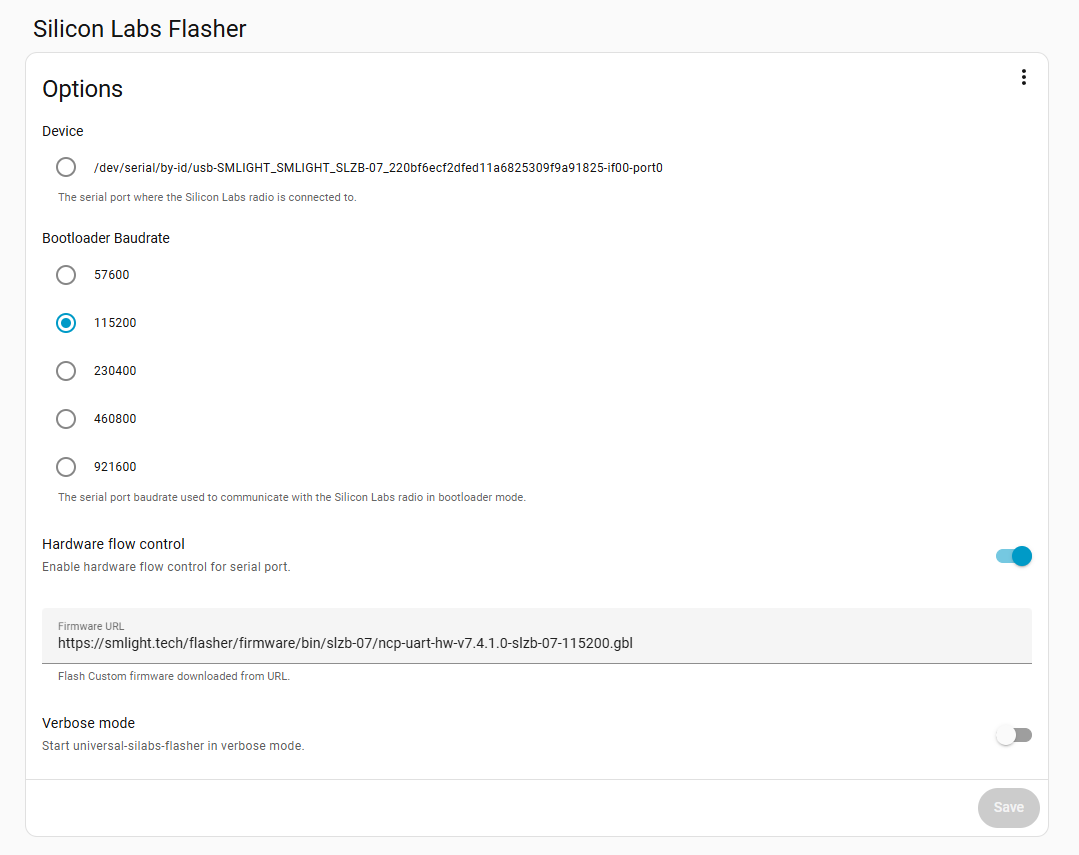
SLZB-07/MGx; https://github.com/home-assistant/addons/tree/master/silabs_flasher
Example config:
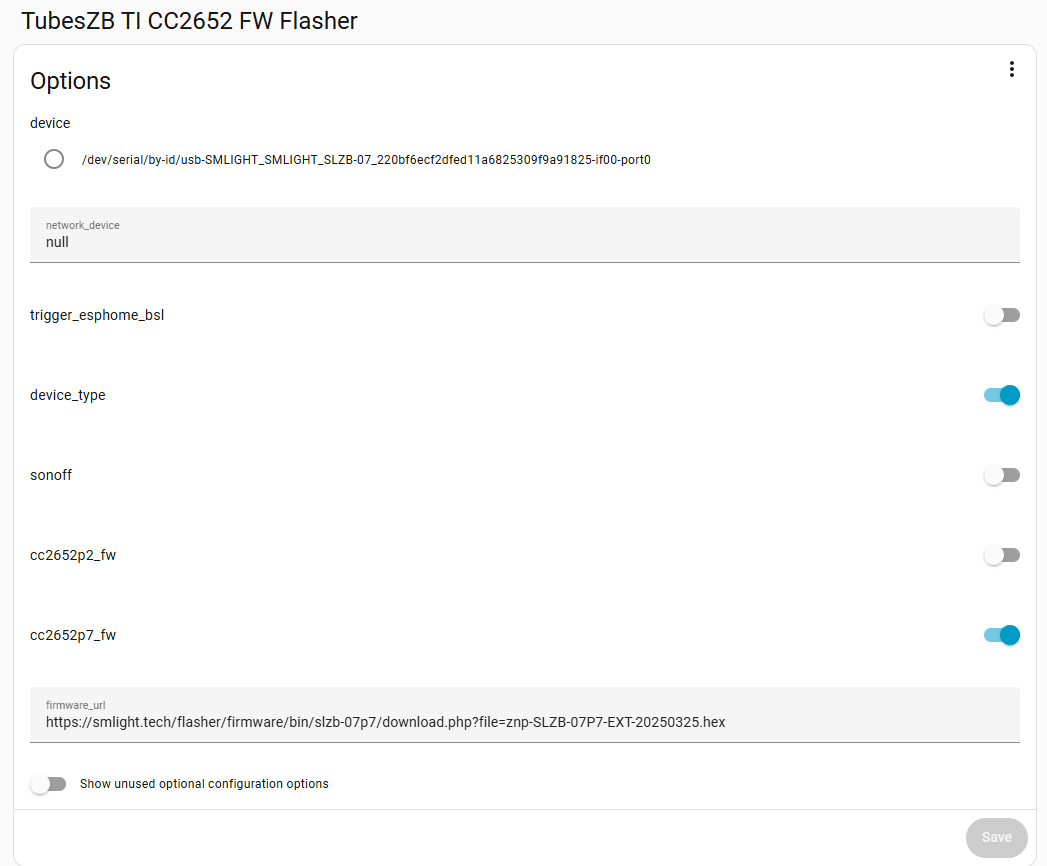
SLZB-07Px: https://github.com/tube0013/tubeszb_addons/tree/main/tzb-cc2652-flasher/
Example configuration:
Community firmware
SLZB-07/MGx
- https://github.com/darkxst/silabs-firmware-builder/tree/main/firmware_builds
- https://github.com/Nerivec/silabs-firmware-builder/releases
SLZB-07P7
- https://github.com/Koenkk/Z-Stack-firmware/releases
Please use CC1352P7_coordinator_* firmware for SLZB-07P7!
Incorrect firmware can brick your device!
SLZB-07P10
Sorry, there is no community firmware at this time.
Zigbee Router mode
General information:
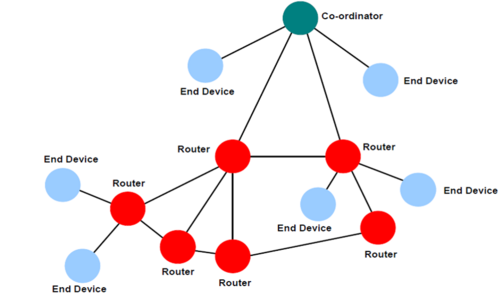
USB stick in Zigbee router mode expands your existing Zigbee network:
- amplifies the signal
- increases the maximum number of devices in the network by 32
Important: you need to pair the stick to your Zigbee network for it to start working as Zigbee router
Configuring device as Zigbee router
Flashing router firmware
- Go to https://smlight.tech/flasher/
- Select your model
- Press Update Firmware button
- Select dongle serial port
- Wait for connection
- Enable pairing in your Zigbee network
- Select firmware (Router)
- Flash firmware
- Immediately after the update, the device will start searching for the network, so it is important that the network is open at this moment.
Manuall pairing activation
If after flashing the device did not pair or you need to pair the device in another location, you can do this!
SLZB-07/MGx:
- Go to https://smlight.tech/flasher/
- Select your model
- Press Router reconnect button
- If that didn't work:
1. Download any serial terminal (e.g. terra term)
2. Connect the dongle to the PC
3. Open the dongle COM in the terminal at 115200 baurate
4. Send network leave
SLZB-07Px:
- Go to https://smlight.tech/flasher/
- Select your model
- Press Router reconnect button
- If that didn't work: repeat step "Flashing router firmware"
Troubleshooting
Сoordinator does not detect the dongle
- Make sure your ZigBee network is open
- Make sure the dongle is within range of your ZigBee network
- Activate pairing on the dongle manually
The dongle appears offline after a while
This may not be true. Z2M marks ZigBee devices as offline if they do not report anything for a long time, but the router firmware has nothing to report (the device does not have any sensors) so the system may mark it as offline.
If the device is truly offline, all devices that were connected through it will become unavailable.
If the device offline then the most likely reason is that it is outside the coverage area of your Zigbee network.
Thread setup
Addon setup
- Flash the Thread firmware. Please follow this manual for device update instructions https://smlight.tech/support/manuals/books/slzb-07pxmgx/page/device-update
- Install the OTBR addon into your Home Assistant OS (HAOS)

If your HA is installed in docker you can try this docker container https://hub.docker.com/r/bnutzer/otbr-tcp - Complete the settings:
In the "Device" option, select the serial port of your dongle.
In the "Baudrate" option, select 460800.
- For SLZB-07/Mg24/MG26
Hardware flow control: ENABLED
- For SLZB-07p7/p10
Hardware flow control: DISABLED - Run the addon

System setup
Setting Up the Matter add-on and Integration
- Go to the Home Assistant interface and navigate to
Settings>Devices & Services. - Click on
Add integrationand search forMatter. - Keep checkbox
Use the official Matter Server Supervisor add-onand clickSubmit. - Wait untill installation of Matter Integration and Matter Server add-on is completed.
- Head over to the Left panel within Home Assistant and Click
Settingsand chooseAdd-ons. Go to the Matter Server add-on. Start the Matter Server add-on. Here we would suggest as well to click bothStart on bootandWatchdog.
Set-up and configuring the Integrations
- Now, let's install the required integration:
ThreadandOpenThread Border Router. - Go back to the Home Assistant interface and navigate to
Settings>Devices & Services. - Basically, all two should be autodiscovered so you just need to configure them. If they are not, click on
Add integrationand search for them there. - OpenThread Border Router – no configurations, just add.
- Thread Integration – click
Configureand make sure you haveOpenThread Border RouterunderPreferred networkline, and it contains an icon with key+phone. If not, do the following:
- click three dots on the right to
OpenThread Border Router, chooseAdd to preferrede network. - Under the preferred network now, click again three dots on the right to
OpenThread Border Router, and chooseUse router for Android + iOS credentials.
- Start the add-on. Here we would suggest as well to click both
Start on bootandWatchdog.
Reboot your Home Assistant server
- Once all Home Assistant components are installed, we reccomend to reboot your Home Assistant server.
Pre-set up your phone
- Install
Home Assistantapp on your Android phone from Play store. At the time of this video, we were unable to pair Matter-over-Thread device via iPhone. - Install
Google Homeapp from Play store. It is recommended byHome Assistantdevelopers and we were not able to pair our Thread devices without installed Google Home app. - Open
Home Assistantapp and sync it with your Home Assistant server. Your phone and Home assistant server should be in the same Wi-Fi network. - In app, go to
Settings–Companion app-> ClickTroubleshootingand clickSync Thread Credentials. - Wait until message
Home Assistant and this device use the same network. If you see another message, namelyAdded network from Home Assistant to this device– you need to click onSync Thread Credentialsagain, until you get that message about the same network. - If you are not getting message
Home Assistant and this device use the same network- try to reset your Google Play Services (remove all data, usually by App settings -> Erase data -> Clear All Data, but namings depend on the smartphone model).
Adding the Matter Device
- With the Matter integration set up, grab your Matter device and Android smartphone. Make sure Bluetooth is enabled on your phone.
- Open the Home Assistant app and navigate to
Settings>Devices & Services->DevicesTab. - Click the
+ ADD DEVICEbutton at the borrom right part of the screen to add a device, chooseAdd Matter device. - Follow the on-screen instructions in the app. You'll likely need to scan a QR code located on your Eve Energy socket or enter pairing code manually. We did it with QR-code scanning.
- Home Assistan app on your phone can as Which app to open? Select
otherand thenHome assistant. - The app will guide you through pairing the device with your Thread network. It should pass through this satuses:
- Connecting to device...
- Generating Matter credentials...
- Connecting device to network...
- Checking netwoek connectivity...
- Connecting device to Home Assistant...
- Device connected!
- Note:
- If a Matter-over-Thread end-device has been powered up for a long time, it may require a reset of device to put back into pairing mode.
- In case you have Google home devices (Nest hub) and experiances issues with pairing, try to turn them off before starting OpenThread Border router add-on on your Home Assistant and your Home Assistant app.
Verifying Connection and Control
- Once the pairing is complete, head back to the Home Assistant interface. You should see your Eve Energy socket listed on your
Dashboardor under theDevicessection . - Click on the device to access its controls. You should be able to turn the socket on and off remotely within the Home Assistant interface.
Congratulations! You've successfully connected your Matter-over-Thread device to Home Assistant using the OpenThread Border Router and Matter Integrations. Now you can enjoy the benefits of Matter's secure and interoperable smart home ecosystem.
TIP:
You can refer to the Home Assistant documentation for Matter and Thread for more troubleshooting steps https://www.home-assistant.io/integrations/thread/