Restore and Updating
SMHUB OS - Update & Restore Methods
Your SMHUB can be updated or restored in three different ways:
-
OTA (recommended) – simple updates directly from the Web Interface
-
Type-C Cable – full recovery if the device doesn’t boot via computer
-
SD-Card – full recovery if the device doesn’t boot without copmuter (more reliable)
Below is a quick overview to help you choose the right method 👇
🟢 1. Regular Update — OTA (Over-the-Air)
The easiest and safest method for normal updates.
How:Web Interface → Settings → Updates & Restore → Check for Updates
What happens:
SMHUB downloads and installs the newest version automatically.
✅ Simple — no cables, no drivers
✅ Keeps your data and settings
⚠️ Works only if your system boots normally
⚡ 2. Restore via Type-C Cable
Good when OTA fails, if you need a clean reinstall, or if you want a quick setup without dealing with command-line environments.
How: Connect SMHUB to your PC via Type-C → Download and run the standalone smhub-flasher → Click to flash.
✅ Zero Configuration: No terminal commands or manual environment setups required.
✅ Always Up-to-Date: The interface automatically fetches and downloads the latest online images directly.
✅ Visual Feedback: Shows real-time progress right on your PC screen.
⚠️ Connection Requirements: Ensure you use a high-quality data cable and that your system detects the USB device.
💡 Alternative: If this fails or you prefer a different route, check the SD-Card method below.
⚠️ IMPORTANT: If the flashing process does not start, please disconnect POE and other Add-ons (4G/Z-Wave).
💽 3. Restore via SD-Card (Full Recovery Method)
Use this if your SMHUB is “bricked” or not responding at all.
How:
Copy 3 files (emmc.img, fip.bin, partition_gpt.xml) to a FAT32 SD card → insert into SMHUB → power on → wait ~5 min → power off → remove card → power on again
https://smlight.tech/support/manuals/books/smhub/page/updaterestore-using-sd-card
✅ Works even if device doesn’t boot
✅ No drivers, no software, no cables
✅ Visible progress - just wait patiently
⚠️ Remove SD before next boot (otherwise it will flash again)
IMPORTANT: If the flashing process does not start, please disconnect POE and other Add-ons (4G/Z-Wave)
🧭 Which method should I use?
| Situation | Best Option |
|---|---|
| Regular update | OTA |
| OTA failed or system unstable | Type-C Cable |
| Device won’t start / “bricked” | SD-Card |
In short:
🔹 Use OTA for normal updates.
🔹 Use Type-C if you need to reinstall.
🔹 Use SD-Card to fully recover a non-booting device.
Update/Restore using Type-C
Flashing over Type-C
SMHUB Flasher
Starting with SMHUB OS v1.0.0.dev4, you can use the SMHUB Flasher—our standalone graphical installer for Windows, macOS, and Linux. Head over to the Smhub-flasher Releases page to download it. The GUI offers a seamless, click-to-flash experience that eliminates the need for terminal commands or manual environment setups, and it automatically downloads the latest online images for you.
🎥 Video Walkthrough Introduction
🛠️ Legacy Manual Method (Older Versions Only)
The guide and video walkthrough below apply only if you are flashing older versions prior to v1.0.0.dev4.
Image Compatibility: Newer firmware images (v1.0.0.dev4 and above) use an updated format that is entirely incompatible with legacy tools in the below guide. Do not attempt to use the manual guide below on the latest images, as the flashing process will fail.
Before you begin, we highly recommend watching the video walkthrough — it shows the entire flashing process from start to finish in real time. In the video, you’ll see exactly what happens on screen and on the SMHUB device
(The link below opens the official SMLIGHT demonstration video.)
https://www.youtube.com/watch?v=XBcEmG1pJnw

⚙️ What You’ll Do
-
Download the ZIP file with firmware
-
Unzip it
-
Install the driver
-
Open CMD as Administrator
-
Go to the folder with
flash.bat -
Run
flash.bat -
Only then connect SMHUB to the PC
-
Wait for flashing to finish
-
Wait for first boot (LED cues)
🚫 Before You Start
You’ll need:
-
Windows 10 or 11 PC with administrator access (we did tests on Win11)
-
USB-C data cable (not just charging)
-
The firmware ZIP file (from the link below)
Do NOT:
-
Connect the SMHUB before starting
flash.bat -
Skip the driver installation
-
Run CMD without Administrator rights
🔴 Common user errors:
Connecting SMHUB before
flash.batstartsNot installing the driver
Not running CMD as Administrator
1) Download the factory firmware file
-
Click the firmware link latest prod:os_v0.9.9 , dev: os_v1.0.0.dev3 (previous: os_v0.3.11 | os_v0.3.10 | os_v0.3.7) and save the ZIP file to your computer (e.g.,
Downloads). - PLEASE NOTE: Sometimes version 0.3.0 (or older versions) cannot be flashed on certain devices (the pattern is not yet identified). However, users can recover by following this process: first flash v0.1.2, and then update to v0.3.x on top of it.
0.1.2 is located here: https://updates.smlight.tech/firmware/smhub/os/smhub_os_v0.1.2.zip
2) Unzip the archive
-
ight-click the ZIP file → Extract All… → choose a simple path (e.g.,
C:\SMHUB\firmware\)
(Avoid paths with non-Latin characters or very long names.) -
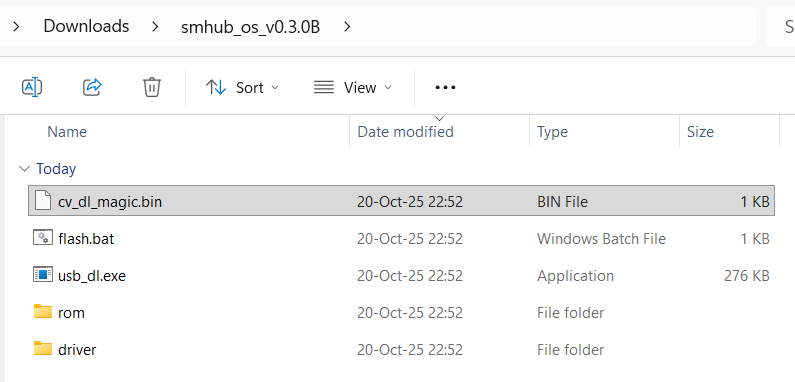
You should now see these files/folders inside the extracted directory:
-
driver\smhub-driver.exe -
rom\emmc.img -
rom\fip.bin -
rom\partition_gpt.xml -
usb_dl.exe -
flash.bat -
cv_dl_magic.bin
-
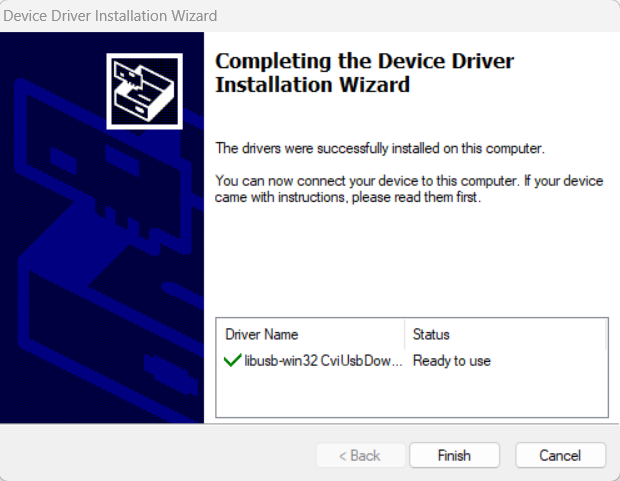
3) Install the driver
-
Open the
driverfolder. -
Double-click
smhub-driver.exe. -
Complete the installation wizard. Allow the installer in Windows security prompts if shown.
-
When it says Finished, close the installer.
If Windows asks for permission to install device software, click Install.

4) Open Command Prompt as Administrator
-
Press Win key, type cmd.

-
Right-click Command Prompt → Run as administrator.

- The title bar must say Administrator: Command Prompt.

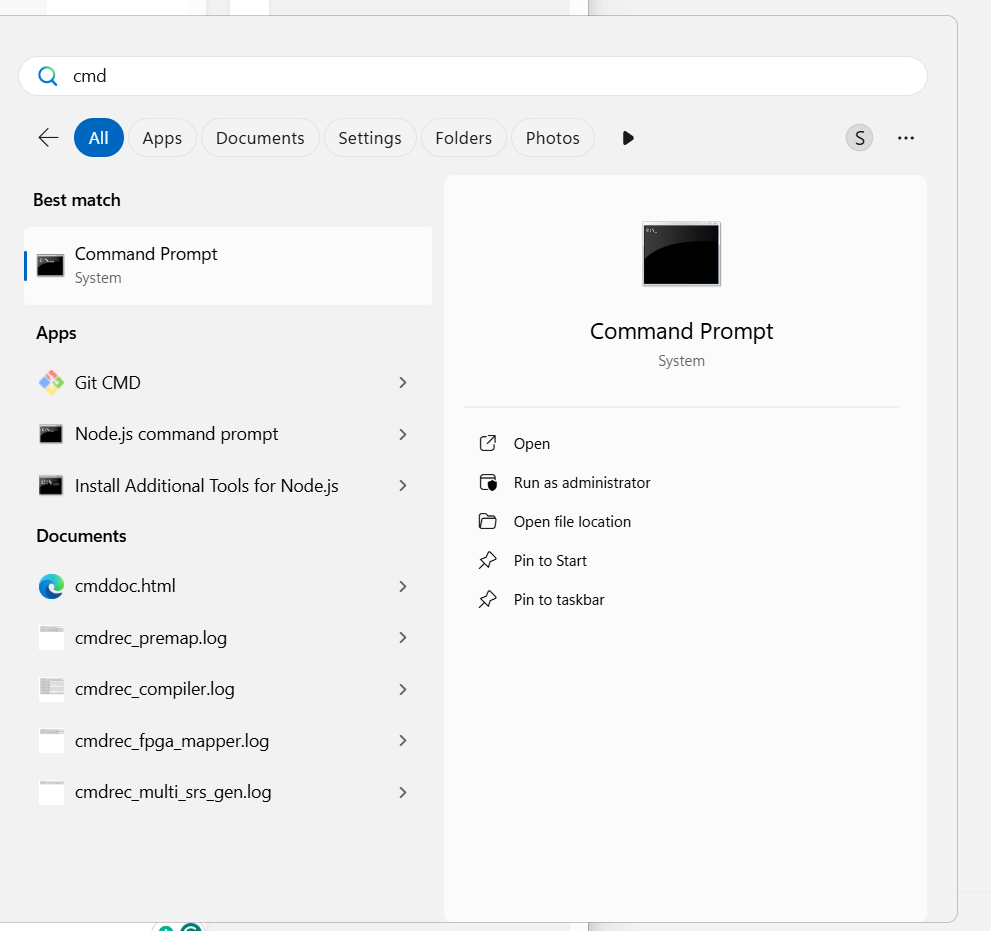
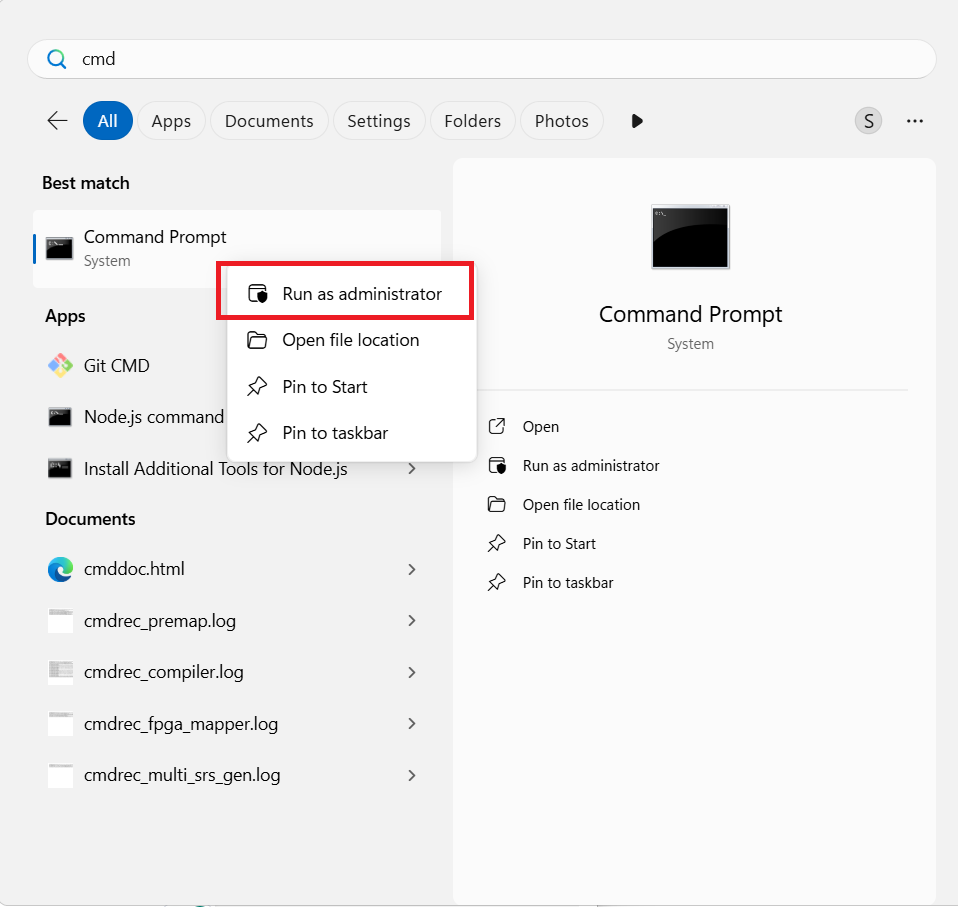
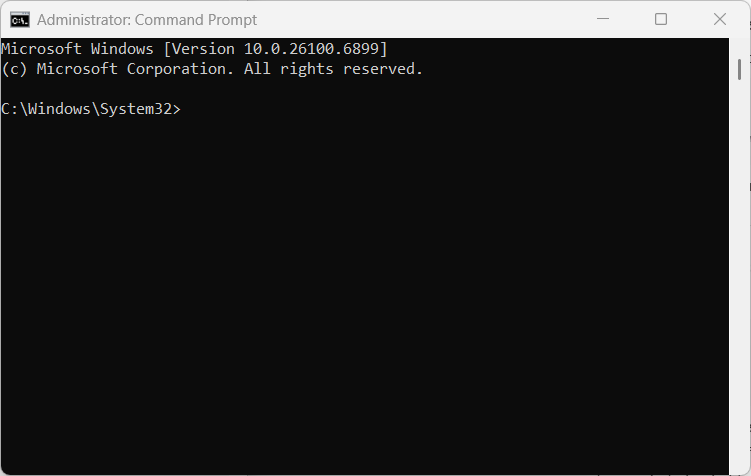
You’ll know it’s correct if the window title says Administrator: Command Prompt.
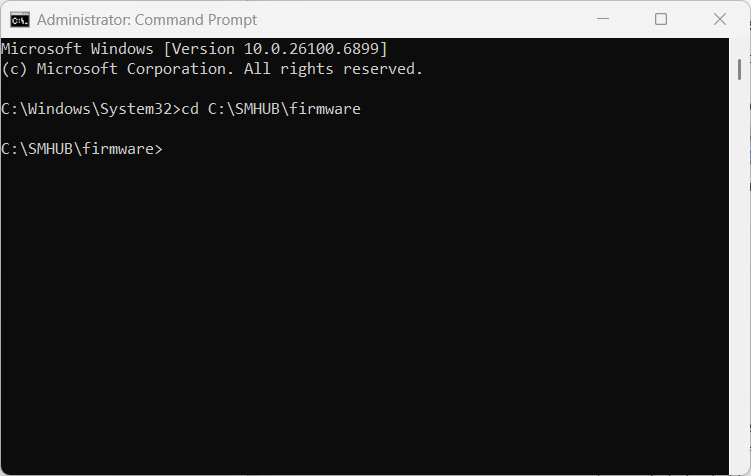
5) Go to the extracted folder
In the admin CMD, change directory to the folder with flash.bat. For this purposes, type cd C:\SMHUB\firmware and press Enter.
Hint: if your path is long for typing, copy it, and in CMD enter cd + do right click. This will insert Clipboard content into CMD window.
6) Start the flashing script
Important: Do not connect the SMHUB yet. The script need to be run first.
Run: flash.bat
By typing this command flash.bat and pressing Enter button.
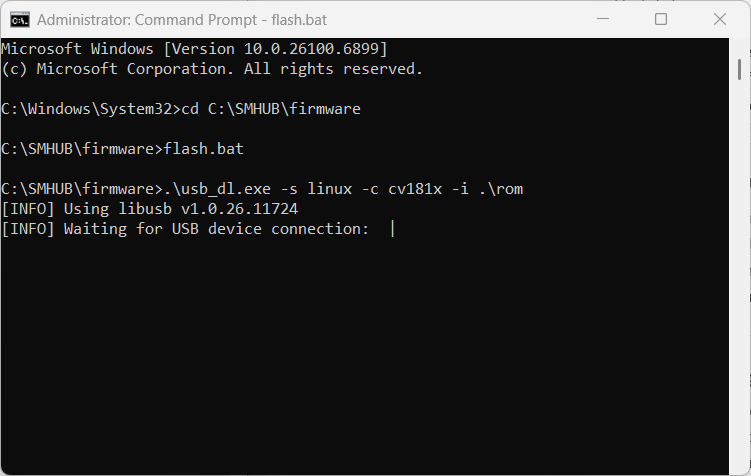
7) Now connect the SMHUB
When flash.bat is running, connect SMHUB to the PC via USB-C (Type-C port on the back of SMHUB, near Ethernet port)
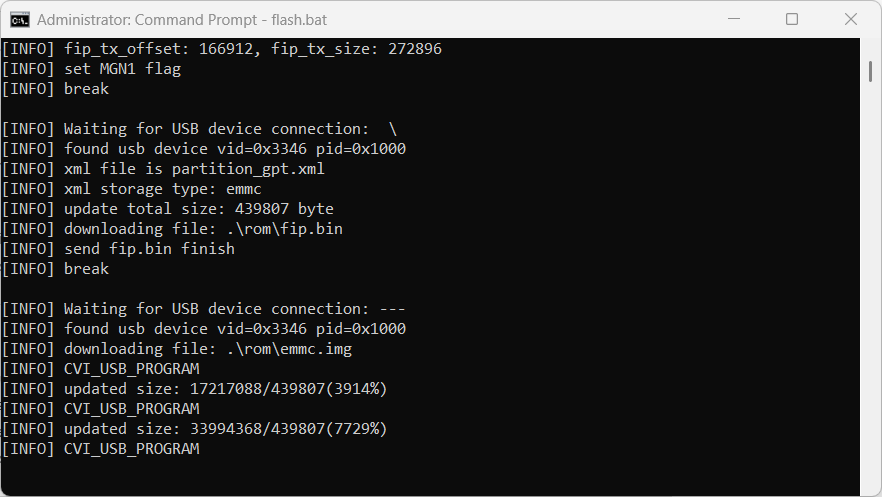
The script will detect the device and begin flashing automatically. You’ll see progress output in the CMD window.
If nothing happens for ~a while, try another USB port or USB-C cable, but keep the script running while you reconnect the cable.
8) Wait for “Flashing completed” (script finishes)
-
When the script completes, it will show a success message and return to the prompt or close.

-
You can now safely disconnect the SMHUB from the PC and power it normally (via its regular power supply), or leave USB-C connected if it provides power.

8-b) IF THE FLASHING PROCESS DOES NOT START
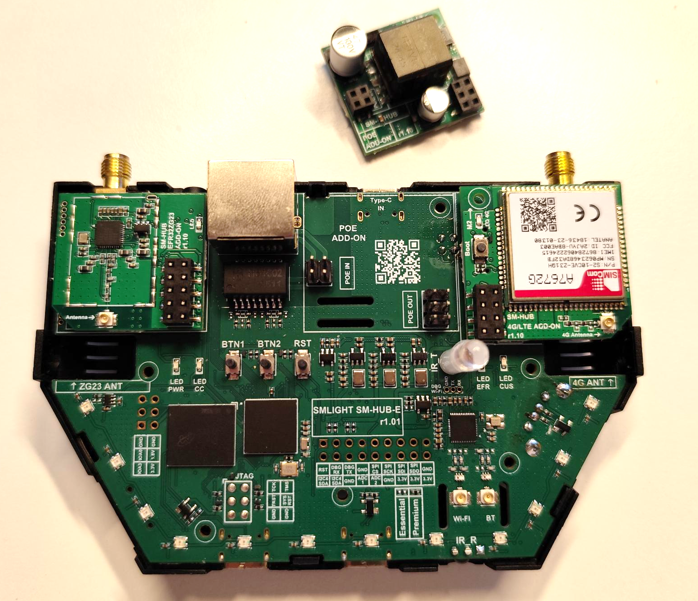
In some cases, removing the PoE add-on may help to start the flashing process successfully. If your device does not start flashing using either the Type-C or SD-Card method, please follow the steps below:
-
Open the enclosure (no screwdrivers are required, as the enclosure is screwless).
-
Physically disconnect the PoE add-on.

- To be even more secure, please remove 4G and Z-Wave addons if you have them installed.
-
Start the flashing process again.
Try to boot without the add-on first. Once the device flashes and boots successfully, you can reinstall the add-on.
9) First boot and LED cues (what “ready” looks like)
First start takes longer than subsequent boots. This is normal.
When the SMHUB starts up after flashing, the LEDs show you exactly what’s happening.
Here’s what to watch step by step:
-
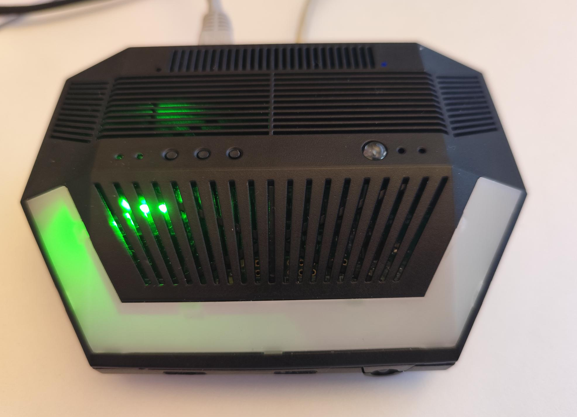
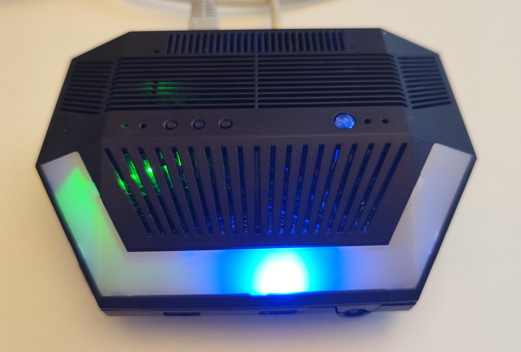
Power ON indicator:
As soon as you plug in the SMHUB, the small green LED near the buttons (not the Ambilight LEDs) turns ON.
→ This simply means the device is receiving power. If you can't power your device - check this bug.
-
Blue chase effect (Ambilight):
Right after powering on, you’ll see a moving blue light (chase effect) running around the Ambilight LEDs.
→ This means the system is booting — please wait.
-
Blue effect stops:
When the blue chase effect stops, it means the core system has finished booting and SSH access is available.
→ From this point, advanced users can connect via SSH if needed.
-
Green Ambilight turns on:
After the delay (1-2 min), all green Ambilight LEDs will light up at once.
→ This means that Web UI and all apps are fully loaded and ready to use.
The green lights will stay on for about 1 minute, then turn off automatically.
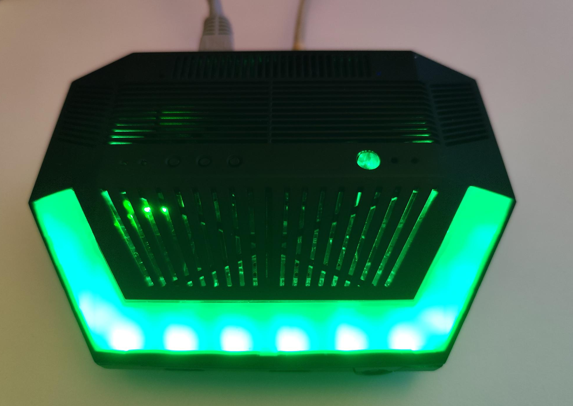
💡 In simple words:
Blue moving lights = starting up
Blue stops = system ready for SSH
Green lights = Web interface ready to use
10) (Optional) Quick post-flash checks
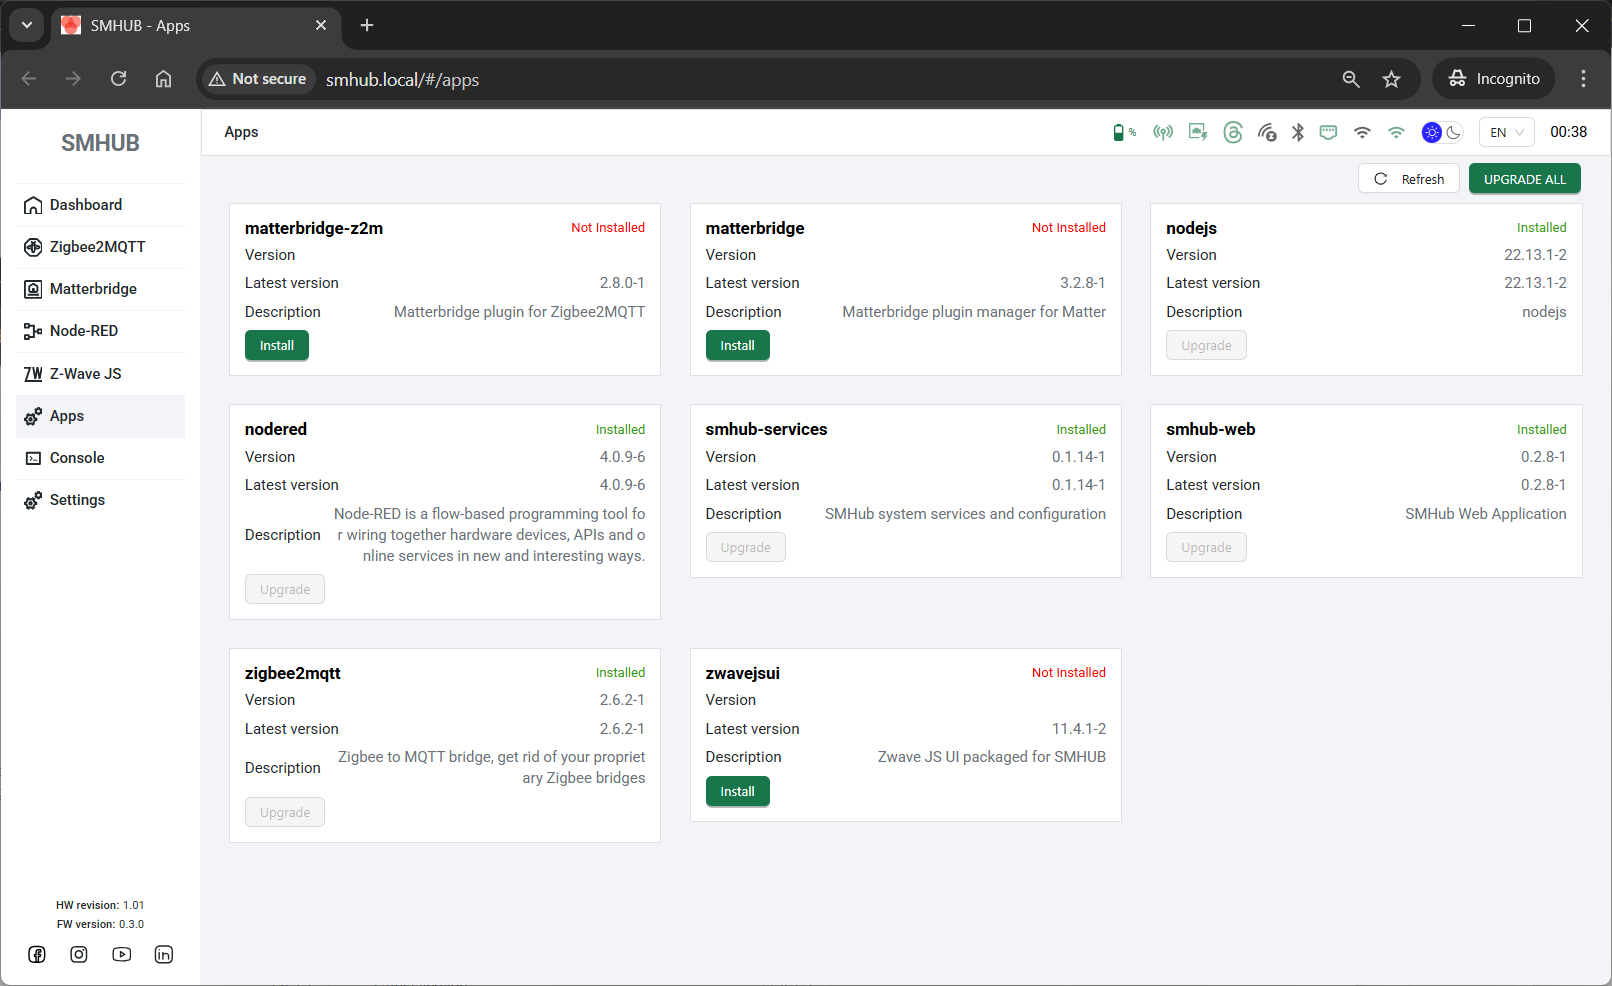
Web UI:
-
Open a browser and go to:
http://smhub.local/(or your device’s IP).
SSH (from Windows using built-in OpenSSH or PuTTY):
-
Hostname:
smhub.local(or your device’s IP) -
Username:
smlight -
Password:
smlight
Troubleshooting
A) The script doesn’t detect my device
-
Most likely cause: Device connected before
flash.bat.
Fix: Close the script, unplug SMHUB, re-run steps 4–7 exactly: admin CMD →flash.bat→ then connect SMHUB. -
Try a different USB port or another data-capable USB-C cable.
B) Driver didn’t install or Windows blocked it
-
Re-run
driver\smhub-driver.exeas admin. -
Approve any Windows prompts.
-
Reboot Windows if the installer requests it, then try again.
C) “Access denied” or “cannot open port”
-
You’re likely not in an Administrator CMD. Close CMD, re-open as Administrator, repeat from step 5.
D) Flashing stops or errors out mid-way
-
Leave the CMD window open; wait a bit to ensure it’s not still working.
-
If it clearly failed, unplug SMHUB, close the CMD, reopen admin CMD, start
flash.batagain, and only then plug SMHUB back in.
E) SSH/Web UI doesn’t come up after flashing
-
Give the device more time on the first boot.
-
Watch the LEDs:
-
Blue ambilight LED stopped running → SSH should be ready.
-
All ambilight greens lit → Web UI should be ready.
-
-
If still nothing, power-cycle the SMHUB and check your network/DHCP (try accessing by IP, not by hostname).
Update/Restore using SD-Card
💾 SD-Card Installation Guide Notice
The direct SD-card installation method is temporarily unavailable for the latest OS images.
Workaround: If you must use an SD card, you can flash an older compatible image first, boot the device, and perform an OTA update to the latest version. Otherwise, we highly recommend skipping the SD card entirely and using the new SMHUB Flasher tool over Type-C for a direct install.
👉 Download the firmware ZIP from your usual link (latest):
SD-CARD RESTORE FIRMWARE: prod: os_v0.9.9 , dev: os_v1.0.0.dev3 (previous: os_v0.3.11 | os_v0.3.10 | os_v0.3.7) and save the ZIP file to your computer (e.g., Downloads).
You’ll need:
-
A microSD card (8–64 GB is ideal) + microSD–to–SD adapter if your PC needs it
-
A Windows PC
-
A way to read/write the microSD card (built-in reader or USB adapter)
⚙️ What You’ll Do
-
Download the ZIP file with the firmware
-
Format microSD to FAT32
-
Copy three files from the archive folder ROM onto the root of the card
-
Insert the card into the SMHUB (click fully)
-
Power on → wait ~4 minutes (silent)
-
Power off → remove the card
- Power on → watch LED cues → open smhub.loca
1) Get the firmware and unzip it
-
Click the firmware link above and download the ZIP to your computer (e.g., Downloads).
[screenshot: browser download] -
Right-click the ZIP → Extract All… → choose a simple folder (e.g.,
C:\SMHUB\firmware\).
Inside the unzipped folder, you’ll see these three files in the rom folder. You’ll copy them to the SD card:
-
emmc.img -
fip.bin -
partition_gpt.xml
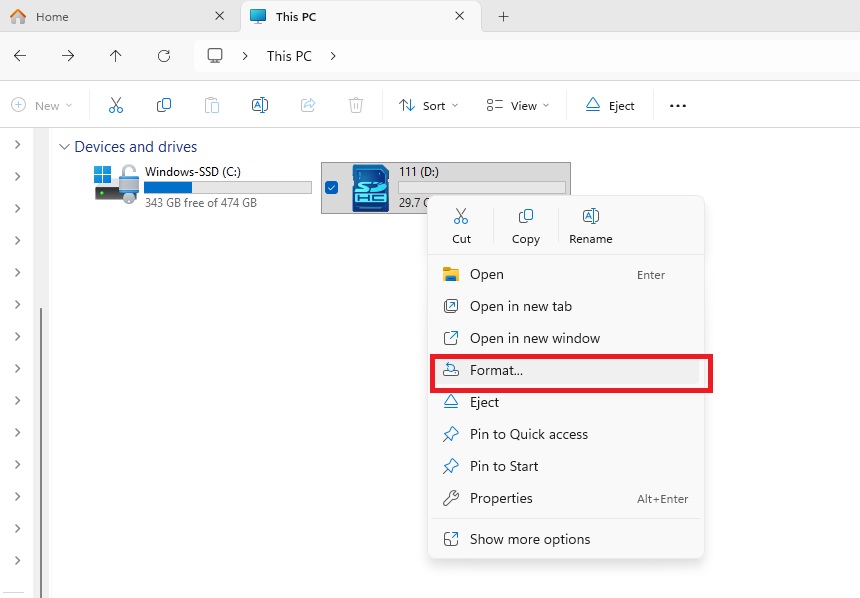
2) Format the microSD card to FAT32
This erases the card completely. Back up anything important first.
-
Insert the microSD (or SD adapter with the microSD inside) into your PC.
-
Open This PC (Windows Explorer).
-
Right-click the SD card drive (e.g., “SDHC (E:)”).
-
Click Format….

-
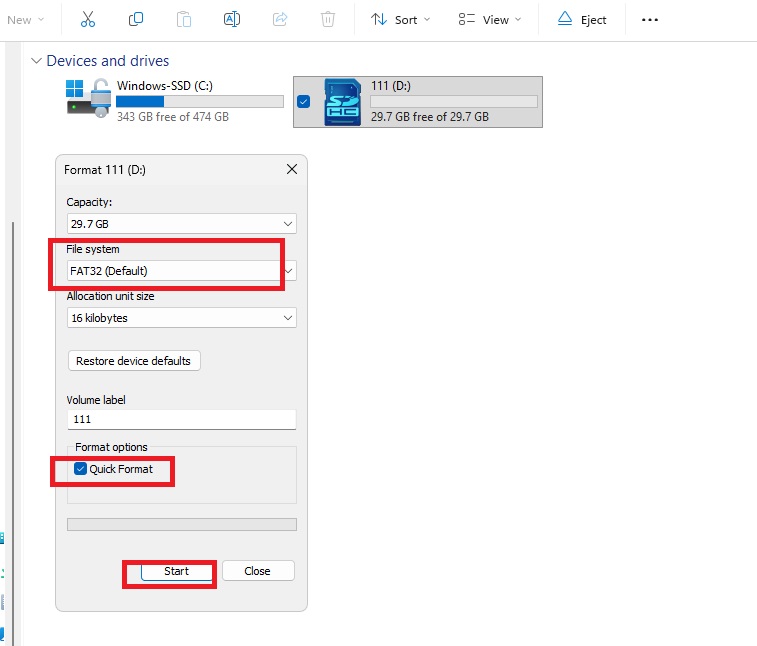
In the Format window:
-
File system: choose FAT32
-
Allocation unit size: leave Default or 16kb
-
Volume label: optional (e.g.,
SMHUB) -
Quick Format: checked (recommended)

-
-
Click Start, then OK/Yes to confirm.
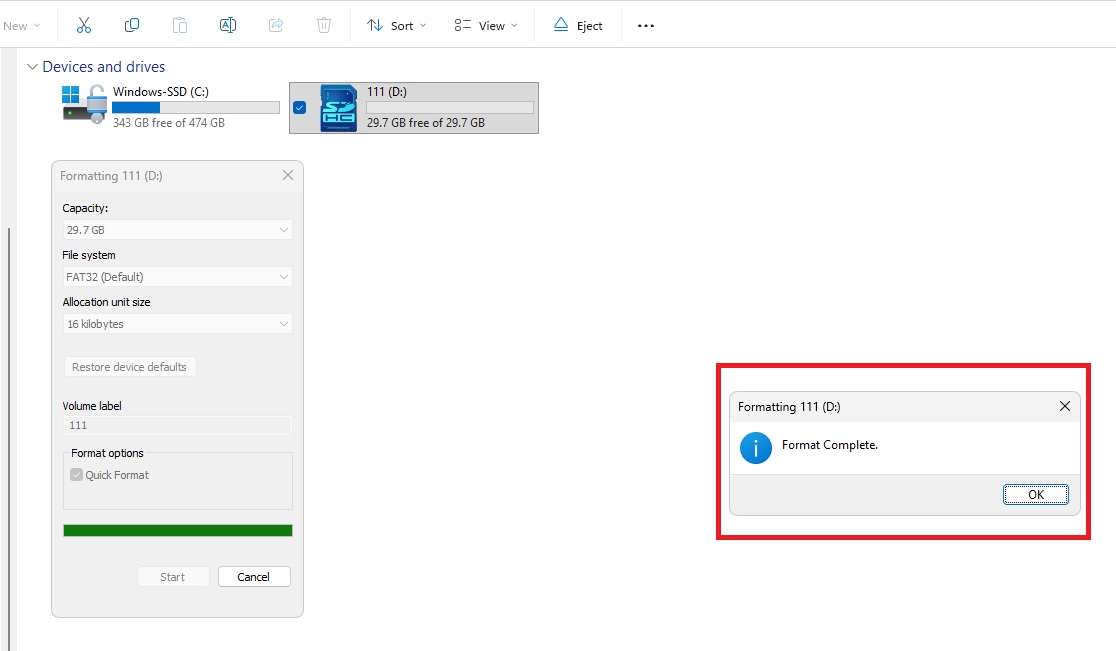
-
Wait for the Format Complete message → click OK and Close.

Tip: If your SD card is larger than 32 GB and FAT32 isn’t shown, try another (smaller) card. (Advanced users: a third-party FAT32 formatter also works.).
Check the lock switch: If you’re using a full-size SD adapter, make sure the tiny switch on its side is not set to “LOCK.” If locked, Windows won’t let you copy files.
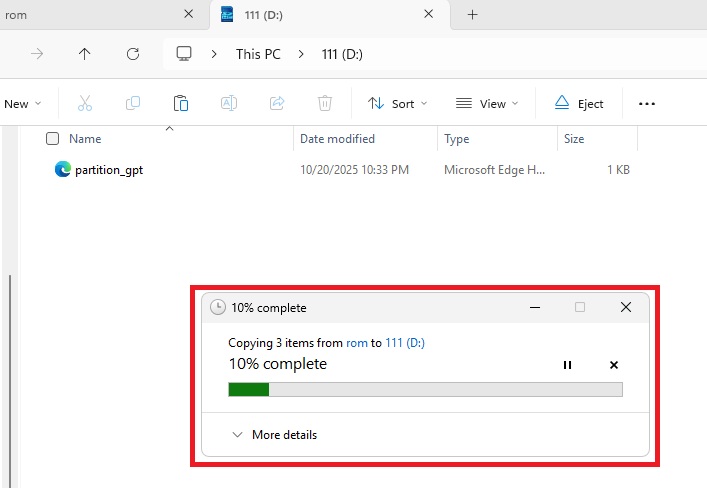
3) Copy the three files to the root of the SD card
-
Open the folder you unzipped earlier.
-
Select these three files:
emmc.img,fip.bin,partition_gpt.xml -
Copy them (Ctrl+C).
-
Open your SD card drive in This PC and Paste (Ctrl+V).
-
The files must be in the root of the SD card (not inside any folder).

-
-
When copying finishes, right-click the SD card drive → Eject → remove the card.
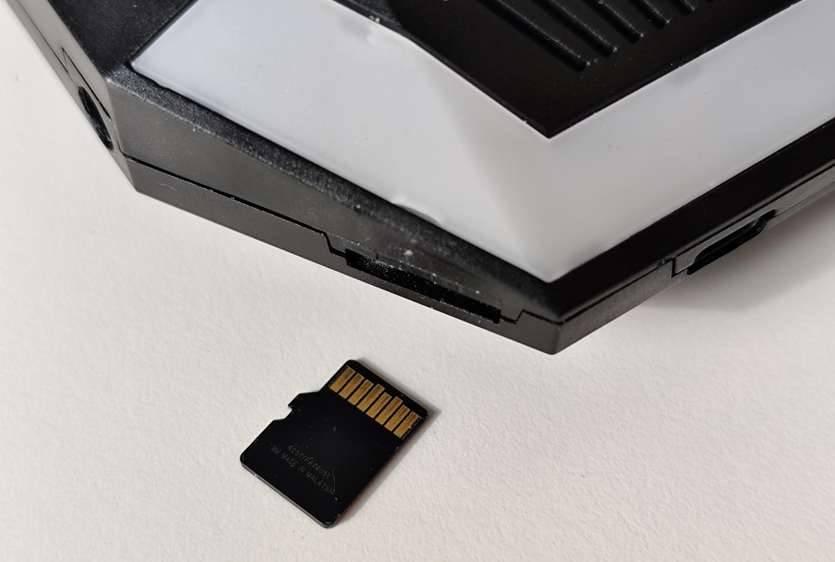
4) Insert the microSD card into the SMHUB
-
With the SMHUB powered OFF, insert the microSD into the slot.

-
Push until you feel a “click.” It must be fully seated.

5) Power ON and wait ~4 minutes until completion
-
Connect power to the SMHUB.
-
The device will automatically and silently flash itself from the SD card.
-
The blue LED (located near the IR transmitter) will begin blinking slowly (approximately once every 2 seconds), indicating that the flashing process has started. Please note that LED indications during SD-card flashing are available only starting from firmware 0.3.1-dev2 (24 Oct 2025).
-