
Thread setup (network and USB connection)
Thread setup for Home Assistant: two options
SLZB devices support two ways to run a Thread network with Home Assistant:
- Option A — “Thread to remote OTBR”: OTBR runs on Home Assistant (OTBR add-on), SLZB works as a Thread RCP (radio).
- Option B — “Thread + OTBR running on device”: OTBR runs directly on the SLZB device, Home Assistant connects to it via REST API.
Prerequisites
- A server with Home Assistant installed and running (example: Raspberry Pi 4 with HAOS).
- An SLZB device with a Thread-capable radio module.
- The Matter device you want to connect (example: Eve Energy EU).
- An Android or iOS smartphone.
Additional requirements per option
- Option A (Thread to remote OTBR): SLZB must run Thread RCP firmware and be connected to HA either via USB or network (Serial-over-IP).
- Option B (Thread + OTBR on device): Available on SLZB-06xU series only. OTBR requires IPv6 on your LAN (IPv6 will be force-enabled on the device when this mode is activated).
Step 1 — Choose your setup option
Option A: “Thread to remote OTBR” (OTBR add-on runs on Home Assistant)
Choose this if you want OTBR to run on Home Assistant. SLZB acts as a Thread RCP (radio only). This is the traditional setup, and supports USB or network connection.
Option B: “Thread + OTBR running on device” (OTBR runs on SLZB)
Choose this if you want OTBR to run directly on the SLZB device. Home Assistant connects via network API (<device-ip>:8080), and you don’t need the OTBR add-on in HA.
Note: this is an initial (beta) integration and may have limitations or unexpected behavior.
Step 2 — Set SLZB mode / firmware
Option A (Thread to remote OTBR): Flash / select Thread RCP mode
- Your device must have an internet connection.
- Go to
Modeand select the Thread RCP / Matter-over-Thread radio mode (RCP). The device will be reflashed; wait until the update completes.
Option B (Thread + OTBR on device): Enable OTBR on the device
- Your device must have an internet connection.
- Go to
Modeand select “Thread + OTBR running on device”. The device will apply the required configuration and services. - OTBR REST API will be available at <device-ip>:8080.
Step 3 — Home Assistant software setup
3.1 Install and start Matter Server (required for both options)
- In Home Assistant go to
Settings→Devices & Services. - Click
Add integrationand search forMatter. - Keep
Use the official Matter Server Supervisor add-onenabled and clickSubmit. - Wait until Matter Integration and Matter Server add-on are installed.
- Go to
Settings→Add-ons→Matter Serverand clickStart. Recommended: enableStart on bootandWatchdog.
Step 4 — Thread / OTBR setup in Home Assistant
Option A: OTBR add-on on Home Assistant
Install the OpenThread Border Router add-on and connect it to the SLZB radio (USB or network).
- Go to
Settings→Add-ons→Add-on Store. - Search for
OpenThread Border Routerand clickInstall. - Open the add-on and go to the
Configuretab.
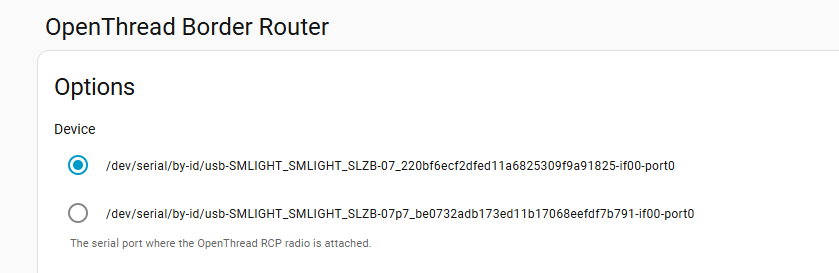
Option A — OTBR add-on with USB connection
- Switch the coordinator to USB connection mode (if applicable).
- Set OTBR add-on parameters:
Port: select your SLZB USB serial port.Hardware flow control: NoBaud rate: 460800Flash firmware: No (use pre-flashed RCP firmware)- Click
Save
- Go to
Infotab and clickStart. - Recommended: enable
Start on bootandWatchdog.
Option A — OTBR add-on with Network connection (Serial-over-IP)
Configure the OTBR add-on to connect to the SLZB network serial endpoint (example: 192.168.1.10:6638).
- Enable
Show unused optional configuration options. Hardware flow control: NoBaud rate: 460800Flash firmware: No (use pre-flashed RCP firmware)Network Device: <slzb-ip>:6638- Click
Save, then go toInfo→Start
Option B: OTBR runs on the SLZB device (no OTBR add-on needed)
In this option, you do not install/use the OTBR add-on in Home Assistant. OTBR is already running on the SLZB device.
- Make sure SLZB mode is set to “Thread + OTBR running on device”.
- OTBR REST API address: <device-ip>:8080
Step 5 — Configure Home Assistant integrations (both options)
- Go to
Settings→Devices & Services. - Add (or confirm autodiscovery of) these integrations:
- Thread
- OpenThread Border Router
Notes:
- If you use Option A, the “OpenThread Border Router” integration will typically use the OTBR add-on.
- If you use Option B, when asked for the Border Router address, use: <device-ip>:8080.
In the Thread integration:
- Set OpenThread Border Router as the Preferred network.
- If available, enable Use router for Android + iOS credentials.
Step 6 — Reboot Home Assistant
- After installing and configuring Matter + Thread components, reboot your Home Assistant server.
Step 7 — Pre-set up your phone
- Install
Home Assistantapp on your phone. - Install
Google Homeapp (often required for Thread credential handling on Android). - Open Home Assistant app and connect it to your Home Assistant server (same Wi-Fi network).
- In the app go to
Settings→Companion app→Troubleshooting→Sync Thread Credentials. - Repeat until you see:
Home Assistant and this device use the same network. - If it fails repeatedly, try resetting Google Play Services data (Android) and try again.
Step 8 — Add the Matter-over-Thread device
- Ensure Bluetooth is enabled on your phone.
- In Home Assistant app:
Settings→Devices & Services→Devices. - Tap
+ ADD DEVICE→Add Matter device. - Scan the QR code (or enter the pairing code) and follow the on-screen steps.
- If prompted “Which app to open?”, choose
Other→Home Assistant.
The pairing flow usually goes through:
- Connecting to device…
- Generating Matter credentials…
- Connecting device to network…
- Checking network connectivity…
- Connecting device to Home Assistant…
- Device connected!
Tips:
- If the device was powered for a long time, you may need to reset it to enter pairing mode again.
- If you have Google/Nest Thread devices and pairing is unstable, try turning them off temporarily while pairing.
Step 9 — Verify connection and control
- After pairing, the device should appear in Home Assistant under
Devices. - Open it and confirm you can control it (e.g., switch on/off).
Congratulations! You’ve successfully connected a Matter-over-Thread device to Home Assistant.
TIP:
Home Assistant Thread documentation: https://www.home-assistant.io/integrations/thread/
---------------------------------------------------------------------------------------
Prerequisites
- A server with Home Assistant installed and running. In this manual, we are using Raspberry Pi 4 with clean fresh install of HAOS.
- An SLZB-06 or MR families Coordinator flashed with OpenThread Border Router firmware. In this manual, we use SMLIGHT SLZB-06 flashed with Thread RCP firmware. This is available in the Core firmware v2.1.0-dev and up.
- The Matter device you want to connect (in this manual, we use the Eve Energy-EU socket).
- An Android or IOS smartphone.
OpenThread Border Router firmware flashing
- Your device must have an internet connection.
- Go to the
Modesection, select theMatter-over-Threadmode, the device will be reflashed, wait for the firmware update to complete.
Software set-up
- We'll need to install the OpenThread Border Router add-on in Home Assistant. Head over to the Left panel within Home Assistant and Click
Settingsand chooseAdd-ons. - Navigate to the Add-on Store and search for
OpenThread Border RouterAdd-on. ClickInstalland wait for the installation to complete. - Once installed, click
Configuretab on the top side of the add-on.
Setting Up the Thread Border Router Add-on (USB connection)

- Switch coordinator to USB mode.
- Make the following OTBR addon settings:
-Port: choose port of your device. If you do not know which one, I recommend you to leave just once device in your USB ports and choose it.
-Hardware flow control: No.
-Baud rate: 460800.
-Flash firmware: No (we use pre-flashed coordinator)
- Click Save.
- Go back to the INFO tab and
Startthe OpenThread Border Router add-on. It may take a moment to initialize. We would suggest to activate bothStart on bootandWatchdog. - You can check logs, they should say that addon started, although they can contain some errors as Thread and Matter are still under development in Home Assistant.
Setting Up the Thread Border Router Add-on (Network connection)
- IMPORTANT: Due to config validation issues, you need to connect any USB serial device to your HAOS so you can save the configuration.
Select USB device, this will allow you to save the configuration, after the addon is configured and the configuration is saved you can disconnect the USB device, the addon still will be able to run but if you need to change the configuration you will need to connect the USB device again. 

- Select
Show unused optional configuration options Hardware flow control: No.Baud rate: 460800.Flash firmware: No (we use pre-flashed coordinator)Network Device: Enter the IP and port of your coordinator. (for example 192.168.1.10:6638)- Click
Save.
- Go back to the INFO tab and
Startthe OpenThread Border Router add-on. It may take a moment to initialize. We would suggest to activate bothStart on bootandWatchdog. - You can check logs, they should say that addon started, although they can contain some errors as Thread and Matter are still under development in Home Assistant.
Setting Up the Matter add-on and Integration
- Go to the Home Assistant interface and navigate to
Settings>Devices & Services. - Click on
Add integrationand search forMatter. - Keep checkbox
Use the official Matter Server Supervisor add-onand clickSubmit. - Wait untill installation of Matter Integration and Matter Server add-on is completed.
- Head over to the Left panel within Home Assistant and Click
Settingsand chooseAdd-ons. Go to the Matter Server add-on. Start the Matter Server add-on. Here we would suggest as well to click bothStart on bootandWatchdog.
Set-up and configuring the Integrations
- Now, let's install the required integration:
ThreadandOpenThread Border Router. - Go back to the Home Assistant interface and navigate to
Settings>Devices & Services. - Basically, all two should be autodiscovered so you just need to configure them. If they are not, click on
Add integrationand search for them there. - OpenThread Border Router – no configurations, just add.
- Thread Integration – click
Configureand make sure you haveOpenThread Border RouterunderPreferred networkline, and it contains an icon with key+phone. If not, do the following:
- click three dots on the right to
OpenThread Border Router, chooseAdd to preferrede network. - Under the preferred network now, click again three dots on the right to
OpenThread Border Router, and chooseUse router for Android + iOS credentials.
- Start the add-on. Here we would suggest as well to click both
Start on bootandWatchdog.
Reboot your Home Assistant server
- Once all Home Assistant components are installed, we reccomend to reboot your Home Assistant server.
Pre-set up your phone
- Install
Home Assistantapp on your Android phone from Play store. At the time of this video, we were unable to pair Matter-over-Thread device via iPhone. - Install
Google Homeapp from Play store. It is recommended byHome Assistantdevelopers and we were not able to pair our Thread devices without installed Google Home app. - Open
Home Assistantapp and sync it with your Home Assistant server. Your phone and Home assistant server should be in the same Wi-Fi network. - In app, go to
Settings–Companion app-> ClickTroubleshootingand clickSync Thread Credentials. - Wait until message
Home Assistant and this device use the same network. If you see another message, namelyAdded network from Home Assistant to this device– you need to click onSync Thread Credentialsagain, until you get that message about the same network. - If you are not getting message
Home Assistant and this device use the same network- try to reset your Google Play Services (remove all data, usually by App settings -> Erase data -> Clear All Data, but namings depend on the smartphone model).
Adding the Matter Device
- With the Matter integration set up, grab your Matter device and Android smartphone. Make sure Bluetooth is enabled on your phone.
- Open the Home Assistant app and navigate to
Settings>Devices & Services->DevicesTab. - Click the
+ ADD DEVICEbutton at the borrom right part of the screen to add a device, chooseAdd Matter device. - Follow the on-screen instructions in the app. You'll likely need to scan a QR code located on your Eve Energy socket or enter pairing code manually. We did it with QR-code scanning.
- Home Assistan app on your phone can as Which app to open? Select
otherand thenHome assistant. - The app will guide you through pairing the device with your Thread network. It should pass through this satuses:
- Connecting to device...
- Generating Matter credentials...
- Connecting device to network...
- Checking netwoek connectivity...
- Connecting device to Home Assistant...
- Device connected!
- Note:
- If a Matter-over-Thread end-device has been powered up for a long time, it may require a reset of device to put back into pairing mode.
- In case you have Google home devices (Nest hub) and experiances issues with pairing, try to turn them off before starting OpenThread Border router add-on on your Home Assistant and your Home Assistant app.
Verifying Connection and Control
- Once the pairing is complete, head back to the Home Assistant interface. You should see your Eve Energy socket listed on your
Dashboardor under theDevicessection . - Click on the device to access its controls. You should be able to turn the socket on and off remotely within the Home Assistant interface.
Congratulations! You've successfully connected your Matter-over-Thread device to Home Assistant using the OpenThread Border Router and Matter Integrations. Now you can enjoy the benefits of Matter's secure and interoperable smart home ecosystem.
TIP:
You can refer to the Home Assistant documentation for Matter and Thread for more troubleshooting steps https://www.home-assistant.io/integrations/thread/