SLZB-07 manual page
SETTING UP AND RUNNING
To use a Zigbee USB coordinator based on the EFR32 chip with Zigbee2MQTT, you’ll need to follow a series of steps to set up the coordinator, install the necessary software, and configure Zigbee2MQTT to communicate with the coordinator.
Prerequisites:
- SLZB-07 Zigbee USB coordinator.
- Computer or Raspberry Pi where Zigbee2MQTT or Home Assistant with ZHA will run.
- Home Assistant + ZHA or Zigbee2MQTT software installed.
Steps:
- Install Zigbee2MQTT or Home Assistant with ZHA
Follow the installation instructions for Zigbee2MQTT based on your system. You can find these instructions on the Zigbee2MQTT GitHub page or the official documentation for Home Assistant and ZHA. - Connect the Zigbee USB Coordinator:
Plug the SLZB-07 Zigbee USB coordinator into an available USB port on your computer or Raspberry Pi - Configure Zigbee2MQTT:
– Open the Zigbee2MQTT configuration file (usually located at /opt/zigbee2mqtt/data/configuration.yaml or similar).
– Find the section related to the coordinator configuration (look for serial: or similar:
serial:
port: /dev/ttyUSB0 # Specify the correct serial port for your coordinator
– Ensure that the port matches the serial port where your coordinator is connected. The port might be different based on your system. - Start Zigbee2MQTT Service:
Start or restart the Zigbee2MQTT service to apply the changes made to the configuration file. - Pairing Devices:
Once Zigbee2MQTT is running and configured with the coordinator, you can start pairing Zigbee devices:
– Put your Zigbee devices (sensors, bulbs, etc.) into pairing mode according to their respective instructions.
– Use Zigbee2MQTT’s interface or command-line tools to initiate the pairing process. Follow the Zigbee2MQTT documentation for the specific commands or steps required. - Device Control and Monitoring:
After successfully pairing your devices, you can control and monitor them using Zigbee2MQTT’s interface or via MQTT messages, depending on your setup.
Additional Resources:
- Zigbee2MQTT Documentation: The official Zigbee2MQTT documentation provides detailed guides, troubleshooting tips, and a list of compatible devices.
- Home Assistant ZHA documentation;
- Silicon Labs EFR32 Documentation: Refer to Silicon Labs’ documentation for any specific details related to using the EFR32 chip as a Zigbee coordinator. This might include firmware flashing guides or technical specifications
FLASHING AND UPDATING
Devices shipped in 2023:
- By default, the device comes with a signed bootloader, so only official firmware can be flashed. This prevents unexpected behavior while incidentally using the wrong firmware.
- For PRO users, there is an option to unlock the bootloader and flash any firmware. This can be done by the following steps:
– Go to the official FIRMARE FLASHING TOOL https://smlight.tech/flasher
– Select SLZB-07
– Press button “Update SLZB-07 FIRMWARE“
– Choose your USB port
– Press “Change firmware“
– Choose “Unlock bootloader” and press Install
After these steps, your bootloader will be unlocked.
Devices shipped starting from 2024:
– Plug your device into USB port, go to https://smlight.tech/flasher, select SLZB-07 and choose:– Zigbee (EZSP) – regular zigbee firmware
– Multi-PAN (RCP) – firmware to work with Matter/Thread
– Thread – firmware to use as Thread router
– Upload your own firmware – you can flash your own file

- Coordinator → Coordinator: online remote flashing, do not need a push to boot mode manually
- Coordinator → Router: online remote flashing, do not need to push to boot mode manually
IMPORTANT NOTE FOR THE CURRENT VERSION OF ROUTER FIRMWARE
If you flashed your coordinator to the router and want to flash it back to the coordinator, you have to push the device to flashing mode manually (is not required for other flashing options, only Router -> Coordinator)
- Router → Coordinator: Need to push the coordinator physically to flashing mode.
– Unplug your coordinator
– Open enclosure
– Connect pad FLSH with the metal part of the antenna (you can use tweezers or scissors
– Plug the coordinator to your PC (keep FLSH connected to the antenna)
– Run flashing.

SMLIGHT SLZB-07 FREQUENTY ASKED QUESTIONS (FAQ)
Does SLZB-07 works with Home Assistant out of the box?
Yes, it does. Just plug in SLZB-07 into the USB port of your server and start ZHA Home Assistant or Zigbee2MQTT.
Can I set up multiple SLZB-07 coodinators with one Home Assistant?
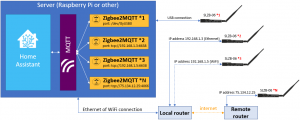
Yes, you can run multiple SLZB-07 with your single server. Please note, that all of them should be connected to the same server. If you want to cover different rooms or even buildings, you can use SLZB-07 with your server and add SLZB-06 or SLZB-06M in other rooms or buildings. For running multiple coordinators, you just need to run a separate instance of Zigbee2MQTT or ZHA for each coordinator. More details can be found in this Article of the official manual.
Overall system architecture with multiple adapters looks like this:

Do I need to use extension cable?
In most cases, you do not need. We designed device in such a way, so it utilizes all interferences from the USB ports and can be used without extension cable!
Can I update firmware distantly, without physical access to the SLZB-07?
Yes, you can. Main chip used in SLZB-07 (EFR32MG21) can be updated distantly from the other global point. That makes the device suitable for installation in rare-visited locations or installation places. You just need to have access to your server.

