WHAT IS VPN WIREGUARD
This is a feature of SLZB-06 family coordinators that allow them to connect to remote Home Assistant / Zigbee2MQTT server through secure VPN tunnel without any additional hardware. WireGuard is an extremely simple yet fast and modern VPN that utilizes state-of-the-art cryptography. It aims to be faster, simpler, leaner, and more useful than IPsec while avoiding the massive headache. It intends to be considerably more performant than OpenVPN.
1. Prerequisites
1.1. Hardware and Software used
- A server with Home Assistant is installed and running. In this manual, we are using Raspberry Pi 3B+ with a clean fresh install of HAOSS.
- An SLZB-06 family coordinator (firmware version 2.2.6 or later).
- WireGuad add-on, Zigbee2MQTT add-on and ZHA integration.
- The Zigbee device you want to connect remotelly.
1.2. IP Address reservation
It is reccomended to reserve a static IP addresses on the router for Home Assistant server and the SLZB-06 family coordinator. In our case, on a TP-Link router, static IP address reservations can be configured under the Network >> DHCP Server >> Address Reservation section.
2. Establishing access to your Home Assistant / Zigbee2MQTT
In order to let remote SLZB-06 coordinator to establish secure connection with your Home Assistant / Zigbee2MQTT, coordinator should know how to reach your Home Assistant. There are two options here:
- if you do not have a white IP address - you can use intermediary services like DuckDNS, that will let SLZB-06 coordinator know how to find your Home Assistant (so coordinator will knock to the doors and ask "Hey, may I connect to your Wireguard Add-on and establish a secure tunnel?").
- if you have a white IP address - you can open a port to access your Home Assistant directly without intermediary services like DuckDNS (although you can use DuckDNS togather with white IP address).
TIP
You need to use only one option - if you do not have white/static IP address from your provider - use DuckDNS, if you have - either open port or use service like DuckDNS as well.
Lets looks through both options.
2.1. Port forwarding
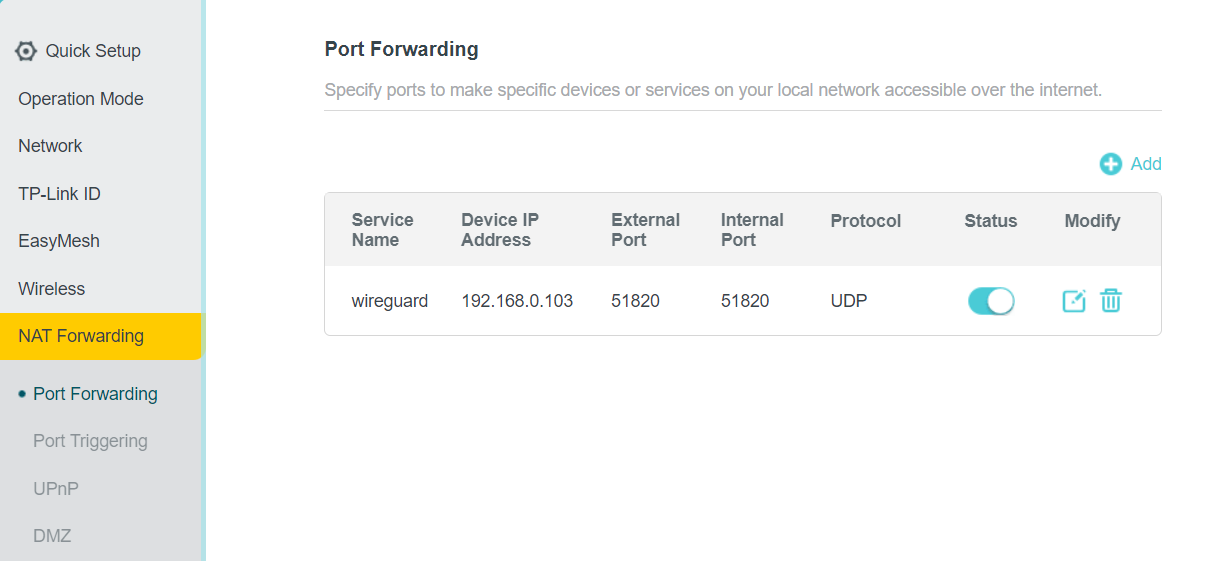
The location of this function may vary depending on your router. On a TP-Link router, it can be found under Advanced >> NAT Forwarding >> Port Forwarding. Add a port forwarding rule in which you specify:
Service Name: wireguard
Device IP Address: IP address of Home Assistant (in our case 192.168.0.103)
External Port: 51820
Internal Port: 51820
Protocol: UDP
2.2. DuckDNS set-up
2.2.1. Duck DNS domain registration
- Visit the duckdns.org website and log in using your preferred method.
- Create a unique domain name, such as slzb-06, enter it in the domains section and click add domain. This will add the new domain to your list of domains.

WARNING
DuckDNS is not compatible with CGNAT
2.2.2. Install Duck DNS add-on
- We'll need to install the DuckDNS add-on in Home Assistant. Head over to the Left panel within Home Assistant click
Settingsand chooseAdd-ons. - Navigate to the Add-on Store and search for
Duck DNSadd-on. ClickInstalland wait for the installation to complete. - Once installed, click
Configuretab on the top side of the add-on.
2.2.3. Duck DNS add-on configuration
TIP
Keep your DuckDNS token private
- In the
Domainsfield, enter the domain you created in Duck DNS. In UI mode, delete the empty domain. - In the
Tokenfield, enter your Duck DNS token. - In the
Lets Encryptsection, setaccept_termsto true. - Save settings and run add-on.
domains:
  - slzb-06.duckdns.org
token: 490d69be-u835-984a-a9aa-8430bcbd02bd
aliases: []
lets_encrypt:
  accept_terms: true
  algo: secp384r1
  certfile: fullchain.pem
  keyfile: privkey.pem
seconds: 300
duckdns-addon-config
Once these steps are completed, you can use the Duck DNS address as the host in Wireguard and as the Endpoint hostname in the coordinator's web interface.
3. WireGuard add-on setting-up and configuration
3.1. Wireguard add-on installation
- We'll need to install the WireGuad add-on in Home Assistant. Head over to the Left panel within Home Assistant click
Settingsand chooseAdd-ons. - Navigate to the Add-on Store and search for
WireGuardAdd-on. ClickInstalland wait for the installation to complete. - Once installed, click the
Configuretab on the top side of the add-on.
3.2. WireGuard add-on configuration in Home Assistant
The configuration is divided into two parts: the server side and the client side.
3.2.1. Server side:
host: The public IP address that clients can use to access WireGuard. This guide uses a static public IP address. However, you can also use DuckDNS.address: The IP address assigned to the WireGuard add-on interface. For a WireGuard network, it is recommended to use a different network than the main one to avoid routing problems. Home routers typically use the 192.168.0.0/24 or 192.168.1.0/24 network.
Network Selection: The /24 subnet mask is the most common. It determines how many devices can be on the network. A /24 subnet mask allows for 256 IP addresses or 254 connected devices. Two IP addresses are reserved for the network address and the gateway address. The /24 subnet mask is popular because of its simplicity. Every /24 network address always ends with 0. For example, 192.168.0.0/24, 192.168.1.0/24, 192.168.2.0/24, ..., 192.168.255.0/24. For WireGuard, you can choose any arbitrary network. For example, I chose 192.168.10.0/24. You can choose this one or another.
Host Selection: Once the network address is selected, you need to choose the host addresses. This includes the WireGuard interface address and the peer addresses. You can use an IP calculator to see the range of available addresses on the network. In my case, this is the range from 192.168.10.1 to 192.168.10.254. For the WireGuard add-on interface address, I chose 192.168.10.1.dns: For DNS, you can use the router's address, or 1.1.1.1, 1.0.0.1.
3.2.2. Client side:
name: Arbitrary client name, e.g., myphone, mylaptop, SLZB-06addresses: Address from the Wireguard network issued to the client. You can take the next address after the Wireguard interface.client_allowed_ips: This is a list of networks that the WireGuard peer is allowed to access. In this guide, this is the main network and the WireGuard network.
server:
  host: 176.37.187.207 #Avoid publicly sharing your public IP address
  addresses:
    - 192.168.10.1
  dns:
    - 192.168.0.1
  log_level: debug
peers:
  - name: slzb-06
    addresses:
      - 192.168.10.2
    allowed_ips: []
    client_allowed_ips:
      - 192.168.0.0/24 #Change this address if your main network is different
      - 192.168.10.0/24
You can add more clients. For example, your phone or another coordinator. To do this, copy the client part, change the name, and increase the IP address by one.
- name: slzb-06-2
  addresses:
    - 192.168.10.3
  allowed_ips: []
  client_allowed_ips:
    - 192.168.0.0/24 #Change this address if your main network is different
    - 192.168.10.0/24
3.3. Getting Wireguard configuration for use at SLZB-06
3.3.1. Using File Editor
- Install the
File Editoradd-on. - Go to the
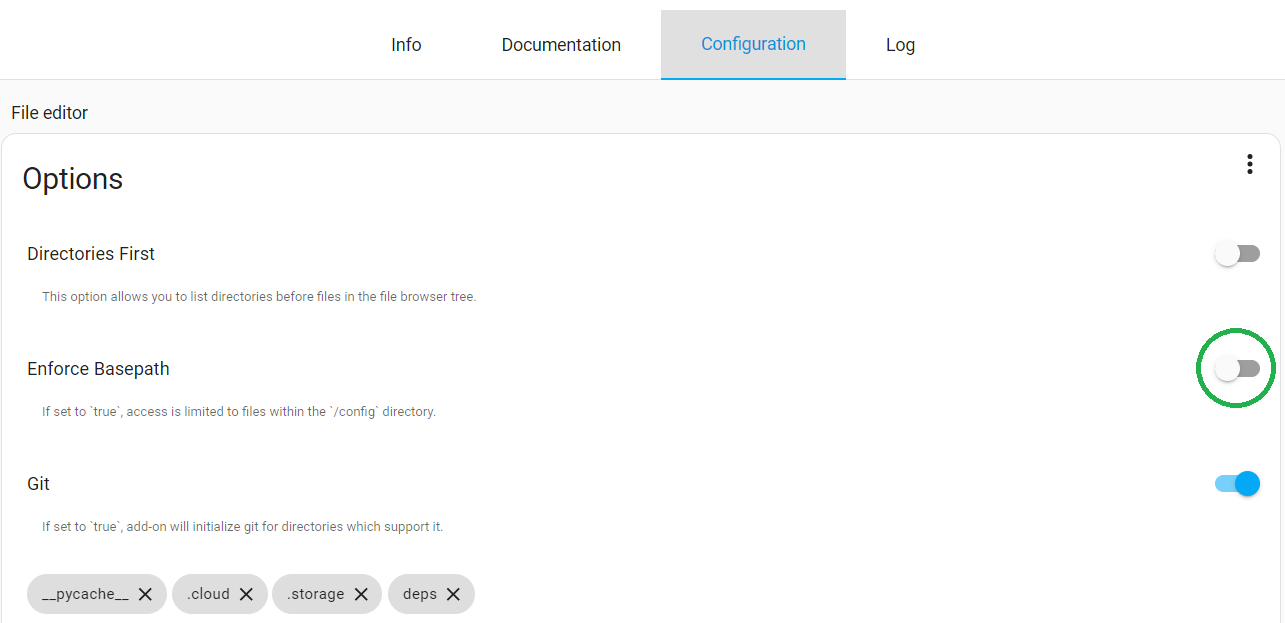
Configurationtab and turn off theEnforce Basepathswitch. This will allow full access to the Home Assistant file system.
- Open the
File editoradd-on. In the top left corner, click the directory icon. Click the back arrow to go up one level. Select the directoryssl>>wireguard>>SLZB-06>>client.conf.
3.3.2. Using Studio Code Server
If you prefer Studio Code Server. Open the add-on, on the left Exproler panel in a space, right-click >> Add Folder to Workspace >> select the ssl directory >> wireguard >> click ok. Select the slzb-06 directory >> client.conf.
TIP
You can run Wireguard in a separate container instead of an HA addon
3a. WireGuard container setting-up and configuration
3a.1. Install wireguard container
docker pull linuxserver/wireguard
3a.2. Run container example
docker run -d \
  --name=wireguard \
  --cap-add=NET_ADMIN \
  --cap-add=SYS_MODULE `#optional` \
  -e PUID=1000 \
  -e PGID=1000 \
  -e TZ=Etc/UTC \
  -e SERVERURL=wireguard.domain.com `#optional` \
  -e SERVERPORT=51820 `#optional` \
  -e PEERS=1 `#optional` \
  -e PEERDNS=auto `#optional` \
  -e INTERNAL_SUBNET=10.13.13.0 `#optional` \
  -e ALLOWEDIPS=0.0.0.0/0 `#optional` \
  -e PERSISTENTKEEPALIVE_PEERS= `#optional` \
  -e LOG_CONFS=true `#optional` \
  -p 51820:51820/udp \
  -v /path/to/wireguard/config:/config \
  -v /lib/modules:/lib/modules `#optional` \
  --sysctl="net.ipv4.conf.all.src_valid_mark=1" \
  --restart unless-stopped \
  lscr.io/linuxserver/wireguard:latest
TIP
Change
- SERVERURL to your URL wireguard (using some like dudckns if this ip changes )
/path/to/wireguard/configin order to use your config wireguard folder.
3a.3. Add route to access client vpn ip's from host and others containers (like zigbee2mqtt)
wireguard_internal_subnet=$(docker exec wireguard printenv INTERNAL_SUBNET)
wireguard_ip=$(docker inspect -f '{{range.NetworkSettings.Networks}}{{.IPAddress}}{{end}}' wireguard)
ip route replace $wireguard_internal_subnet/24 via $wireguard_ip
3a.4. Get wireguard connection data
- Go to wireguard config folder and enter into
peer1orpeer2and readpeer1.conforpeer2.conf - Enter this info into SLZB-06
3a.5. zigbee2mqtt configuration.yaml for WG container
- Modify line
port: tcp://IP:6638and replace IP with the IP Address of wireguard container (The$wireguard_ipvalue obtaneid previously) - Restart Z2M container/addon
4. Wireguard configuration on SLZB-06
WARNING
You should never share your private key and public IP address with anyone.
TIP
Newer versions of Wireguard require a Preshared Key. SLZB-06 supports Preshared Key starting from firmware version v2.5.3
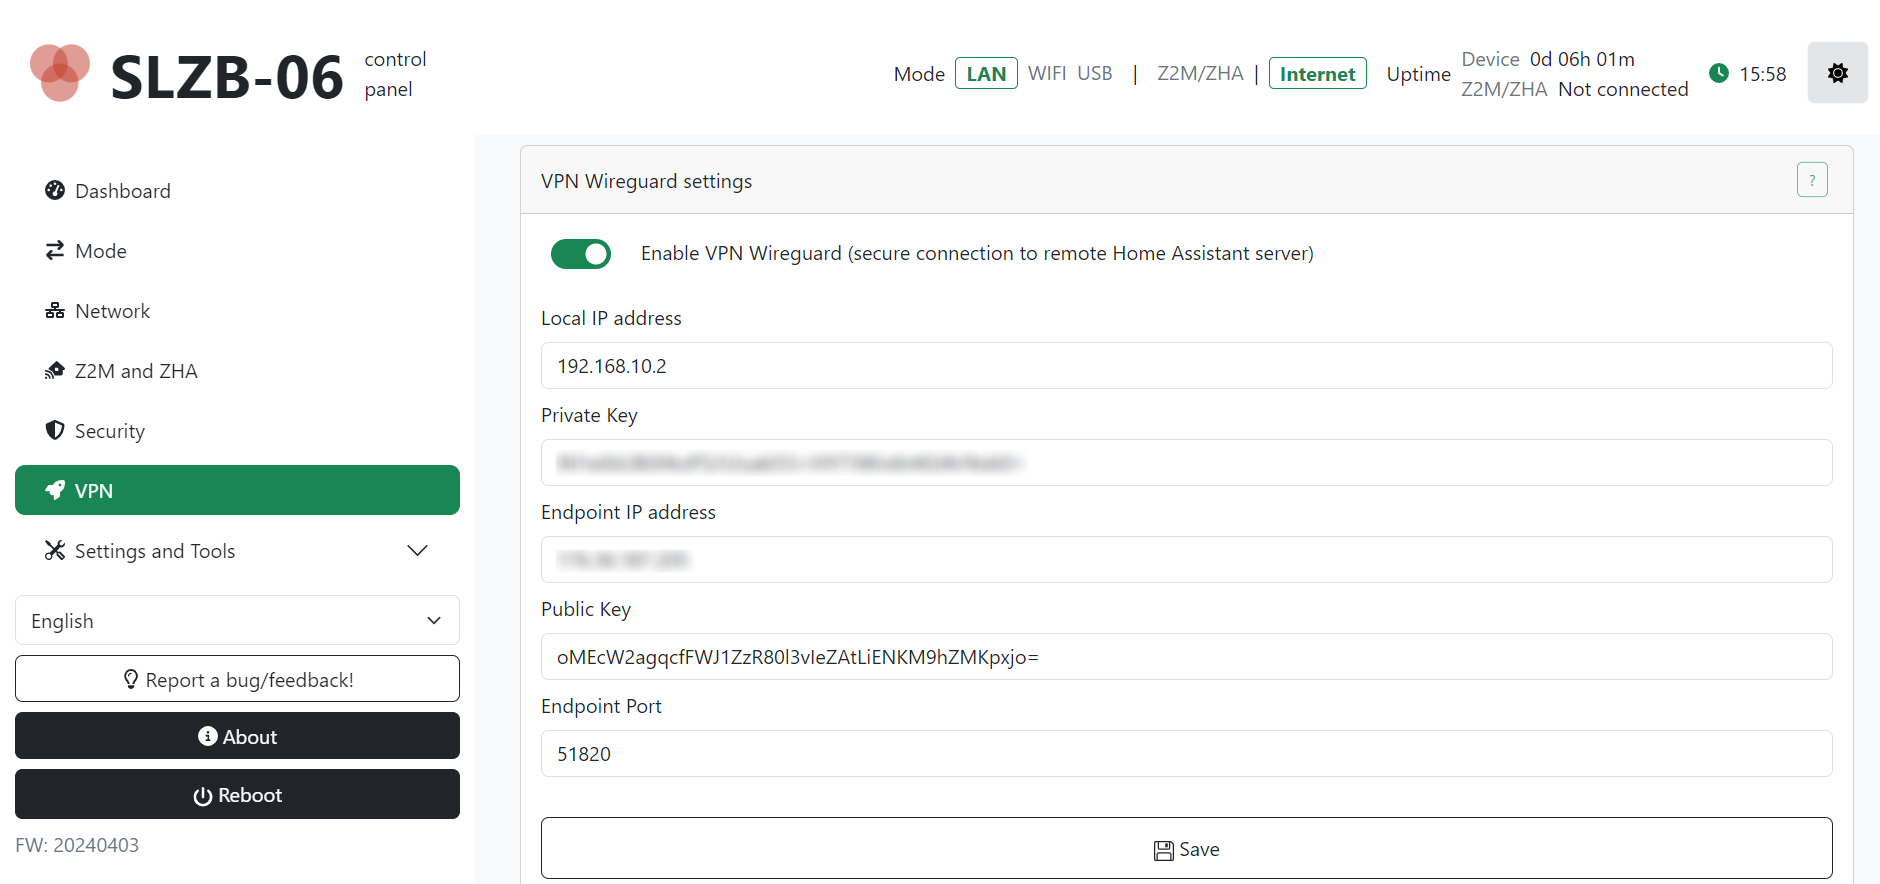
A VPN tunnel allows you to be on one network and connect to another. To add a VPN configuration to the SLZB-06 coordinator, go to the device address, in the left-hand side menu, click VPN, and activate the Enable VPN Wireguard switch. Transfer local and endpoint IP addresses, and private and public keys from the client.conf file. Click Save
5. Configuring IP routing on Home Assistant server
- Install the
Advanced SSH & Web Terminaladd-on on your Home Assistant. - Go to the
Configurationtab and in thepasswordrow set a strong password. The password can be generated. ClickSave - In the
Infotab, disable theProtection modeswitch and start the add-on. - Click
Open Web UIand paste the following command:
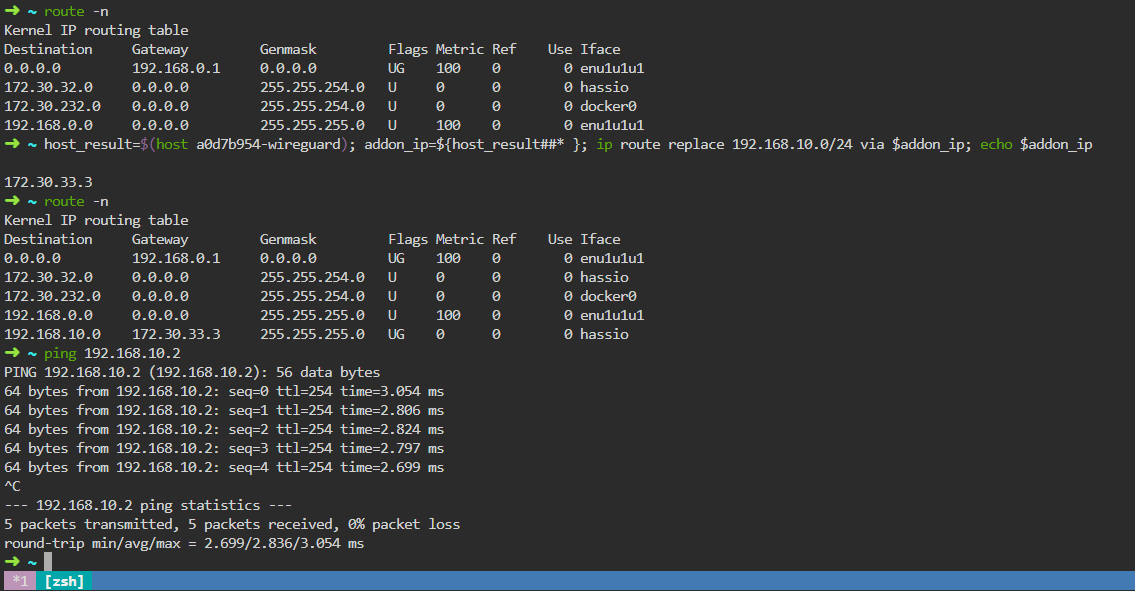
host_result=$(host a0d7b954-wireguard); addon_ip=${host_result##* }; ip route replace 192.168.10.0/24 via $addon_ip; echo $addon_ip
where 192.168.10.0/24 is the network that we have allocated for the Wireguard interface and peers. This command tells Home Assistant that to reach the 192.168.10.0/24 network, it needs to go through the IP address of the Wireguard add-on.
To check if the command works, you can view the routing table by running the command route -n. If the desired network is in the list, then the command worked. Additionally, you can ping the coordinator.
The routing command only works temporarily and then gets erased. To make it permanent, you need to create a sensor in the configuration.yaml file and restart Home Assistant. After that, the sensor name will appear in Devices & Services >> Entities.
command_line:
  - sensor:
      name: wireguard_route
      command: host_result=$(host a0d7b954-wireguard); addon_ip=${host_result##* }; ip route replace 192.168.10.0/24 via $addon_ip; echo $addon_ip
6. Running ZHA / Zigbee2MQTT with remote SLZB-06
6.1. ZHA launch with remote SLZB-06
- Head over to the Left panel within Home Assistant click
Settingsand chooseDevices & Services. - In the bottom right corner, click the
Add Integrationbutton, find and select theZigbee Home Automationintegration. - In the Radio Type window, select the line
- ZNP - for SLZB-06/06p7 and 06p10 (based on Texas Instruments chips)
Submit. - EZSP - for SLZB-06M and SLZB-06Mg24 (based on SiliconLabs chips) and click
Submit.
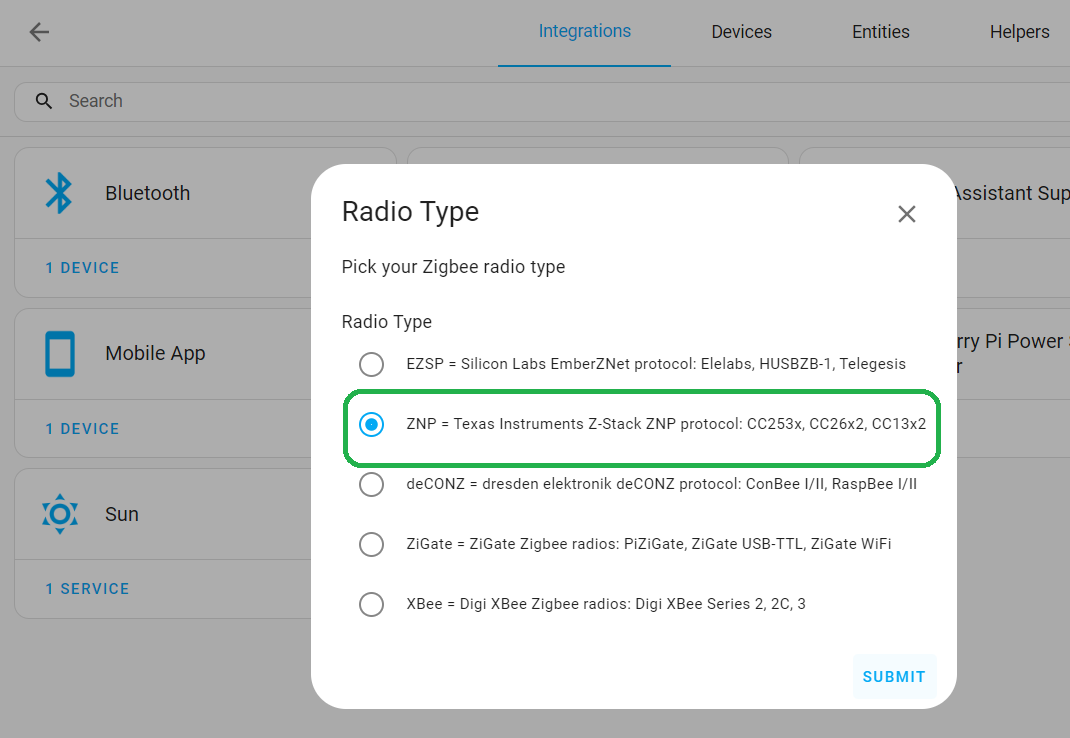
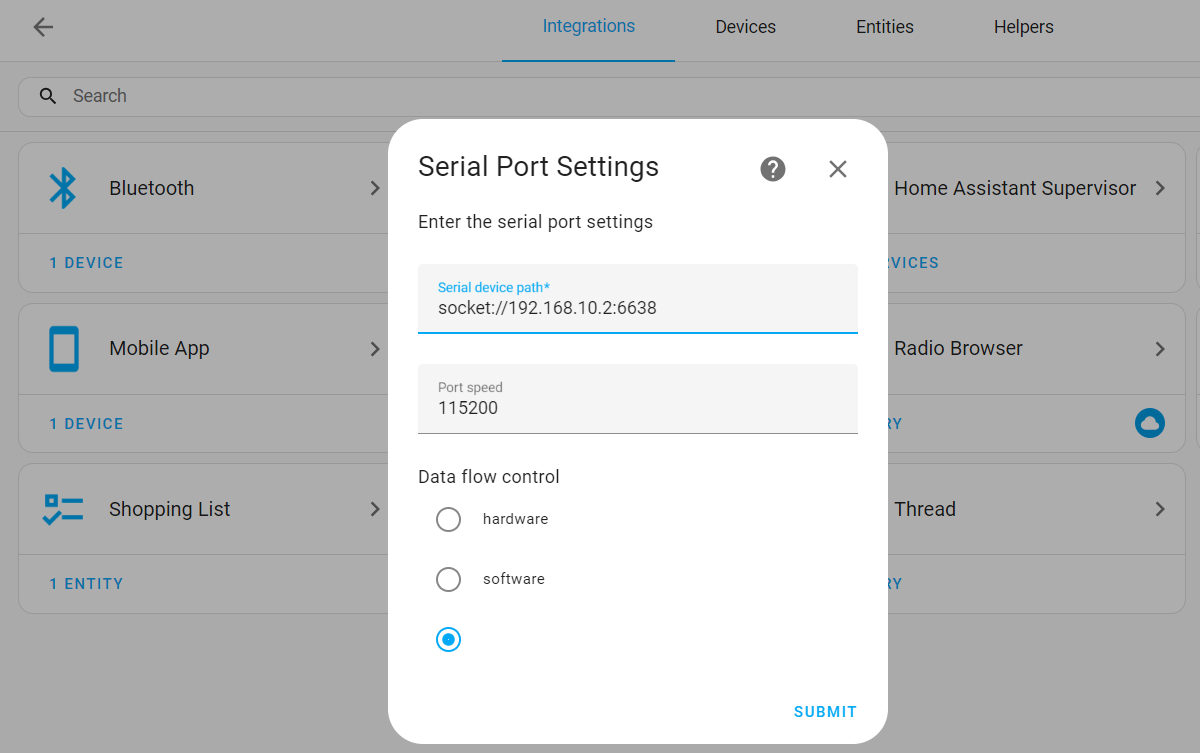
- In the Serial Port Settings window, enter
socket://192.168.10.2:6638. Where 192.168.10.2 is the IP address assigned to the coordinator in Wireguard. Leave the Port speed and Data flow control unchanged and clickSubmit. - In the Network Formation window, select the option to create a new network. After following these steps, you should receive a success message.
6.2. Running local and Remote SLZB-06 with Zigbee2MQTT via Wireguard
6.2.1. Zigbee2MQTT running with local SLZB-06
MQTT Settings
- in Home Assistant go to
Settings>>Add-ons>>Add-on storeand install theMosquitto brokeraddon >> enable Watchdog switch, then start it. As of the writing of this manual, the version of the add-on is 6.4.0. - Click on the Home Assistant user icon >> User settings section >> and enable the Advanced mode switch.
- Go to
Settings>>People>>Users tab>> click the add user button:Display name: mqtt_userUsername: mqtt_userPassword: mqtt_password
You can choose your username and password. - Go to
Settings>>Devices & Services>> press the Add Integration button >> MQTT >> MQTTBroker: core-mosquittoPort: 1883Username: mqtt_userPassword: mqtt_password
Press Submit and Finish
Zigbee2MQTT Settings
- Go back to the Add-on store, click
⋮>> Repositories, fill inhttps://github.com/zigbee2mqtt/hassio-zigbee2mqttand click Add - Install
Zigbee2MQTTadd-on and enable the Watchdog switch. As of the writing of this manual, the version of the add-on is 1.37.1-1. - Click on
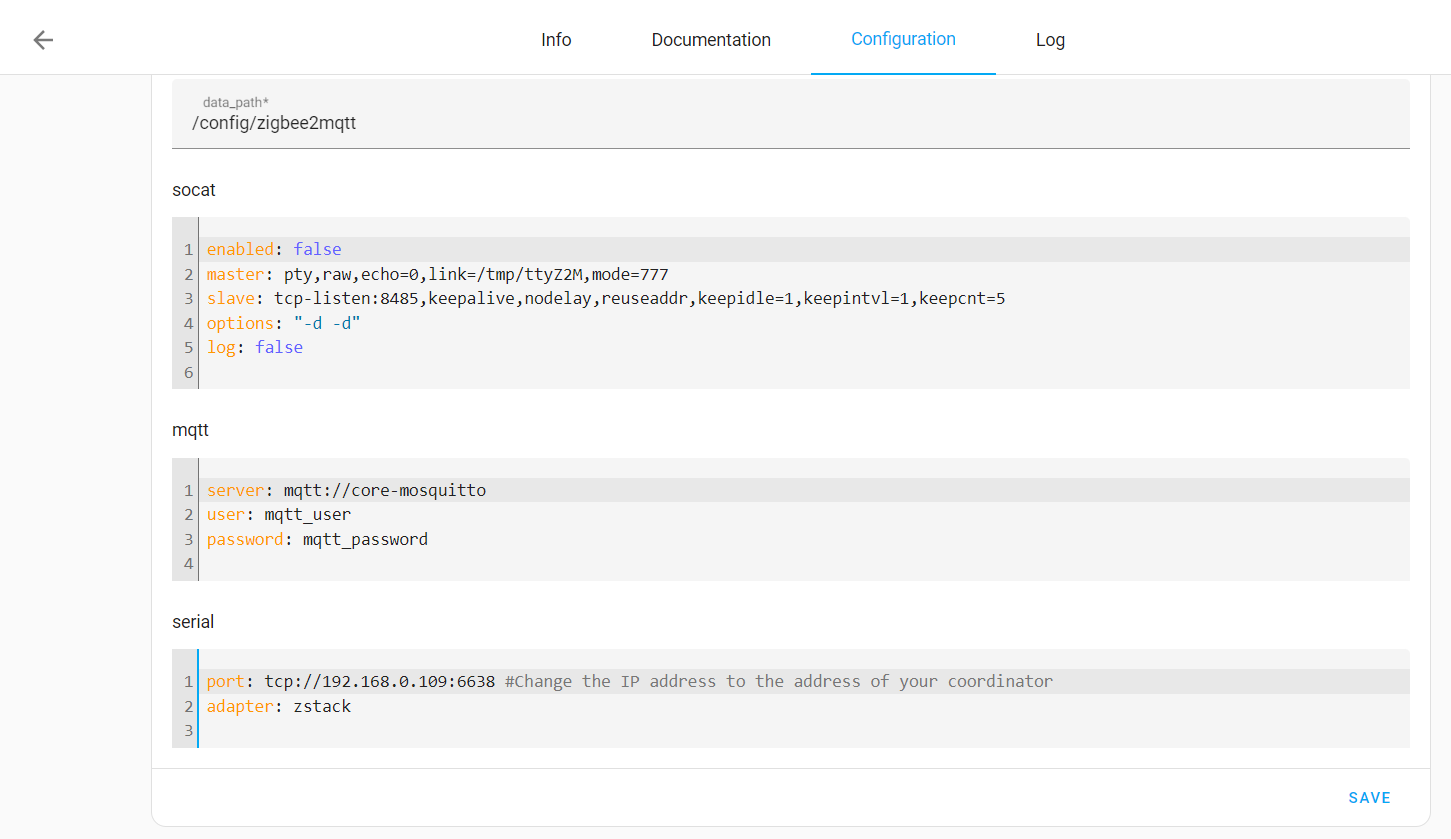
Configurationand paste in the following configuration. You need to change the mqtt login and password in it if they differ and the coordinator IP address. ClickSave. Switch to the info tab and click Start. The add-on takes some time to start, so if you get a502: Bad Gatewayerror try again in a minute.
data_path: /config/zigbee2mqtt
socat:
  enabled: false
  master: pty,raw,echo=0,link=/tmp/ttyZ2M,mode=777
  slave: tcp-listen:8485,keepalive,nodelay,reuseaddr,keepidle=1,keepintvl=1,keepcnt=5
  options: "-d -d"
  log: false
mqtt:
  server: mqtt://core-mosquitto
  user: mqtt_user
  password: mqtt_password #Change password if it is different for you
serial:
  port: tcp://192.168.0.109:6638 #Change the IP address to the address of your coordinator
  adapter: zstack
6.2.2. Zigbee2MQTT running with remote SLZB-06 connected via Wireguard
To set up a second Zigbee2MQTT instance, you need to add another slightly modified repository URL to Home Assistant. Each such URL is perceived as new and unique. Here are some examples of modified URLs:
https://github.com/zigbee2mqtt/hassio-zigbee2mqtt/ http://github.com/zigbee2mqtt/hassio-zigbee2mqtt http://github.com/zigbee2mqtt/hassio-zigbee2mqtt/ http://www.github.com/zigbee2mqtt/hassio-zigbee2mqtt/
- Navigate to the
Add-on store, click on the three dots⋮icon, and then select Repositories. Paste any of the provided links into the URL field. - Refresh the page and install the new Zigbee2MQTT instance. Activate the Watchdog switch.
- Click on the Configuration tab and paste in the following configuration, change the network port and save it.
data_path: /config/zigbee2mqtt_lan2
socat:
  enabled: false
  master: pty,raw,echo=0,link=/tmp/ttyZ2M,mode=777
  slave: tcp-listen:8485,keepalive,nodelay,reuseaddr,keepidle=1,keepintvl=1,keepcnt=5
  options: "-d -d"
  log: false
mqtt:
  server: mqtt://core-mosquitto
  base_topic: zigbee2mqtt_lan2
  user: mqtt_user
  password: mqtt_password
serial:
  port: tcp://192.168.10.3:6638
  adapter: zstack
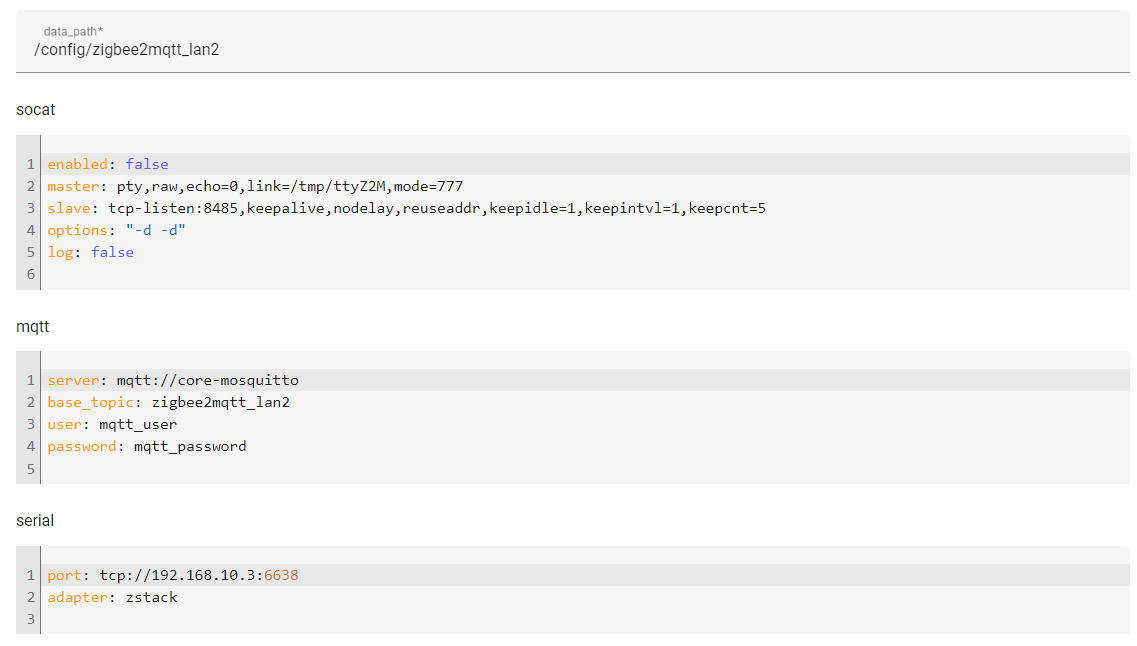
data_path: The directory where the Zigbee2MQTT configuration file is located. By default, this is the /config/zigbee2mqtt directory (the same as homeassistant/zigbee2mqtt/ in File Editor"). For the second network, I created a new directory by changing its name in the add-on settings to /config/zigbee2mqtt_lan2
base_topic: The MQTT topic for publishing messages to and from the Zigbee network. By default, the base topic is called zigbee2mqtt and is used by the first instance. For the second network, I created a different topic by changing its name to zigbee2mqtt_lan2 in the add-on settings.
Network port: By default, port 8485 is used. This port is occupied by the first add-on. For the second instance, I used port 8486 and saved the port settings.

As a result, we will have two instances of Zigbee2MQTT with two different Zigbee networks running independently of each other. Following the example of the second instance, more Zigbee2mqtt instances can be set up.
Advanced Config
For advanced Zigbee network configuration, including pan ID, coordinator transmit power, device last seen time, and Z2M logging level, you can utilize a separate Zigbee2MQTT configuration file named configuration.yaml.
If the addon has not been started after changing the configuration, the folder and file must be created manually.
For example, if your data path in the addon configuration is called config/zigbee2mqtt_lan2, then the directory that needs to be created will be named zigbee2mqtt_lan2 in the homeassistant folder This is the same thing. Then you need to create a new file called configuration.yaml and paste the configuration below.

If the addon is running, stop it and completely delete its directory with all subfolders. Create a folder with the same name again, and create a configuration.yaml file inside it. After that, you can start the Zigbee2MQTT addon.
mqtt:
  server: mqtt://core-mosquitto:1883
  user: mqtt_user
  password: mqtt_password
  base_topic: zigbee2mqtt_lan2
  version: 5
serial:
  port: tcp://192.168.10.3:6638
  adapter: zstack
  baudrate: 115200
  disable_led: false
advanced:
  transmit_power: 20
  channel: 15
  pan_id: GENERATE
  network_key: GENERATE
  availability_blocklist: []
  availability_passlist: []
  last_seen: ISO_8601
7. Pairing Zigbee devices on a remote coordinator
Adding Zigbee devices to a remote WireGuard coordinator is the same as adding them to a local network coordinator.
8. Conclusion
As a result of following this guide, we established a secure connection to a remote Zigbee LAN coordinator using a custom Wireguard VPN client.
9. Troubleshooting
z2m: MQTT error: Connection refused: Not authorized
Check the correctness of the mqtt_user data. Wrap mqtt_user and mqtt_password in quotes like this "
Zigbee2MQTT not adding to MQTT Bridge
Delete the MQTT integration settings and reconfigure it
502: Bad Gateway
Zigbee2MQTT is still starting up, or failed to start. Zigbee2MQTT takes about 1 minute to start. The error also occurs with various addon startup errors. See the logs for Zigbee2MQTT add-on errors.
